Ecosyste.ms: Awesome
An open API service indexing awesome lists of open source software.
https://github.com/canyuegongzi/simple-push-center
基于nest的推送系统(集成kafka消息, redis任务队列),可实现对邮箱 手机号 websocket app客户端的消息推送
https://github.com/canyuegongzi/simple-push-center
bull kafka mongodb nest node redis
Last synced: 3 months ago
JSON representation
基于nest的推送系统(集成kafka消息, redis任务队列),可实现对邮箱 手机号 websocket app客户端的消息推送
- Host: GitHub
- URL: https://github.com/canyuegongzi/simple-push-center
- Owner: canyuegongzi
- Created: 2020-06-20T16:07:13.000Z (over 4 years ago)
- Default Branch: master
- Last Pushed: 2023-03-05T01:33:34.000Z (almost 2 years ago)
- Last Synced: 2024-10-05T13:01:31.456Z (4 months ago)
- Topics: bull, kafka, mongodb, nest, node, redis
- Language: TypeScript
- Homepage: http://canyuegongzi.xyz/simple-push-center-web/#/taskManage/TaskList
- Size: 3.15 MB
- Stars: 43
- Watchers: 5
- Forks: 14
- Open Issues: 23
-
Metadata Files:
- Readme: README.md
Awesome Lists containing this project
README
### 系统功能
* * *
#### 概述
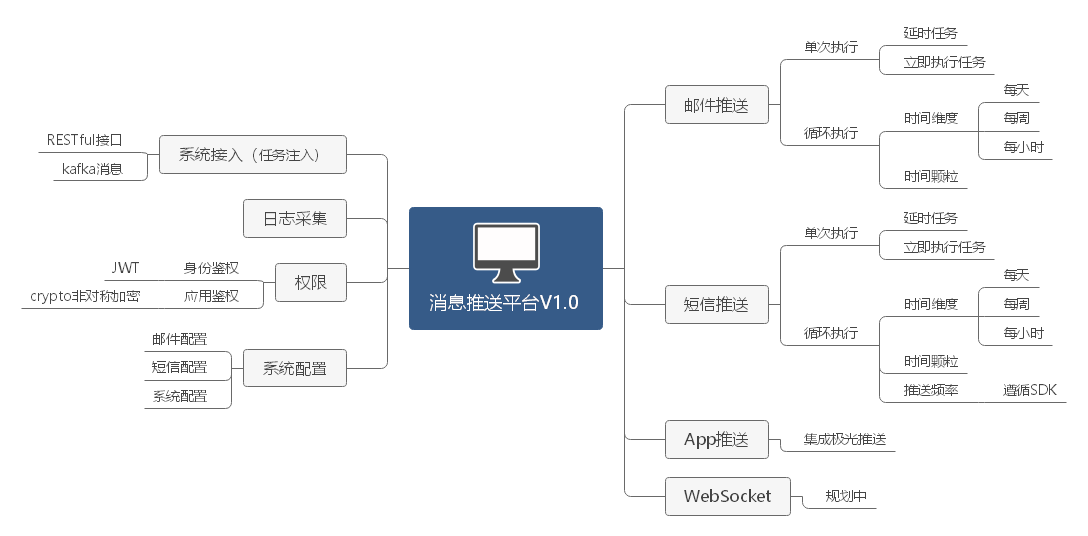
针对各子系统普遍需要消息推送的功能需求(订单流程中的短信、邮件消息推送),为避免冗余代码,将推送的功能抽为一独立的平台,各子系统通过通过普通的RESTful接口或者消息(kafka)生成任务。
推送功能从推送方式可以是邮件、短信、WebSocket、App任意一种类型,任务可以立即执行,也可以是定时执行,为满足多次提醒的功能,在延时任务的基础之上又扩展了循环任务。循环任务是一种特殊的延时任务,任务执行之后根据任务类型标记动态的重新注入任务,直至全部任务完成,(详解见系统编码)
#### 结构图

### 技术难点
#### redis任务队列
1. 定时任务|任务队列
定时任务的实现方式有很多,node定时模块node-schedule、原生API中的定时器适合单一任务的执行,并不适合多任务并行的情况(不适合 !== 不能)。
```info
* 引入消息队列主要是用于各服务的解耦;
* 就系统本身而言,推送任务可能会存在看消息量大,并发量高的问题,而引入消息队列可以起到削峰的作用
* 消息推送中有特别重要的一点:异步,服务的调用方在大部分的场合可能对消息推送结果的回调的需求并不是很高,消息生产者通过特定的通道发起一个消费的请求后,可以继续之后的流程;(只适合不依赖执行反馈的情景【串行不适合】)
```
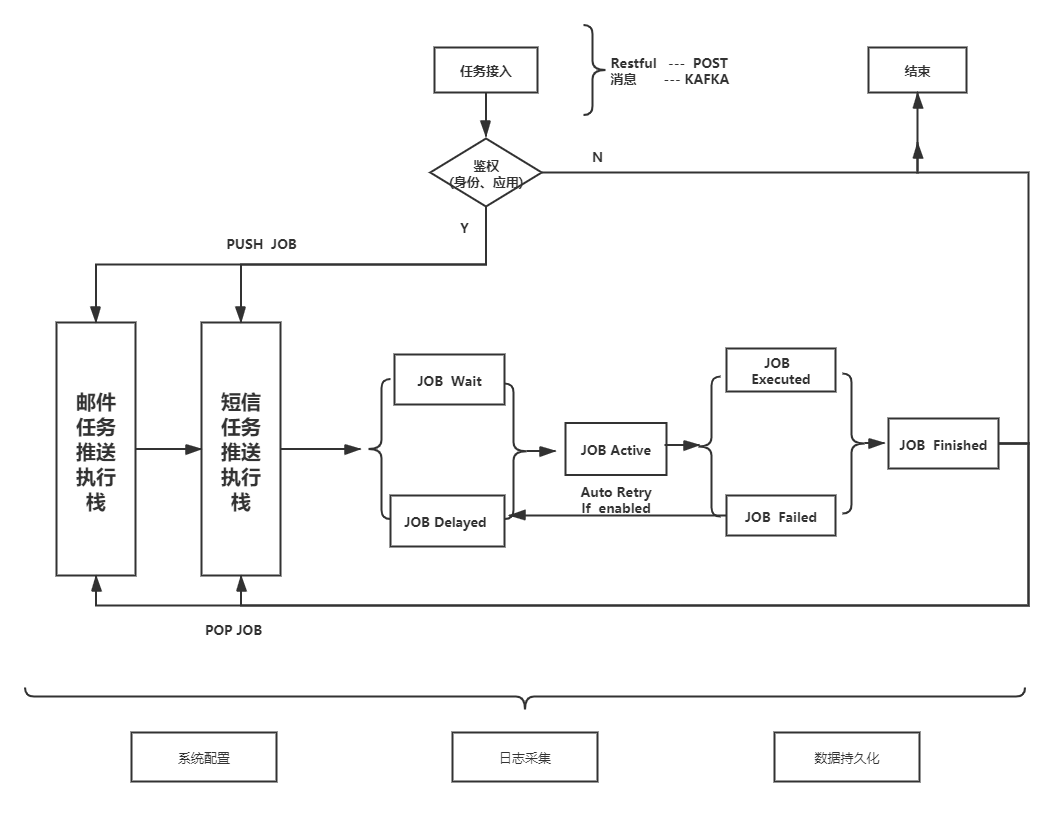
系统中使用了node生态中比较好的模块bull,流程图如下,系统调用方发起任务请求,系统首先对请求的合法性进行校验(权限校验见下一部分),之后根据不同类型push进任务执行栈,在bull中的任务大致有六种状态,等待,延时,激活,完成,失败,在任务栈中的任务状态标记为激活时,任务进入执行阶段,直到结束进入下一任务。
```info
* bull:github: https://github.com/OptimalBits/bull
* bull:底层利用的redis的发布订阅特性
```

#### 权限校验
1、身份校验
为防止系统被恶意调用,恶意注入任务,应用入口以及网关层面做身份鉴权是非常有必要的,本文只对应用入口的鉴权进行讲解,关于网关的校验的会在之后的博客中讲解。
系统中也是采用主流的JWT的token机制,服务生成token,之后客户端每一次请求必须携带token,单微服务的设计来说,单系统的身份认证完全可以迁移到网关层面去实现。
2、应用鉴权
应用鉴权在单系统中是主要的功能,系统中采用node中负责安全的模块crypto
crypto的简单使用见一下代码块
* crypto.publicEncrypt(key, buffer)(加密)
* crypto.privateDecrypt(privateKey, buffer)(解密)
```
import moment = require('crypto');
// 加密
const encrypt = (data, key) => {
return crypto.publicEncrypt(key, Buffer.from(data));
}
// 解密
const decrypt = (data, key) => {
return crypto.privateDecrypt(key, encrypted);
}
const test = '测试加密信息'
// 加密
const crypted = encrypt(test, keys.pubKey);
// 解密
const decrypted = decrypt(crypted, keys.privKey);
```
```alert
keys.privKey keys.pubKey 分别为对应的私钥和公钥
[crypto](https://nodejs.org/api/crypto.html)
```
### 系统编码
此次博文中对各模块的具体实现不做详细讲解,只对通用方法进行讲解
* redis通用方法封装
```
## redis封装
import {HttpService, Inject, Injectable} from '@nestjs/common';
import { RedisService } from 'nestjs-redis';
@Injectable()
export class RedisCacheService {[https://github.com/OptimalBits/bull](https://github.com/OptimalBits/bull)
public client;
constructor(@Inject(RedisService) private redisService: RedisService) {
this.getClient().then(r => {} );
}
async getClient() {
this.client = await this.redisService.getClient();
}
// 设置值的方法
async set(key: string, value: any, seconds?: number) {
value = JSON.stringify(value);
if (!this.client) {
await this.getClient();
}
if (!seconds) {
await this.client.set(key, value);
} else {
await this.client.set(key, value, 'EX', seconds);
}
}
// 获取值的方法
async get(key: string) {
if (!this.client) {
await this.getClient();
}
const data: any = await this.client.get(key);
if (!data) { return; }
return JSON.parse(data);
}
}
```
* bull任务注入
```
export class TaskService {
constructor(
// 服务中注入已经创建好的任务队列的实例
@InjectQueue('email') private readonly emailNoticeQueue: Queue,
@InjectQueue('message') private readonly messageNoticeQueue: Queue,
) { }
// delayValue: 延时时长
public async addTask() {
await this.emailNoticeQueue.add('emitEmail', {
id: taskResult.insertedId,
config: config.name,
}, { delay: delayValue});
}
}
```
* 任务周期处理函数(NoticeEmailProcessor.ts)
bull周期处理函数可参考https://github.com/OptimalBits/bull官方文档
```
@Injectable()
@Processor('email')
export class NoticeEmailProcessor {
constructor(
@InjectQueue('email') private readonly emailNoticeQueue: Queue,
private readonly redisCacheService: RedisCacheService,
private readonly taskLogService: TaskLogService,
private readonly taskEmitEmailService: TaskEmitEmailService,
@Inject(TaskService)
private readonly taskService: TaskService,
) {}
@Process('emitEmail')
public async handleTranscode(job: Job) {
}
/**
* 下一步执行任务()
*/
protected async nextLoopTak(task: TaskEntity, isSuccessFlag: boolean, status: number) {
}
}
```
* 日期处理采用moment.js
```info
https://github.com/moment/moment
```
### 系统部署
系统采用docker的部署,系统默认会启动在10001端口之上
1、DOCKERFILE
```
FROM ubuntu
MAINTAINER canyuegongzi
ENV HOST 0.0.0.0
RUN mkdir -p /app
COPY .. /app
WORKDIR /app
EXPOSE 10001
RUN apt-get update && \
apt-get install redis-server && \
npm config set registry https://registry.npm.taobao.org && \
npm install && \
npm install pm2 -g
CMD ["sh", "-c", "redis-server && pm2-runtime start ecosystem.config.js"]
```
2、pm2启动脚本
```
## ecosystem.config.js
module.exports = [{
script: 'dist/main.js',
name: 'simpleNoticeCenterApi',
exec_mode: 'cluster',
instances: 2
}]
```
### 结言
系统目前处于持续迭代开发中,可能会存在不同程度的问题,就普通的消息推送还是可以完成的,之后将进一步提升系统的安全性,其他的功能也会陆续迭代。详细代码讲解会在后续博客讲解,包括前后端。