https://github.com/cdklabs/cdk-pipelines-github
https://github.com/cdklabs/cdk-pipelines-github
Last synced: 6 months ago
JSON representation
- Host: GitHub
- URL: https://github.com/cdklabs/cdk-pipelines-github
- Owner: cdklabs
- License: apache-2.0
- Created: 2021-06-23T11:18:02.000Z (almost 5 years ago)
- Default Branch: main
- Last Pushed: 2025-04-14T00:36:15.000Z (about 1 year ago)
- Last Synced: 2025-04-14T01:29:37.049Z (about 1 year ago)
- Language: TypeScript
- Size: 5.21 MB
- Stars: 363
- Watchers: 18
- Forks: 39
- Open Issues: 27
-
Metadata Files:
- Readme: README.md
- Contributing: CONTRIBUTING.md
- License: LICENSE
- Code of conduct: CODE_OF_CONDUCT.md
Awesome Lists containing this project
- awesome-github-repos - cdklabs/cdk-pipelines-github - (TypeScript)
README
# CDK Pipelines for GitHub Workflows

[](https://constructs.dev/packages/cdk-pipelines-github)
> The APIs in this module are experimental and under active development.
> They are subject to non-backward compatible changes or removal in any future version. These are
> not subject to the [Semantic Versioning](https://semver.org/) model and breaking changes will be
> announced in the release notes. This means that while you may use them, you may need to update
> your source code when upgrading to a newer version of this package.
A construct library for painless Continuous Delivery of CDK applications,
deployed via
[GitHub Workflows](https://docs.github.com/en/actions/using-workflows/workflow-syntax-for-github-actions).
The CDK already has a CI/CD solution,
[CDK Pipelines](https://docs.aws.amazon.com/cdk/api/v2/docs/aws-cdk-lib.pipelines-readme.html),
which creates an AWS CodePipeline that deploys CDK applications. This module
serves the same surface area, except that it is implemented with GitHub
Workflows.
## Table of Contents
- [CDK Pipelines for GitHub Workflows](#cdk-pipelines-for-github-workflows)
- [Table of Contents](#table-of-contents)
- [Usage](#usage)
- [Initial Setup](#initial-setup)
- [AWS Credentials](#aws-credentials)
- [GitHub Action Role](#github-action-role)
- [`GitHubActionRole` Construct](#githubactionrole-construct)
- [GitHub Secrets](#github-secrets)
- [Runners with Preconfigured Credentials](#runners-with-preconfigured-credentials)
- [Using Docker in the Pipeline](#using-docker-in-the-pipeline)
- [Authenticating to Docker registries](#authenticating-to-docker-registries)
- [Runner Types](#runner-types)
- [GitHub Hosted Runner](#github-hosted-runner)
- [Self Hosted Runner](#self-hosted-runner)
- [Escape Hatches](#escape-hatches)
- [Additional Features](#additional-features)
- [GitHub Action Step](#github-action-step)
- [Configure GitHub Environment](#configure-github-environment)
- [Waves for Parallel Builds](#waves-for-parallel-builds)
- [Manual Approval Step](#manual-approval-step)
- [Pipeline YAML Comments](#pipeline-yaml-comments)
- [Common Configuration for Docker Asset Publishing Steps](#common-configuration-for-docker-asset-publishing-steps)
- [Workflow Concurrency](#workflow-concurrency)
- [AWS China partition support](#aws-china-partition-support)
- [Tutorial](#tutorial)
- [Not supported yet](#not-supported-yet)
- [Contributing](#contributing)
- [License](#license)
## Usage
Assuming you have a
[`Stage`](https://docs.aws.amazon.com/cdk/api/v2/docs/aws-cdk-lib.Stage.html)
called `MyStage` that includes CDK stacks for your app and you want to deploy it
to two AWS environments (`BETA_ENV` and `PROD_ENV`):
```ts
import { ShellStep } from 'aws-cdk-lib/pipelines';
const app = new App();
const pipeline = new GitHubWorkflow(app, 'Pipeline', {
synth: new ShellStep('Build', {
commands: [
'yarn install',
'yarn build',
],
}),
awsCreds: AwsCredentials.fromOpenIdConnect({
gitHubActionRoleArn: 'arn:aws:iam:::role/GitHubActionRole',
}),
});
// Build the stages
const betaStage = new MyStage(app, 'Beta', { env: BETA_ENV });
const prodStage = new MyStage(app, 'Prod', { env: PROD_ENV });
// Add the stages for sequential build - earlier stages failing will stop later ones:
pipeline.addStage(betaStage);
pipeline.addStage(prodStage);
// OR add the stages for parallel building of multiple stages with a Wave:
const wave = pipeline.addWave('Wave');
wave.addStage(betaStage);
wave.addStage(prodStage);
app.synth();
```
When you run `cdk synth`, a `deploy.yml` workflow will be created under
`.github/workflows` in your repo. This workflow will deploy your application
based on the definition of the pipeline. In the example above, it will deploy
the two stages in sequence, and within each stage, it will deploy all the
stacks according to their dependency order and maximum parallelism. If your app
uses assets, assets will be published to the relevant destination environment.
The `Pipeline` class from `cdk-pipelines-github` is derived from the base CDK
Pipelines class, so most features should be supported out of the box. See the
[CDK Pipelines](https://docs.aws.amazon.com/cdk/api/v2/docs/aws-cdk-lib.pipelines-readme.html)
documentation for more details.
To express GitHub-specifc details, such as those outlined in [Additional Features](#additional-features), you have a few options:
- Use a `GitHubStage` instead of `Stage` (or make a `GitHubStage` subclass instead of a `Stage` subclass) - this adds the `GitHubCommonProps` to the `Stage` properties
- With this you can use `pipeline.addStage(myGitHubStage)` or `wave.addStage(myGitHubStage)` and the properties of the
stage will be used
- Using a `Stage` (or subclass thereof) or a `GitHubStage` (or subclass thereof) you can call `pipeline.addStageWithGitHubOptions(stage, stageOptions)` or `wave.addStageWithGitHubOptions(stage, stageOptions)`
- In this case you're providing the same options along with the stage instead of embedded in the stage.
- Note that properties of a `GitHubStage` added with `addStageWithGitHubOptions()` will override the options provided to `addStageWithGitHubOptions()`
**NOTES:**
- Environments must be bootstrapped separately using `cdk bootstrap`. See [CDK
Environment
Bootstrapping](https://docs.aws.amazon.com/cdk/api/v2/docs/aws-cdk-lib.pipelines-readme.html#cdk-environment-bootstrapping)
for details.
## Initial Setup
Assuming you have your CDK app checked out on your local machine, here are the suggested steps
to develop your GitHub Workflow.
- Set up AWS Credentials your local environment. It is highly recommended to authenticate via an OpenId
Connect IAM Role. You can set one up using the [`GithubActionRole`](#github-action-role) class provided
in this module. For more information (and alternatives), see [AWS Credentials](#aws-credentials).
- When you've updated your pipeline and are ready to deploy, run `cdk synth`. This creates a workflow file
in `.github/workflows/deploy.yml`.
- When you are ready to test your pipeline, commit your code changes as well as the `deploy.yml` file to
GitHub. GitHub will automatically try to run the workflow found under `.github/workflows/deploy.yml`.
- You will be able to see the result of the run on the `Actions` tab in your repository:
For an in-depth run-through on creating your own GitHub Workflow, see the
[Tutorial](#tutorial) section.
## AWS Credentials
There are two ways to supply AWS credentials to the workflow:
- GitHub Action IAM Role (recommended).
- Long-lived AWS Credentials stored in GitHub Secrets.
The GitHub Action IAM Role authenticates via the GitHub OpenID Connect provider
and is recommended, but it requires preparing your AWS account beforehand. This
approach allows your Workflow to exchange short-lived tokens directly from AWS.
With OIDC, benefits include:
- No cloud secrets.
- Authentication and authorization management.
- Rotating credentials.
You can read more
[here](https://docs.github.com/en/actions/deployment/security-hardening-your-deployments/about-security-hardening-with-openid-connect).
### GitHub Action Role
Authenticating via OpenId Connect means you do not need to store long-lived
credentials as GitHub Secrets. With OIDC, you provide a pre-provisioned IAM
role with optional role session name to your GitHub Workflow via the `awsCreds.fromOpenIdConnect` API:
```ts
import { ShellStep } from 'aws-cdk-lib/pipelines';
const app = new App();
const pipeline = new GitHubWorkflow(app, 'Pipeline', {
synth: new ShellStep('Build', {
commands: [
'yarn install',
'yarn build',
],
}),
awsCreds: AwsCredentials.fromOpenIdConnect({
gitHubActionRoleArn: 'arn:aws:iam:::role/GitHubActionRole',
roleSessionName: 'optional-role-session-name',
}),
});
```
There are two ways to create this IAM role:
- Use the `GitHubActionRole` construct (recommended and described below).
- Manually set up the role ([Guide](https://github.com/cdklabs/cdk-pipelines-github/blob/main/GITHUB_ACTION_ROLE_SETUP.md)).
#### `GitHubActionRole` Construct
Because this construct involves creating an IAM role in your account, it must
be created separate to your GitHub Workflow and deployed via a normal
`cdk deploy` with your local AWS credentials. Upon successful deployment, the
arn of your newly created IAM role will be exposed as a `CfnOutput`.
To utilize this construct, create a separate CDK stack with the following code
and `cdk deploy`:
```ts
class MyGitHubActionRole extends Stack {
constructor(scope: Construct, id: string, props?: StackProps) {
super(scope, id, props);
const provider = new GitHubActionRole(this, 'github-action-role', {
repos: ['myUser/myRepo'],
});
}
}
const app = new App();
new MyGitHubActionRole(app, 'MyGitHubActionRole');
app.synth();
```
Specifying a `repos` array grants GitHub full access to the specified repositories.
To restrict access to specific git branch, tag, or other
[GitHub OIDC subject claim](https://docs.github.com/en/actions/deployment/security-hardening-your-deployments/about-security-hardening-with-openid-connect#example-subject-claims),
specify a `subjectClaims` array instead of a `repos` array.
```ts
class MyGitHubActionRole extends Stack {
constructor(scope: Construct, id: string, props?: StackProps) {
super(scope, id, props);
const provider = new GitHubActionRole(this, 'github-action-role', {
subjectClaims: [
'repo:owner/repo1:ref:refs/heads/main',
'repo:owner/repo1:environment:prod',
],
});
}
}
const app = new App();
new MyGitHubActionRole(app, 'MyGitHubActionRole');
app.synth();
```
Note: If you have previously created the GitHub identity provider with url
`https://token.actions.githubusercontent.com`, the above example will fail
because you can only have one such provider defined per account. In this
case, you must provide the already created provider into your `GithubActionRole`
construct via the `provider` property.
> Make sure the audience for the provider is `sts.amazonaws.com` in this case.
```ts
class MyGitHubActionRole extends Stack {
constructor(scope: Construct, id: string, props?: StackProps) {
super(scope, id, props);
const provider = new GitHubActionRole(this, 'github-action-role', {
repos: ['myUser/myRepo'],
provider: GitHubActionRole.existingGitHubActionsProvider(this),
});
}
}
```
### GitHub Secrets
Authenticating via this approach means that you will be manually creating AWS
credentials and duplicating them in GitHub secrets. The workflow expects the
GitHub repository to include secrets with AWS credentials under
`AWS_ACCESS_KEY_ID` and `AWS_SECRET_ACCESS_KEY`. You can override these defaults
by supplying the `awsCreds.fromGitHubSecrets` API to the workflow:
```ts
import { ShellStep } from 'aws-cdk-lib/pipelines';
const app = new App();
const pipeline = new GitHubWorkflow(app, 'Pipeline', {
synth: new ShellStep('Build', {
commands: [
'yarn install',
'yarn build',
],
}),
awsCreds: AwsCredentials.fromGitHubSecrets({
accessKeyId: 'MY_ID', // GitHub will look for the access key id under the secret `MY_ID`
secretAccessKey: 'MY_KEY', // GitHub will look for the secret access key under the secret `MY_KEY`
}),
});
```
### Runners with Preconfigured Credentials
If your runners provide credentials themselves, you can configure `awsCreds` to
skip passing credentials:
```ts
import { ShellStep } from 'aws-cdk-lib/pipelines';
const app = new App();
const pipeline = new GitHubWorkflow(app, 'Pipeline', {
synth: new ShellStep('Build', {
commands: [
'yarn install',
'yarn build',
],
}),
awsCreds: AwsCredentials.runnerHasPreconfiguredCreds(), // NO credentials will be provided.
});
```
### Using Docker in the Pipeline
You can use Docker in GitHub Workflows in a similar fashion to CDK Pipelines.
For a full discussion on how to use Docker in CDK Pipelines, see
[Using Docker in the Pipeline](https://github.com/aws/aws-cdk/blob/master/packages/@aws-cdk/pipelines/README.md#using-docker-in-the-pipeline).
Just like CDK Pipelines, you may need to authenticate to Docker registries to
avoid being throttled.
#### Authenticating to Docker registries
You can specify credentials to use for authenticating to Docker registries as
part of the Workflow definition. This can be useful if any Docker image assets —
in the pipeline or any of the application stages — require authentication, either
due to being in a different environment (e.g., ECR repo) or to avoid throttling
(e.g., DockerHub).
```ts
import { ShellStep } from 'aws-cdk-lib/pipelines';
const app = new App();
const pipeline = new GitHubWorkflow(app, 'Pipeline', {
synth: new ShellStep('Build', {
commands: [
'yarn install',
'yarn build',
],
}),
dockerCredentials: [
// Authenticate to ECR
DockerCredential.ecr('.dkr.ecr..amazonaws.com'),
// Authenticate to GHCR
DockerCredential.ghcr(),
// Authenticate to DockerHub
DockerCredential.dockerHub({
// These properties are defaults; feel free to omit
usernameKey: 'DOCKERHUB_USERNAME',
personalAccessTokenKey: 'DOCKERHUB_TOKEN',
}),
// Authenticate to Custom Registries
DockerCredential.customRegistry('custom-registry', {
usernameKey: 'CUSTOM_USERNAME',
passwordKey: 'CUSTOM_PASSWORD',
}),
],
});
```
## Runner Types
You can choose to run the workflow in either a GitHub hosted or [self-hosted](https://docs.github.com/en/actions/hosting-your-own-runners/about-self-hosted-runners) runner.
### GitHub Hosted Runner
The default is `Runner.UBUNTU_LATEST`. You can override this as shown below:
```ts
import { ShellStep } from 'aws-cdk-lib/pipelines';
const app = new App();
const pipeline = new GitHubWorkflow(app, 'Pipeline', {
synth: new ShellStep('Build', {
commands: [
'yarn install',
'yarn build',
],
}),
runner: Runner.WINDOWS_LATEST,
});
```
### Self Hosted Runner
The following example shows how to configure the workflow to run on a self-hosted runner. Note that you do not need to pass in `self-hosted` explicitly as a label.
```ts
import { ShellStep } from 'aws-cdk-lib/pipelines';
const app = new App();
const pipeline = new GitHubWorkflow(app, 'Pipeline', {
synth: new ShellStep('Build', {
commands: [
'yarn install',
'yarn build',
],
}),
runner: Runner.selfHosted(['label1', 'label2']),
});
```
## Escape Hatches
You can override the `deploy.yml` workflow file post-synthesis however you like.
```ts
import { ShellStep } from 'aws-cdk-lib/pipelines';
const app = new App();
const pipeline = new GitHubWorkflow(app, 'Pipeline', {
synth: new ShellStep('Build', {
commands: [
'yarn install',
'yarn build',
],
}),
});
const deployWorkflow = pipeline.workflowFile;
// add `on: workflow_call: {}` to deploy.yml
deployWorkflow.patch(JsonPatch.add('/on/workflow_call', {}));
// remove `on: workflow_dispatch` from deploy.yml
deployWorkflow.patch(JsonPatch.remove('/on/workflow_dispatch'));
```
## Additional Features
Below is a compilation of additional features available for GitHub Workflows.
### GitHub Action Step
If you want to call a GitHub Action in a step, you can utilize the `GitHubActionStep`.
`GitHubActionStep` extends `Step` and can be used anywhere a `Step` type is allowed.
The `jobSteps` array is placed into the pipeline job at the relevant `jobs..steps` as [documented here](https://docs.github.com/en/actions/using-workflows/workflow-syntax-for-github-actions#jobsjob_idsteps).
GitHub Actions Job permissions can be modified by passing the `permissions` object to `GitHubActionStep`.
The default set of permissions is simply `contents: write`.
In this example,
```ts
import { ShellStep } from 'aws-cdk-lib/pipelines';
const app = new App();
const pipeline = new GitHubWorkflow(app, 'Pipeline', {
synth: new ShellStep('Build', {
commands: [
'yarn install',
'yarn build',
],
}),
});
// "Beta" stage with a pre-check that uses code from the repo and an action
const stage = new MyStage(app, 'Beta', { env: BETA_ENV });
pipeline.addStage(stage, {
pre: [new GitHubActionStep('PreBetaDeployAction', {
permissions: {
idToken: JobPermission.WRITE,
contents: JobPermission.WRITE,
},
jobSteps: [
{
name: 'Checkout',
uses: 'actions/checkout@v4',
},
{
name: 'pre beta-deploy action',
uses: 'my-pre-deploy-action@1.0.0',
},
{
name: 'pre beta-deploy check',
run: 'npm run preDeployCheck',
},
],
})],
});
app.synth();
```
### Configure GitHub Environment
You can run your GitHub Workflow in select
[GitHub Environments](https://docs.github.com/en/actions/deployment/targeting-different-environments/using-environments-for-deployment).
Via the GitHub UI, you can configure environments with protection rules and secrets, and reference
those environments in your CDK app. A workflow that references an environment must follow any
protection rules for the environment before running or accessing the environment's secrets.
Assuming (just like in the main [example](#usage)) you have a
[`Stage`](https://docs.aws.amazon.com/cdk/api/v2/docs/aws-cdk-lib.Stage.html)
called `MyStage` that includes CDK stacks for your app and you want to deploy it
to two AWS environments (`BETA_ENV` and `PROD_ENV`) as well as GitHub Environments
`beta` and `prod`:
```ts
import { ShellStep } from 'aws-cdk-lib/pipelines';
const app = new App();
const pipeline = new GitHubWorkflow(app, 'Pipeline', {
synth: new ShellStep('Build', {
commands: [
'yarn install',
'yarn build',
],
}),
awsCreds: AwsCredentials.fromOpenIdConnect({
gitHubActionRoleArn: 'arn:aws:iam:::role/GitHubActionRole',
}),
});
pipeline.addStageWithGitHubOptions(new Stage(this, 'Beta', {
env: BETA_ENV,
}), {
gitHubEnvironment: { name: 'beta' },
});
pipeline.addStageWithGitHubOptions(new MyStage(this, 'Prod', {
env: PROD_ENV,
}), {
gitHubEnvironment: { name: 'prod' },
});
app.synth();
```
#### Waves for Parallel Builds
You can add a Wave to a pipeline, where each stage of a wave will build in parallel.
> **Note**: The `pipeline.addWave()` call will return a `Wave` object that is actually a `GitHubWave` object, but
> due to JSII rules the return type of `addWave()` cannot be changed. If you need to use
> `wave.addStageWithGitHubOptions()` then you should call `pipeline.addGitHubWave()` instead, or you can
> use `GitHubStage`s to carry the GitHub properties.
When deploying to multiple accounts or otherwise deploying mostly-unrelated stacks, using waves can be a huge win.
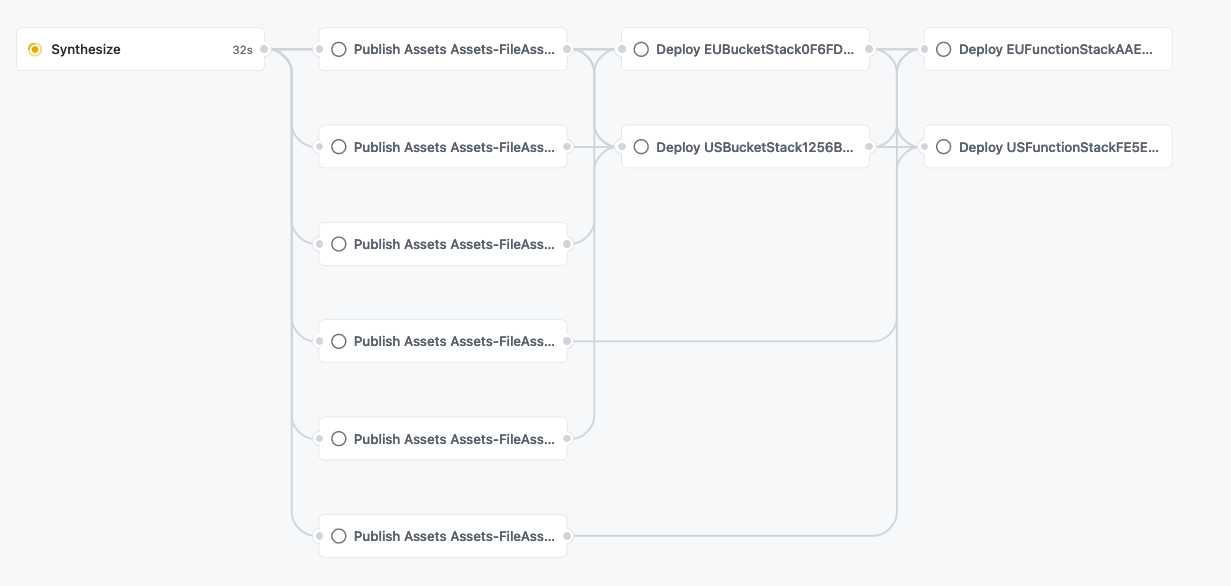
Here's a relatively large (but real) example, **without** a wave:

You can see how dependencies get chained unnecessarily, where the `cUrl` step should be the final step (a test) for an account:

Here's the exact same stages deploying the same stacks to the same accounts, but **with** a wave:

And the dependency chains are reduced to only what is actually needed, with the `cUrl` calls as the final stage for each account:

For additional information and a code example see [here](docs/waves.md).
#### Manual Approval Step
One use case for using GitHub Environments with your CDK Pipeline is to create a
manual approval step for specific environments via Environment protection rules.
From the GitHub UI, you can specify up to 5 required reviewers that must approve
before the deployment can proceed:

For more information and a tutorial for how to set this up, see this
[discussion](https://github.com/cdklabs/cdk-pipelines-github/issues/162).
### Pipeline YAML Comments
An "AUTOMATICALLY GENERATED FILE..." comment will by default be added to the top
of the pipeline YAML. This can be overriden as desired to add additional context
to the pipeline YAML.
```yaml
declare const pipeline: GitHubWorkflow;
pipeline.workflowFile.commentAtTop = `AUTOGENERATED FILE, DO NOT EDIT DIRECTLY!
Deployed stacks from this pipeline:
${STACK_NAMES.map((s)=>`- ${s}\n`)}`;
```
This will generate the normal `deploy.yml` file, but with the additional comments:
```yaml
# AUTOGENERATED FILE, DO NOT EDIT DIRECTLY!
# Deployed stacks from this pipeline:
# - APIStack
# - AuroraStack
name: deploy
on:
push:
branches:
< the rest of the pipeline YAML contents>
```
### Common Configuration for Docker Asset Publishing Steps
You can provide common job configuration for all of the docker asset publishing
jobs using the `dockerAssetJobSettings` property. You can use this to:
- Set additional `permissions` at the job level
- Run additional steps prior to the docker build/push step
Below is an example of example of configuration an additional `permission` which
allows the job to authenticate against GitHub packages. It also shows
configuration additional `setupSteps`, in this case setup steps to configure
docker `buildx` and `QEMU` to enable building images for arm64 architecture.
```ts
import { ShellStep } from 'aws-cdk-lib/pipelines';
const app = new App();
const pipeline = new GitHubWorkflow(app, 'Pipeline', {
synth: new ShellStep('Build', {
commands: [
'yarn install',
'yarn build',
],
}),
dockerAssetJobSettings: {
permissions: {
packages: JobPermission.READ,
},
setupSteps: [
{
name: 'Setup Docker QEMU',
uses: 'docker/setup-qemu-action@v3',
},
{
name: 'Setup Docker buildx',
uses: 'docker/setup-buildx-action@v3',
},
],
},
awsCreds: AwsCredentials.fromOpenIdConnect({
gitHubActionRoleArn: 'arn:aws:iam:::role/GitHubActionRole',
}),
});
app.synth();
```
### Workflow Concurrency
If you want to prevent your workflow from running in parallel you can specify the concurrency at workflow level.
Below is an example of a workflow that will not run in parallel and where a running workflow will be cancelled in favor of the more recent one.
The [GitHub docs](https://docs.github.com/en/actions/using-jobs/using-concurrency) provide further details on this.
```ts
import { ShellStep } from 'aws-cdk-lib/pipelines';
const app = new App();
const pipeline = new GitHubWorkflow(app, 'SequentialPipeline', {
concurrency: {
group: '${{ github.workflow }}-group',
cancelInProgress: true,
},
synth: new ShellStep('Build', {
commands: [
'yarn install',
'yarn build',
],
}),
awsCreds: AwsCredentials.fromOpenIdConnect({
gitHubActionRoleArn: 'arn:aws:iam:::role/GitHubActionRole',
}),
});
```
## AWS China partition support
The `CDK_AWS_PARTITION` environment variable can be used to specify the AWS partition for the pipeline.
If it's specified to `aws-cn`, the assets generated by pipeline will reference the resources in
`.amazonaws.com.cn` instead of `.amazonaws.com`.
If `CDK_AWS_PARTITION` environment variable is not specified, the default behaviour for the pipeline is
to use the `aws` partition.
It is not possible to have a pipeline that deploys to both `aws` and `aws-cn` partitions.
If you need to deploy to both partitions, you will need to create two separate pipelines.
The stages and stacks can be shared between the two pipelines.
## Tutorial
You can find an example usage in [test/example-app.ts](./test/example-app.ts)
which includes a simple CDK app and a pipeline.
You can find a repository that uses this example here: [eladb/test-app-cdkpipeline](https://github.com/eladb/test-app-cdkpipeline).
To run the example, clone this repository and install dependencies:
```shell
cd ~/projects # or some other playground space
git clone https://github.com/cdklabs/cdk-pipelines-github
cd cdk-pipelines-github
yarn
```
Now, create a new GitHub repository and clone it as well:
```shell
cd ~/projects
git clone https://github.com/myaccount/my-test-repository
```
You'll need to set up AWS credentials in your environment. Note that this tutorial uses
long-lived GitHub secrets as credentials for simplicity, but it is recommended to set up
a GitHub OIDC role instead.
```shell
export AWS_ACCESS_KEY_ID=xxxx
export AWS_SECRET_ACCESS_KEY=xxxxx
```
Bootstrap your environments:
```shell
export CDK_NEW_BOOTSTRAP=1
npx cdk bootstrap aws://ACCOUNTID/us-east-1
npx cdk bootstrap aws://ACCOUNTID/eu-west-2
```
Now, run the `manual-test.sh` script when your working directory is the new repository:
```shell
cd ~/projects/my-test-repository
~/projects/cdk-piplines/github/test/manual-test.sh
```
This will produce a `cdk.out` directory and a `.github/workflows/deploy.yml` file.
Commit and push these files to your repo and you should see the deployment
workflow in action. Make sure your GitHub repository has `AWS_ACCESS_KEY_ID` and
`AWS_SECRET_ACCESS_KEY` secrets that can access the same account that you
synthesized against.
> In this tutorial, you are supposed to commit `cdk.out` (i.e. the code is pre-synthed).
> Do not do this in your app; you should always synth during the synth step of the GitHub
> workflow. In the example app this is achieved through the `preSynthed: true` option.
> It is for example purposes only and is not something you should do in your app.
>
> ```ts
> import { ShellStep } from 'aws-cdk-lib/pipelines';
> const pipeline = new GitHubWorkflow(new App(), 'Pipeline', {
> synth: new ShellStep('Build', {
> commands: ['echo "nothing to do (cdk.out is committed)"'],
> }),
> // only the example app should do this. your app should synth in the synth step.
> preSynthed: true,
> });
> ```
## Not supported yet
Most features that exist in CDK Pipelines are supported. However, as the CDK Pipelines
feature are expands, the feature set for GitHub Workflows may lag behind. If you see a
feature that you feel should be supported by GitHub Workflows, please open a GitHub issue
to track it.
## Contributing
See [CONTRIBUTING](CONTRIBUTING.md) for more information.
## License
This project is licensed under the Apache-2.0 License.