https://github.com/chapyter/chapyter
Chapyter: ChatGPT Code Interpreter in Jupyter Notebooks
https://github.com/chapyter/chapyter
Last synced: 7 months ago
JSON representation
Chapyter: ChatGPT Code Interpreter in Jupyter Notebooks
- Host: GitHub
- URL: https://github.com/chapyter/chapyter
- Owner: chapyter
- License: bsd-3-clause
- Created: 2023-07-05T08:01:06.000Z (over 2 years ago)
- Default Branch: main
- Last Pushed: 2023-10-20T00:00:10.000Z (about 2 years ago)
- Last Synced: 2025-05-09T11:05:30.665Z (8 months ago)
- Language: Python
- Homepage:
- Size: 14 MB
- Stars: 829
- Watchers: 7
- Forks: 71
- Open Issues: 30
-
Metadata Files:
- Readme: README.md
- License: LICENSE
Awesome Lists containing this project
- awesome-chatgpt - Chapyter - Integrate ChatGPT capabilities into Jupyter Notebook. (Integrations / Examples)
- awesome-ChatGPT-repositories - chapyter - Chapyter: ChatGPT Code Interpreter in Jupyter Notebooks (Others)
- ai-game-devtools - Chapyter
- awesome-chatgpt - Chapyter - Integrate ChatGPT capabilities into Jupyter Notebook. (Integrations / Examples)
README

**[Please check our latest blogpost on Chapyter release.](https://www.szj.io/posts/chapyter)**
## What is Chapyter
Chapyter is a JupyterLab extension that seamlessly connects GPT-4 to your coding environment.
It features a code interpreter that can translate your natural language description into Python code and automatically execute it.
By enabling "natural language programming" in your most familiar IDE, Chapyter can boost your productivity and empower you to explore many new ideas that you would not have tried otherwise.
| Functionality | Example |
| --- | --- |
| **Code generation from natural language and automatic execution**
Simply adding the magic command `%%chat` at the beginning of the cell of a natural language description of the task, the code is generated and the results are shown in a few seconds. |  |
| **Using coding history and execution output for code generation**
By adding the `--history` or `-h` flag in generation, chapyter can use the previous execution history and outputs to generate the appropriate visualization for the loaded IRIS dataset. | |
| **In-situ debugging and code editing**
The generated code might not be perfect and could contain bugs or errors. Since Chapyter is fully integrated into Jupyter Notebook, you can easily inspect the code and fix any errors or bugs (e.g., installing missing dependencies in this case) without leaving the IDE. |  |
| **Transparency on the prompts and AI configuration and allows for customization** | We release all the prompts used in our library and we are working on easy customization of the used prompts and settings. See in [chapyter/programs.py](https://github.com/chapyter/chapyter/blob/main/chapyter/programs.py). |
| **Privacy-first when using latest powerful AI** | Since we are using OpenAI API, all the data sent to OpenAI will not be saved for training (see [OpenAI API Data Usage Policies](https://openai.com/policies/api-data-usage-policies)). As a comparison, whenever you are using Copilot or ChatGPT, your data will be somewhat cached and can be used for their training and analysis. |
## Quick Start
1. Installation
```bash
pip install chapyter # Automatically installs the extension to jupyterlab
pip uninstall chapyter # Uninstalls the extension from jupyterlab
```
Note: It will upgrade the jupyterlab to ≥ 4.0. It might break your environments.
2. Usage: see [examples/01-quick-start.ipynb](examples/01-quick-start.ipynb) for a starter notebook.
1. Set the proper `OPENAI_API_KEY` and `OPENAI_ORGANIZATION` in the environment variable
2. Use the magic command `%%chat` in a code cell:
```
%%chat -m gpt-4-0613
List all the files in the folder
```
It will call gpt-4-0613 to generate the python code for listing all the files in the folder, and execute the generated code automatically. In this case, this plugin serves as the interpreter that translates the natural language to python code and execute it.
3. Examples:
- [examples/01-quick-start.ipynb](examples/01-quick-start.ipynb) illustrates the basic functions of `chapyter`, including how to use the magic command `%%chat`
- [examples/02-configure-chapyter.ipynb](examples/02-configure-chapyter.ipynb) shows how to customize `chapyter`:
- Use different default models (e.g., gpt-3.5-turbo instead of gpt-4)
- Use different types of API (now we support use the default OpenAI API or the Azure OpenAI API)
## Development Notes
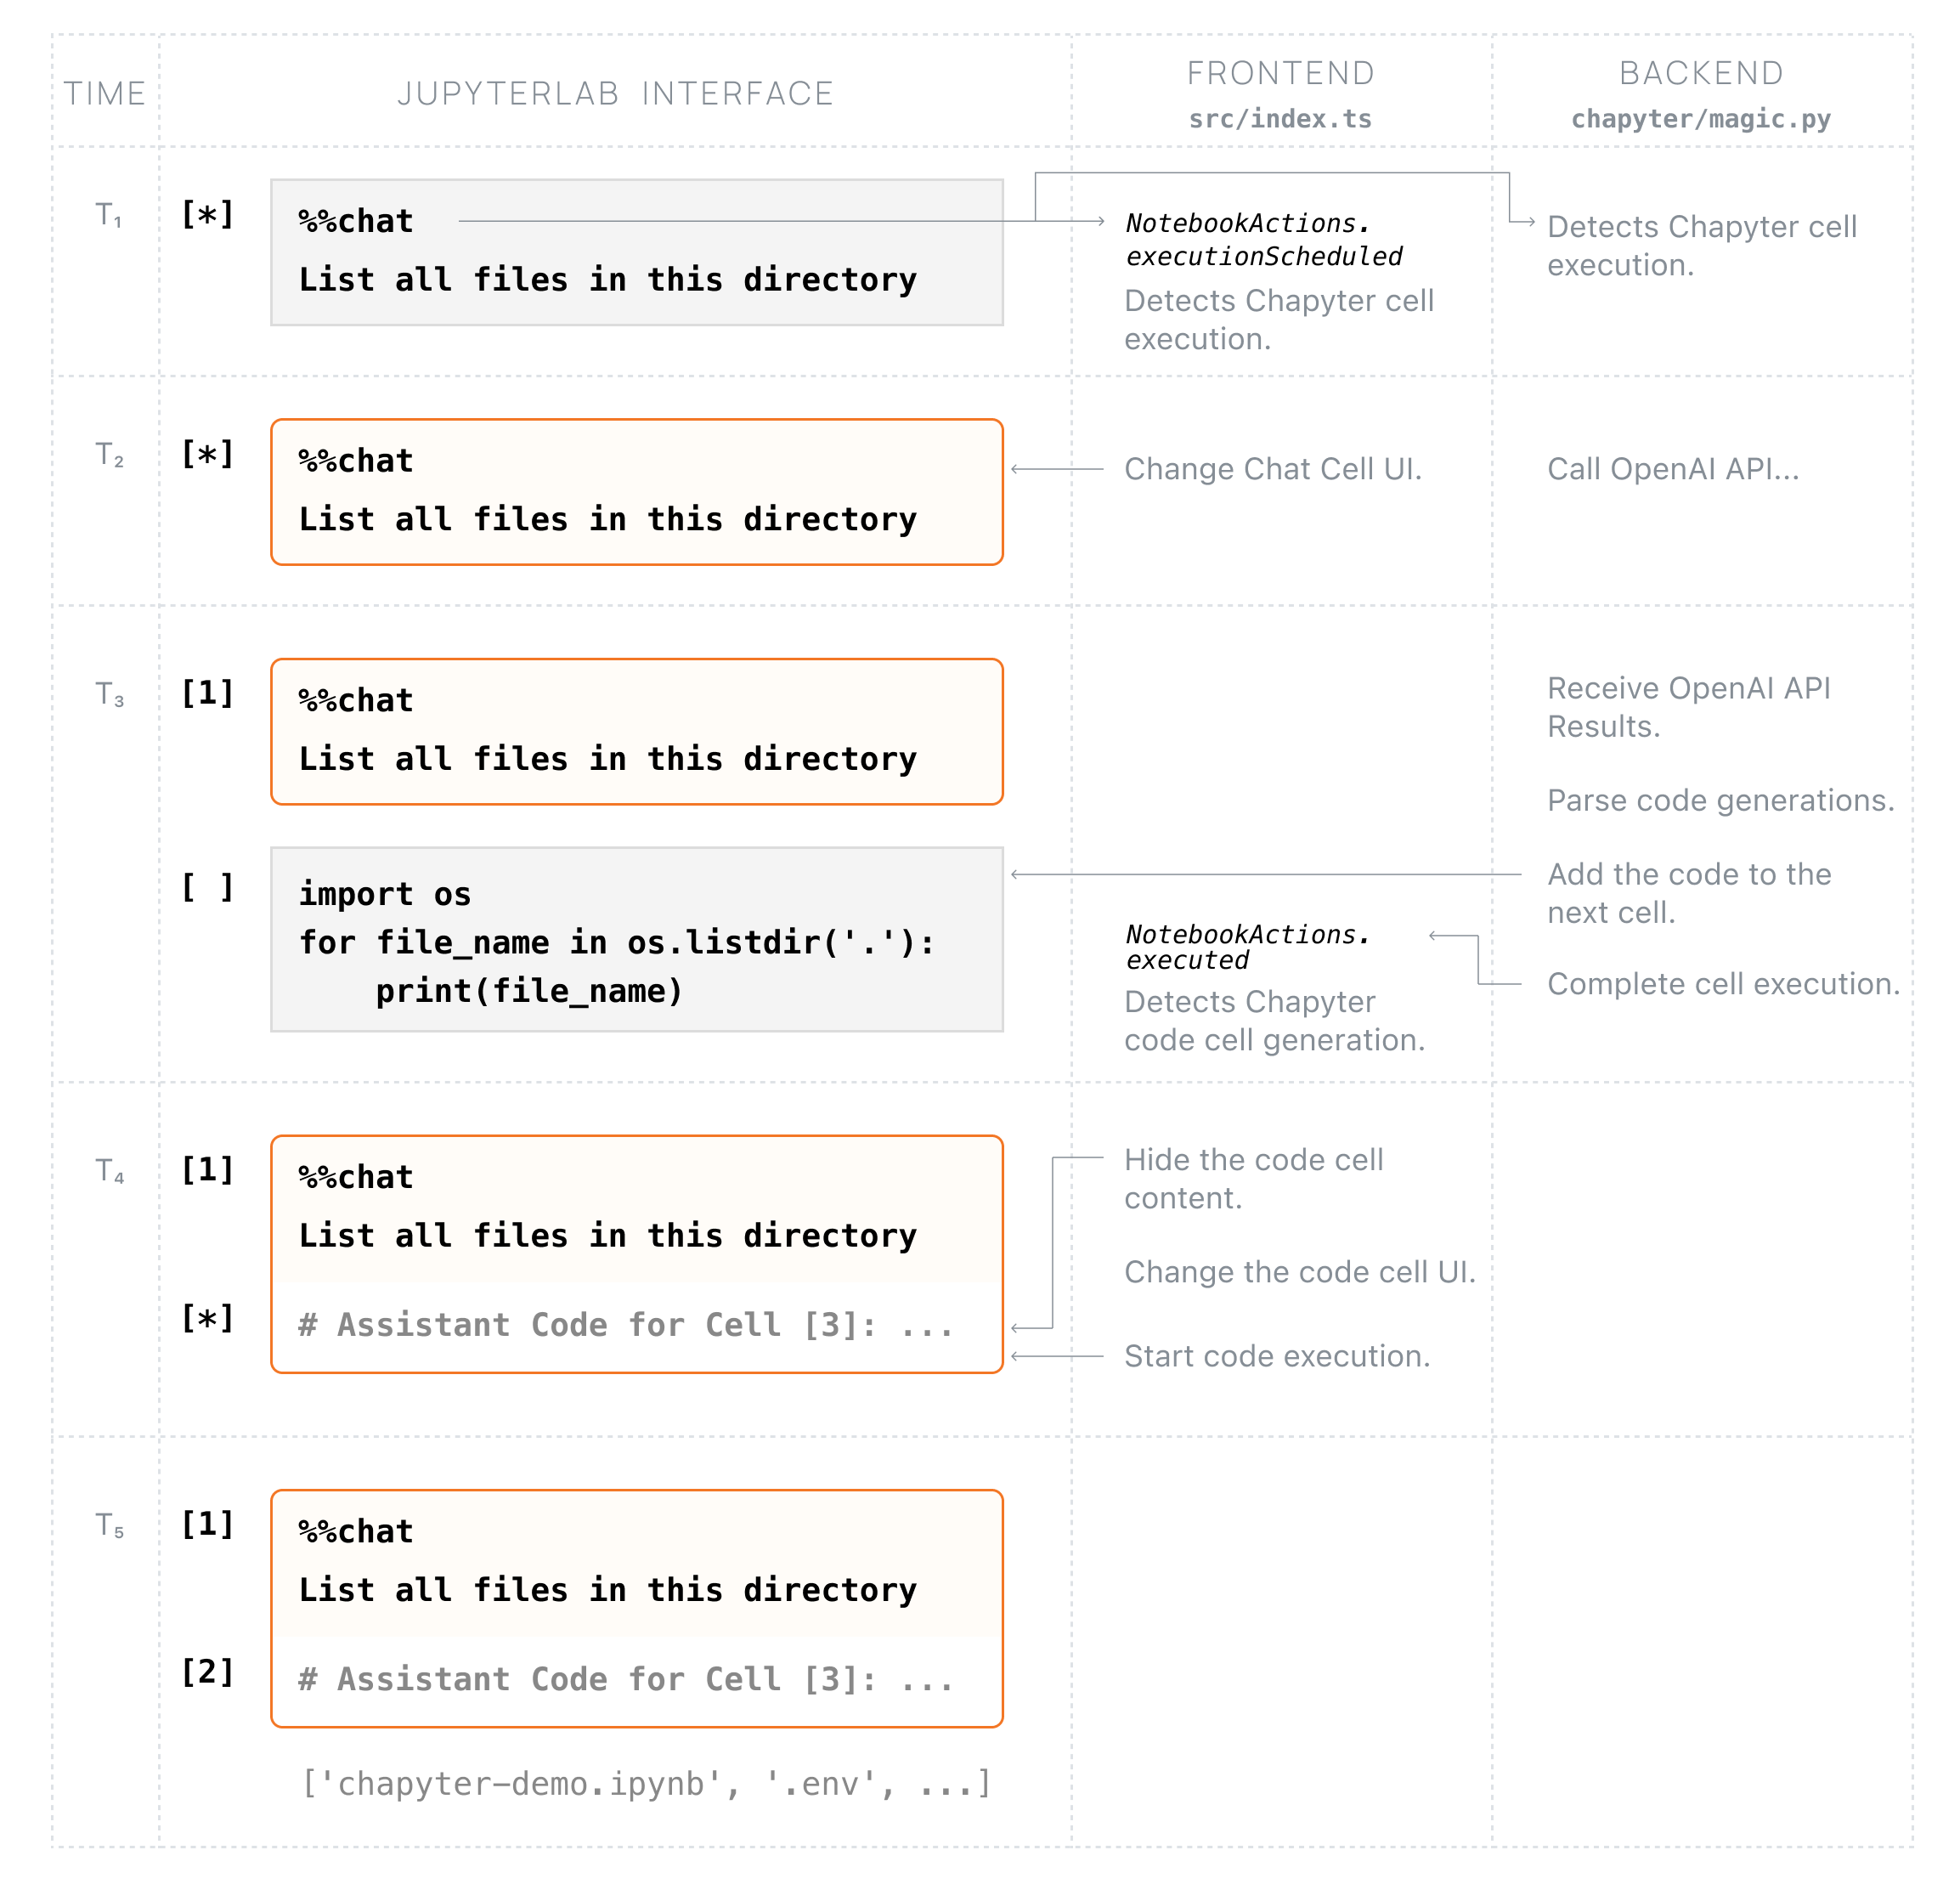
There are two major components in Chapyter: implementing the ipython magic command that handles the prompting and calling GPT-X models, and the frontend that listens to Chapyter cell execution and automatically executes the newly generated cell and updates the cell styles. The chart below illustrates the orchestration of the frontend and ipython kernel after a Chapyter cell is executed.
### Details
1. NodeJS is needed to build the extension package.
2. The `jlpm` command is JupyterLab's pinned version of [yarn](https://yarnpkg.com/) that is installed with JupyterLab. You may use
`yarn` or `npm` in lieu of `jlpm` below.
```bash
# Clone the repo to your local environment
# Change directory to the chapyter directory
# Install package in development mode
pip install -e "."
# Link your development version of the extension with JupyterLab
jupyter labextension develop . --overwrite
# Rebuild extension Typescript source after making changes
jlpm build
```
3. You can watch the source directory and run JupyterLab at the same time in different terminals to watch for changes in the extension's source and automatically rebuild the extension.
```bash
# Watch the source directory in one terminal, automatically rebuilding when needed
jlpm watch
# Run JupyterLab in another terminal
jupyter lab
```
With the watch command running, every saved change will immediately be built locally and available in your running JupyterLab. Refresh JupyterLab to load the change in your browser (you may need to wait several seconds for the extension to be rebuilt).
4. By default, the `jlpm build` command generates the source maps for this extension to make it easier to debug using the browser dev tools. To also generate source maps for the JupyterLab core extensions, you can run the following command:
```bash
jupyter lab build --minimize=False
```
5. Packaging and release: please refer to [RELEASE](RELEASE.md).