https://github.com/chenxinfeng4/ffmpegcv
The ffmpegcv is a ffmpeg backbone for open-cv like Video Reader and Writer
https://github.com/chenxinfeng4/ffmpegcv
ffmpeg opencv-python video-decoding video-encoding
Last synced: 9 months ago
JSON representation
The ffmpegcv is a ffmpeg backbone for open-cv like Video Reader and Writer
- Host: GitHub
- URL: https://github.com/chenxinfeng4/ffmpegcv
- Owner: chenxinfeng4
- Created: 2022-04-16T08:14:02.000Z (about 4 years ago)
- Default Branch: main
- Last Pushed: 2025-09-26T08:35:12.000Z (10 months ago)
- Last Synced: 2025-09-27T23:02:32.737Z (10 months ago)
- Topics: ffmpeg, opencv-python, video-decoding, video-encoding
- Language: Python
- Homepage:
- Size: 193 KB
- Stars: 220
- Watchers: 6
- Forks: 32
- Open Issues: 17
-
Metadata Files:
- Readme: README.md
Awesome Lists containing this project
README
# FFMPEGCV is an alternative to OPENCV for video reading&writing.

[](https://pypi.org/project/ffmpegcv/)
[](https://pepy.tech/project/ffmpegcv)


English Version | [中文版本](./README_CN.md)
Here is the Python version of ffmpegcv. For the C++ version, please visit [FFMPEGCV-CPP](https://github.com/chenxinfeng4/ffmpegcv-cpp)
The ffmpegcv provide Video Reader and Video Witer with ffmpeg backbone, which are faster and powerful than cv2. Integrating ffmpegcv into your deeplearning pipeline is very smooth.
- The ffmpegcv is api **compatible** to open-cv.
- The ffmpegcv can use **GPU accelerate** encoding and decoding*.
- The ffmpegcv supports much more video **codecs** v.s. open-cv.
- The ffmpegcv supports **RGB** & BGR & GRAY format as you like.
- The ffmpegcv supports fp32 CHW & HWC format shortcut to CUDA memory.
- The ffmpegcv supports **Stream reading** (IP Camera) in low latency.
- The ffmpegcv supports ROI operations.You can **crop**, **resize** and **pad** the ROI.
In all, ffmpegcv is just similar to opencv api. But it has more codecs and does't require opencv installed at all. It's great for deeplearning pipeline.
## Functions:
- `VideoWriter`: Write a video file.
- `VideoCapture`: Read a video file.
- `VideoCaptureNV`: Read a video file by NVIDIA GPU.
- `VideoCaptureQSV`: Read a video file by Intel QuickSync Video.
- `VideoCaptureCAM`: Read a camera.
- `VideoCaptureStream`: Read a RTP/RTSP/RTMP/HTTP stream.
- `VideoCaptureStreamRT`: Read a RTSP stream (IP Camera) in real time low latency as possible.
- `noblock`: Read/Write a video file in background using mulitprocssing.
- `toCUDA`: Translate a video/stream as CHW/HWC-float32 format into CUDA device, >2x faster.
## Install
You need to download ffmpeg before you can use ffmpegcv.
```
#1A. LINUX: sudo apt install ffmpeg
#1B. MAC (No NVIDIA GPU): brew install ffmpeg
#1C. WINDOWS: download ffmpeg and add to the path
#1D. CONDA: conda install ffmpeg=6.0.0 #don't use the default 4.x.x version
#2A. python
pip install ffmpegcv #stable verison
pip install git+https://github.com/chenxinfeng4/ffmpegcv #latest verison
#2B. recommand only when you want advanced functions. See the toCUDA section
pip install ffmpegcv[cuda]
```
## When should choose `ffmpegcv` other than `opencv`:
- The `opencv` is hard to install. The ffmpegcv only requires `numpy` and `FFmpeg`, works across Mac/Windows/Linux platforms.
- The `opencv` packages too much image processing toolbox. You just want a simple video/camero IO with GPU accessible.
- The `opencv` didn't support profiling `h264`/`h265` and other video writers.
- You want to **crop**, **resize** and **pad** the video/camero ROI.
- You are interested in deeplearning pipeline.
## Basic example
Read a video by CPU, and rewrite it by GPU.
```python
vidin = ffmpegcv.VideoCapture(vfile_in)
vidout = ffmpegcv.VideoWriterNV(vfile_out, 'h264', vidin.fps) #NVIDIA-GPU
with vidin, vidout:
for frame in vidin:
cv2.imshow('image', frame)
vidout.write(frame)
```
Read the camera.
```python
# by device ID
cap = ffmpegcv.VideoCaptureCAM(0)
# by device name
cap = ffmpegcv.VideoCaptureCAM("Integrated Camera")
```
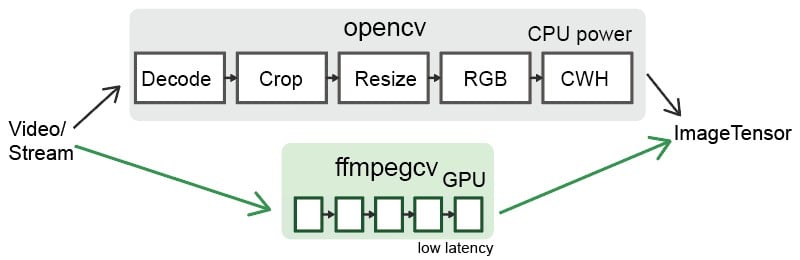
Deeplearning pipeline.
```python
"""
—————————— NVIDIA GPU accelerating ⤴⤴ ———————
| |
V V
video -> decode -> crop -> resize -> RGB -> CUDA:CHW float32 -> model
"""
cap = ffmpegcv.toCUDA(
ffmpegcv.VideoCaptureNV(file, pix_fmt='nv12', resize=(W,H)),
tensor_format='chw')
for frame_CHW_cuda in cap:
frame_CHW_cuda = (frame_CHW_cuda - mean) / std
result = model(frame_CHW_cuda)
```
## Cross platform
The ffmpegcv is based on Python+FFmpeg, it can cross platform among `Windows, Linux, Mac, X86, Arm`systems.
## GPU Acceleration
- Support **NVIDIA** card only, test in x86_64 only.
- Works in **Windows**, **Linux** and **Anaconda**.
- Works in the **Google Colab** notebook.
- Infeasible in the **MacOS**. That ffmpeg didn't supports NVIDIA at all.
> \* The ffmegcv GPU reader is a bit slower than CPU reader, but much faster when use ROI operations (crop, resize, pad).
## Codecs
| Codecs | OpenCV-reader | ffmpegcv-cpu-r | gpu-r | OpenCV-writer | ffmpegcv-cpu-w | gpu-w |
| ----------- | ------------- | ---------------- | ---- | ------------- | ---------------- | ---- |
| h264 | √ | √ | √ | × | √ | √ |
| h265 (hevc) | not sure | √ | √ | × | √ | √ |
| mjpeg | √ | √ | × | √ | √ | × |
| mpeg | √ | √ | × | √ | √ | × |
| others | not sure | ffmpeg -decoders | × | not sure | ffmpeg -encoders | × |
## Benchmark
*On the way...(maybe never)*
## Video Reader
---
The ffmpegcv is just similar to opencv in api.
```python
# open cv
import cv2
cap = cv2.VideoCapture(file)
while True:
ret, frame = cap.read()
if not ret:
break
pass
# ffmpegcv
import ffmpegcv
cap = ffmpegcv.VideoCapture(file)
while True:
ret, frame = cap.read()
if not ret:
break
pass
cap.release()
# alternative
cap = ffmpegcv.VideoCapture(file)
nframe = len(cap)
for frame in cap:
pass
cap.release()
# more pythonic, recommand
with ffmpegcv.VideoCapture(file) as cap:
nframe = len(cap)
for iframe, frame in enumerate(cap):
if iframe>100: break
pass
```
Use GPU to accelerate decoding. It depends on the video codes.
h264_nvcuvid, hevc_nvcuvid ....
```python
cap_cpu = ffmpegcv.VideoCapture(file)
cap_gpu0 = ffmpegcv.VideoCaptureNV(file) #NVIDIA GPU0
cap_gpu1 = ffmpegcv.VideoCaptureNV(file, gpu=1) #NVIDIA GPU1
cap_qsv = ffmpegcv.VideoCaptureQSV(file) #Intel QSV, experimental
```
Use `rgb24` instead of `bgr24`. The `gray` version would be more efficient.
```python
cap = ffmpegcv.VideoCapture(file, pix_fmt='rgb24') #rgb24, bgr24, gray
ret, frame = cap.read()
plt.imshow(frame)
```
### ROI Operations
You can crop, resize and pad the video. These ROI operation is `ffmpegcv-GPU` > `ffmpegcv-CPU` >> `opencv`.
**Crop** video, which will be much faster than read the whole canvas. The top-left corner is (0, 0).
```python
cap = ffmpegcv.VideoCapture(file, crop_xywh=(0, 0, 640, 480))
```
**Resize** the video to the given size.
```python
cap = ffmpegcv.VideoCapture(file, resize=(640, 480))
```
**Resize** and keep the aspect ratio with black border **padding**.
```python
cap = ffmpegcv.VideoCapture(file, resize=(640, 480), resize_keepratio=True)
```
**Crop** and then **resize** the video.
```python
cap = ffmpegcv.VideoCapture(file, crop_xywh=(0, 0, 640, 480), resize=(512, 512))
```
### Extend Options
**INFILE_OPTIONS**: Add extra options to ffmpeg input.
```python
cap = ffmpegcv.VideoCapture(file, infile_options='-re -stream_loop -1')
# equivalent ffmpeg command
ffmpeg INFILE_OPTIONS -i FILE -f rawvideo pipe:
```
## toCUDA device
---
The ffmpegcv can translate the video/stream from HWC-uint8 cpu to CHW-float32 in CUDA device. It significantly reduce your cpu load, and get >2x faster than your manually convertion.
Prepare your environment. The cuda environment is required. The `pycuda` package is required. The `pytorch` package is non-essential.
> nvcc --version # check you've installed NVIDIA CUDA Compiler. Already installed if
> you've installed Tensorflow-gpu or Pytorch-gpu
>
> pip install ffmpegcv[cuda] #auto install pycuda
```python
# Read a video file to CUDA device, original
cap = ffmpegcv.VideoCaptureNV(file, pix_fmt='rgb24')
ret, frame_HWC_CPU = cap.read()
frame_CHW_CUDA = torch.from_numpy(frame_HWC_CPU).permute(2, 0, 1).cuda().contiguous().float() # 120fps, 1200% CPU load
# speed up
cap = toCUDA(ffmpegcv.VideoCapture(file, pix_fmt='yuv420p')) #pix_fmt: 'yuv420p' or 'nv12' only
cap = toCUDA(ffmpegcv.VideoCaptureNV(file, pix_fmt='nv12')) #'nv12' is better for gpu
cap = toCUDA(vid, tensor_format='chw') #tensor format:'chw'(default) or 'hwc', fp32 precision
cap = toCUDA(vid, gpu=1) #choose gpu
# read to the cuda device
ret, frame_CHW_pycuda = cap.read() #380fps, 200% CPU load, dtype is [pycuda array]
ret, frame_CHW_pycudamem = cap.read_cudamem() #dtype is [pycuda mem_alloc]
ret, frame_CHW_CUDA = cap.read_torch() #dtype is [pytorch tensor]
ret, _ = cap.read_torch(frame_CHW_CUDA) #no copy, but need to specify the output memory
frame_CHW_pycuda[:] = (frame_CHW_pycuda - mean) / std #normalize
```
How can `toCUDA` make it faster in your deeplearning pipeline than `opencv` or `ffmpeg`?
> 1. The opencv/ffmpeg uses the cpu to convert video pix_fmt from original YUV to RGB24, which is slow. The ffmpegcv use the cuda to accelerate pix_fmt convertion.
> 2. Use `yuv420p` or `nv12` can save the cpu load and reduce the memory copy from CPU to GPU.
> 3. The ffmpeg stores the image as HWC format. The ffmpegcv can use HWC & CHW format to accelerate the video reading.
## Video Writer
---
```python
# cv2
out = cv2.VideoWriter('outpy.avi',
cv2.VideoWriter_fourcc('M','J','P','G'),
10,
(w, h))
out.write(frame1)
out.write(frame2)
out.release()
# ffmpegcv, default codec is 'h264' in cpu 'h265' in gpu.
# frameSize is decided by the size of the first frame.
# use the 'mp4/mkv' instead of 'avi' to avoid the codec outdated.
out = ffmpegcv.VideoWriter('outpy.mp4', None, 10)
out.write(frame1)
out.write(frame2)
out.release()
# more pythonic
with ffmpegcv.VideoWriter('outpy.mp4', None, 10) as out:
out.write(frame1)
out.write(frame2)
```
Use GPU to accelerate encoding. Such as h264_nvenc, hevc_nvenc.
```python
out_cpu = ffmpegcv.VideoWriter('outpy.mp4', None, 10)
out_gpu0 = ffmpegcv.VideoWriterNV('outpy.mp4', 'h264', 10) #NVIDIA GPU0
out_gpu1 = ffmpegcv.VideoWriterNV('outpy.mp4', 'hevc', 10, gpu=1) #NVIDIA GPU1
out_qsv = ffmpegcv.VideoWriterQSV('outpy.mp4', 'h264', 10) #Intel QSV, experimental
```
Input image is rgb24 instead of bgr24
```python
out = ffmpegcv.VideoWriter('outpy.mp4', None, 10, pix_fmt='rgb24')
```
Resize the video
```python
out_resz = ffmpegcv.VideoWriter('outpy.mp4', None, 10, resize=(640, 480)) #Resize
```
## Video Reader and Writer
---
```python
import ffmpegcv
vfile_in = 'A.mp4'
vfile_out = 'A_h264.mp4'
vidin = ffmpegcv.VideoCapture(vfile_in)
vidout = ffmpegcv.VideoWriter(vfile_out, None, vidin.fps)
with vidin, vidout:
for frame in vidin:
vidout.write(frame)
```
## Camera Reader
---
**Experimental feature**. The ffmpegcv offers Camera reader. Which is consistent with VideoFiler reader.
- The `VideoCaptureCAM` aims to support ROI operations. The Opencv will be general fascinating than ffmpegcv in camera read. **I recommand the opencv in most camera reading case**.
- The ffmpegcv can use name to retrieve the camera device. Use `ffmpegcv.VideoCaptureCAM("Integrated Camera")` is readable than `cv2.VideoCaptureCAM(0)`.
- The `VideoCaptureCAM` will be laggy and dropping frames if your post-process takes long time. The VideoCaptureCAM will buffer the recent frames.
- The `VideoCaptureCAM` is continously working on background even if you didn't read it. **Please release it in time**.
- Works perfect in Windows, not-perfect in Linux and macOS.
```python
import cv2
cap = cv2.VideoCapture(0)
while True:
ret, frame = cap.read()
cv2.imshow('frame', frame)
if cv2.waitKey(1) & 0xFF == ord('q'):
break
cap.release()
# ffmpegcv, in Windows&Linux
import ffmpegcv
cap = ffmpegcv.VideoCaptureCAM(0)
while True:
ret, frame = cap.read()
cv2.imshow('frame', frame)
if cv2.waitKey(1) & 0xFF == ord('q'):
break
cap.release()
# ffmpegcv use by camera name, in Windows&Linux
cap = ffmpegcv.VideoCaptureCAM("Integrated Camera")
# ffmpegcv use camera path if multiple cameras conflict
cap = ffmpegcv.VideoCaptureCAM('@device_pnp_\\\\?\\usb#vid_2304&'
'pid_oot#media#0001#{65e8773d-8f56-11d0-a3b9-00a0c9223196}'
'\\global')
# ffmpegcv use camera with ROI operations
cap = ffmpegcv.VideoCaptureCAM("Integrated Camera", crop_xywh=(0, 0, 640, 480), resize=(512, 512), resize_keepratio=True)
```
**List all camera devices**
```python
from ffmpegcv.ffmpeg_reader_camera import query_camera_devices
devices = query_camera_devices()
print(devices)
```
>{0: ('Integrated Camera', '@device_pnp_\\\\?\\usb#vid_2304&pid_oot#media#0001#{65e8773d-8f56-11d0-a3b9-00a0c9223196}\\global'),
1: ('OBS Virtual Camera', '@device_sw_{860BB310-5D01-11D0-BD3B-00A0C911CE86}\\{A3FCE0F5-3493-419F-958A-ABA1250EC20B}')}
**Set the camera resolution, fps, vcodec/pixel-format**
```python
from ffmpegcv.ffmpeg_reader_camera import query_camera_options
options = query_camera_options(0) # or query_camera_options("Integrated Camera")
print(options)
cap = ffmpegcv.VideoCaptureCAM(0, **options[-1])
```
>[{'camcodec': 'mjpeg', 'campix_fmt': None, 'camsize_wh': (1280, 720), 'camfps': 60.0002}, {'camcodec': 'mjpeg', 'campix_fmt': None, 'camsize_wh': (640, 480), 'camfps': 60.0002}, {'camcodec': 'mjpeg', 'campix_fmt': None, 'camsize_wh': (1920, 1080), 'camfps': 60.0002}, {'camcodec': None, 'campix_fmt': 'yuyv422', 'camsize_wh': (1280, 720), 'camfps': 10}, {'camcodec': None, 'campix_fmt': 'yuyv422', 'camsize_wh': (640, 480), 'camfps': 30}, {'camcodec': None, 'campix_fmt': 'yuyv422', 'camsize_wh': (1920, 1080), 'camfps': 5}]
**Known issues**
1. The VideoCaptureCAM didn't give a smooth experience in macOS. You must specify all the camera parameters. And the query_camera_options woun't give any suggestion. That's because the `ffmpeg` cannot list device options using mac native `avfoundation`.
```python
# The macOS requires full argument.
cap = ffmpegcv.VideoCaptureCAM('FaceTime HD Camera', camsize_wh=(1280,720), camfps=30, campix_fmt='nv12')
```
2. The VideoCaptureCAM cann't list the FPS in linux. Because the `ffmpeg` cound't query the device's FPS using linux native `v4l2` module. However, it's just OK to let the FPS empty.
## Stream Reader (Live streaming, RTSP IP cameras)
**Experimental feature**. The ffmpegcv offers Stream reader. Which is consistent with VideoFiler reader, and more similiar to the camera.
Becareful when using it.
- Support `RTSP`, `RTP`, `RTMP`, `HTTP`, `HTTPS` streams.
- The `VideoCaptureStream` will be laggy and dropping frames if your post-process takes long time. The VideoCaptureCAM will buffer the recent frames.
- The `VideoCaptureStreamRT` is continously working on background even if you didn't read it. **Please release it in time**.
- **Low latency** RTSP IP camera reader. Batter than opencv.
- *It's still experimental*. Recommand you to use opencv.
```python
# opencv
import cv2
stream_url = 'http://devimages.apple.com.edgekey.net/streaming/examples/bipbop_4x3/gear2/prog_index.m3u8'
cap = cv2.VideoCapture(stream_url, cv2.CAP_FFMPEG)
if not cap.isOpened():
print('Cannot open the stream')
exit(-1)
while True:
ret, frame = cap.read()
if not ret:
break
pass
# ffmpegcv
import ffmpegcv
cap = ffmpegcv.VideoCaptureStream(stream_url)
while True:
ret, frame = cap.read()
if not ret:
break
pass
# ffmpegcv, IP Camera Low-latency
# e.g. HIK Vision IP Camera, `101` Main camera stream, `102` the second
stream_url = 'rtsp://admin:PASSWD@192.168.1.xxx:8554/Streaming/Channels/102'
cap = ffmpegcv.VideoCaptureStreamRT(stream_url) # Low latency & recent buffered
cap = ffmpegcv.ReadLiveLast(ffmpegcv.VideoCaptureStreamRT, stream_url) #no buffer
while True:
ret, frame = cap.read()
if not ret:
break
pass
```
## Noblock
A proxy to automatic prepare frames in backgroud, which does not block when reading&writing current frame (multiprocessing). This make your python program more efficient in CPU usage. Up to 2x boost.
> ffmpegcv.VideoCapture(*args) -> ffmpegcv.noblock(ffmpegcv.VideoCapture, *args)
>
> ffmpegcv.VideoWriter(*args) -> ffmpegcv.noblock(ffmpegcv.VideoWriter, *args)
```python
#Proxy any VideoCapture&VideoWriter args and kargs
vid_noblock = ffmpegcv.noblock(ffmpegcv.VideoCapture, vfile, pix_fmt='rbg24')
# this is fast
def cpu_tense(): time.sleep(0.01)
for _ in tqdm.trange(1000):
ret, img = vid_noblock.read() #current img is already buffered, take no time
cpu_tense() #meanwhile, the next img is buffering in background
# this is slow
vid = ffmpegcv.VideoCapture(vfile, pix_fmt='rbg24')
for _ in tqdm.trange(1000):
ret, img = vid.read() #this read will block cpu, take time
cpu_tense()
```