https://github.com/chenzhaiyu/polygnn
PolyGNN: Polyhedron-based graph neural network for 3D building reconstruction from point clouds [ISPRS 2024]
https://github.com/chenzhaiyu/polygnn
3d building gnn point-cloud reconstruction
Last synced: about 1 year ago
JSON representation
PolyGNN: Polyhedron-based graph neural network for 3D building reconstruction from point clouds [ISPRS 2024]
- Host: GitHub
- URL: https://github.com/chenzhaiyu/polygnn
- Owner: chenzhaiyu
- License: mit
- Created: 2023-07-17T21:04:17.000Z (almost 3 years ago)
- Default Branch: main
- Last Pushed: 2025-03-13T09:17:59.000Z (about 1 year ago)
- Last Synced: 2025-03-13T10:26:39.114Z (about 1 year ago)
- Topics: 3d, building, gnn, point-cloud, reconstruction
- Language: Python
- Homepage: https://github.com/chenzhaiyu/polygnn
- Size: 2.23 MB
- Stars: 122
- Watchers: 10
- Forks: 14
- Open Issues: 4
-
Metadata Files:
- Readme: README.md
- License: LICENSE
- Citation: CITATION.bib
Awesome Lists containing this project
README
# PolyGNN
-----------
[](https://www.sciencedirect.com/science/article/pii/S0924271624003691)
[](https://www.sciencedirect.com/science/article/pii/S0924271624003691/pdfft?md5=3d0d8b3b72cdd3f4c809d714b1292137&pid=1-s2.0-S0924271624003691-main.pdf)
[](https://raw.githubusercontent.com/chenzhaiyu/polygnn/main/LICENSE)
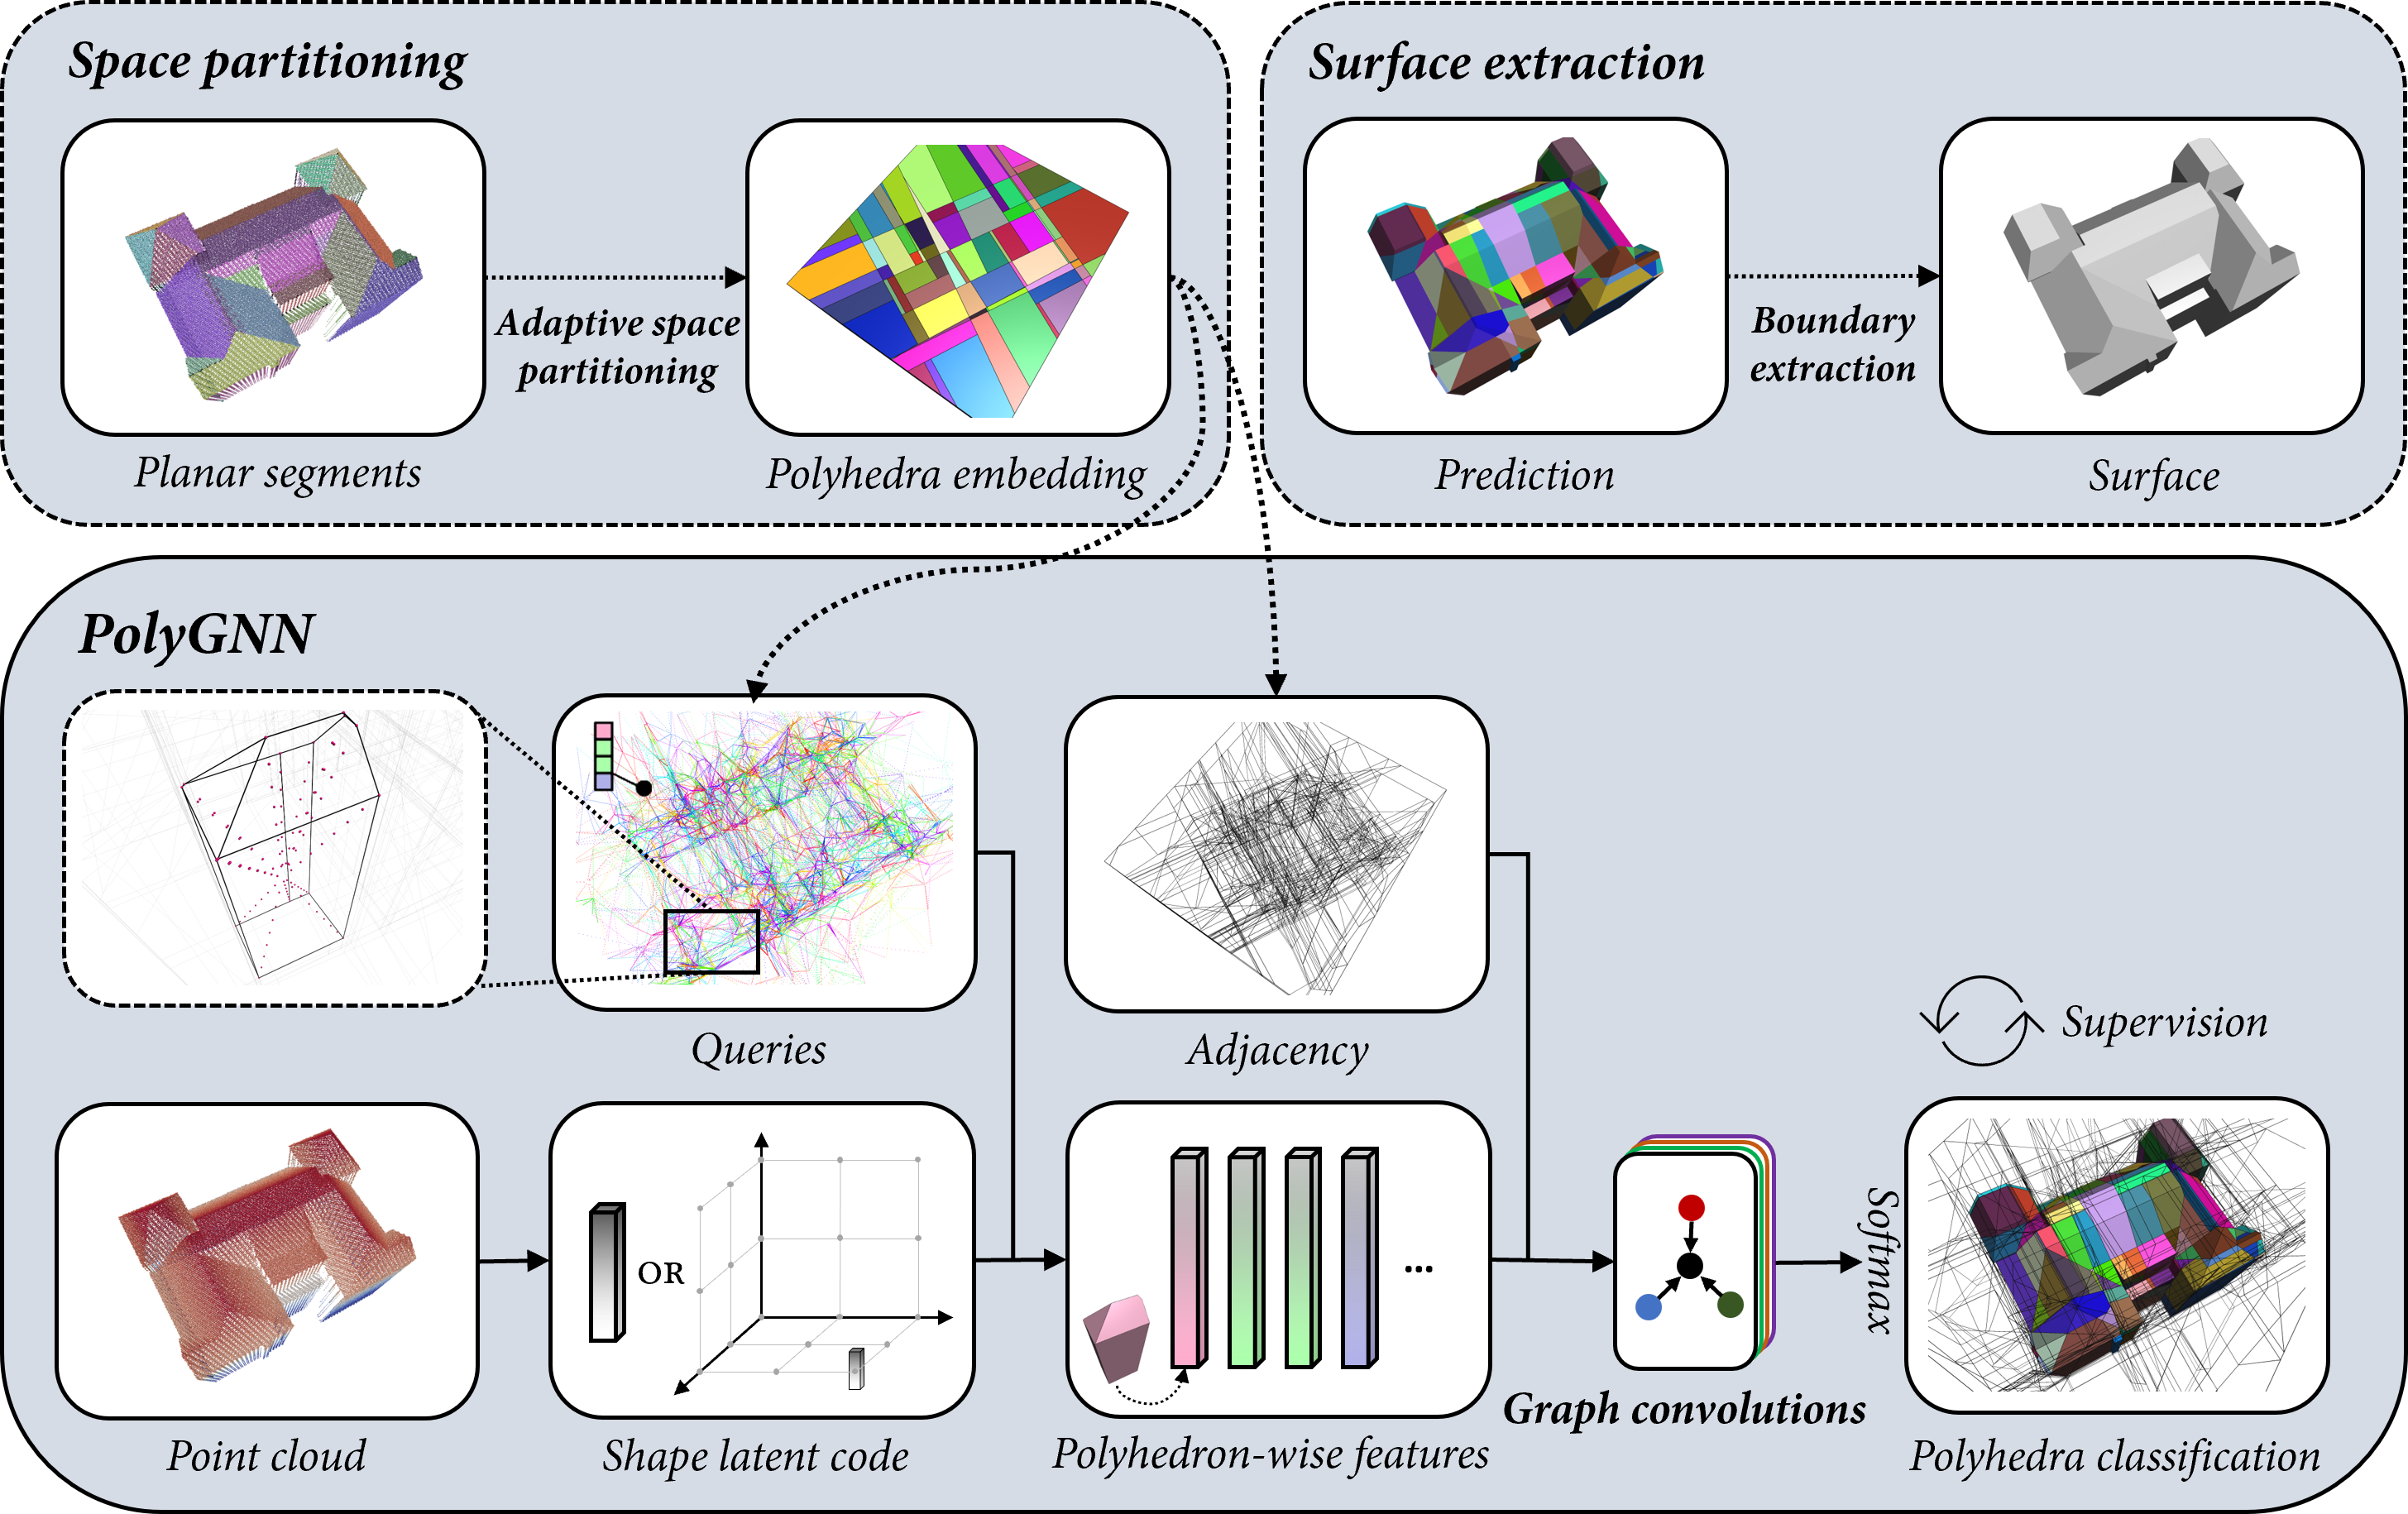
PolyGNN is an implementation of the paper [*PolyGNN: Polyhedron-based Graph Neural Network for 3D Building Reconstruction from Point Clouds*](https://www.sciencedirect.com/science/article/pii/S0924271624003691).
PolyGNN learns a piecewise planar occupancy function, supported by polyhedral decomposition, for efficient and scalable 3D building reconstruction.
## 🛠️ Setup
### Repository
Clone the repository:
```bash
git clone https://github.com/chenzhaiyu/polygnn && cd polygnn
```
### All-in-one installation
Create a conda environment with all dependencies:
```bash
conda env create -f environment.yml && conda activate polygnn
```
### Manual installation
Still easy! Create a conda environment and install [mamba](https://github.com/mamba-org/mamba) for faster parsing:
```bash
conda create --name polygnn python=3.10 && conda activate polygnn
conda install mamba -c conda-forge
```
Install the required dependencies:
```
mamba install pytorch torchvision sage=10.0 pytorch-cuda=11.7 pyg=2.3 pytorch-scatter pytorch-sparse pytorch-cluster torchmetrics rtree -c pyg -c pytorch -c nvidia -c conda-forge
pip install abspy==0.2.6 hydra-core hydra-colorlog omegaconf trimesh tqdm wandb plyfile
```
## 🚀 Usage
### Quick start
Download the mini dataset and pretrained weights:
```python
python download.py dataset=mini
```
In case you encounter issues (e.g., Google Drive limits), manually download the data and weights [here](https://drive.google.com/drive/folders/1fAwvhGtOgS8f4IldE1J4v5s0438WM24b?usp=sharing), then extract them into `./checkpoints/mini` and `./data/mini`, respectively.
The mini dataset contains 200 random instances (~0.07% of the full dataset).
Train PolyGNN on the mini dataset (provided for your reference and is not intended for full-scale training):
```python
python train.py dataset=mini
```
The data will be automatically preprocessed the first time you initiate training.
Evaluate PolyGNN with option to save predictions:
```python
python test.py dataset=mini evaluate.save=true
```
Generate meshes from predictions:
```python
python reconstruct.py dataset=mini reconstruct.type=mesh
```
Remap meshes to their original CRS:
```python
python remap.py dataset=mini
```
Generate reconstruction statistics:
```python
python stats.py dataset=mini
```
### Available configurations
```python
# check available configurations for training
python train.py --cfg job
# check available configurations for evaluation
python test.py --cfg job
```
Alternatively, review the configuration file: `conf/config.yaml`.
### Full dataset
The Munich dataset is available for download on [Zenodo](https://zenodo.org/records/14254264). Note that it requires 332 GB of storage when decompressed. Meshes for CRS remapping can be downloaded [here](https://drive.google.com/file/d/1hn11XMqyoPUnq-9WGfAwQq47uuUvcbi7/view?usp=drive_link).
### Custom data
PolyGNN requires polyhedron-based graphs as input. To prepare this from your own point clouds:
1. Extract planar primitives using tools such as [Easy3D](https://github.com/LiangliangNan/Easy3D) or [GoCoPP](https://github.com/Ylannl/GoCoPP), preferably in [VertexGroup](https://abspy.readthedocs.io/en/latest/vertexgroup.html) format.
2. Build [CellComplex](https://abspy.readthedocs.io/en/latest/api.html#abspy.CellComplex) from the primitives using [abspy](https://github.com/chenzhaiyu/abspy). Example code:
```python
from abspy import VertexGroup, CellComplex
vertex_group = VertexGroup(vertex_group_path, quiet=True)
cell_complex = CellComplex(vertex_group.planes, vertex_group.aabbs,
vertex_group.points_grouped, build_graph=True, quiet=True)
cell_complex.prioritise_planes(prioritise_verticals=True)
cell_complex.construct()
cell_complex.save(complex_path)
```
Alternatively, you can modify [`CityDataset`](https://github.com/chenzhaiyu/polygnn/blob/67addd77a6be1d100448e3bd7523babfa063d0dd/dataset.py#L157) or [`TestOnlyDataset`](https://github.com/chenzhaiyu/polygnn/blob/67addd77a6be1d100448e3bd7523babfa063d0dd/dataset.py#L276) to accept inputs directly from [VertexGroup](https://abspy.readthedocs.io/en/latest/vertexgroup.html) or [VertexGroupReference](https://abspy.readthedocs.io/en/latest/api.html#abspy.VertexGroupReference).
3. Structure your dataset similarly to the provided mini dataset:
```bash
YOUR_DATASET_NAME
└── raw
├── 03_meshes
│ ├── DEBY_LOD2_104572462.obj
│ ├── DEBY_LOD2_104575306.obj
│ └── DEBY_LOD2_104575493.obj
├── 04_pts
│ ├── DEBY_LOD2_104572462.npy
│ ├── DEBY_LOD2_104575306.npy
│ └── DEBY_LOD2_104575493.npy
├── 05_complexes
│ ├── DEBY_LOD2_104572462.cc
│ ├── DEBY_LOD2_104575306.cc
│ └── DEBY_LOD2_104575493.cc
├── testset.txt
└── trainset.txt
```
4. To train or evaluate PolyGNN using your dataset, run the following commands:
```python
# start training
python train.py dataset=YOUR_DATASET_NAME
# start evaluation
python test.py dataset=YOUR_DATASET_NAME
```
For evaluation only, you can instantiate your dataset as a [`TestOnlyDataset`](https://github.com/chenzhaiyu/polygnn/blob/67addd77a6be1d100448e3bd7523babfa063d0dd/dataset.py#L276), as in [this line](https://github.com/chenzhaiyu/polygnn/blob/94ffc9e45f0721653038bd91f33f1d4eafeab7cb/test.py#L178).
## 👷 TODOs
- [x] Demo with mini data and pretrained weights
- [x] Short tutorial for getting started
- [x] Host the full dataset
## 🎓 Citation
If you use PolyGNN in a scientific work, please consider citing the paper:
```bibtex
@article{chen2024polygnn,
title = {PolyGNN: Polyhedron-based graph neural network for 3D building reconstruction from point clouds},
journal = {ISPRS Journal of Photogrammetry and Remote Sensing},
volume = {218},
pages = {693-706},
year = {2024},
issn = {0924-2716},
doi = {https://doi.org/10.1016/j.isprsjprs.2024.09.031},
url = {https://www.sciencedirect.com/science/article/pii/S0924271624003691},
author = {Zhaiyu Chen and Yilei Shi and Liangliang Nan and Zhitong Xiong and Xiao Xiang Zhu},
}
```
The synthetic point clouds are simulated with [pyhelios](https://github.com/chenzhaiyu/pyhelios).
You might also want to check out [abspy](https://github.com/chenzhaiyu/abspy) for 3D adaptive binary space partitioning and [Points2Poly](https://github.com/chenzhaiyu/points2poly) for reconstruction with deep implicit fields.