https://github.com/clooos/home-assistant-mobile-first
A minimalist and user-friendly design, combined with an mobile first approach for the Home Assistant dashboard.
https://github.com/clooos/home-assistant-mobile-first
dashboard frontend home-assistant home-assistant-config home-assistant-custom home-assistant-dashboard home-assistant-frontend home-assistant-theme lovelace mobile-first personal-project theme ui-design user-friendly weather
Last synced: about 1 year ago
JSON representation
A minimalist and user-friendly design, combined with an mobile first approach for the Home Assistant dashboard.
- Host: GitHub
- URL: https://github.com/clooos/home-assistant-mobile-first
- Owner: Clooos
- License: mit
- Created: 2023-02-08T16:28:13.000Z (over 3 years ago)
- Default Branch: master
- Last Pushed: 2025-05-04T07:22:47.000Z (about 1 year ago)
- Last Synced: 2025-05-16T11:05:37.444Z (about 1 year ago)
- Topics: dashboard, frontend, home-assistant, home-assistant-config, home-assistant-custom, home-assistant-dashboard, home-assistant-frontend, home-assistant-theme, lovelace, mobile-first, personal-project, theme, ui-design, user-friendly, weather
- Homepage:
- Size: 18.1 MB
- Stars: 1,328
- Watchers: 58
- Forks: 67
- Open Issues: 0
-
Metadata Files:
- Readme: README.md
- License: LICENSE
Awesome Lists containing this project
README
# Home Assistant - Mobile First Dashboard
A minimalist and user-friendly design, combined with an mobile first approach for the Home Assistant dashboard.
[](#) [](#) [](https://www.reddit.com/user/Clooooos/submitted/) [](https://community.home-assistant.io/t/a-minimalist-and-user-friendly-dashboard-with-an-mobile-first-approach-now-on-github/535580) [](https://www.buymeacoffee.com/clooos)
About three years ago, a friend introduced me to Home Assistant. I was drawn to the idea and its open-source nature, so I purchased a Raspberry Pi 4 and quickly became enamored with the platform.
I’m now happy to share my personal setup with the community and hope it inspires you.
## Screenshots and features

# Installation
There is **no easy installation process**, as this is my personal setup uploaded as is.
But here is a step-by-step guide that will show you where to start.
You need to install the following dependencies using HACS (more details below). Note that you may not need all of them depending on what you want, but these are the ones that I use in my setup:
- [lovelace-card-mod](https://github.com/thomasloven/lovelace-card-mod)
This is a custom component that allows modifying the appearance of any Lovelace card using CSS styles.
**This one is mandatory.**
- [button-card](https://github.com/custom-cards/button-card)
This is a button card that allows creating buttons with icons, text, actions, and styles.
**This one is mandatory.**
- [vertical-stack-in-card](https://github.com/ofekashery/vertical-stack-in-card)
This is a custom card that allows stacking multiple cards vertically.
**This one is mandatory.**
- [decluttering-card](https://github.com/custom-cards/decluttering-card)
This is a card that allows you to reuse multiple times the same configuration in your lovelace configuration to avoid repetition.
**This one is mandatory.**
- [lovelace-paper-buttons-row](https://github.com/jcwillox/lovelace-paper-buttons-row)
This is a custom row that shows multiple buttons with icons and actions on the same row.
**This one is mandatory.**
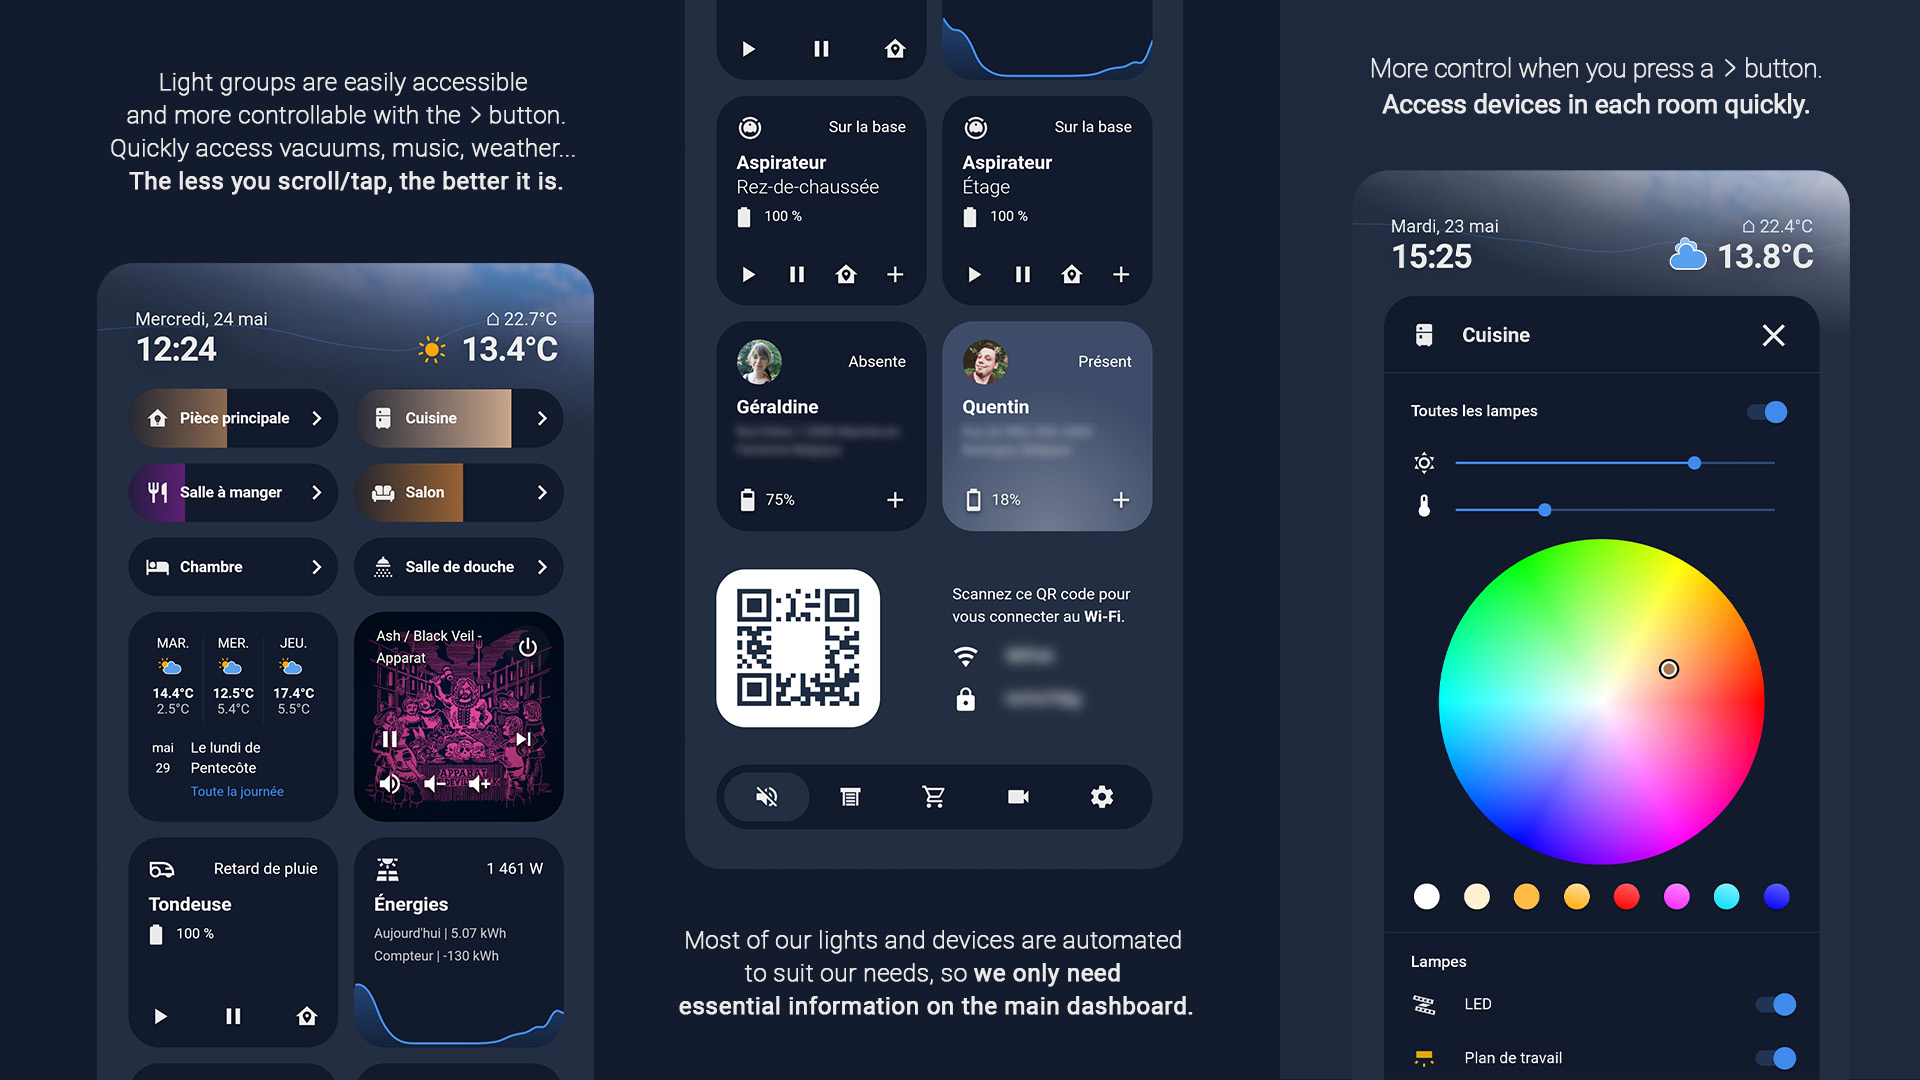
- [slider-button-card](https://github.com/mattieha/slider-button-card)
This is a button card that shows and controls numeric values of entities with a slider and an action button.
This one is used for my room light sliders.
- [light-entity-card](https://github.com/ljmerza/light-entity-card)
This is a light card that shows and controls the brightness, color, and color temperature of light entities.
This one is used on any of my room views.
- [rgb-light-card](https://github.com/bokub/rgb-light-card)
This is the buttons that controls the color of RGB light entities with a color wheel.
This one is used on any of my room views.
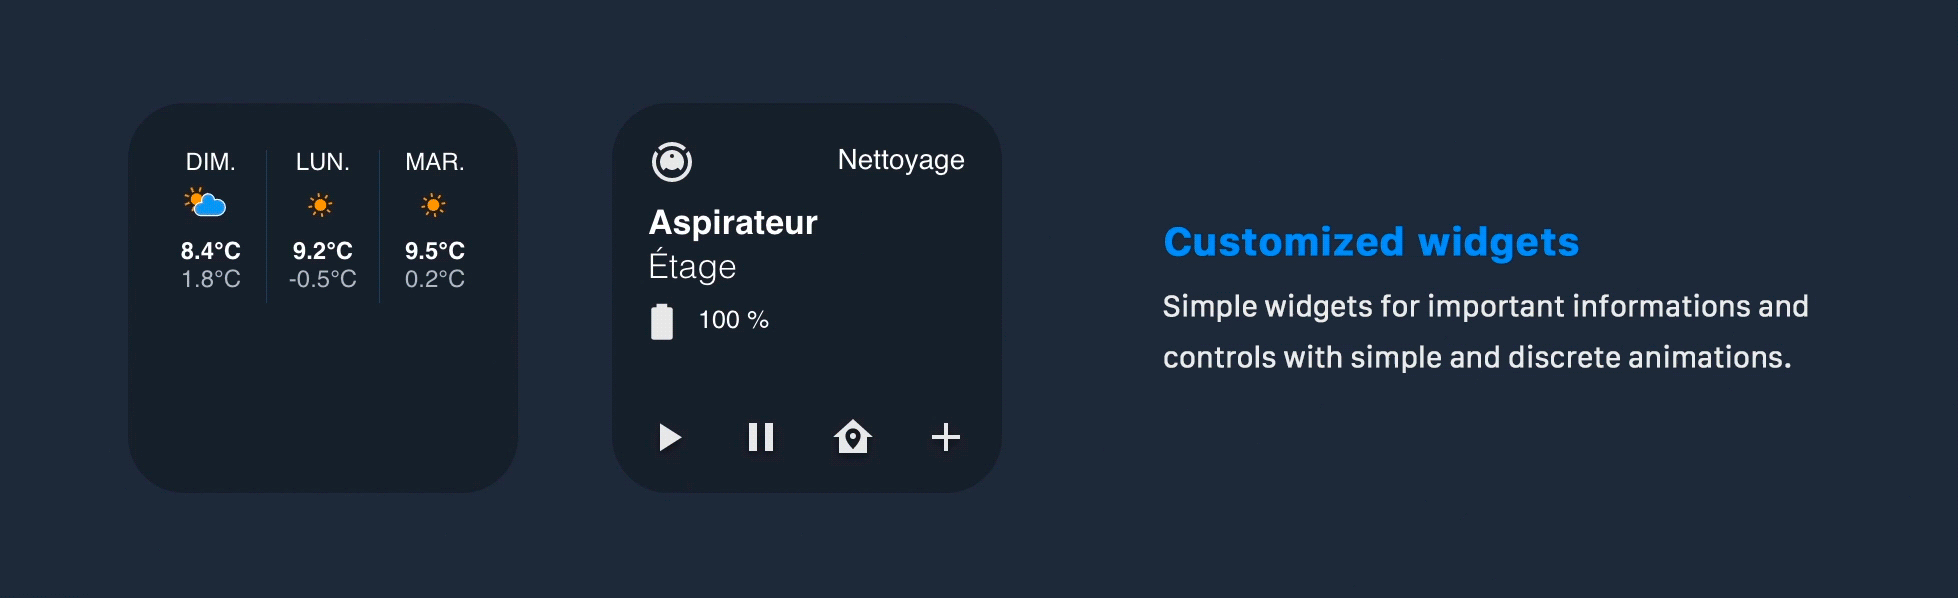
- [mini-graph-card](https://github.com/kalkih/mini-graph-card)
This is a customizable graph card that can display multiple entities on the same graph.
This one is for the header and my energy card.
- [atomic-calendar-revive](https://github.com/marksie1988/atomic-calendar-revive)
This is a calendar card that shows events from various calendar platforms with advanced customization options.
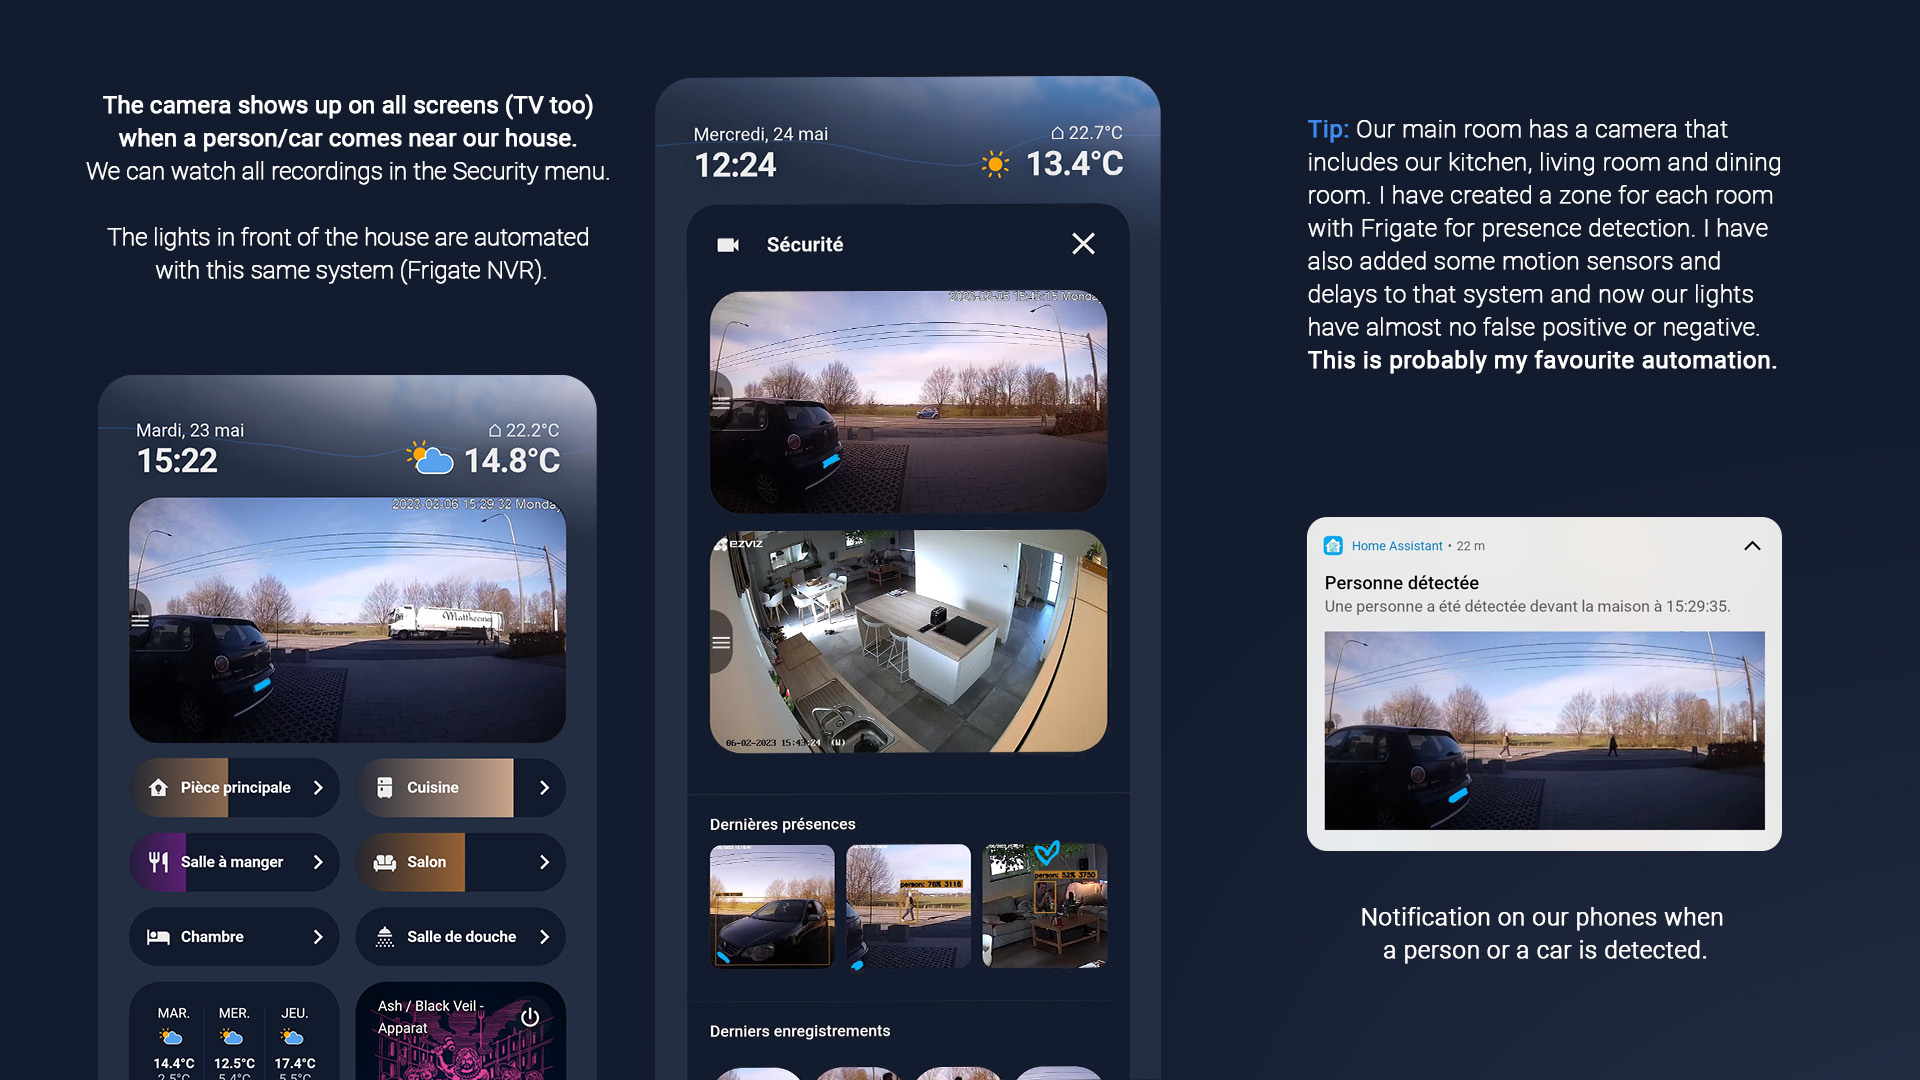
- [frigate-hass-card](https://github.com/dermotduffy/frigate-hass-card)
This is a card that displays live video and records from Frigate.
- [lovelace-multiple-entity-row](https://github.com/benct/lovelace-multiple-entity-row)
This is a custom row that shows multiple attributes or entities on the same row.
- [lovelace-slider-entity-row](https://github.com/thomasloven/lovelace-slider-entity-row)
This is a slider to adjust numeric values of entities.
- [lovelace-xiaomi-vacuum-map-card](https://github.com/PiotrMachowski/Home-Assistant-Lovelace-Xiaomi-Vacuum-Map-card)
This is a map card that shows and controls Xiaomi vacuum cleaners with live map and zones support.
- [mini-media-player](https://github.com/kalkih/mini-media-player)
This is a media player card that supports various media sources and controls.
- [weather-card](https://github.com/bramkragten/weather-card)
This is a card that shows the weather and forecast from various weather providers.
## 1. Installing HACS and the dependencies
1. Download HACS following the instructions on [https://hacs.xyz/docs/setup/download](https://hacs.xyz/docs/setup/download/)
2. Proceed to the initial configuration following the instructions on [https://hacs.xyz/docs/configuration/basic](https://hacs.xyz/docs/configuration/basic)
3. On your sidebar go to `HACS` > `Frontend` and click on the `+` button at the bottom right corner. Search for each dependency you want to install and click on it. Then click on `Download` twice.
4. After installing all the dependencies, go to `Configuration` > `System` to restart Home Assistant.
## 2. Installing the theme
1. Download the files from this repository by clicking on `Code` > `Download ZIP`.
2. Copy the `themes` folder in your Home Assistant configuration directory (you can do that with the Samba share add-on or the File editor add-on for exemple).
3. Copy the `icons` folder from the `www` folder to your `www` folder.
4. Add the following lines to your `configuration.yaml` file:
```yaml
frontend:
themes: !include_dir_merge_named themes
extra_module_url:
- /hacsfiles/lovelace-card-mod/card-mod.js
```
5. Go to `Configuration` > `System` to restart Home Assistant.
6. After restarting, go to your profile and select the Noctis theme from the drop-down menu.
*Please note that my version of Noctis from @aFFekopp is heavily modified and you will need to replace the original one if you have it already installed.
You can use the service `frontend.reload_themes` to refresh it.*
## 3. Configuring a new view with the header and the footer
*Here is the tricky part, because you will need to edit a lot of my code to fit your configuration and entities.*
*Also note that I'm using the UI mode and this is the way that I will cover in the next part of this guide.*
1. First you need to add the following lines to your `configuration.yaml` and translate it to the language you want, then save it and restart Home Assistant.
```yaml
sensor:
- platform: template
sensors:
jour_fr:
value_template: "{{ ['Lundi', 'Mardi', 'Mercredi', 'Jeudi', 'Vendredi', 'Samedi', 'Dimanche'][now().weekday()] }}"
date_fr:
value_template: "{% set months = ['janvier', 'février', 'mars', 'avril', 'mai', 'juin', 'juillet', 'août', 'septembre', 'octobre', 'novembre', 'décembre'] %} {{ now().day | string + ' ' + months[now().month-1]}}"
```
2. Go to your dashboard and click on the 3 dots icon in the top right corner of the page then click on `Edit Dashboard`.
3. Click on the `+` button to add a new view.
4. Fill in the first fields (the icon is optional, I don't use it) and select Noctis in the theme drop-down menu.
5. **Important**: For the view type select `Sidebar` (for every additional views you will need to turn on the `Subview` toggle button), click on Save.
6. Click on the 3 dots icon in the top right corner then click on `Raw configuration editor`.
7. In the folder you downloaded earlier, open the `lovelace.yaml` file with a text editor.
8. Copy all the lines of code from `decluttering_templates:` to the last line right before `title:`.
9. Paste this code in the top of your `Raw configuration editor` in Home Assistant.
10. Edit the following lines to fit your actual configuration:
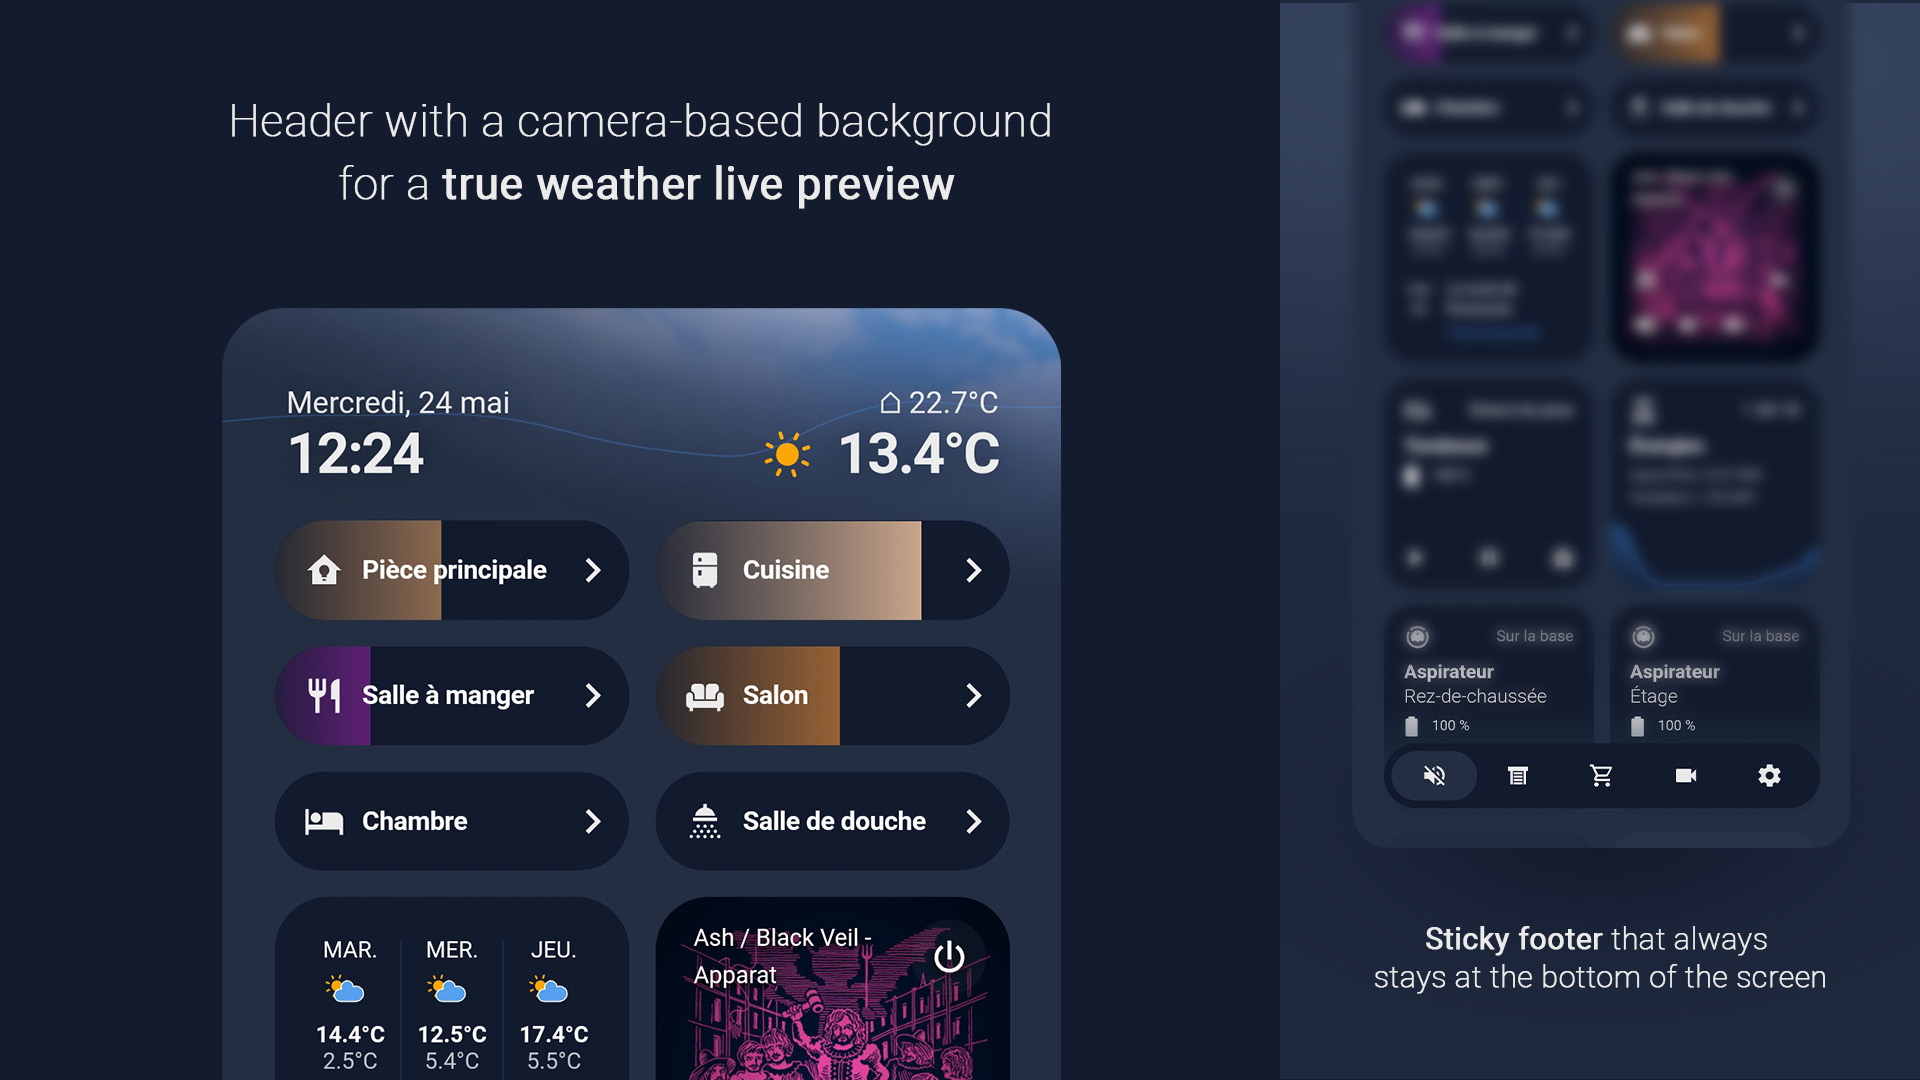
For `header_live_weather_background:`
```yaml
# Your camera for the live weather view.
camera_image: camera.camera_sonnette_mjpeg
# You can change this to 'live' if you want a true live view.
camera_view: auto
# You will probably need to play with these values to have a perfect crop of your sky.
style: |
ha-card {
...
width: 1500px;
top: 0px;
right: 0px;
...
```
For `header_temperature_graph:`
*This one need you to have `mini-graph-card`.*
*This is optional and you can remove it if you don't use it.*
```yaml
# The temperature sensor you want to show for the header graph.
- entity: sensor.temperature_interieure
```
For `header_main:`
```yaml
# You can edit jour_fr (day in french) and date_fr to fit the sensors that you have added before.
name: '{{ states(''sensor.jour_fr'') }}, {{ states(''sensor.date_fr'') }}'
# A temperature sensor that you have inside your house, you can change °C if you need to.
name: ⌂ {{ states('sensor.temperature_interieure') }}°C
# A temperature sensor for outside, you can use {{ states('sensor.your_sensor') }}
state: '{{ state_attr(''weather.openweathermap'',''temperature'') }}°C'
# Your weather integration for the state of the weather icon in the header.
{% set state = states('weather.maison_2') %}
```
For `header_conditional_camera:`
*This one need you to have Frigate and `frigate-hass-card`.*
*This is optional and you can remove it if you don't use it.*
```yaml
# Your motion sensor from Frigate.
- entity: binary_sensor.sonnette_motion
# Your camera entity and a title for it
- camera_entity: camera.sonnette_pir
live_provider: frigate-jsmpeg
title: Entrée
```
For `footer_sticky_menu:`
```yaml
# This is the first icon of the footer, this is where you want to put a toggleable entity for a fast access.
# I'm using a Mute input_boolean in some of my automations that mute my music, tv, vacuums, tts notifications or anything that can emit sound.
- entity: input_boolean.mode_silencieux
layout: icon
name: Silence
# These are shorcuts to other views that you will need to create after.
- layout: icon
icon: mdi:window-shutter
name: Volets
tap_action:
action: navigate
navigation_path: /lovelace/volets
```
11. Now add the following lines to your new view (take a look at the `#` commented lines), this should look like this:
```yaml
...
- theme: noctis
icon: ''
path: default_view
title: HOME
visible:
- user: 12345678901234567890
type: sidebar
badges: []
cards:
# These are the lines that you need to past for the header.
- type: custom:decluttering-card
template: header_live_weather_background
- type: custom:decluttering-card
template: header_temperature_graph
- type: custom:decluttering-card
template: header_main
# This is optional and you can remove it if you don't use it.
- type: custom:decluttering-card
template: header_conditional_camera
# These are the lines that you need to past at the bottom of this view for the footer.
# This card need to always be at the bottom of your view.
# The sticky position don't work with Decluttering card. This is why I have to add a part of the CSS style here.
- type: custom:vertical-stack-in-card
cards:
- type: custom:decluttering-card
template: footer_sticky_menu
style: |
:host {
position: sticky !important;
bottom: 26px;
margin-bottom: 10px !important;
animation: 1.2s position ease-in-out;
}
@keyframes position {
0% { bottom: -80px; }
20% { bottom: -80px; }
70% { bottom: 26px; }
90% { bottom: 24px; }
100% { bottom: 26px; }
}
ha-card {
background: none;
border-radius: 26px !important;
}
:host:before {
content: '';
display: block;
position: absolute;
bottom: -26px;
left: -8px;
padding-right: 16px;
height: 130px;
width: 100%;
background: linear-gradient(180deg, rgba(45, 56, 76, 0) 0%, rgba(35, 46, 66, 0.85) 50%);
pointer-events: none;
animation: 1.2s opacity ease-in-out;
}
@keyframes opacity {
0% { opacity: 0; }
20% { opacity: 0; }
100% { opacity: 1; }
}
```
12. Click on `Save` then on `X`.
14. You should now have a working header and footer.
*If you have errors please take a look at this link: https://hacs.xyz/docs/faq/status_not_loaded/*
*Please note that the footer need more content to stay at the bottom of the page.*
## 4. Configuring the other cards and views
I can't cover every details of my huge configuration but at this point you should now have the skill to keep going by yourself.
Have fun ❤️
*Also please note that this guide may not be perfect at this time, if you see something that is missing or if you notice any error you can take a look at the point below.*
# Troubleshooting
If you have specific questions or if you have noticed any error in this guide, feel free to post a comment [here](https://community.home-assistant.io/t/a-minimalist-and-user-friendly-dashboard-with-an-mobile-first-approach-now-on-github/535580) on the Home Assistant community forum and I will try to answer as soon as possible.
Thank you all for your support and motivation!