https://github.com/cloudlinkd-networks/smarthospital-whatsapp-notification
Smart Hospital WhatsApp Notification
https://github.com/cloudlinkd-networks/smarthospital-whatsapp-notification
cloudlinkd crm notification notifications plugins smart-hospital smarthospital whatsap-notification whatsapp whatsapp-api whatsapp-integration whatsapp-notifications
Last synced: about 1 year ago
JSON representation
Smart Hospital WhatsApp Notification
- Host: GitHub
- URL: https://github.com/cloudlinkd-networks/smarthospital-whatsapp-notification
- Owner: cloudlinkd-networks
- License: mit
- Created: 2025-05-10T21:26:03.000Z (about 1 year ago)
- Default Branch: main
- Last Pushed: 2025-05-10T21:46:39.000Z (about 1 year ago)
- Last Synced: 2025-05-10T22:26:09.758Z (about 1 year ago)
- Topics: cloudlinkd, crm, notification, notifications, plugins, smart-hospital, smarthospital, whatsap-notification, whatsapp, whatsapp-api, whatsapp-integration, whatsapp-notifications
- Homepage: https://wa.cloudlinkd.com
- Size: 217 KB
- Stars: 1
- Watchers: 0
- Forks: 0
- Open Issues: 0
-
Metadata Files:
- Readme: README.md
- License: LICENSE
Awesome Lists containing this project
README

# CloudLinkd Smart Hospital WhatsApp Notification

Our aim is to deliver maximum functionality, enabling you as a site owner to configure the plugin exactly as needed, all while maintaining an user-friendly interface.
However, it's beneficial to be familiar with all the available options.
The plugin is organized into two primary sections:
Installation and Settings.
## Installation
- Download the latest "CloudLinkd-Smart-Hospital.zip" file from the releases tab.
- Unzip the Downloaded file to the root of your smart hospital website.
- Go to application/libraries/customsms.php and enter your API Secret and WhatsApp Account Unique ID from your CloudLinkd WhatsApp account https://wa.cloudlinkd.com.
## Settings
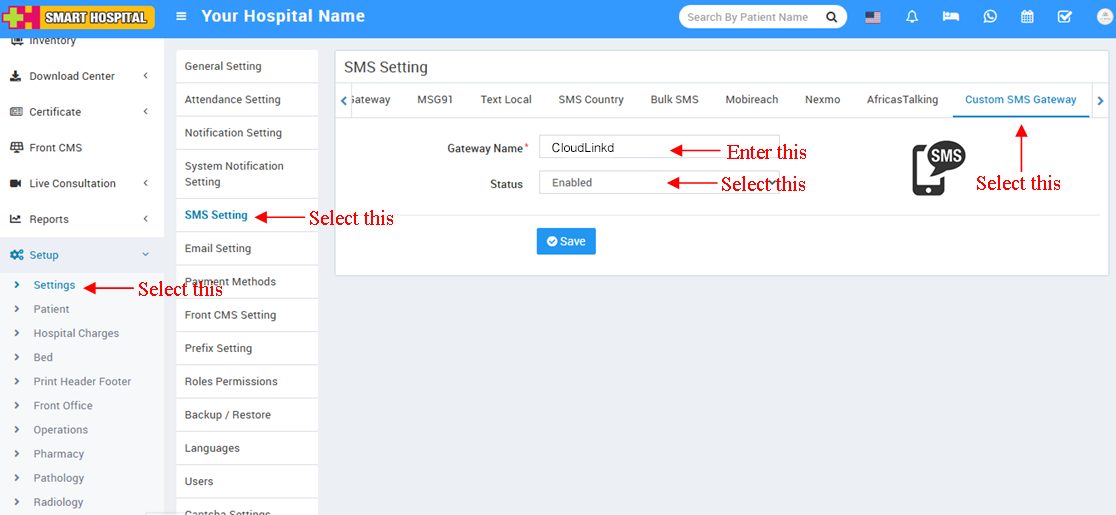
- Log in to your Smart Hospital admin panel.
- Select the System Settings then select SMS Settings.
- Select Custom SMS Gateway.
- Enter the Gateway Name: CloudLinkd.
- Select Enabled then save.
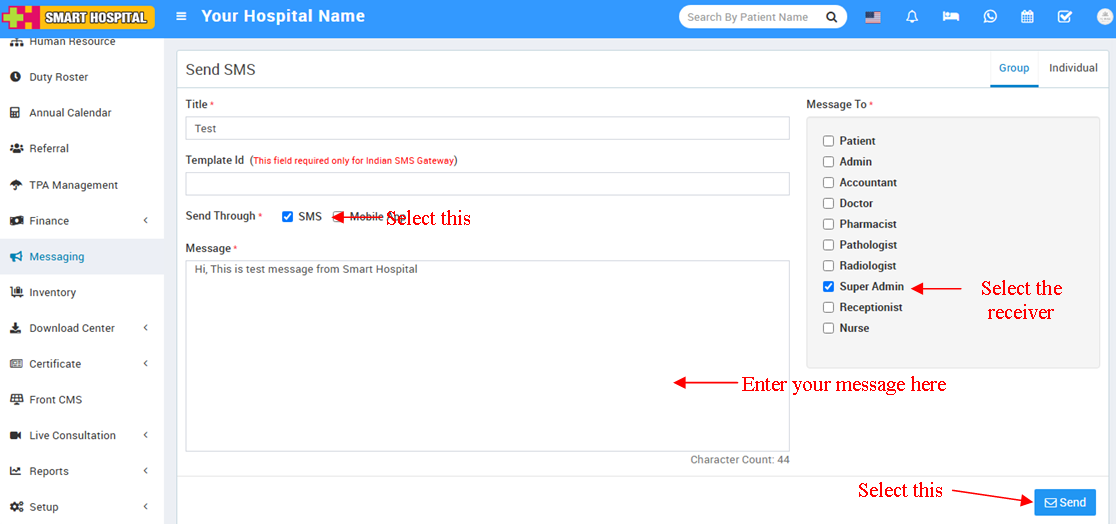
- Select Communicate tab then select Send SMS.
- Select Send Through : SMS.
- Select option from Message to field.
- Enter your message in the Message field.
- Select Send Now and then Submit.
## Settings 1 :
## Settings 2 :
----------
## Credits
All credits to the [Team CloudLinkd](https://www.cloudlinkd.com) and the original creators of these files.