https://github.com/compulim/codeaholics-iot-demo
Codeaholics meetup: Alexa + Azure IoT + Arduino
https://github.com/compulim/codeaholics-iot-demo
alexa arduino-ide aws-lambda azure azure-iot iot
Last synced: 2 months ago
JSON representation
Codeaholics meetup: Alexa + Azure IoT + Arduino
- Host: GitHub
- URL: https://github.com/compulim/codeaholics-iot-demo
- Owner: compulim
- License: mit
- Created: 2017-01-23T04:38:19.000Z (over 9 years ago)
- Default Branch: master
- Last Pushed: 2017-02-02T17:39:59.000Z (over 9 years ago)
- Last Synced: 2025-05-15T18:13:27.461Z (about 1 year ago)
- Topics: alexa, arduino-ide, aws-lambda, azure, azure-iot, iot
- Language: Arduino
- Size: 12.4 MB
- Stars: 1
- Watchers: 1
- Forks: 0
- Open Issues: 0
-
Metadata Files:
- Readme: README.md
- License: LICENSE.md
Awesome Lists containing this project
README
# Codeaholics meetup: Alexa + Azure IoT + Arduino
This is the repository for Codeaholics meetup on 2017 January, presented by [William Wong](https://github.com/compulim).
## Devices
| Device name | Description |
| ---------------- | -------------------------------------------- |
| `bridge` | Bridge for device discovery and health check |
| `powerStrip1` | Power strip controller |
## Preparation
### Install Arduino IDE
1. Install [Arduino IDE](https://www.arduino.cc/en/Main/Software)
2. Install Sparkfun ESP8266 Thing Dev board by following these [steps](https://learn.sparkfun.com/tutorials/esp8266-thing-development-board-hookup-guide/all#setting-up-arduino)
### Prepare Azure IoT Hub
1. Create Azure Iot Hub, write down the connection string for `iothubowner`
2. Log into IoT hub
* `iothub-explorer login HostName=.azure-devices.net;SharedAccessKeyName=iothubowner;SharedAccessKey=`
3. Create `bridge` device
* `iothub-explorer create bridge`
4. Create `powerStrip1` device
* `iothub-explorer create powerStrip1`
## How to use
### Setup Sparkfun ESP8266 Thing Dev
1. Run Arduino IDE
2. Open [`arduino/StandardFirmataWiFi/StandardFirmataWiFi.ino`](arduino/StandardFirmataWiFi/StandardFirmataWiFi.ino)
3. Modify [`arduino/StandardFirmataWiFi/wifiConfig.h`](arduino/StandardFirmataWiFi/wifiConfig.h)
1. Modify [line 122](arduino/StandardFirmataWiFi/wifiConfig.h#L122), update `char ssid[] = "";`
2. Modify [line 129](arduino/StandardFirmataWiFi/wifiConfig.h#L129), update `#define STATIC_IP_ADDRESS 192,168,0,123`
3. Modify [line 154](arduino/StandardFirmataWiFi/wifiConfig.h#L154), update `char wpa_passphrase[] = "";`
4. Upload the sketch to your [Sparkfun ESP8266 Thing Dev](https://www.sparkfun.com/products/13711)
### Setup AWS Lambda
AWS Lambda is required for using [Alexa Smart Home Skill API](https://developer.amazon.com/public/solutions/alexa/alexa-skills-kit/docs/smart-home-skill-api-reference#health-check-messages).
1. Follow Alexa instructions to setup Alexa app and AWS Lambda
2. Compress the folder [lambda](lambda) and upload it to AWS Lambda
### Setup local Node.js bridge
1. Modify [`bridge/lib/config.js`](bridge/lib/config.js) to provide connection strings
2. Modify [`bridge/lib/powerStrip1.js`](bridge/lib/powerStrip1.js) if you are using different pin for control and status, default is pin 15 and 4 respectively
3. Under [`bridge/`](bridge/), run `npm start`
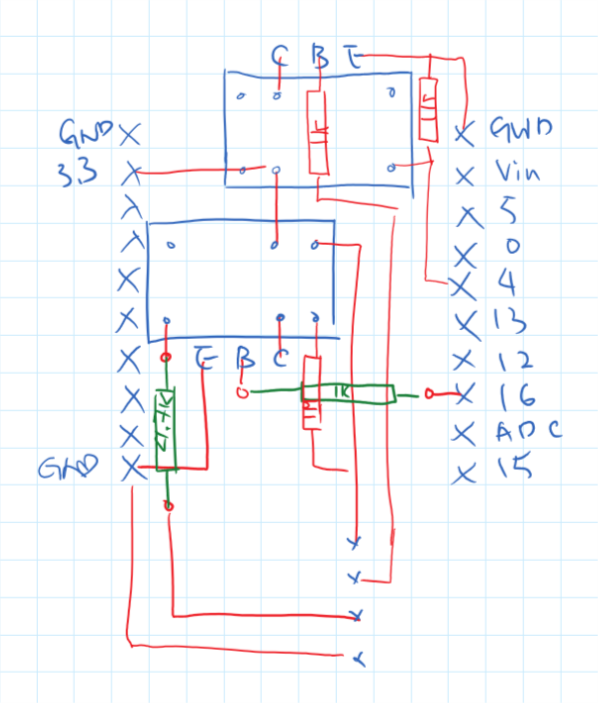
### Build the board
## Development points
### Sparkfun ESP8266 Thing Dev
* The board is 3.3V logic
* [Pins](https://learn.sparkfun.com/tutorials/esp8266-thing-development-board-hookup-guide/using-the-esp8266-in-arduino) are very limited, some numbered pins has special feature
* Prefer leaving [boot up pins] alone, pin 0, 2, 15(http://www.forward.com.au/pfod/ESP8266/GPIOpins/index.html), otherwise, the ESP8266 may not boot up
* Pin 5 will flash on device boot
### AWS Lambda
* Make sure all dependencies are in [`lambda/package.json`](lambda/package.json)
### Local Node.js bridge
* Set environment variable `DEBUG` to `device*` for debugging
### Azure IoT Hub explorer
Currently `iothub-explorer` is buggy and does not work with device methods, we wrote some [CLI scripts](cli/) to invoke device methods for testing.