Ecosyste.ms: Awesome
An open API service indexing awesome lists of open source software.
https://github.com/concurrencylabs/aws-pricing-tools
Lambda functions and scripts designed to simplify AWS pricing calculations. Includes a Lambda function that calculates near real-time price.
https://github.com/concurrencylabs/aws-pricing-tools
Last synced: about 2 months ago
JSON representation
Lambda functions and scripts designed to simplify AWS pricing calculations. Includes a Lambda function that calculates near real-time price.
- Host: GitHub
- URL: https://github.com/concurrencylabs/aws-pricing-tools
- Owner: concurrencylabs
- License: gpl-3.0
- Created: 2016-08-26T01:11:53.000Z (about 8 years ago)
- Default Branch: master
- Last Pushed: 2022-06-21T21:11:14.000Z (over 2 years ago)
- Last Synced: 2024-06-28T07:35:39.068Z (3 months ago)
- Language: Python
- Size: 8.63 MB
- Stars: 306
- Watchers: 21
- Forks: 72
- Open Issues: 5
-
Metadata Files:
- Readme: README.md
- License: LICENSE.md
Awesome Lists containing this project
README
## Concurrency Labs - AWS Price Calculator tool
This repository uses the AWS Price List API to implement price calculation utilities.
Supported services:
* EC2
* ELB
* EBS
* RDS
* Lambda
* Dynamo DB
* Kinesis
Visit the following URLs for more details:
https://www.concurrencylabs.com/blog/aws-pricing-lambda-realtime-calculation-function/
https://www.concurrencylabs.com/blog/aws-lambda-cost-optimization-tools/
https://www.concurrencylabs.com/blog/calculate-near-realtime-pricing-serverless-applications/
The code is structured in the following way:
**awspricecalculator**. The modules in this package search data within the AWS Price List API index files.
They take price dimension parameters as inputs and return results in JSON format. This package
is called by Lambda functions or other Python scripts.
**functions**. This is where our Lambda functions live. Functions are packaged using the Serverless framework.
**scripts**. Here are some Python scripts to help with management and price optimizations. See README.md in the scripts
folder for more details.
## Available Lambda functions:
### calculate-near-realtime
This function is called by a schedule configured using CloudWatch Events.
The function receives a JSON object configured in the schedule. The JSON object supports the following format:
Tag-based: ```{"tag":{"key":"mykey","value":"myvalue"}}```.
The function finds resources with the corresponding tag, gets current usage using CloudWatch metrics,
projects usage into a longer time period (a month), calls pricecalculator to calculate price
and puts results in CloudWatch metrics under the namespace ```ConcurrencyLabs/Pricing/NearRealTimeForecast```.
Supported services are EC2, EBS, ELB, RDS and Lambda. Not all price dimensions are supported for all services, though.
You can configure as many CloudWatch Events as you want, each one with a different tag.
**Rules:**
* The function only considers for price calculation those resources that are tagged. For example, if there is an untagged ELB
with tagged EC2 instances, the function will only consider the EC2 instances for the calculation.
If there is a tagged ELB with untagged EC2 instances, the function will only calculate price
for the ELB.
* The behavior described above is intended for simplicity, otherwise the function would have to
cover a number of combinations that might or might not be suitable to all users of the function.
* To keep it simple, if you want a resource to be included in the calculation, then tag it. Otherwise
leave it untagged.
**Limitations**
The function doesn't support cost estimations for the following:
* EC2 data transfer for instances not registered to an ELB
* EC2 Reserved Instances
* EBS Snapshots
* RDS data trasfer
* Lambda data transfer
* Kinesis PUT Payload Units are partially calculated based on CloudWatch metrics (there's no 100% accuracy for this price dimension)
* Dynamo DB storage
* Dynamo DB data transfer
## Install - using CloudFormation (recommended)
I created a CloudFormation template that deploys the Lambda function, as well as the CloudWatch Events
schedule. All you have to do is specify the tag key and value you want to calculate pricing for.
For example: TagKey:stack, TagValue:mywebapp
Click here to get started:

### Metrics
The function publishes a metric named `EstimatedCharges` to CloudWatch, under namespace `ConcurrencyLabs/Pricing/NearRealTimeForecast` and it uses
the following dimensions:
* Currency: USD
* ForecastPeriod: monthly
* ServiceName: ec2, rds, lambda, kinesis, dynamodb
* Tag: mykey=myvalue
### Updating to the latest version using CloudFormation
This function will be updated regularly in order to fix bugs, update AWS Price List data and also to add more functionality.
This means you will likely have to update the function at some point. I recommend installing
the function using the CloudFormation template, since it will simplify the update process.
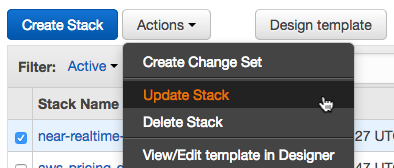
To update the function, just go to the CloudFormation console, select the stack you've created
and click on Actions -> Update Stack:
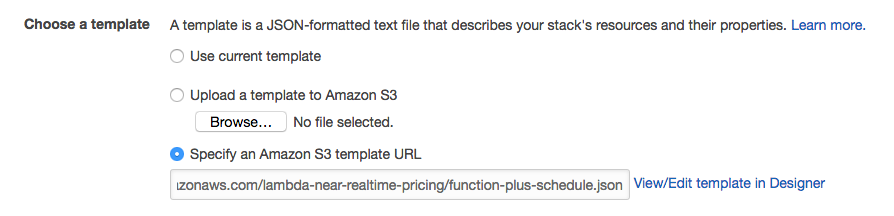
Then select "Specify an Amazon S3 template URL" and enter the following value:
```
http://concurrencylabs-cfn-templates.s3.amazonaws.com/lambda-near-realtime-pricing/function-plus-schedule.json
```
And that's it. CloudFormation will update the function with the latest code.
## Install Locally (if you want to modify it) - Manual steps
If you only want to install the Lambda function, you don't need to follow the steps below, just follow
the instructions in the "Install - Using CloudFormation" section above.
If you want to setup a dev environment, run a local copy, make some modifications and then install in your AWS account, then keep reading...
### Clone the repo
```
git clone https://github.com/concurrencylabs/aws-pricing-tools aws-pricing-tools
```
### (Optional, but recommended) Create an isolated Python environment using virtualenv
It's always a good practice to create an isolated environment so we have greater control over
the dependencies in our project, including the Python runtime.
If you don't have virtualenv installed, run:
```
pip install virtualenv
```
For more details on virtualenv, click here.
Now, create a Python 2.7 virtual environment in the location where you cloned the repo into. If you want to name your project
aws-pricing-tools, then run (one level up from the dir, use the same local name you used when you cloned
the repo):
```
virtualenv aws-pricing-tools -p python2.7
```
After your environment is created, it's time to activate it. Go to the recently created
folder of your project (i.e. aws-pricing-tools) and from there run:
```
source bin/activate
```
### Install Requirements
From your project root folder, run:
```
./install.sh
```
This will install the following dependencies to the ```vendored``` directory:
* **tinydb** - The code in this repo queries the Price List API csv records using the tinydb library.
* **numpy** - Used for statistics in the lambda optimization script
... and the following dependencies in your default site-packages location:
* **python-local-lambda** - lets me test my Lambda functions locally using test events in my workstation.
* **boto3** - AWS Python SDK to call AWS APIs.
### Install the Serverless Framework

Since the pricing tool runs on AWS Lambda, I decided to use the Serverless Framework.
This framework enormously simplifies the development, configuration and deployment of Function as a Service (a.k.a. FaaS, or "serverless")
code into AWS Lambda.
You should follow the instructions described here,
which can be summarized in the following steps:
1. Make sure you have Node.js installed in your workstation.
```
node --version
```
2. Install the Serverless Framework
```
npm install -g serverless
```
3. Confirm Serverless has been installed
```
serverless --version
```
The steps in this post were tested using version ```1.6.1```
4. Serverless needs access to your AWS account, so it can create and update AWS Lambda
functions, among other operations. Therefore, you have to make sure Serverless can access
a set of IAM User credentials. Follow these instructions.
In the long term, you should make sure these credentials are limited to only the API operations
Serverless requires - avoid Administrator access, which is a bad security and operational practice.
5. Checkout the code from this repo into your virtualenv folder.
### Set environment variables
```
export AWS_DEFAULT_PROFILE=
export AWS_DEFAULT_REGION=
```
### How to test the function locally
**Download the latest AWS Price List API Index file**
The code needs a local copy of the the AWS Price List API index file.
The GitHub repo doesn't come with the index file, therefore you have to
download it the first time you run your code and every time AWS publishes a new
Price List API index.
Also, this index file is constantly updated by AWS. I recommend subscribing to the AWS Price List API
change notifications.
In order to download the latest index file, go to the ```scripts```` folder and run:
```
python get-latest-index.py --service=all
```
The script takes a few seconds to execute since some index files are a little heavy (like the EC2 one).
**Run a test**
Once you have the virtualenv activated, all dependencies installed, environment
variables set and the latest AWS Price List index file, it's time to run a test.
Update ```test/events/constant-tag.json``` with a tag key/value pair that exists in your AWS account.
Then run, from the **root** location in the local repo and replace and with actual values:
```
python-lambda-local functions/calculate-near-realtime.py test/events/constant-tag.json -l lib/ -l . -f handler -t 30 -a arn:aws:lambda:::function:calculate-near-realtime
```
### Deploy the Serverless Project
From your project root folder, run:
```
serverless deploy
```