https://github.com/corzed/agentify
Orchestration platform designed to manage and coordinate multiple AI agents.
https://github.com/corzed/agentify
agent agent-based-framework agents agenttools ai gpt llm openai openai-api openai-chatgpt orchestration orchestration-framework orchestrator
Last synced: 3 months ago
JSON representation
Orchestration platform designed to manage and coordinate multiple AI agents.
- Host: GitHub
- URL: https://github.com/corzed/agentify
- Owner: Corzed
- License: mit
- Created: 2024-08-25T15:22:17.000Z (almost 2 years ago)
- Default Branch: master
- Last Pushed: 2024-08-27T17:03:00.000Z (almost 2 years ago)
- Last Synced: 2025-02-09T10:41:52.750Z (over 1 year ago)
- Topics: agent, agent-based-framework, agents, agenttools, ai, gpt, llm, openai, openai-api, openai-chatgpt, orchestration, orchestration-framework, orchestrator
- Language: Python
- Homepage:
- Size: 64.5 KB
- Stars: 1
- Watchers: 1
- Forks: 0
- Open Issues: 0
-
Metadata Files:
- Readme: README.MD
- License: LICENSE
Awesome Lists containing this project
README
# Agentify 🤖
Agentify is an intelligent orchestration platform designed to manage and coordinate multiple AI agents. It leverages OpenAI's GPT model to facilitate seamless interaction between agents and their tools, offering a dynamic environment for complex task execution.
## Table of Contents
- [Features](#features-)
- [Installation](#installation-)
- [Backend Structure](#backend-structure-)
- [Agent & Tool Format](#agent--tool-format-%EF%B8%8F)
- [Configuration](#configuration-%EF%B8%8F)
- [Usage](#usage-)
- [Contributing](#contributing-)
- [License](#license-)
## Features ✨
- **Agent Creation**: Dynamically create AI agents with specific contexts and toolsets.
- **Orchestration**: Execute complex workflows by delegating tasks to various agents.
- **Tool Integration**: Easily extend agent capabilities with custom tools.
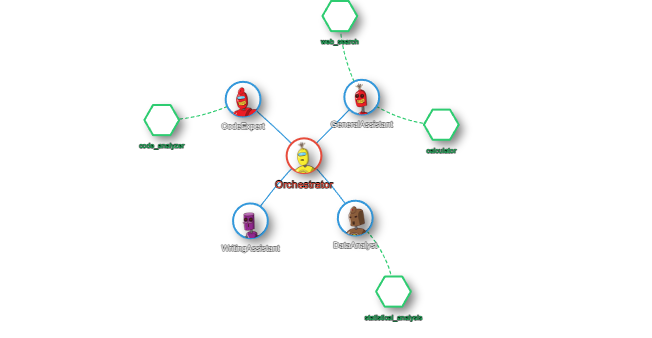
- **Visualization**: Visualize agent networks and interactions in real-time.
## Installation 🚀
To get started with Agentify, follow these steps:
```bash
git clone https://github.com/corzed/agentify.git
cd agentify
pip install -r requirements.txt
cp .env.example .env
```
Ensure you set up your `.env` file with the appropriate environment variables, including your OpenAI API key.
## Backend Structure 📂
Organized as follows:
```
backend/
│
├── agents/ # Folder for storing agent configuration files
│ ├── agent1.json
│ └── agent2.json
│
├── tools/ # Folder for storing tool scripts
│ ├── tool1.py
│ └── tool2.py
│
├── app.py # Main Flask application
├── requirements.txt # Python dependencies
└── .env.example # Example environment variables
```
## Agent & Tool Format 🛠️
### Agent Configuration Files
Each agent is represented by a JSON file stored in the `agents/` directory. The file defines the agent's name, context, and associated tools.
**Example: `agents/agent1.json`**
```json
{
"name": "Agent1",
"context": "This is the context for Agent1.",
"tools": ["tool1", "tool2"]
}
```
- **name**: The agent's name.
- **context**: The initial context or background information for the agent.
- **tools**: A list of tools available to the agent.
### Tool Scripts
Tools are Python scripts located in the `tools/` directory. Each tool should define a `tool` dictionary with at least a `description` and a `function` key.
**Example: `tools/tool1.py`**
```python
tool = {
"description": "This tool processes data and returns results.",
"function": lambda data: f"Processed {data}"
}
```
- **description**: A brief description of what the tool does.
- **function**: A callable that performs the tool's operation.
## Configuration ⚙️
The main configurations are handled through the `.env` file:
- **OPENAI_API_KEY**: Your OpenAI API key.
- **GPT_MODEL**: The GPT model to be used (e.g., `gpt-4o-mini`).
## Usage 💻
### Running the Application
To start the Agentify server, run:
```bash
python app.py
```
This will start the Flask server with SocketIO enabled for real-time communication.
### Managing Agents and Tools
Agents can be added in real time on the website, or added/modified by updating the respective JSON files in the `agents/` directory and Python scripts in the `tools/` directory. The server will not automatically recognize these changes and will require a restart though.
### Visualizing the Network
Once the agents are created and active, you can visualize the network of agents, orchestrators, and tools in real-time.
## Contributing 🤝
Contributions are welcome! Please follow these steps:
1. Fork the repository.
2. Create a new branch (`git checkout -b feature-branch`).
3. Make your changes.
4. Commit your changes (`git commit -m 'Add some feature'`).
5. Push to the branch (`git push origin feature-branch`).
6. Open a pull request.
## License 📄
This project is licensed under the MIT License. See the [LICENSE](LICENSE) file for more details.