https://github.com/cubxxw/go-mod
🏄♂️ 用来学习Go语言的mod包管理工具,包括go1.18新特性workspaces使用。 并且提供包和笔记分享学习
https://github.com/cubxxw/go-mod
gomodule mod workspaces
Last synced: 12 days ago
JSON representation
🏄♂️ 用来学习Go语言的mod包管理工具,包括go1.18新特性workspaces使用。 并且提供包和笔记分享学习
- Host: GitHub
- URL: https://github.com/cubxxw/go-mod
- Owner: cubxxw
- Created: 2022-05-25T14:27:22.000Z (about 4 years ago)
- Default Branch: master
- Last Pushed: 2022-11-20T08:59:29.000Z (over 3 years ago)
- Last Synced: 2025-04-08T10:41:33.261Z (over 1 year ago)
- Topics: gomodule, mod, workspaces
- Language: Shell
- Homepage:
- Size: 20.5 KB
- Stars: 3
- Watchers: 2
- Forks: 1
- Open Issues: 1
-
Metadata Files:
- Readme: README.md
Awesome Lists containing this project
README
# Go-mod包 & 多模块工作区(Workspaces)
[toc]
## ⚡ go mod
### 包的导入方式
1. 绝对路径导入(在GOPATH目录中导入包)
2. 相对路径导入(不建议!!!)
3. 点导入
+ 相当于直接复制源文件过来,此时不需要用.
```
Println("hello word")
```
4. 别名导入
5. 下划线导入
### Go-mod方式管理包
#### 优势:
- **代码可以放在任意位置,不用设置GOPATH**
- **自动下载依赖管理**
- **版本控制**
- **不允许使用相对导入**
- **replace机制(goproxy代理机制)**
### 项目开始~
> 为了理清关系,这一节从头开始做
**目录结构**
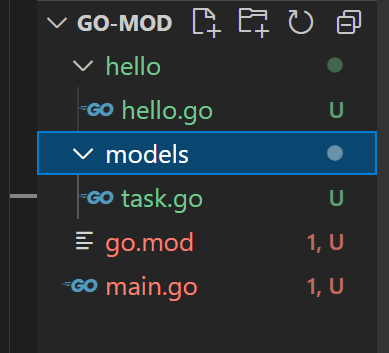
**我们的项目就叫go-mod**
```
mkdir go-mod
cd go-mod
mkdir hello
```
### 为代码启用依赖项跟踪
**需要设置名字,一般和报名是一样的**
```
PS C:\Users\smile\Desktop\区块链\code\go-mod> go mod init go-mod
go: creating new go.mod: module go-mod
go: to add module requirements and sums:
go mod tidy
```
**查看模块**
```
module go-mod
go 1.18
```
**编辑hello.go**
```
package main
import "fmt"
func main() {
fmt.Println("hello word")
}
```
**编译:**
```
PS C:\Users\smile\Desktop\区块链\code\go-mod\hello> go run .
hello word
```
**目录结构**
```bash
PS C:\Users\smile\Desktop\区块链\code\go-mod> tree
卷 系统 的文件夹 PATH 列表
卷序列号为 DE95-1D97
C:.
├─hello
└─main
PS C:\Users\smile\Desktop\区块链\code\go-mod> cd .\main\
PS C:\Users\smile\Desktop\区块链\code\go-mod\main> New-Item main.go
目录: C:\Users\smile\Desktop\区块链\code\go-mod\main
Mode LastWriteTime Length Name
---- ------------- ------ ----
-a---- 2022/5/25 21:32 0 main.go
```
**创建一个包文件夹,创建一个文件task.go**
```
PS C:\Users\smile\Desktop\区块链\code\go-mod> mkdir models
目录: C:\Users\smile\Desktop\区块链\code\go-mod
Mode LastWriteTime Length Name
---- ------------- ------ ----
d----- 2022/5/25 22:00 models
PS C:\Users\smile\Desktop\区块链\code\go-mod> New-Item task.go
目录: C:\Users\smile\Desktop\区块链\code\go-mod
Mode LastWriteTime Length Name
---- ------------- ------ ----
-a---- 2022/5/25 22:02 0 task.go
```
**主函数**
```
package main
import (
. "fmt"
"go-mod/hello"
"go-mod/models"
)
func main() {
Println("main主函数")
hello.Hello()
Println(models.Name)
//hello.Hello()
}
```
**编译:**
```
PS C:\Users\smile\Desktop\区块链\code\go-mod> go run .\main.go
main主函数
hello word
test
```
### 所出现问题
文件mod包嵌入使用的问题,导致mod机制没办法正常在子目录使用~
### github导入包
```go
package models
import "fmt"
import "github.com/astaxie/beego"
var Name = "test"
func init() {
fmt.Println("最先开始调用多个")
}
func main() {
beego.Run()
}
```
**回到主目录**
```
PS C:\Users\smile\Desktop\区块链\code\go-mod> go get github.com/astaxie/beego
```
**下载依赖,查看go-mod**
```
module go-mod
go 1.18
require (
github.com/astaxie/beego v1.12.3 // indirect
github.com/beorn7/perks v1.0.1 // indirect
github.com/cespare/xxhash/v2 v2.1.1 // indirect
github.com/golang/protobuf v1.4.2 // indirect
github.com/hashicorp/golang-lru v0.5.4 // indirect
github.com/matttproud/golang_protobuf_extensions v1.0.1 // indirect
github.com/prometheus/client_golang v1.7.0 // indirect
github.com/prometheus/client_model v0.2.0 // indirect
github.com/prometheus/common v0.10.0 // indirect
github.com/prometheus/procfs v0.1.3 // indirect
github.com/shiena/ansicolor v0.0.0-20151119151921-a422bbe96644 // indirect
golang.org/x/crypto v0.0.0-20191011191535-87dc89f01550 // indirect
golang.org/x/net v0.0.0-20190620200207-3b0461eec859 // indirect
golang.org/x/sys v0.0.0-20200615200032-f1bc736245b1 // indirect
golang.org/x/text v0.3.0 // indirect
google.golang.org/protobuf v1.23.0 // indirect
gopkg.in/yaml.v2 v2.2.8 // indirect
)
```
**还有一个go sum文件**
### 远程推送到github上
1. 在github上新建一个项目Go-mod
2. `go mod init github.com/3293172751/go-mod`
3. 添加readme.m
## ⚡ go workspace
## Why you need it?
::: tip
在参与sealos工程的时候,它们用到了Go语言新特性:Workspaces
+ [https://github.com/labring/sealos/blob/main/DEVELOPGUIDE.md](https://github.com/labring/sealos/blob/main/DEVELOPGUIDE.md)
由于sealos使用的是go1.18的workspace特性,添加新模块后,需要`go work usr -r .`在root目录下运行更新同步的workspace。
我们这篇来学习和使用这个新特性
:::
Go 多模块工作区能够使开发者能够更容易地同时处理多个模块的工作,如:
> 方便进行依赖的代码调试(打断点、修改代码)、排查依赖代码 bug
> 方便同时进行多个仓库/模块并行开发调试
## 简单上手
当前目录结构
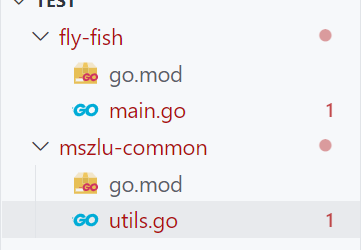
### 文件内容
**mod包内容:**
```go
module nsddd.top/mszlu-common
go 1.19
-----------
module nsddd.top/fly-fish
go 1.19
```
**对应文件:**
`mszlu-common/utils.go`
```go
package utils
import (
"fmt"
)
func Print() {
fmt.Println("这是utils.go")
//调用fly-fish的main.go
}
```
`fly-fish/main.go`
```go
package main
import "fmt"
func main() {
fmt.Println("这是fly-fish的main.go")
}
```
### 如何调用
我们希望调用另一个 mod 模块的函数,我们使用work
```bash
go work init ./fly-fish
```
**使用`fly-fish`**
我们再加入一个工作区:
```bash
go work use ./mszlu-common
```
**此时工作目录文件:`go.work`**
```go
go 1.19
use (
./fly-fish
./mszlu-common
)
```
### 调用 utils
`fly-fish/main.go`
```go
package main
import (
"fmt"
utils "nsddd.top/mszlu-common"
)
func main() {
fmt.Println("这是fly-fish的main.go")
utils.Print()
}
```
🚀 编译结果如下:
```bash
[Running] go run "c:\Users\smile\Desktop\test\fly-fish\main.go"
这是fly-fish的main.go
这是utils.go
```
## `go work` 支持命令
+ 通常情况下,建议不要提交 **go.work** 文件到 git 上,因为它主要用于本地代码开发。
+ 推荐在: `$GOPATH` 路径下执行,生成 **go.work** 文件
+ `go work init` 初始化工作区文件,用于生成 **go.work** 工作区文件
> 初始化并写入一个新的 **go.work** 到当前路径下,可以指定需要添加的代码模块
> 示例: `go work init ./hello` 将本地仓库 **hello** 添加到工作区
> **hello** 仓库必须是 go mod 依赖管理的仓库(**./hello/go.mod** 文件必须存在)
+ `go work use` 添加新的模块到工作区
> 命令示例:
> `go work use ./example` 添加一个模块到工作区
> `go work use ./example ./example1` 添加多个模块到工作区
> `go work use -r ./example` 递归 **./example** 目录到当前工作区
> 删除命令使用 `go work edit -dropuse=./example` 功能
+ `go work edit` 用于编辑 **go.work** 文件
> 可以使用 `edit` 命令编辑和手动编辑 `go.work` 文件效果是相同的 示例:
> `go work edit -fmt go.work` 重新格式化 **go.work** 文件
> `go work edit -replace=github.com/link1st/example=./example go.work` 替换代码模块
> `go work edit -dropreplace=github.com/link1st/example` 删除替换代码模块
> `go work edit -use=./example go.work` 添加新的模块到工作区
> `go work edit -dropuse=./example go.work` 从工作区中删除模块
+ `go work sync` 将工作区的构建列表同步到工作区的模块
+ `go env GOWORK`
> 查看环境变量,查看当前工作区文件路径 可以排查工作区文件是否设置正确,**go.work** 路径找不到可以使用 GOWORK 指定
```
> go env GOWORK
$GOPATH/src/link1st/link1st/workspaces/go.work
```
### **go.work** 文件结构
+ 文件结构和 **go.mod** 文件结构类似,支持 Go 版本号、指定工作区和需要替换的仓库
+ 文件结构示例:
```
go 1.18
use (
./hello
./example
)
replace (
github.com/link1st/example => ./example1
)
```
#### `use` 指定使用的模块目录
+ 可以使用 `go work use hello` 添加模块,也可以手动修改 **go.work** 工作区添加新的模块
+ 在工作区中添加了模块路径,编译的时候会自动使用 **use** 中的本地代码进行代码编译,和 `replaces` 功能类似。
```
# 单模块结构
use ./hello
# 多模块结构
use (
./hello
./example
)
```
#### `replaces` 替换依赖仓库地址
+ `replaces` 命令与 **go.mod** 指令相同,用于替换项目中依赖的仓库地址
+ 需要注意的是 `replaces` 和 `use` 不能同时指定相同的本地路径
> 同时指定报错信息:
> go: workspace module github.com/link1st/example is replaced at all versions in the go.work file. To fix, remove the replacement from the go.work file or specify the version at which to replace the module.
+ 错误示例
> 同时在 `use` 和 `replace` 指定相同的本地路径
```
go 1.18
use (
./hello
./example
)
replace (
github.com/link1st/example => ./example
)
```
#### **go.work** 文件优先级高于 **go.mod** 中定义
+ 在同时使用 **go.work** 和 **go.mod** `replace` 功能的的时候分别指定不同的代码仓库路径,**go.work** 优先级高于 **go.mod** 中定义
> **go.mod** 中定义替换为本地仓库 **example**
```
replace (
github.com/link1st/example => ./example1
)
```
> **go.work** 中定义替换为本地仓库 **example1**
```
replace (
github.com/link1st/example => ./example1
)
```
+ 在代码构建时候使用的是 **go.work** 指定的 **example1** 仓库的代码,**go.work** 优先级别更高
### 如何使用
+ 在 Go 1.18 `go run` 和 `go build` 都会默认使用工作区功能
+ `GOWORK` 也可以指定配置 **go.work** 文件位置
```
export GOWORK="~/go/src/test/go.18/workspace/go.work"
```
### 如何禁用工作区
+ Go 全局变量 `GOWORK` 设置 `off` 则可以禁用工作区功能
> ```
> export GOWORK=off
> ```
## 开发流程演示
+ 演示如何使用多模块工作区功能。在现在微服务盛行的年代,一个人会维护多个代码仓库,很多的时候是多个仓库进行同时开发
+ 假设我们现在进行 **hello** 仓库开发,实现的功能是,实现将输入的字符串反转并输出,字符串反转功能依赖于 **github.com/link1st/example** (下文统称 **example**)公共仓库实现
+ 新建 **hello** 项目
```
mkdir hello
cd hello
# 代码仓库启动 go mod 依赖管理,生成 go.mod 文件
go mod init github.com/link1st/link1st/workspaces/hello
# 下载依赖包
go get github.com/link1st/example
# 编写 main 文件
vim main.go
```
+ **main.go** 代码
```
// Package main main 文件,go 多模块工作区演示代码
// 实现将输入的字符串反转输出并输出
package main
import (
"flag"
"fmt"
"github.com/link1st/example/stringutil"
)
var (
str = ""
)
func init() {
flag.StringVar(&str, "str", str, "输入字符")
flag.Parse()
}
func main() {
if str == "" {
fmt.Println("示例: go run main.go -str hello")
fmt.Println("str 参数必填")
flag.Usage()
return
}
// 调用公共仓库,进行字符串反转
str = stringutil.Reversal(str)
// 输出反转后的字符串
fmt.Println(str)
return
}
```
+ 运行代码 `go run main.go -str "hello world"` 或 `go run github.com/link1st/link1st/workspaces/hello -str "hello world"` 可以看到输出了 **hello world** 反转以后的字符串
```
> go run main.go -str "hello world"
dlrow olleh
```
+ 到这里,最初的功能已经完成,但是后续需求变动,不仅需要输出反转以后的字符串,还需要将字符串大写
+ 我们则需要去 **example** 仓库中添加开发 **将字符串大写的功能**
```
# 回到工作根目录,将 common 代码下载到本地进行添加新的功能
# 下载依赖的 example 包
git clone git@github.com:link1st/example.git
# 在 example 包中添加 字符串大学的功能
```
+ **vim example/stringutil/to_upper.go** 代码如下
```
// Package stringutil stringutil
package stringutil
import (
"unicode"
)
// ToUpper 将字符串进行大写
func ToUpper(s string) string {
r := []rune(s)
for i := range r {
r[i] = unicode.ToUpper(r[i])
}
return string(r)
}
```
+ 由于代码还在本地调试,未提交 git 仓库中,这个时候就需要用到 Go 多模块工作区的功能了。
+ 进入项目根目录,初始化我们现在正在开发的模块
```
# 初始化 go.work 文件
go work init ./hello ./example
# 查看 go.work 文件内容
cat go.work
```
+ 文件结构如下
```
go 1.18
use (
./example
./hello
)
```
+ 回到 **hello** 项目,`vim main.go` 将字符串大写的功能添加上。
```
func main() {
...
// 调用公共仓库,进行字符串反转
str = stringutil.Reversal(str)
// 增加字符大写的功能
str = stringutil.ToUpper(str)
// 输出反转后的字符串
fmt.Println(str)
...
}
```
+ 运行代码
> 可以看到输出了反转并 **大写** 的字符串,大写的函数功能只在本地,未提交到 git 上,这样我们就实现了可以同时在两个模块上并行开发
```
go run main.go -str "hello world"
DLROW OLLEH
```
+ 到这里,演示的代码已经全部完成
## 总结
+ 使用 Go 多模块工作区的功能,可以让我们轻松在多个模块之间切换工作,更能适应现代微服务架构开发。
## 参考文献
[Go 1.18 新特性多模块工作区教程](https://github.com/link1st/link1st/tree/master/workspaces)
[Go 1.18 is released!](https://go.dev/blog/go1.18)
[Tutorial: Getting started with multi-module workspaces](https://go.dev/doc/tutorial/workspaces)