https://github.com/cyberagentgameentertainment/novashader
Multi-functional shader for the Particle System that supports Universal Render Pipeline (URP) of Unity.
https://github.com/cyberagentgameentertainment/novashader
graphics particles particlesystem shaders unity urp vfx
Last synced: 6 months ago
JSON representation
Multi-functional shader for the Particle System that supports Universal Render Pipeline (URP) of Unity.
- Host: GitHub
- URL: https://github.com/cyberagentgameentertainment/novashader
- Owner: CyberAgentGameEntertainment
- License: mit
- Created: 2021-11-12T05:42:12.000Z (over 4 years ago)
- Default Branch: main
- Last Pushed: 2025-05-07T07:53:35.000Z (about 1 year ago)
- Last Synced: 2025-05-07T08:41:46.308Z (about 1 year ago)
- Topics: graphics, particles, particlesystem, shaders, unity, urp, vfx
- Language: C#
- Homepage:
- Size: 68.5 MB
- Stars: 1,312
- Watchers: 23
- Forks: 79
- Open Issues: 3
-
Metadata Files:
- Readme: README.md
- License: LICENSE.md
Awesome Lists containing this project
README


# NOVA Shader: Uber shader for Particle System
[](LICENSE.md)
[](https://github.com/CyberAgentGameEntertainment/NovaShader/pulls)
[](#Requirements)
**Docs** ([English](README.md), [日本語](README_JA.md))
| **Samples** ([English](Assets/Samples/README.md), [日本語](Assets/Samples/README_JA.md))
| **Demo** ([English](Assets/Demo/README.md), [日本語](Assets/Demo/README_JA.md))
NOVA Shader is a multi-functional shader for the Particle System that supports Universal Render Pipeline (URP).
General-purpose functions commonly used in visual effects are implemented so you can create high-quality effects efficiently.

Author: @Ugokashiya
It implements some distinctive features like Flow Map, Flip-Book (sequential texture animation), Dissolve, Fade, Rotation, Animated Tint Map, Emission, Distortion, and so on.
Features
For more information, please refer to the following documents, [Samples](Assets/Samples/README.md) and [Demo](Assets/Demo/README.md).
## Table of Contents
Details
- [Setup](#setup)
- [Requirements](#requirements)
- [Install](#install)
- [Usage](#usage)
- [Add Renderer Feature](#add-renderer-feature)
- [Activate Depth Texture](#activate-depth-texture)
- [Create and assign the Material](#create-and-assign-the-material)
- [Uber Unlit Shader](#uber-unlit-shader)
- [Render Settings](#render-settings)
- [Vertex Deformation](#vertex-deformation)
- [Base Map](#base-map)
- [Tint Color](#tint-color)
- [Flow Map](#flow-map)
- [Parallax Map](#parallax-map)
- [Color Correction](#color-correction)
- [Alpha Transition](#alpha-transition)
- [Emission](#emission)
- [Transparency](#transparency)
- [Uber Lit Shader](#uber-lit-shader)
- [Render Settings](#render-settings-1)
- [Surface Maps](#surface-maps)
- [Distortion Shader](#distortion-shader)
- [Render Settings](#render-settings-2)
- [Distortion](#distortion)
- [Flow Mapping](#flow-mapping)
- [Alpha Transition](#alpha-transition-1)
- [Transparency](#transparency-1)
- [Uber Unlit/Lit shaders( for uGUI )](#uber-unlitlit-shaders-for-ugui-)
- [Abort Shadow Caster](#abort-shadow-caster)
- [Use with the Custom Vertex Streams](#use-with-the-custom-vertex-streams)
- [Set up the Custom Data](#set-up-the-custom-data)
- [Set up the Custom Vertex Streams](#set-up-the-custom-vertex-streams)
- [Set up the Material Property](#set-up-the-material-property)
- [Use Mesh GPU Instancing](#use-mesh-gpu-instancing)
- [Enable Mesh GPU Instancing](#enable-mesh-gpu-instancing)
- [Set up the Custom Vertex Streams](#set-up-the-custom-vertex-streams-1)
- [Automatic set up the Custom Vertex Streams.](#automatic-set-up-the-custom-vertex-streams)
- [Fix Now](#fix-now)
- [Remove Unused Parameter References](#remove-unused-parameter-references)
- [Reducing Memory Usage with Optimized Shaders](#reducing-memory-usage-with-optimized-shaders)
- [OptimizedShaderGenerator.Generate()](#optimizedshadergeneratorgenerate)
- [OptimizedShaderGenerator.Replace()](#optimizedshadergeneratorreplace)
- [Sample Code](#sample-code)
- [Editor APIs Reference](#editor-apis-reference)
- [Licenses](#licenses)
## Setup
### Requirements
This library is compatible with the following environments.
* Unity 2022.3 LTS or higher
* Universal Render Pipeline
* Shader Model 3.5
Note that Shader Model 4.5 is required to use [Mesh GPU Instancing](https://docs.unity3d.com/Manual/PartSysInstancing.html). And also, if you want to use `Mirror Sampling`, your hardware needs to support [Inline Sampler States](https://docs.unity3d.com/Manual/SL-SamplerStates.html). And if you are using 3D Texture or 2D Texture Array, the compression format must support them.
And this document assumes that you have already set up the Universal Render Pipeline. For more information about the Universal Render Pipeline, please refer to the [Unity Manual](https://docs.unity3d.com/Packages/com.unity.render-pipelines.universal@13.1/manual/)
#### Install
To install the software, follow the steps below.
1. Open the Package Manager from `Window > Package Manager`
2. `"+" button > Add package from git URL`
3. Enter the following
* https://github.com/CyberAgentGameEntertainment/NovaShader.git?path=/Assets/Nova

Or, open `Packages/manifest.json` and add the following to the dependencies block.
```json
{
"dependencies": {
"jp.co.cyberagent.nova": "https://github.com/CyberAgentGameEntertainment/NovaShader.git?path=/Assets/Nova"
}
}
```
If you want to set the target version, write as follows.
* https://github.com/CyberAgentGameEntertainment/NovaShader.git?path=/Assets/Nova#1.0.0
Note that if you get a message like `No 'git' executable was found. Please install Git on your system and restart Unity`, you will need to set up Git on your machine.
To update the version, rewrite the version as described above.
If you don't want to specify a version, you can also update the version by editing the hash of this library in the package-lock.json file.
```json
{
"dependencies": {
"jp.co.cyberagent.nova": {
"version": "https://github.com/CyberAgentGameEntertainment/NovaShader.git?path=/Assets/Nova",
"depth": 0,
"source": "git",
"dependencies": {},
"hash": "..."
}
}
}
```
## Usage
#### Add Renderer Feature
First, set up the **Renderer Feature** to apply Distortion.
Click **Add Renderer Feature > Screen Space Distortion** from the bottom of the Inspector of the **ForwardRendererData** asset.

Add Screen Space Distortion
Confirm that **Screen Space Distortion** has been added as shown below.

Screen Space Distortion
> **Note**
> This setting is not necessary if you do not use the Distortion Shader.
#### Activate Depth Texture
Next, activate Depth Texture to use the **Soft Particles** or **Depth Fade** features.
Check Depth Texture in the **UniversalRenderPipelineAsset** Inspector.

Depth Texture
Depth Texture setting is also found in each Camera, so set it as necessary.
> **Note**
> This setting is not necessary if neither **Soft Particles** nor **Depth Fade** is used.
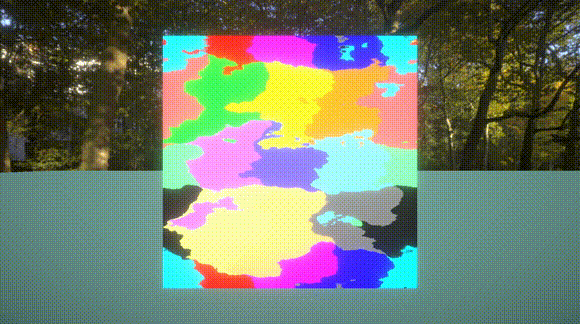
#### Create and assign the Material
Next, create a material with the Nova shader.
Create a material and set the shader to **Nova/Particles/UberUnlit** and assign a texture to the Base Map.

Material
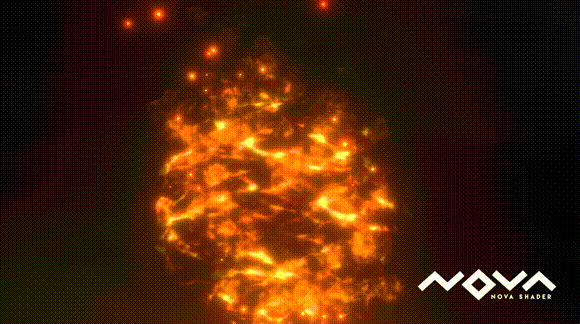
After creating a Particle System and assigning this material, you will see particles with the specified texture.

Particle
For more information on each shader and each function, see the sections below.
## Uber Unlit Shader
The Uber Unlit shader is a multifunctional shader with no lighting applied.
Use this shader for particles that do not need lighting, such as glowing effects.
To use this shader, assign the `Nova/Particles/UberUnlit` shader to your material. The following is the description of each property that can be set from the Inspector.
#### Render Settings
The Render Settings control how the Material is rendered.

Render Settings
Property NameDescription
Render Type
You can specify the type of rendering from the following options.
- Opaque
- Cutout
- Transparent (Default)
If you select Cutout, the CutOff property will be displayed.
When Transparent is selected, the Blend Mode property will be displayed.
CutOff
This property is visible only when the Render Type is set to Cutout.
Controls the threshold to clip semi-transparent areas.
The higher this value is, the more alpha will be cropped.
Blend Mode
This property is visible only when the Render Type is set to Transparent.
You can specify the color blend method from the following options.
- Alpha (Alpha Blending / Default)
- Average
- Multiply
Render Face
You can specify the rendering face from the following options.
- Front (Default)
- Back
- Both
Render Priority
If the Render Type is the same, the one with the lower Render Priority will be drawn first.
Vertex Alpha Mode
You can specify how to use the alpha value of the vertex color from the following options.
- Alpha: Use as alpha value (Default).
- Transition Progress: Use as Progress in Alpha Transition function (see below).
ZWrite
You can set ZWrite value.
- Auto: ZWrite is disabled when the Render Type is set to Transparent, and it is enabled when the Render Type is set to any other values.
- Off: ZWrite is always disabled.
- On: ZWrite is always enabled.
ZTest
You can set ZTest value.
- Disabled
- Never
- Less
- Equal
- Less Equal (Default)
- Greater
- Not Equal
- Greater Equal
- Always
#### Vertex Deformation
With Vertex Deformation, you can control the deformation of vertices.

Vertex Deformation
Property NameDescription
Texture
Sets the Vertex Deformation Map. The specifications are as follows.
- Push vertices in the normal direction of the object space based on the value of a single specified texture channel.
- You can select a channel by Channels property.
- Areas of the texture with a value of zero will not be pushed out, and areas with larger values will be pushed out more towards the exterior.
Note that you need to uncheck sRGB Color in the texture import setting because the pixels will be used as values, not colors.
Intensity
Sets the Vertex Deformation intensity.
Base Value
It is an offset applied to the values of the texture.
Values lower than this will be pushed inward, while larger values will be pushed outward.
#### Base Map
Base Map controls the base color texture and its settings.

Base Map
Property NameDescription
Mode
You can specify the type of the Base Map from the following options.
- Single Texture: Use 2D texture (Default).
- Flip Book: Use Flip-Book animation.
- Flip Book Blending: Use Flip-Book animation with interpolated frames.
The required texture type will change depending on the mode you selected.
Note: In NOVA Shader, please do not use the Particle System's Texture Sheet Animation. Instead, use the Flip Book feature.
Texture
Set the Base Map.
If you specify Flip Book as the Mode, you need to set Texture2DArray.
And if you specify Flip Book Blending, you need to set Texture3D.
Channel
Select which color channel from the Base Map to use for rendering. When a single channel is selected (Red/Green/Blue), the selected channel value is applied to RGB components while preserving the original alpha channel. Available options:
- RGB: Use all color channels as-is (Default)
- Red: Convert red channel to grayscale
- Green: Convert green channel to grayscale
- Blue: Convert blue channel to grayscale
Rotation
Set the amount of rotation of the Base Map.
Offset
Shifts the center coordinate of rotation.
Mirror Sampling
If true, mirrors the texture to create a repeating pattern.
Flip-Book Progress
This property is visible only when the Mode is set to Flip Book or Flip Book Blending.
The progress of the Flip-Book or Flip-Book Blending.
Random Row Selection
This property is visible only when the Mode is set to Flip Book or Flip Book Blending.
Equivalent to Unity's Texture Sheet Animation Row Mode > Random functionality. When enabled, each particle randomly selects and maintains one row throughout its lifetime for animation playback.
Uses Unity Particle System's Custom Coord for random value input. First set Row Count to match the number of rows in your texture sheet, then configure any Custom Coord channel in "Random Between Two Constants" mode (range: 0 to Row Count) and assign it.
Row Count
This property is visible only when Random Row Selection is enabled.
Set the number of rows in your texture sheet (e.g., for a 4×4 texture sheet, set Row Count to 4).
Random Coord
This property is visible only when Random Row Selection is enabled.
Select the Custom Coord channel for random value input. This should correspond to the Custom Data channel configured in Unity Particle System with "Random Between Two Constants" mode.
Tone Mode
Controls tone mapping for color adjustment based on luminance values. Select from the following options:
-
None: No tone mapping applied (Default). -
Tritone: Three-tone mapping with Highlights, Midtones, and Shadows control. -
Pentone: Five-tone mapping with Highlights, Brights, Midtones, Darktones, and Shadows control.
Boundary values determine the thresholds between regions, mapping them to the configured colors.
Colors between each boundary are linearly interpolated, applying smooth tone mapping.
Note that this linear interpolation is performed in the shader, so you need to consider your project's color space when setting parameters.
Tone Channel
This property is visible when Tone Mode is not None.
Selects which color channel to use for luminance calculation in tone mapping. Choose from Red, Green, Blue, or Alpha (default).
Highlights Color
This property is visible when Tone Mode is Tritone or Pentone.
Sets the color applied to highlight regions.
Brights Color
This property is visible only when Tone Mode is Pentone.
Sets the color applied to brights regions (between highlights and midtones).
Midtones Color
This property is visible when Tone Mode is Tritone or Pentone.
Sets the color applied to midtone regions.
Darktones Color
This property is visible only when Tone Mode is Pentone.
Sets the color applied to darktones regions (between midtones and shadows).
Shadows Color
This property is visible when Tone Mode is Tritone or Pentone.
Sets the color applied to shadow regions.
Highlights
This property is visible when Tone Mode is Tritone or Pentone.
Sets the luminance boundary value for highlights.
Brights
This property is visible only when Tone Mode is Pentone.
Controls the position of the brights boundary between midtones and highlights.
Midtones
This property is visible when Tone Mode is Tritone or Pentone.
Controls the balance between tonal regions by determining the midpoint position between shadows and highlights.
Darktones
This property is visible only when Tone Mode is Pentone.
Controls the position of the darktones boundary between shadows and midtones.
Shadows
This property is visible when Tone Mode is Tritone or Pentone.
Sets the luminance boundary value for shadows.
#### Tint Color
Tint Color controls the color to be multiplied.
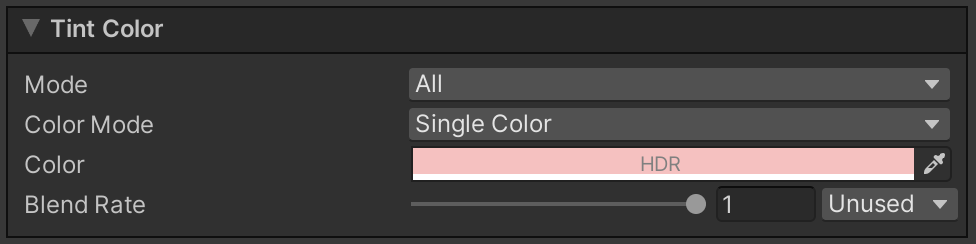
Tint Color
Property NameDescription
Mode
You can specify the area to apply the Tint Color from the following options.
- None: Disable the Tint Color (Default).
- All: Apply to the entire surface.
- Rim: Apply to the rim.
Progress
This property is visible only when the Mode is set to Rim.
The larger this value is, the more only the areas near the edges will be colored.
Sharpness
This property is visible only when the Mode is set to Rim.
The larger this value is, the sharper the edge of the rim will be.
Inverse
This property is visible only when the Mode is set to Rim.
If checked, reverse the range of the rim.
Color Mode
You can specify how you set the Tint Color.
- Single Color: Single Color (Default).
- Single Texture: Specified by the texture.
- Flip Book: Use Flip-Book animation.
- Flip Book Blending: Use Flip-Book animation with interpolated frames.
The required texture type will change depending on the mode you selected.
Color
This property is visible only when the Color Mode is set to Single Color.
The color to be multiplied.
Texture
This property is visible only when the Color Mode is set to Single Texture, Flip Book, or Flip Book Blending.
The texture whose color will be multiplied.
If you specify Flip Book as the Color Mode, you need to set Texture2DArray.
And if you specify Flip Book Blending, you need to set Texture3D.
Rotation
This property is visible only when the Color Mode is set to Single Texture, Flip Book, or Flip Book Blending.
Set the amount of rotation of the Tint Map.
Offset
Shifts the center coordinate of rotation.
Flip-Book Progress
This property is visible only when the Color Mode is set to Flip Book or Flip Book Blending.
The progress of the Flip-Book or Flip-Book Blending.
Blend Rate
The color multiplication factor.
If this value is zero, the color will not be applied; if it is one, the color will be multiplied as is.
Random Row Selection
This property is visible only when the Color Mode is set to Flip Book or Flip Book Blending.
Equivalent to Unity's Texture Sheet Animation Row Mode > Random functionality. When enabled, each particle randomly selects and maintains one row throughout its lifetime for animation playback.
Uses Unity Particle System's Custom Coord for random value input. First set Row Count to match the number of rows in your texture sheet, then configure any Custom Coord channel in "Random Between Two Constants" mode (range: 0 to Row Count) and assign it.
Row Count
This property is visible only when Random Row Selection is enabled.
Set the number of rows in your texture sheet (e.g., for a 4×4 texture sheet, set Row Count to 4).
Random Coord
This property is visible only when Random Row Selection is enabled.
Select the Custom Coord channel for random value input. This should correspond to the Custom Data channel configured in Unity Particle System with "Random Between Two Constants" mode.
#### Flow Map
You can use the Flow Map to distort the Base Map to the specified directions.

Flow Map
Property NameDescription
Texture
Sets the Flow Map. The specifications are as follows.
- Shifts the UV values of the Base Map based on the texture color channels.
- The color channels used is determined by the X value and Y value of the Channels properties.
- The smaller the value from 0.5, the more the UV value shifts in the negative direction, and vice versa.
Note that you need to uncheck sRGB Color in the texture import setting because the pixels will be used as values, not colors.
Rotation
Set the amount of rotation of the Flow Map.
Offset
Shifts the center coordinate of rotation.
Intensity
Sets the Flow Map intensity.
Targets
Set the targets to which the flow map will be applied (multiple selections are possible).
* Base Map
* Tint Map
* Alpha Transition Map
* Emission Map
#### Parallax Map
Parallax Map can create a parallax effect.

Parallax Map
PropertyDescription
Mode
Specifies the mode of the parallax map from the following options:
- Single Texture: Regular 2D texture (default)
- Flip Book: Flip-Book animation
- Flip Book Blending: Flip-Book animation with blending
The texture type changes depending on the selected mode.
Texture
Sets the parallax map.
If Flip Book is selected in Mode, a Texture2DArray needs to be set.
If Flip Book Blending is selected in Mode, a Texture3D needs to be set.
The specifications of the parallax map are as follows:
- Changes the surface's concavity based on the color value of the specified channel
- The value of 0 is the original state, and the closer it gets to 1, the more concave it becomes
Since a texture is used as a value, not a color, be sure to uncheck the sRGB Color checkbox in the texture settings.
Strength
Sets the strength of the parallax map when applied.
Flip-Book Progress
This property is visible only when the Mode is set to Flip Book or Flip Book Blending.
The progress of the Flip-Book or Flip-Book Blending.
Random Row Selection
This property is visible only when the Mode is set to Flip Book or Flip Book Blending.
Equivalent to Unity's Texture Sheet Animation Row Mode > Random functionality. When enabled, each particle randomly selects and maintains one row throughout its lifetime for animation playback.
Uses Unity Particle System's Custom Coord for random value input. First set Row Count to match the number of rows in your texture sheet, then configure any Custom Coord channel in "Random Between Two Constants" mode (range: 0 to Row Count) and assign it.
Row Count
This property is visible only when Random Row Selection is enabled.
Set the number of rows in your texture sheet (e.g., for a 4×4 texture sheet, set Row Count to 4).
Random Coord
This property is visible only when Random Row Selection is enabled.
Select the Custom Coord channel for random value input. This should correspond to the Custom Data channel configured in Unity Particle System with "Random Between Two Constants" mode.
Strength
Sets the strength of the parallax map when applied.
Targets
Sets the targets to apply the parallax map (multiple selection possible).
Base Map
Tint Map
Emission Map
#### Color Correction
Color Correction correct the colors up to this point.

Color Correction
Property NameDescription
Mode
You can specify how to correct the colors.
- None: Disable the Color Correction (Default).
- Greyscale: Chage the colors to greyscale.
- Gradient Map: Use the gradient map.
Texture
This property is visible only when the Mode is set to Gradient.
Sets the Gradient Map. The specifications are as follows.
- Replace the luminance with the colors of the gradient map.
- Change the U value for sampling the gradient map according to luminance.
- When luminance is at maximum, the right edge of the gradient map is sampled.
- Therefore, we need to use a texture with a horizontal gradient.
#### Alpha Transition
Alpha Transition controls the alpha value using a texture.

Alpha Transition
Property NameDescription
Mode
You can specify Alpha Transition Mode from the following options.
- None: Disable the Alpha Transition (Default).
- Fade: Transition using the fade texture.
- Dissolve: Transition using the dissolve texture.
Map Mode
You can specify the type of the Alpha Transition Map from the following options.
- Single Texture: Use 2D texture (Default).
- Flip Book: Use Flip-Book animation.
- Flip Book Blending: Use Flip-Book animation with interpolated frames.
The required texture type will change depending on the mode you selected.
Texture
Sets the Alpha Transition Map. The specifications are as follows.
- Changes the alpha value based on the texture color channel.
- The color channels used is determined by the X value of the Channels properties.
- The smaller the R value, the easier it is to disappear, and vice versa.
If you specify Flip Book as the Mode, you need to set Texture2DArray.
And if you specify Flip Book Blending, you need to set Texture3D.
Note that you need to uncheck sRGB Color in the texture import setting because the pixels will be used as values, not colors.
Rotation
Set the amount of rotation of the Alpha Transition Map.
Offset
Shifts the center coordinate of rotation.
Flip-Book Progress
This property is visible only when the Map Mode is set to Flip Book or Flip Book Blending.
Sets the progress of Flip-Book or Flip-Book Blending.
Random Row Selection
This property is visible only when the Map Mode is set to Flip Book or Flip Book Blending.
Equivalent to Unity's Texture Sheet Animation Row Mode > Random functionality. When enabled, each particle randomly selects and maintains one row throughout its lifetime for animation playback.
Uses Unity Particle System's Custom Coord for random value input. First set Row Count to match the number of rows in your texture sheet, then configure any Custom Coord channel in "Random Between Two Constants" mode (range: 0 to Row Count) and assign it.
Row Count
This property is visible only when Random Row Selection is enabled.
Set the number of rows in your texture sheet (e.g., for a 4×4 texture sheet, set Row Count to 4).
Random Coord
This property is visible only when Random Row Selection is enabled.
Select the Custom Coord channel for random value input. This should correspond to the Custom Data channel configured in Unity Particle System with "Random Between Two Constants" mode.
Transition Progress
Sets the progress of Transition.
2nd Texture Blend Mode
You can specify how to composite the second texture from the following options.
- None: Don't use The second texture (Default).
- Additive: Referring to the average of two textures.
- Multiply
2nd Texture Rotation
This property is visible only when 2nd Texture Blend Mode is set to Average or Multiply.
Set the amount of rotation of the second Alpha Transition Map.
Offset
Shifts the center coordinate of rotation.
Edge Sharpness
This property is visible only when the Mode is set to Dissolve.
Sets the sharpness of the edge.
#### Emission
The Emission control how the particles are glowing.

Emission
Property NameDescription
Mode
You can specify the area to be glowed.
- None: Disable the Emission (Default).
- All: The entire surface will glow.
- By Texture: The area specified by the texture will glow.
- Edge: Edges (areas where alpha is greater than 0 and less than 1) will glow.
Map Mode
This property is visible only when the Mode is set to By Texture.
You can specify the Mode of the Emission Map from the following options.
- Single Texture: Use 2D texture (Default).
- Flip Book: Use Flip-Book animation.
- Flip Book Blending: Use Flip-Book animation with interpolated frames.
The required texture type will change depending on the mode you selected.
Texture
This property is visible only when the Mode is set to By Texture.
Sets the Emission Map. The specifications are as follows.
- The larger the texture color channles value, the more likely it is to glow.
- The color channels used is determined by the X value of the Channels property.
If you specify Flip Book as the Mode, you need to set Texture2DArray.
And if you specify Flip Book Blending, you need to set Texture3D.
Note that you need to uncheck sRGB Color in the texture import setting because the pixels will be used as values, not colors.
Rotation
This property is visible only when the Mode is set to By Texture.
Set the amount of rotation of the Emission Map.
Offset
Shifts the center coordinate of rotation.
Flip-Book Progress
This property is visible only when the Mode is set to By Texture and the Map Mode is set to Flip Book or Flip Book Blending.
Sets the progress of Flip-Book or Flip-Book Blending.
Random Row Selection
This property is visible only when the Mode is set to By Texture and the Map Mode is set to Flip Book or Flip Book Blending.
Equivalent to Unity's Texture Sheet Animation Row Mode > Random functionality. When enabled, each particle randomly selects and maintains one row throughout its lifetime for animation playback.
Uses Unity Particle System's Custom Coord for random value input. First set Row Count to match the number of rows in your texture sheet, then configure any Custom Coord channel in "Random Between Two Constants" mode (range: 0 to Row Count) and assign it.
Row Count
This property is visible only when Random Row Selection is enabled.
Set the number of rows in your texture sheet (e.g., for a 4×4 texture sheet, set Row Count to 4).
Random Coord
This property is visible only when Random Row Selection is enabled.
Select the Custom Coord channel for random value input. This should correspond to the Custom Data channel configured in Unity Particle System with "Random Between Two Constants" mode.
Color Type
You can specify the type of the emission color from the following options.
- Color: Use the specified single color as the emission color.
- Base Color: Use the RGB values up to this point as the emission color.
- Gradient Map: Use a gradient map to specify the emission color.
Gradient Map can only be selected when Mode is set to By Texture or Edge.
Color
This property is visible only when the Color Type is set to Color.
Sets the emission color as HDR color.
Keep Edge Transparency
This property is visible only when the Mode is set to Edge.
If checked, the edges will not be transparent.
Gradient Map
This property is visible only when the Color Type is set to Gradient Map.
Sets the Gradient Map. The specifications are as follows.
- When Mode is By Texture: Sampling the R value of the Emission Map as the U value of the Gradient Map.
- When Mode is Edge: Sample alpha values as U values of the Gradient Map.
- You need to use a texture with a horizontal gradient as the Gradient Map.
Intensity
Sets the intensity of the emission.
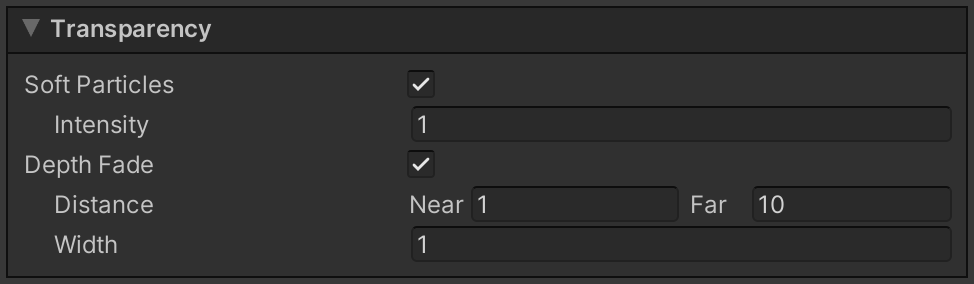
#### Transparency
Control the transparency in various ways.

Transparency
Property NameDescription
Rim
If checked, the rim will be transparent.
Progress
Sets the progress of transparency.
Sharpness
The larger this value is, the sharper the edge will be.
Inverse
Inverse the transparency area.
Luminance
If checked, areas with low brightness will be transparent.
Progress
Sets the progress of transparency.
Sharpness
The larger this value is, the sharper the edge will be.
Inverse
Inverse the transparency area.
Sort Particles
If checked, soft particles will be enabled.
To use this feature, the Depth Texture in URP settings must be enabled.
Intensity
The larger this value, the larger the transparent area.
Depth Fade
Makes the areas near and far from the camera transparent.
To use this feature, the Depth Texture in URP settings must be enabled.
Distance
Set the transparency range.
The area closer than Near and farther than Far from the camera will be transparent.
Width
The distance from the beginning of transparency to the end of complete transparency.
## Uber Lit Shader
The Uber Lit shader is a multifunctional shader with lighting applied. Use this shader for particles that need lighting, such as mesh effects.
This shader reflects lighting compliant with Unity's PBR lighting specification.
To use this shader, assign the `Nova/Particles/UberLit` shader to your material.
This shader is based on the Uber Unlit shader with additional processing and properties.
The description of the added properties is as follows.
#### Render Settings
The following red-framed properties have been added to Render Settings.

Render Settings
Property NameDescription
Work Flow Mode
You can specify the mode of PBR workflow from the following options.
- Specular
- Metallic
For more information on workflow, please refer to the following URL
https://docs.unity3d.com/2018.4/Documentation/Manual/StandardShaderMetallicVsSpecular.html
https://docs.unity3d.com/2018.4/Documentation/Manual/StandardShaderMaterialParameterSpecular.html
https://docs.unity3d.com/2018.4/Documentation/Manual/StandardShaderMaterialParameterMetallic.html
Receive Shadows
If checking the box, it will be received shadows from directional lights.
Specular Highlights
If checking the box, it will be enabled specular highlighting.
Environment Reflections
If checking the box, it will be affected ambient light from the Reflection Probe and Skybox.
For more information on the effects of ambient light, please refer to "Environment Reflection" at the following URL.
https://docs.unity3d.com/2018.4/Documentation/Manual/GlobalIllumination.html
#### Surface Maps
Several surface properties have been added for lighting.

Surface Maps
Property NameDescription
Normal Map
Set up the normal map.The specifications of the normal map are as follows.
- The only normal maps that can be set up are those for tangent space.
- If normal map isn't specified, vertex normals are used
- The normal scale value can be specified. The default scale is 1.0.
For more infomation of the normal map
Please refer to the following URL for details on the normal map.
https://docs.unity3d.com/2021.3/Documentation/Manual/StandardShaderMaterialParameterNormalMap.html
Metallic Map
It is displayed when the Work Flow Mode is set to Metallic.
Set up the metallic map.The specifications of the metallic map are as follows.
- If the metallic map isn't set, the value of the metallic property will be used as the uniform metallicity.
- If the metallic map is set、the value of the metallic property will be used as multiplier value.
- The Channels property allows specifying the channel where the metallic value is stored. Default is R channel.
Please refer to the following URL for details on the metallic map.
https://docs.unity3d.com/2018.4/Documentation/Manual/StandardShaderMaterialParameterMetallic.html
Specular Map
It is displayed when the Work Flow Mode is set to Specular.
Set up the specular map. The specifications of the specular map are as follows.
- If the specular map isn't set, the color of specular property will be used as the uniform specular color.
- If the specular map is set, the color of specular property will be used as the multiplier color.
Please refer to the following URL for details on the specular map.
https://docs.unity3d.com/2018.4/Documentation/Manual/StandardShaderMaterialParameterSpecular.html
Smoothness Map
Set up the smoothness map. The specifications of the smoothness map are as follows.
- If the smoothness map isn't set, the value of the smoothness property will be used as the uniform smoothess.
- If the smoothness map is set, the value of the smoothness property will be used as the multiplier value.
- The Channels property allows specifying the channel where the smoothness value is stored. Default is α channel.
## Distortion Shader
Using the Distortion shader, you can apply distortion effects to the screen, such as heat waves.
To use this shader, assign the `Nova/Particles/Distortion` shader to your material. The following is the descriptions of each property that can be set from the Inspector.
#### Render Settings
The Render Settings control how the Material is rendered.

Render Settings
Property NameDescription
Render Face
You can specify the rendering face from the following options.
- Front (Default)
- Back
- Both
ZTest
You can set ZTest value.
- Disabled
- Never
- Less
- Equal
- Less Equal (Default)
- Greater
- Not Equal
- Greater Equal
- Always
#### Distortion
Distortion controls how it is distorted.

Distortion
Property NameDescription
Texture
Sets the Distortion Map. The specifications are as follows.
- Distorts the screen based on the texture color channels.
- The color channels used is determined by the X value of the Channels Property.
- 0.5 is the reference value, and the further away from the reference value, the stronger the distortion.
Note that you need to uncheck sRGB Color in the texture import setting because the pixels will be used as values, not colors.
Intensity Mode
Specifies how distortion intensity is controlled.
- Single: Use a single intensity value for both X and Y (Default).
- XY: Use separate intensity values for X and Y axes.
Intensity
This property is visible only when Intensity Mode is set to Single.
Sets the distortion intensity.
Intensity X / Intensity Y
These properties are visible only when Intensity Mode is set to XY.
Sets the distortion intensity for each axis independently.
Rotation
Set the amount of rotation of the Distortion Map.
Offset
Shifts the center coordinate of rotation.
Mirror Sampling
If true, mirrors the texture to create a repeating pattern.
Use As Normal Map
If true, the Texture Type is treated as a Normal Map and will be unpacked for sampling.
Additionally, please specify a normalized Normal Map for the Texture. Otherwise, the rendering results may vary depending on the platform.
#### Flow Mapping
You can use the Flow Map to distort the Distortion Map to the specified directions.
Flow Map
Property NameDescription
Texture
Sets the Flow Map. The specifications are as follows.
- Shifts the UV values of the Distortion Map based on the texture color channles.
- The texture color channels used is determined by the X value of the Channels property.
- The smaller the value from 0.5, the more the UV value shifts in the negative direction, and vice versa.
Note that you need to uncheck sRGB Color in the texture import setting because the pixels will be used as values, not colors.
Rotation
Set the amount of rotation of the Flow Map.
Offset
Shifts the center coordinate of rotation.
Intensity
Sets the Flow Map intensity.
#### Alpha Transition
Alpha Transition controls the alpha value using a texture.

Alpha Transition
Property NameDescription
Mode
You can specify Alpha Transition Mode from the following options.
- None: Don't use the Alpha Transition (Default).
- Fade: Transition using the fade texture.
- Dissolve: Transition using the dissolve texture.
Texture
Sets the Alpha Transition Map. The specifications are as follows.
- Changes the alpha value based on the texture color channel.
- The color channles used is determined by the X value of the Channels property.
- The smaller the R value, the easier it is to disappear, and vice versa.
Note that you need to uncheck sRGB Color in the texture import setting because the pixels will be used as values, not colors.
Rotation
Set the amount of rotation of the Alpha Transition Map.
Offset
Shifts the center coordinate of rotation.
Progress
Sets the progress of Transition.
Edge Sharpness
This property is visible only when the Mode is set to Dissolve.
Sets the sharpness of the edge.
#### Transparency
Control the transparency in various ways.
Transparency
Property NameDescription
Rim
If checked, the rim will be transparent.
Progress
Sets the progress of transparency.
Sharpness
The larger this value is, the sharper the edge will be.
Inverse
Inverse the transparency area.
Luminance
If checked, areas with low brightness will be transparent.
Progress
Sets the progress of transparency.
Sharpness
The larger this value is, the sharper the edge will be.
Inverse
Inverse the transparency area.
Sort Particles
If checked, soft particles will be enabled.
To use this feature, the Depth Texture in URP settings must be enabled.
Intensity
The larger this value, the larger the transparent area.
Depth Fade
Makes the areas near and far from the camera transparent.
To use this feature, the Depth Texture in URP settings must be enabled.
Distance
Set the transparency range.
The area closer than Near and farther than Far from the camera will be transparent.
Width
The distance from the beginning of transparency to the end of complete transparency.
## Uber Unlit/Lit shaders( for uGUI )
Uber Unlit/Lit shaders are available for uGUI. if you want to play the effect on uGUI, use `Nova/UIParticles/UberUnlit` or `Nova/UIParticles/UberLit`.
The items that can be set in the material inspector are basically the same as for the regular `UberUnlit` and `UberLit`, but note that the z and w elements are not available when working with Custom Vertex Streams.
This is because z and w data are discarded inside uGUI.
If z and w are used, an error will be displayed as shown in the following figure.

Custom Vertex Error
Also, if you want to [use with the Custom Vertex Streams](#use-with-the-custom-vertex-streams), please add TexCoord1 and TexCoord2 to `Additional Shader Channels` in Canvas.

Additional Shader Channels
## Abort Shadow Caster
Enabling the Shadow Caster feature will allow you to cast shadows from NovaShader.

Shadow Caster
Property NameDiscription
Enable
Check this to enable ShadowCasterPass
Apply Vertex Deformation
If checked, Vertex Deformation will be applied to shadow casting calculations
Alpha Test Enable
If checked, Alpha Test will be enabled for calculating shadow casting, and shadows will not be cast in areas that do not pass.
Cutoff
Areas where the Alpha value is less than the Cutoff value will not cast a shadow (this will be a different value from the Cutoff of the drawing process)
Alpha Affected By
Items that affect Alpha value during shadow casting calculation
Tint Color
If checked, Tint Color will affect Alpha value
Flow Map
If checked, Flow Map will affect Alpha value
Alpha Transition Map
If checked, Alpha Transition Map will affect Alpha value
Transparency Luminance
If checked, Transparency Luminance will affect Alpha value

Shadow Caster Demo
## Use with the Custom Vertex Streams
Using the Particle System's Custom Vertex Streams, you can animate the properties of the Material.
The shader supports both regular vertex streams and trail vertex streams.
In the following example, we will use the Custom Vertex Streams to rotate the texture.
#### Set up the Custom Data
First, set up the [Particle System's Custom Data](https://docs.unity3d.com/2019.4/Documentation/Manual/PartSysCustomDataModule.html).
In this case, we have set a value that changes from 0 to 1 over time to `Custom1.X`.
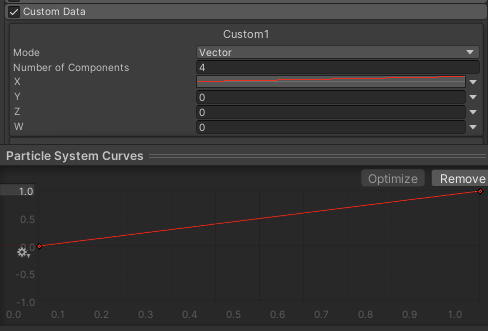
Custom Data
#### Set up the Custom Vertex Streams
Next, set the Custom Vertex Streams as shown below to pass `Custom1.x` to `TEXCOORD1.x`.

Custom Vertex Streams
#### Set up the Material Property
Next, select `COORD 1X` from the `Rotation` dropdown to use the value passed to `TEXCOORD1.x` as shown below.

Coord
The texture will now rotate.

Rotation
## Use Mesh GPU Instancing
You can use the [Particle System Mesh GPU Instancing](https://docs.unity3d.com/Manual/PartSysInstancing.html) to draw particles efficiently.
The following section describes how to use `Mesh GPU Instancing` for materials using this shader.
> **Note**
> When displaying particles on the preview screen using **PreviewRenderUtility**, we have confirmed a bug on the Unity side that does not render correctly when **Enable Mesh GPU Instancing** is enabled.
#### Enable Mesh GPU Instancing
To use `Mesh GPU Instancing`, you need to set the `Render Mode` of the `Renderer` module to Mesh.
Then, check the `Enable Mesh GPU Instancing` checkbox.

Enable Mesh GPU Instancing
#### Set up the Custom Vertex Streams
Next, set up the Custom Vertex Streams as shown below.

Custom Vertex Streams
The `Custom Data` section can be filled with values from other modules, such as Noise, but make sure that all of `INSTANCED1.xyzw` and `INSTANCED2.xyzw` are filled without excess or deficiency.
Now you can use `Mesh GPU Instancing`.
## Automatic set up the Custom Vertex Streams.
We have seen several cases where Custom Vertex Streams are set up manually.
In addition, the vertex streams required by the GPUs vary depending on their settings.
It has a feature that automatically set up the Custom vertex streams as `Fix Now`. The automatic setup feature supports both regular particle systems and trail vertex streams.
#### Fix Now
If vertex streams are different from what the CPUs require,
`Fix Now` button and error will appear at bottom of the inspector.
At this time, pressing this button will automatically set the typical vertex stream needed. This feature works for both sharedMaterial and trailMaterial configurations, ensuring that all necessary vertex streams are properly configured.

Fix Now
If you are not familiar with setting up Custom Vertex Streams,
It is recommended that you use `Fix Now` to correct errors to avoid unwanted errors.
## Remove Unused Parameter References
During the trial-and-error process of effect creation, references to parameters that are not actually used may remain.
(Example: The Base Map Mode is set to Single Texture, but a Texture 2D Array for Flip Book is also assigned.)
If unused texture references remain, issues such as an increase in Asset Bundle size may occur, so it is recommended to remove them.
To address this, there is a feature called `RemoveUnusedReferences`.
You can execute this feature by selecting one or more materials in the Project view and navigating to `Tools > NOVA Shader > RemoveUnusedReferences`.
If any unused references are removed, a log will be output to the Console.
## Reducing Memory Usage with Optimized Shaders
The Uber Unlit/Lit shaders are versatile general-purpose shaders with many shader keywords defined. This can potentially lead to an explosion of variants due to keyword combinations.
Additionally, shader passes such as `Depth Only Pass`, `Depth Normals Pass`, and `Shadow Caster Pass` may be included even when unnecessary for certain projects.
These factors can cause increased memory usage in Uber shaders.
To address this issue, Nova Shader provides the following editor APIs that generate and apply optimized shaders by removing unused shader keywords and passes:
|API|Description|
|---|---|
|OptimizedShaderGenerator.Generate()|Generate optimized shaders|
|OptimizedShaderGenerator.Replace()|Replace with optimized shaders|
By utilizing these APIs to optimize shaders, we have confirmed that memory usage can be reduced by up to 50%.
### OptimizedShaderGenerator.Generate()
Generates optimized shaders from the Uber shader. The generated shaders are created based on combinations of `Rendering Type` and `Used Shader Passes` as shown below.
For detailed information on how to use the API, please refer to the API reference [OptimizedShaderGenerator](Documentation~/OptimizedShaderGenerator.md).

Optimized Shader
### OptimizedShaderGenerator.Replace()
Replaces Uber shaders assigned to materials with appropriate optimized shaders based on their rendering type and shader pass settings. To use this API, you must first generate optimized shaders using `OptimizedShaderGenerator.Generate()`.
For detailed information on how to use the API, please refer to the API reference [OptimizedShaderReplacer](Documentation~/OptimizedShaderReplacer.md).
### Sample Code
Please refer to [ShaderOptimizeSample.cs](https://github.com/CyberAgentGameEntertainment/NovaShader/blob/main/Assets/Samples/Editor/ShaderOptimizeSample.cs) for a sample implementation of using these APIs.
## Editor APIs Reference
- [RenderErrorHandler](Documentation~/RenderErrorHandler.md)
- [OptimizedShaderGenerator](Documentation~/OptimizedShaderGenerator.md)
- [OptimizedShaderReplacer](Documentation~/OptimizedShaderReplacer.md)
## Licenses
This software is released under the MIT license.
You are free to use it within the scope of the license, but the following copyright and license notices are required.
* [LICENSE.md](LICENSE.md)
In addition, the table of contents for this document has been created using the following software
* [toc-generator](https://github.com/technote-space/toc-generator)
See [Third Party Notices.md](Third%20Party%20Notices.md) for more information about the license of toc-generator.