https://github.com/cyberark/conjur-quickstart
Start securing your secrets and infrastructure by installing Conjur, using Docker and the official Conjur containers on DockerHub.
https://github.com/cyberark/conjur-quickstart
conjbot-notify conjur core oss secrets-management
Last synced: 28 days ago
JSON representation
Start securing your secrets and infrastructure by installing Conjur, using Docker and the official Conjur containers on DockerHub.
- Host: GitHub
- URL: https://github.com/cyberark/conjur-quickstart
- Owner: cyberark
- License: apache-2.0
- Created: 2019-04-16T19:50:43.000Z (about 6 years ago)
- Default Branch: main
- Last Pushed: 2024-05-03T15:57:02.000Z (about 1 year ago)
- Last Synced: 2024-06-12T04:52:55.286Z (12 months ago)
- Topics: conjbot-notify, conjur, core, oss, secrets-management
- Language: Shell
- Homepage:
- Size: 610 KB
- Stars: 27
- Watchers: 22
- Forks: 34
- Open Issues: 1
-
Metadata Files:
- Readme: README.md
- Changelog: CHANGELOG.md
- Contributing: CONTRIBUTING.md
- License: LICENSE
- Codeowners: .github/CODEOWNERS
- Security: SECURITY.md
Awesome Lists containing this project
README
# conjur-quickstart
This repository guides you through a sample installation of Conjur Open Source
using Docker Compose.
__THIS REPO IS INTENDED ONLY FOR DEMO PURPOSES AND SHOULD NOT BE USED FOR CREATING PRODUCTION INSTANCES OF CONJUR OSS__
- [Certification level](#certification-level)
- [Requirements](#requirements)
- [Usage instructions](#usage-instructions)
* [Using this quick start with Conjur Open Source](#using-this-quick-start-with-conjur-open-source)
* [Step by step guide](#step-by-step-guide)
+ [Set up a Conjur Open Source environment](#set-up-a-conjur-open-source-environment)
+ [Define policy](#define-policy)
+ [Store a secret](#store-a-secret)
+ [Run the demo app](#run-the-demo-app)
* [Next steps](#next-steps)
* [Explore the Conjur database](#explore-the-conjur-database)
* [Use Conjur with telemetry](#use-conjur-with-telemetry)
* [Configuring Conjur with predefined admin password](#configuring-conjur-with-predefined-admin-password)
* [Using persistent Conjur configuration](#using-persistent-conjur-configuration)
+ [Set up a Conjur Open Source environment with persistence](#set-up-a-conjur-open-source-environment-with-persistence)
+ [Restarting the Conjur Open Source environment using persistence](#restarting-the-conjur-open-source-environment-using-persistence)
+ [Delete the Conjur data directory when done](#delete-the-conjur-data-directory-when-done)
* [Adding or Modifying Container Environment Variables](#adding-or-modifying-container-environment-variables)
* [Troubleshooting](#troubleshooting)
+ [`Failed to open TCP connection` error for Conjur login](#failed-to-open-tcp-connection-error-for-conjur-login)
- [Contributing](#contributing)
Table of contents generated with markdown-toc
## Certification level

This repo is a **Community** level project. It's a community contributed project
that **is not reviewed or supported by CyberArk**. For more detailed information
on our certification levels, see [our community guidelines](https://github.com/cyberark/community/blob/master/Conjur/conventions/certification-levels.md#community).
## Requirements
To follow this quick start guide, you will need to install
[Docker Desktop](https://docs.docker.com/desktop/).
You will also need to [clone this repository](https://docs.github.com/en/enterprise/2.13/user/articles/cloning-a-repository)
to your working directory:
```
git clone https://github.com/cyberark/conjur-quickstart.git
```
## Usage instructions
### Using this quick start with Conjur Open Source
We **strongly** recommend choosing the version of this project to use from the
latest [Conjur OSS suite release](https://docs.conjur.org/Latest/en/Content/Overview/Conjur-OSS-Suite-Overview.html).
Conjur maintainers perform additional testing on the suite release versions to
ensure compatibility. When possible, upgrade your Conjur version to match the
[latest suite release](https://docs.conjur.org/Latest/en/Content/ReleaseNotes/ConjurOSS-suite-RN.htm);
when using integrations, choose the latest suite release that matches your Conjur
version. For any questions, please contact us on [Discourse](https://discuss.cyberarkcommons.org/c/conjur/5).
### Step by step guide
In the sections below, we'll walk through standing this environment up step by
step. Alternatively, you can follow the instructions by visiting the web
tutorial: https://www.conjur.org/get-started/quick-start/oss-environment/.
#### Set up a Conjur Open Source environment
In this unit you will learn how to install Conjur OpenSource using Docker.
At the end of this section:
You will have a working Conjur Open Source environment with a Conjur account and an
admin user.
1. Pull the Docker images
Open a terminal session and browse to `conjur-quickstart`. Pull the Docker
images defined in `docker-compose.yml`:
```
docker compose pull
```
**Verification**
When the required images are successfully pulled, the terminal returns the
following:
```
⠿ openssl Skipped - Image is already being pulled by conjur
⠿ database Pulled
⠿ bot_app Pulled
⠿ proxy Pulled
⠿ pgadmin Pulled
...
⠿ conjur Pulled
⠿ client Pulled
```
1. Generate the master key
The master data key will be used later to encrypt the database.
In the working directory, generate the key and store it to a file:
_* **Tip**: Although not mandatory, we prefer to store sensitive data to a
file and not to display it directly on console screen._
```
docker compose run --no-deps --rm conjur data-key generate > data_key
```
The data key is generated in the working directory and is stored in a file called data_key.
**Verification**
When the key is generated, the terminal returns the following:
```
Network conjur-quickstart_default Created
```
1. Load master key as an environment variable
Load `data_key` file content (the master data key) as an environment variable:
```
export CONJUR_DATA_KEY="$(< data_key)"
```
1. Start the Conjur Open Source environment
Start the Conjur Open Source environment:
```
docker compose up -d
```
When Conjur Open Source starts, the terminal returns the following:
```
⠿ Container bot_app Started
⠿ Container conjur-quickstart-pgadmin-1 Started
⠿ Container postgres_database Started
⠿ Container openssl Started
⠿ Container conjur_server Started
⠿ Container nginx_proxy Started
⠿ Container conjur_client Started
```
**Verification**
Run the following command to see a list of running containers:
```
docker ps -a
```
1. Create an admin account
Create a Conjur account and initialize the built-in admin user.
```
docker compose exec conjur conjurctl account create myConjurAccount > admin_data
```
An account named myConjurAccount is created and the admin user is initialized,
following keys are created and stored at admin_data file:
- admin user API key. Later on, we will use this key to log in to Conjur.
- `myConjurAccount` Conjur account public key.
1. Connect the Conjur client to the Conjur server
This is a one-time action. For the duration of the container’s life or until
additional initcommand is issued, the Conjur client and the Conjur server
remain connected.
Use the account name that you created in step 5. You will be prompted to trust
the TLS certificate of the Conjur server. Type `y` to trust the certificate:
```
docker compose exec client conjur init -u https://proxy -a myConjurAccount --self-signed
```
**Verification**
The terminal returns the following output:
```
Wrote certificate to /root/conjur-server.pem
Wrote configuration to /root/.conjurrc
```
#### Define policy
In this unit you will learn how to load your first policy.
Formatted in YAML, policy defines Conjur entities and the relationships between
them. An entity can be a policy, a host, a user, a layer, a group, or a variable.
A sample application policy named BotApp.yml is provided in the client container
under policy directory.
At the end of this section:
As a privileged user, you will load a policy that defines a human user, a non-human
user that represents your application, and a variable.
1. Log in to Conjur as admin
Log in to Conjur as admin. When prompted for a password, insert the API key
stored in the `admin_data` file:
```
docker compose exec client conjur login -i admin
```
**Verification**
When you successfully log in, the terminal returns:
```
Logged in
```
1. Load the sample policy
Load the provided sample policy into Conjur built-in `root` policy to create
the resources for the BotApp:
```
docker compose exec client conjur policy load -b root -f policy/BotApp.yml > my_app_data
```
Conjur generates the following API keys and stores them in a file, my_app_data:
- An API key for Dave, the human user. This key is used to authenticate user
Dave to Conjur.
- An API key for BotApp, the non-human identity. This key is used to
authenticate BotApp application to Conjur.
Those API keys is correlated with the number of Users & Hosts defined in a policy.
**Verification**
The terminal returns:
```
Loaded policy 'root'
```
1. Log out of Conjur
Log out of Conjur:
```
docker compose exec client conjur logout
```
**Verification**
When you successfully log out, the terminal returns:
```
Logged out
```
#### Store a secret
In this unit you will learn how to store your first secret in Conjur.
1. Log in as Dave
Log in as Dave, the human user. When prompted for a password, copy and paste
Dave’s API key stored in the `my_app_data` file:
```
docker compose exec client conjur login -i Dave@BotApp
```
**Verification**
To verify that you logged in successfully, run:
```
docker compose exec client conjur whoami
```
The terminal returns:
```
{
"client_ip": "xxx.xx.x.x",
"user_agent": "Go-http-client/1.1",
"account": "myConjurAccount",
"username": "Dave@BotApp",
"token_issued_at": "yyyy-mm-ddThh:mm:ss.sss+00:00"
}
```
1. Generate a secret
Generate a value for your application’s secret:
```
secretVal=$(openssl rand -hex 12 | tr -d '\r\n')
```
This generates a 12-hex-character value.
1. Store the secret
Store the generated value in Conjur:
```
docker compose exec client conjur variable set -i BotApp/secretVar -v ${secretVal}
```
A policy predefined variable named `BotApp/secretVar` is set with a random
generated secret.
**Verification**
The terminal returns a message:
```
Value added
```
#### Run the demo app
In this unit you will learn how to program an application to fetch a secret from
Conjur using the REST API.
At the end of this section:
You will know how to leverage Conjur’s ability to store your application’s secrets
securely.
1. Start a bash session
Enter the BotApp container.
```
docker exec -it bot_app bash
```
1. Generate a Conjur token
Generate a Conjur token to the conjur_token file, using the BotApp API key:
```
curl -d "" -k https://proxy/authn/myConjurAccount/host%2FBotApp%2FmyDemoApp/authenticate > /tmp/conjur_token
```
The Conjur token is stored in the conjur_token file.
1. Fetch the secret
Run program to fetch the secret:
```
/tmp/program.sh
```
The secret is displayed.
TIP: If the secret is not displayed, try generating the token again. You have eight minutes between generating the conjur token and fetching the secret with BotApp.
**Congratulations! You are ready to secure your own apps with Conjur.**
### Next steps
Now that you've got a local Conjur instance running, what can you do with it?
Try some of our [tutorials](https://www.conjur.org/get-started/tutorials/) on
Conjur.org.
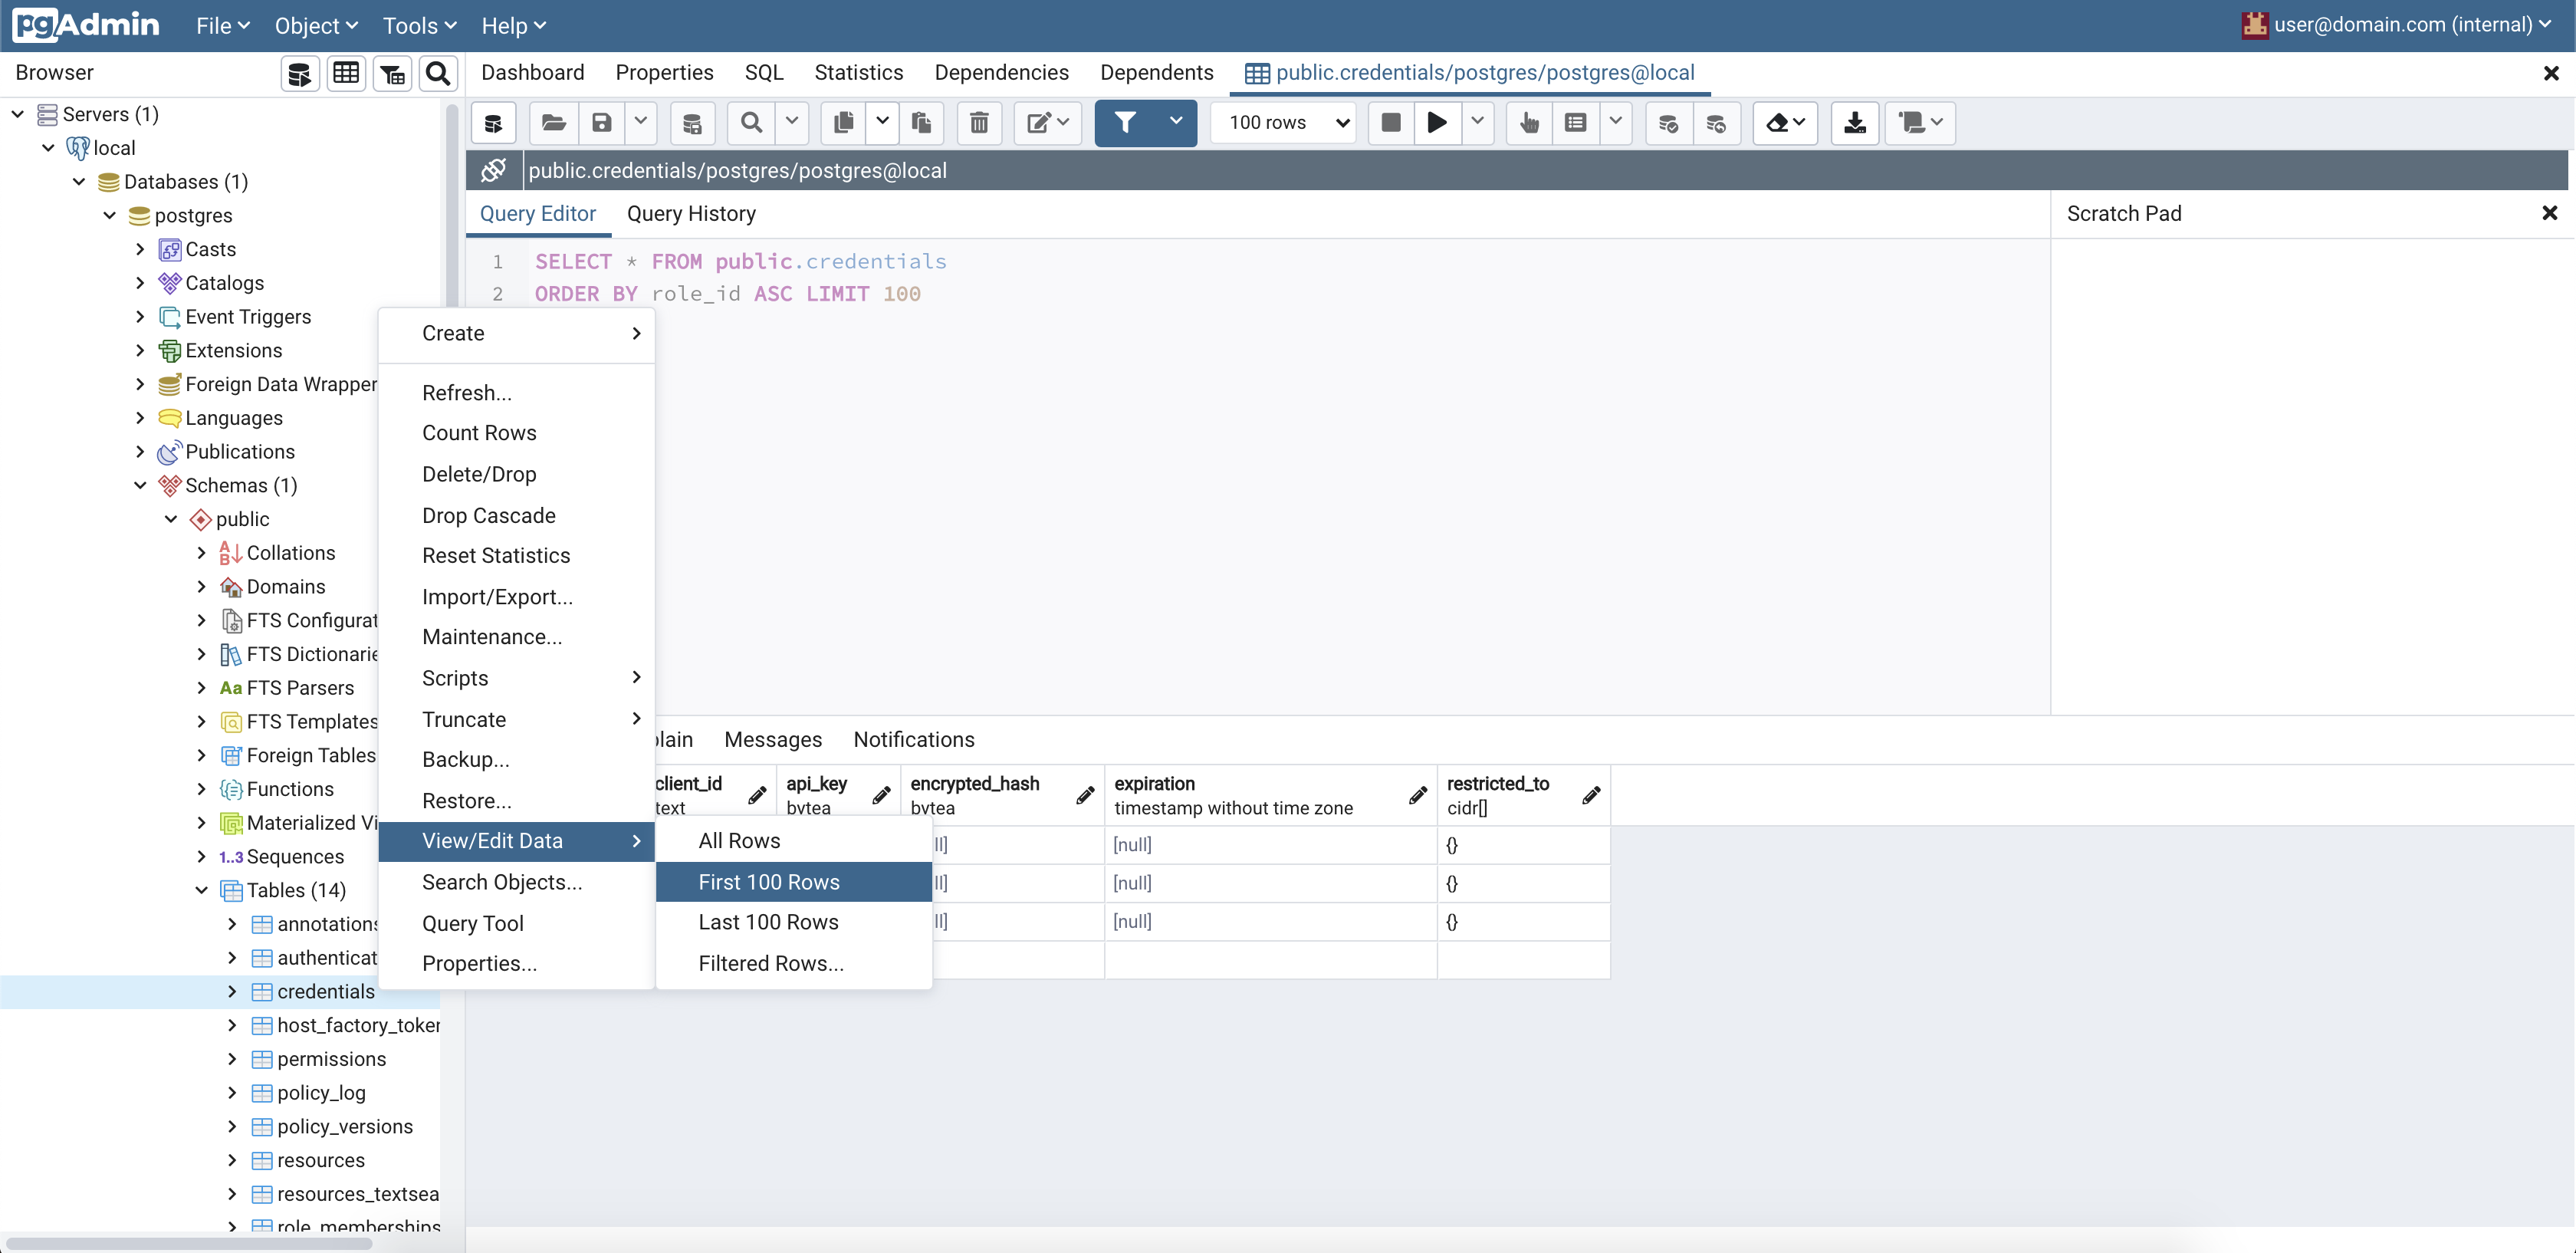
### Explore the Conjur database
This section is about exploring the database. The admin panel from pgAdmin can be used to
discover and explore the database schema, stored procedures and triggers that constitute a
significant part of the inner working of Conjur. It offers a glimpse into the data model
of Conjur.
This section should follow only after completion of the [Store a secret](#store-a-secret)
section. There's more insight to be gleamed from the database when it has become reasonably populated
with some representative data i.e. roles, identities, permissions etc.
As part of [Setting up a Conjur Open Source environment](#set-up-a-conjur-open-source-environment) the `pgadmin`
service is spun up. It will be accessible on your local machine at `http://localhost:8081`.
To explore the database
1. Visit `http://localhost:8081`
2. Login with email "[email protected]" and password "SuperSecret"
3. Add a new server. Name it "Conjur DB". Set the connection details. Host is "database", Port is "5432", Database is "postgres", Username is "postgres", and there is no password. Note that `pgamdin` is running inside the `docker-compose` network, it is for this reason that the Host of "database" is resolvable.
4. Dig in as shown below!
### Use Conjur with telemetry
Conjur supports telemetry as an opt-in feature. The telemetry feature has a general purpose mechanism for collection, but currently only supports a single method for export, a Prometheus scrape target endpoint. Below are instructions for enabling and exploring the telemetry feature.
In order to enable telemetry in Conjur you must opt-in via configuration.
You have a choice between setting an environment variable:
```sh
CONJUR_TELEMETRY_ENABLED=true
```
or updating a value in the `conjur.conf` configuration file:
```yaml
telemetry_enabled: true
```
Note that the environment variables takes precedence.
1. If you are already running the Conjur Open Source quickstart environment without
telemetry, bring down the Conjur container:
```
docker compose down conjur
```
1. Modify `docker-compose.yml` in this repository to enable telemetry
by setting the `CONJUR_TELEMETRY_ENABLED` environment variable to the value `'true'` (It needs to be a string otherwise the docker compose YAML parser will not be happy). Below is an illustration of the required change:
```yaml
services:
# ...
conjur:
environment:
# ...
CONJUR_TELEMETRY_ENABLED: 'true'
```
1. Start the Conjur Open Source environment using telemetry:
- If you had previously been running the Conjur Open Source environment,
follow the steps 2 and 3 of the
[Set up a Conjur Open Source environment](#set-up-a-conjur-open-source-environment)
section above in order to recreate the Conjur container.
- Otherwise, follow the steps starting from Step 1 of the
[Set up a Conjur Open Source environment](#set-up-a-conjur-open-source-environment)
section above.
1. Navigate to the [telemetry README](./telemetry/README.md#getting-started) and, starting from step 2, follow the instructions to set up the telemetry related services.
The telemetry README provides instructions for a comprehensive quickstart for setting up services such as Prometheus and Grafana,
creating relevant connections between those services and the Conjur Prometheus scrape target endpoint, and providing an example
dashboard with the metrics collected by Conjur.
### Configuring Conjur with predefined admin password
The following command will allow you to specify the admin user's password:
```
docker compose exec conjur bash -c 'echo -n "MySecretP@SS1" | conjurctl account create --password-from-stdin --name myConjurAccount'
```
The password must be provided via STDIN in any manner you prefer and must meet
the following complexity rules:
- Between 12 and 128 characters
- 2 uppercase letters
- 2 lowercase letters
- 1 special character
- 1 digit
*Note: This feature is available in Conjur v1.11.5+*
### Using persistent Conjur configuration
With small variations to the steps outlined above, it is possible to set
up a Conjur Open Source environment that retains Conjur configuration or state
across Docker container restarts. Using the steps outlined below, a
Conjur Open Source environment can be set up that uses a local directory on
the host to persist Conjur configuration across container restarts.
#### Set up a Conjur Open Source environment with persistence
1. If you are already running the Conjur Open Source quickstart environment without
persistence, bring down the associated containers:
```
docker compose down
```
1. Create a directory for storing persistent state. For example:
```
mkdir temp-db-data
```
_**NOTE: The permissions on this directory will automatically be changed
to 700 by docker compose when the directory gets host-mounted by the
Conjur container.**_
1. Modify `docker-compose.yml` in this repository to support persistent
storage of Conjur state. Add the following line to the bottom of the
`database` service configuration, replacing ``
with the path to the directory created in the previous step:
```
volumes:
- :/var/lib/postgresql/data
```
For example:
```
volumes:
- /home/myusername/conjur-quickstart/temp-db-data:/var/lib/postgresql/data
```
1. Start the Conjur Open Source environment using persistence:
- If you had previously been running the Conjur Open Source environment,
follow the steps outlined above starting with Step 4 of the
[Set up a Conjur Open Source environment](#set-up-a-conjur-open-source-environment)
section above.
- Otherwise, follow the steps starting with Step 1 of the
[Set up a Conjur Open Source environment](#set-up-a-conjur-open-source-environment)
section above.
#### Restarting the Conjur Open Source environment using persistence
Once you have set up the Conjur Open Source environment to support persistent Conjur
state, you can restart your environment as follows:
1. Bring the containers down:
```
docker compose down
```
_**NOTE: You must use the `docker compose down` command here rather than
the `docker compose stop` in order to avoid having stale, ephemeral
connection state in the Conjur container. If you use the `docker compose
stop` command here instead, you may see errors as described in the
[`Failed to open TCP connection` error for Conjur login](#failed-to-open-tcp-connection-error-for-conjur-login)
section below.**_
1. Bring the containers back up:
```
docker compose up -d
```
1. Reconnect the Conjur client to the Conjur server. Use the account name
that you created in the
[Create an admin account](#create-an-admin-account) section above. For
example:
```
docker compose exec client conjur init -u https://proxy -a myConjurAccount --self-signed
```
1. Log in again to Conjur as admin. When prompted for a password, insert the
API key stored in the `admin_data` file:
```
docker compose exec client conjur login -i admin
```
**Verification**
When you successfully log in, the terminal returns:
```
Logged in
```
#### Delete the Conjur data directory when done
For added security, remember to delete the data directory that you created
in Step 1 of the
[Set up a Conjur Open Source environment with persistence](#set-up-a-conjur-open-source-environment-with-persistence)
section above.
### Adding or Modifying Container Environment Variables
This section describes the process of either adding or modifying environment variables for
a `docker-compose` service. The process recreates a service with the desired changes, while
the rest of the system continues running. Note that for a stateful service, there should be a
[persistence mechanism](#using-persistent-conjur-configuration) in place (e.g. volume mounts),
otherwise data will be lost when the container is recreated.
The example below will add an environment variable `CONJUR_LOG_LEVEL=debug` to the `conjur`
service container.
1. Add or modify environment variables in `docker-compose.yml`
`docker-compose.yml` is used to define the Conjur Open Source system. Additions and modifications to
environment variables are made in the `environment` configuration of the desired service,
and are of the form:
```
version: '3'
services:
...
conjur:
...
environment:
CONJUR_LOG_LEVEL: debug
```
1. Recreate the container
```
docker compose up -d --no-deps conjur
```
The new container now contains the updated configuration defined in `docker-compose.yml`.
1. Verify that the desired environment variables are now defined in the container
Run the following:
```
docker compose exec conjur printenv CONJUR_LOG_LEVEL
```
If the environment variable was correctly assigned in the container, the terminal returns
the value of the variable:
```
debug
```
## Troubleshooting
### `Failed to open TCP connection` error for Conjur login
If you are
[using persistent Conjur configuration](#using-persistent-conjur-configuration),
and you see the following error when trying to log into Conjur:
```
error: Failed to open TCP connection to conjur:80 (Connection refused - connect(2) for "conjur" port 80)
```
Then try the following:
1. Run the following command:
```
docker compose logs conjur | grep "already running"
```
1. If the command in Step 1 produces the following line:
```
A server is already running. Check /opt/conjur-server/tmp/pids/server.pid.
```
then it may be that the Conjur container was stopped (e.g.
`docker compose stop conjur`) and restarted
(`docker compose up -d conjur`)
without being brought fully down (e.g. with `docker compose down conjur`),
leaving the container with stale connection state.
To recover from this, run:
```
docker compose down conjur
docker compose up -d conjur
```
And log in again, e.g.:
```
docker compose exec client conjur login -i admin
```
1. If "A server is already running" does not show in the Conjur container
logs, or Step 2 above is unsuccessful, then try restarting all containers:
```
docker compose down
docker compose up -d
```
and try logging in again, e.g.:
```
docker compose exec client conjur login -i admin
```
## Contributing
We welcome contributions of all kinds to this repository. For instructions on how
to get started and descriptions of our development workflows, please see our
[contributing guide][contrib].
[contrib]: CONTRIBUTING.md