https://github.com/d3vilh/openvpn-aws
OpenVPN and OpenVPN-UI for any Cloud or x86 bare metal instance
https://github.com/d3vilh/openvpn-aws
amazon-web-services aws aws-ec2 docker openvpn openvpn-admin openvpn-aws openvpn-ui x86-64
Last synced: 11 months ago
JSON representation
OpenVPN and OpenVPN-UI for any Cloud or x86 bare metal instance
- Host: GitHub
- URL: https://github.com/d3vilh/openvpn-aws
- Owner: d3vilh
- License: apache-2.0
- Created: 2023-01-22T17:24:38.000Z (over 3 years ago)
- Default Branch: master
- Last Pushed: 2024-06-01T13:46:40.000Z (about 2 years ago)
- Last Synced: 2024-12-07T18:11:42.633Z (over 1 year ago)
- Topics: amazon-web-services, aws, aws-ec2, docker, openvpn, openvpn-admin, openvpn-aws, openvpn-ui, x86-64
- Language: Jinja
- Homepage:
- Size: 1.16 MB
- Stars: 115
- Watchers: 2
- Forks: 24
- Open Issues: 11
-
Metadata Files:
- Readme: README.md
- License: LICENSE
Awesome Lists containing this project
README
# OpenVPN AWS
**OpenVPN instance**. Which includes
[**OpenVPN container**](https://github.com/d3vilh/openvpn-server) with simple [**WEB UI**](https://github.com/d3vilh/openvpn-ui) as lightweight web administration interface:
# Requirements
**Any Intel or AMD x86 based computer**, or x86 VM, or cloud instance with at least 1 CPU core and 512Mb RAM.
For Amazon AWS will be enough:
- [**Amazon AWS EC2 T2 Micro Instance**](https://aws.amazon.com/ec2/instance-types/t2/) 1x CPU Core, 1Gb RAM
- [**Amazon AWS Debian amd64 AMI**](https://wiki.debian.org/Cloud/AmazonEC2Image/Bullseye),Debian 11 Bullseye
- **At least 4Gb GP2 Storage**
- **Opened UDP/1194 and TCP/8080** ports (TCP/8080 necessary for [OpenVPN-UI](https://github.com/d3vilh/openvpn-ui) initial configuration only)
> Theoretically [OpenVPN AWS](https://github.com/d3vilh/openvpn-aws) will run on EC2 T2 Nano Instance (1x CPU Core, 512Mb RAM), it was never tested (however it runs very well on ARM based Raspberry Pi Zero1 with 512MB RAM).
# Installation
1. Install [Ansible](https://docs.ansible.com/ansible) and [Git](https://git-scm.com):
```shell
sudo apt-get install -y python3-pip git rsync ansible
```
2. Clone this repository:
```shell
git clone https://github.com/d3vilh/openvpn-aws
```
3. Then enter the repository directory:
```shell
cd openvpn-aws
```
4. Install requirements:
```shell
ansible-galaxy collection install -r requirements.yml --force
```
> If you see `ansible-galaxy: command not found`, you have to relogin and then try again.
5. Make copies of the configuration files and modify them for your enviroment:
```shell
yes | cp -p example.config.yml config.yml
```
6. Run the following command to add the `docker` group if it doesn't exist and add user to the `docker` group:
```shell
sudo groupadd docker
sudo usermod -aG docker $USER
```
**RELOGIN NOW** to apply group changes.
7. **Double check** that `ansible_user` is correct for `inventory.yml`. Need to run installtion on the remote server - follow the recomendations in config file.
> **Note**: To make all necesary changes: `nano inventory.yml`, save the file - `Ctrl+O` and `Ctrl+X` to exit.
8. Run installation playbook:
```shell
sudo ansible-playbook main.yml
```
> **If running locally on the EC2**: You may have error like `Error while fetching server API version` or `Permission denied`. You have to relogin and then run the playbook again.
9. Now, open your [EC2 console](https://console.aws.amazon.com/ec2/home) and go to `"Network & Security"` > `"Security Groups"` to create two new Security groups for opening OpenVPN UDP/1194 and OpenVPN-UI TCP/8080 ports for your EC2 instance.
10. Configure Security Group for OpenVPN (to open UDP/1194 port for Public access):

11. Configure Security Group for OpenVPN-UI (to open TCP/8080 port for Public access):

12. Assign both Security groups to your running EC2 instance.
13. **Generate first .OVPN profile** as described below, with **"Trusted"** subnet IP (`10.0.70.0/24`) via OpenVPN-UI web GUI and connect with it, to check your setup.
14. Now when you have OpenVPN-UI access over VPN you **MUST** remove OpenVPN-UI Security group profile from you EC2 instance settings. **Because of security reasons!!!**
# Usage
**OpenVPN WEB UI** can be accessed on own port (*e.g. http://localhost:8080 , change `localhost` to your EC2's Public or Private IPv4 address*), the default user and password is `aws-admin/gagaZush` preconfigured in `config.yml` which you supposed to [set in](https://github.com/d3vilh/openvpn-aws/blob/master/example.config.yml#L9) `ovpnui_user` & `ovpnui_password` vars, just before the installation.
### Container volume
The container volume can be initialized by using the [d3vilh/openvpn-server](https://github.com/d3vilh/openvpn-server) image with included scripts to automatically generate everything you need on the first run:
- Diffie-Hellman parameters
- an EasyRSA CA key and certificate
- a new private key
- a self-certificate matching the private key for the OpenVPN server
- a TLS auth key from HMAC security
However you can generate all the above components on OpenVPN UI `Configuration > Maintenance` page.
### EasyRSA vars
You can update all EasyRSA parameters with OpenVPN UI on `Configuration > EasyRSA vars` page. You also can set custom EasyRSA vars for every new Client Certificate during its creation.
Default EasyRSA configuration [can be set prior](https://github.com/d3vilh/openvpn-aws/blob/master/example.config.yml#L9) installation in `config.yml` file:
```shell
# EasyRSA configuration parameters.
easyrsa_dn: "org" # Leave this as-is. "org" for traditional, "cn_only" for CN only.
easyrsa_req_country: "UA" # The two-letter country code (e.g. US).
easyrsa_req_province: "KY" # The two-letter state or province code (e.g. CA).
easyrsa_req_city: "Kyiv" # The city of the organization.
easyrsa_req_org: "SweetHome" # The name of the organization.
easyrsa_req_email: "sweet@home.net" # The email address of the organization.
easyrsa_req_ou: "MyOrganizationalUnit" # The name of the organizational unit.
easyrsa_req_cn: "server" # The name of the common name.
easyrsa_key_size: 2048 # Leave this as-is. Size in bits for your keypairs.
easyrsa_ca_expire: 3650 # Number of days until the root CA expires.
easyrsa_cert_expire: 825 # Number of days until certificates expire.
easyrsa_cert_renew: 30 # Number of days before expiration to renew certificates.
easyrsa_crl_days: 180 # Number of days until the CRL expires.
```
In the process of installation these vars will be copied to container volume `/etc/openvpn/pki/vars` and used during all EasyRSA operations.
### Monitoring
To install OpenVPN Grafana Dashboard you have to set following configuration parameters in `config.yml` file:
```shell
# OpenVPN monitoring configuration. # Requires `monitoring_enable`
monitoring_enable: true # Set true to enable OpenVPN Server monitoring
monitoring_grafana_admin_password: "admin" # Is only used the first time when Grafana starts up
monitoring_days_keep_interval: 90d # How long to keep data in Prometheus DB (decrease if you have less than 5Gb of free disk space)
```
It will install Prometheus and Grafana containers and configure them to collect OpenVPN Server metrics.
### Network configuration
This setup use `tun` mode by default, because it works on the widest range of devices. `tap` mode, for instance, does not work on Android, except if the device is rooted.
The default topology is `subnet`, because it works on the widest range of OS. `p2p`, for instance, does not work on Windows.
The server config by default [specifies](https://github.com/d3vilh/openvpn-server/tree/main/config/server.conf#L35) `push redirect-gateway def1 bypass-dhcp`, meaning that after establishing the VPN connection, all traffic will go through the VPN. This might cause problems if you use local DNS recursors which are not directly reachable, since you will try to reach them through the VPN and they might not answer to you. If that happens, use public DNS resolvers like those of OpenDNS (`208.67.222.222` and `208.67.220.220`) or Google (`8.8.4.4` and `8.8.8.8`).
If you wish to use your local DNS server (Pi-Hile?), you have to modify a [dns-configuration](https://github.com/d3vilh/openvpn-server/tree/main/config/server.conf#L21) with your local DNS IP address.
This also can be done easy via `"Configuration" > "OpenVPN Server" > "Push DHCP"` options on OpenVPN UI webpage.
### OpenVPN client subnets. Guest and Home users
By default [d3vilh/openvpn-server](https://github.com/d3vilh/openvpn-server) OpenVPN server uses option `server 10.0.70.0/24` as **"Trusted"** subnet to grab dynamic IPs for all your Clients which, by default will have full access to your **"Private/Home"** subnet, as well as Internet over VPN.
However you can be desired to share internet over VPN with specific, Guest Clients and restrict access to your **"Private/Home"** subnet. For this scenario [d3vilh/openvpn-server](https://github.com/d3vilh/openvpn-server) `server.conf` configuration file has special `route 10.0.71.0/24` option, aka **"Guest users"** subnet.

To assign desired subnet policy to the specific client, you have to define static IP address for the client during its profile/Certificate creation.
To do that, just enter `"Static IP (optional)"` field in `"Certificates"` page and press `"Create"` button.
> Keep in mind, by default, all the clients have full access, so you don't need to specifically configure static IP for your own devices, your home devices always will land to **"Trusted"** subnet by default.
### Firewall rules
By default `docker_entrypoint.sh` of [d3vilh/openvpn-server](https://github.com/d3vilh/openvpn-server) OpenVPN Server container will apply following Firewall rules:
```shell
IPT MASQ Chains:
MASQUERADE all -- ip-10-0-70-0.ec2.internal/24 anywhere
MASQUERADE all -- ip-10-0-71-0.ec2.internal/24 anywhere
IPT FWD Chains:
0 0 DROP 1 -- * * 10.0.71.0/24 0.0.0.0/0 icmptype 8
0 0 DROP 1 -- * * 10.0.71.0/24 0.0.0.0/0 icmptype 0
0 0 DROP 0 -- * * 10.0.71.0/24 192.168.88.0/24
```
You can apply optional Firewall rules in `~/openvpn-server/fw-rules.sh` file, which will be executed on the container start.
Here is example of blocking all the traffic between 2 "Trusted" subnet clients:
```shell
~/openvpn-server $ cat fw-rules.sh
iptables -A FORWARD -s 10.0.70.88 -d 10.0.70.77 -j DROP
iptables -A FORWARD -d 10.0.70.77 -s 10.0.70.88 -j DROP
```
Check detailed subnets description on [here](https://github.com/d3vilh/openvpn-ui/tree/main#openvpn-client-subnets-guest-and-home-users).
### Generating .OVPN client profiles
How to generate .OVPN client profile
You can update external client IP and port address anytime under `"Configuration > OpenVPN Client"` menue.
For this go to `"Configuration > OpenVPN Client"`:

And then update `"Connection Address"` and `"Connection Port"` fields with your external Internet IP and Port.
To generate new Client Certificate go to `"Certificates"`, then press `"Create Certificate"` button, enter new VPN client name, complete all the rest fields and press `"Create"` to generate new Client certificate:


To download .OVPN client configuration file, press on the `Client Name` you just created:

Install [Official OpenVPN client](https://openvpn.net/vpn-client/) to your client device.
Deliver .OVPN profile to the client device and import it as a FILE, then connect with new profile to enjoy your free VPN:


### Renew Certificates for client profiles
How to renew old client profile
To renew certificate, go to `"Certificates"` and press `"Renew"` button for the client you would like to renew certificate for:

Right after this step new Certificate will be genrated and it will appear as new client profile with the same Client name. At this point both client profiles will have updated Certificate when you try to download it.
Once you will deliver new client profile with renewed Certificate to you client, press `"Revoke"` button for old profile to revoke old Certificate, old client profile will be deleted from the list.
If, for some reason you still would like to keep old certificate you have to `"Revoke"` new profile, old certificate will be rolled back and new profile will be deleted from the list.
Renewal process will not affect active VPN connections, old client will be disconnected only after you revoke old certificate or certificate term of use will expire.
### Revoking .OVPN profiles
How to revoke client certificate
If you would like to prevent client to use yor VPN connection, you have to revoke client certificate and restart the OpenVPN daemon.
You can do it via OpenVPN UI `"Certificates"` menue, by pressing `"Revoke"`` amber button:

Certificate revoke won't kill active VPN connections, you'll have to restart the service if you want the user to immediately disconnect. It can be done from the same `"Certificates"` page, by pressing Restart red button:

You can do the same from the `"Maintenance"` page.
After Revoking and Restarting the service, the client will be disconnected and will not be able to connect again with the same certificate. To delete the certificate from the server, you have to press `"Remove"` button.
### Two Factor Authentication (2FA)
Starting from vestion `0.9.3` OpenVPN-UI has Two Factor Authentication (2FA) feature.
OpenVPN-UI uses [oath-toolkit](https://savannah.nongnu.org/projects/oath-toolkit/) for two factor authentication. Means you don't need any ThirdParty 2FA provider.
When generating 2FA-enabled certificates OpenVPN-UI will provide QR code with 2FA secret, which you can scan with your 2FA app (Google Authenticator [iOS](https://apps.apple.com/us/app/google-authenticator/id388497605), [Android](https://play.google.com/store/apps/details?id=com.google.android.apps.authenticator2&pcampaignid=web_share), Microsoft Authenticator [iOS](https://apps.apple.com/us/app/microsoft-authenticator/id983156458), [Android](https://play.google.com/store/apps/details?id=com.azure.authenticator&pcampaignid=web_share), etc) to get 2FA token for connection with this certificate.
2FA Certificates **`Renewal`**, **`Revoke`** and **`Delete`** process is the same as for regular certificates.
#### To enable 2FA you have to:
* Go to `"Configuration > OpenVPN Client"` page and enable `"Two Factor Authentication"` option to switch Certificates interface to 2FA mode, so you can generate certificates with 2FA enabled and access 2FA QR code for already generated certificates.
> **Note**: You can generate 2FA-ready certificates at this stage, then deliver 2FA Certificates to all your client devices and enable 2FA Server support later, when you'll be ready to use it. Before that Server will still accept non 2FA-ready certificates only.
* Go to `"Configuration > OpenVPN Server"` page and enable `"Two Factor Authentication"` option for OpenVPN Server backend. Once 2FA is enabled for Server, OpenVPN-Server **will allow 2FA connections only** (non 2FA-ready certificates won't connect).
#### 2FA .OVPN profiles creation
How to generate 2FA Certificate
Procedure for 2FA generation is the same as for regular certificate, but you have to use the uniq `2FA Name` in the email-kind format:

> **Note**: For Multifactor Authentication (MFA), you can add one more password by completing **`Passphrase`** option.
Both **`Passphrase`** and **`Client Static IP`** are optional parameters.
When you complete all the fields, click on **`Create`** and your new 2FA Certificate will be ready.
Once this done, you can click on the new certificate in the `Certificates` page to see all the details including QR code for 2FA token:

You can copy or email this information directly to happy 2FA certificate owner.
#### 2FA certificates usage
How to add 2FA profile to client
To use 2FA certificate you have to install 2FA app on your device (**Google Authenticator** [iOS](https://apps.apple.com/us/app/google-authenticator/id388497605), [Android](https://play.google.com/store/apps/details?id=com.google.android.apps.authenticator2&pcampaignid=web_share), **Microsoft Authenticator** [iOS](https://apps.apple.com/us/app/microsoft-authenticator/id983156458), [Android](https://play.google.com/store/apps/details?id=com.azure.authenticator&pcampaignid=web_share), etc) and scan QR code from the `Certificates` details page.
After scanning QR-code, new Authenticator profile will be created in your 2FA app with the same name as your 2FA Certificate name:

Then you have to download and deliver `.OVPN profile` to [OpenVPN Connect app](https://openvpn.net/client/) and open it as a file. Following window appear:

Click `Add` to add new profile to OpenVPN Connect. Then you will be asked to enter your Username. As username use `2FA Name` which you used during Certificate/profile generation (as precisely as you can. `2FA Name` is part of authentication process):

When you'll be prompted to Enter the password, you have to enter your 2FA token from your 2FA app:

Connection will be suceeded if you entered `2FA Name` and 2FA token correctly.
For MFA authentication you can use optional `Passphrase` when generating new Client certificate, to protect your 2FA token with additional password. In this case you have to enter your `Passphrase` as a `Private Key Password` and 2FA token as `Password`:

### User Management
You can create and delete users with different privileges - Administrators or regular users:
* Administrators has full access
* Regular users has access to Home page, Certificates and Logs pages only. This users can create, renew, revoke and delete all the certificates.
How to manage OpenVPN-UI Users
This functionality available via `"Users Profiles"` page:

Then, if your user have enough privilegies you can Create new profile or manage profiles of other users:


### OpenVPN Pstree structure
All the Server and Client configuration located in Docker volume and can be easely tuned. Here are tree of volume content:
```shell
|-- clients
| |-- your_client1.ovpn
|-- config
| |-- client.conf
| |-- easy-rsa.vars //EasyRSA vars draft, see below real vars file.
| |-- server.conf
|-- db
| |-- data.db //OpenVPN UI DB
|-- log
| |-- openvpn.log
|-- pki
| |-- ca.crt
| |-- vars // EasyRSA real vars, used by all applications
| |-- certs_by_serial
| | |-- your_client1_serial.pem
| |-- crl.pem
| |-- dh.pem
| |-- index.txt
| |-- ipp.txt
| |-- issued
| | |-- server.crt
| | |-- your_client1.crt
| |-- openssl-easyrsa.cnf
| |-- private
| | |-- ca.key
| | |-- your_client1.key
| | |-- server.key
| |-- renewed
| | |-- certs_by_serial
| | |-- private_by_serial
| | |-- reqs_by_serial
| |-- reqs
| | |-- server.req
| | |-- your_client1.req
| |-- revoked
| | |-- certs_by_serial
| | |-- private_by_serial
| | |-- reqs_by_serial
| |-- safessl-easyrsa.cnf
| |-- serial
| |-- ta.key
|-- staticclients //Directory where stored all the satic clients configuration
```
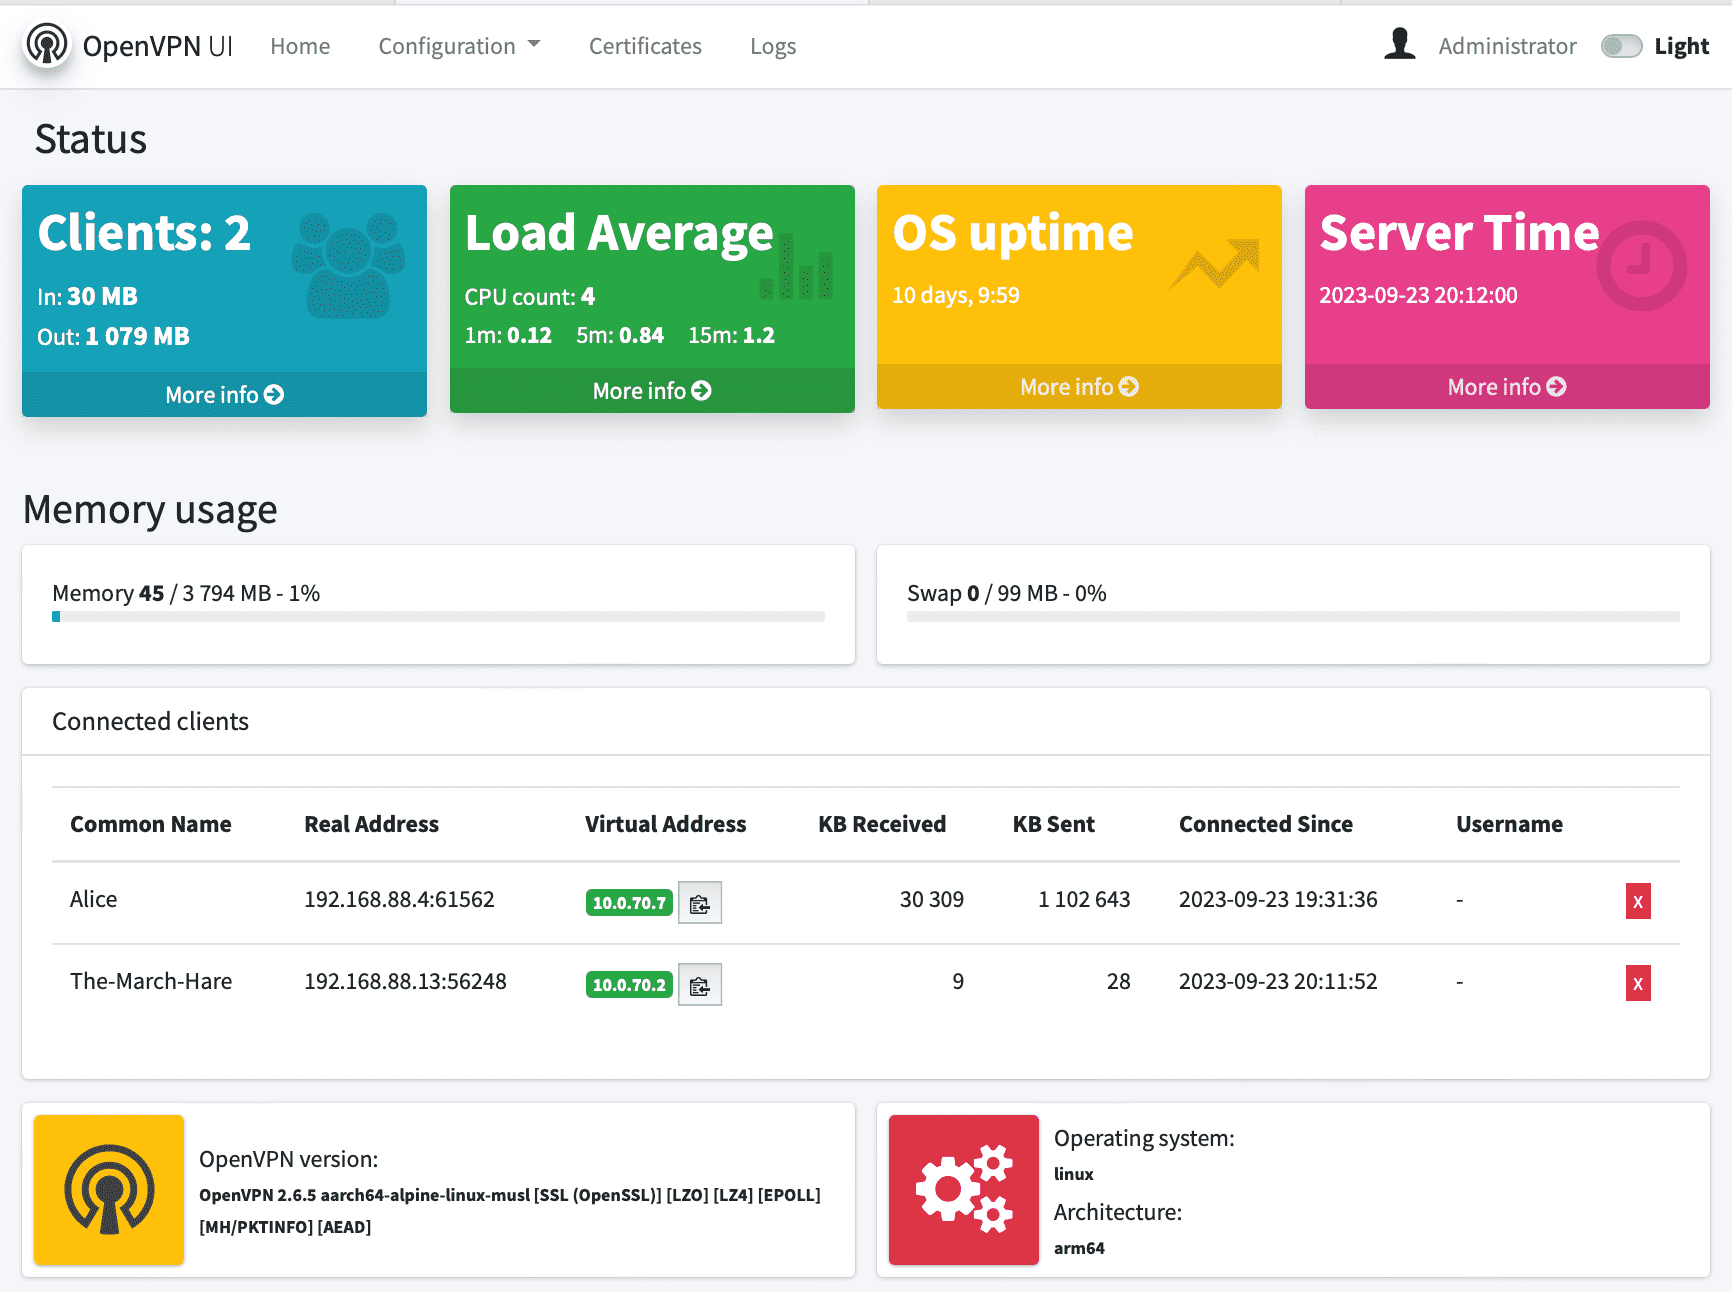
### Screenshots:


Build 22.01.2023 by [d3vilh](https://github.com/d3vilh) for small home project.