https://github.com/d3vilh/xray-cloud
Fast Shadowsocks and XTLS-Reality tunnel proxy that helps you bypass firewalls.
https://github.com/d3vilh/xray-cloud
reality shadowsocks x-ui xray xtls xtls-reality
Last synced: about 1 month ago
JSON representation
Fast Shadowsocks and XTLS-Reality tunnel proxy that helps you bypass firewalls.
- Host: GitHub
- URL: https://github.com/d3vilh/xray-cloud
- Owner: d3vilh
- Created: 2023-08-17T07:58:18.000Z (almost 2 years ago)
- Default Branch: main
- Last Pushed: 2023-08-19T18:14:10.000Z (almost 2 years ago)
- Last Synced: 2025-03-14T17:21:39.426Z (3 months ago)
- Topics: reality, shadowsocks, x-ui, xray, xtls, xtls-reality
- Language: Jinja
- Homepage:
- Size: 201 KB
- Stars: 17
- Watchers: 3
- Forks: 4
- Open Issues: 3
-
Metadata Files:
- Readme: README.md
- Funding: .github/FUNDING.yml
Awesome Lists containing this project
README
        # Xray-cloud

Fast shadowsocks tunnel proxy that helps you bypass firewalls.

**Xray-cloud** supports any x86 servers be it a VPS, Cloud provider (AWS, GoogleC, Azure), a dedicated server, or a home computer. It also supports any ARM-based devices such as Raspberry Pi, Banana Pi, etc.

  > **!Beaware!**: Some protocols described here are [prohibited in PRC](https://en.wikipedia.org/wiki/Shadowsocks). Don't use this if you are in PRC. This is for your educational purposes only.


# Installation

  1. Install [Ansible](https://docs.ansible.com/ansible/latest/installation_guide/intro_installation.html) and Git:

     ```shell

     sudo apt-get install -y python3-pip git rsync

     sudo apt install ansible

     ```

  2. Clone this repository:

     ```shell

     git clone https://github.com/d3vilh/xray-cloud

     ```

  3. Then enter the repository directory:

     ```shell

     cd xray-cloud

     ```

  4. Install requirements:

     ```shell

     ansible-galaxy collection install -r requirements.yml

     ```

     > If you see `ansible-galaxy: command not found`, you have to relogin and then try again.

  5. Run the following command to add the `docker` group if it doesn't exist and add user to the `docker` group:

     > If you have docker installed for current user, you can skip this step.

     ```shell

     sudo groupadd docker

     sudo usermod -aG docker $USER

     ```

  6. **Double check** that `ansible_user` is correct for `inventory.yml`. Need to run installtion on the remote server - follow the recomendations in config file.

  7. Run installation playbook:

     ```shell

     ansible-playbook main.yml

     ```

  8. You have to allow following ports for Inbound traffic in Security Group configuration: `443`, `54321` (temporary for UI), `2098` (if you'll be using subscriptions).


  9. After installation, you can access the Xray Web UI at `http://:54321` and login with the default username `admin` and password `admin`. You must change the password in the Web UI.

# Basic Xray Server Configuration

## Important configuration notes:

   * **UI access port** `http://localhost:54321`, (*change `localhost` to your server host ip/name*)

   * **Default password** is `admin/admin`, which **must** be changed via web interface on first login (`Pannel Settings` > `User Settings`).

   * **External ports** used by container: `443:tcp`, `54321:tcp`(by default), Inbound ports you'll configure.

   * **Configuration files** you should mount `db` and `cert` directories into container, there it will store SQLite DB with configuration and there you'll put https certificate.

   * **It is Important** to change following settings for better security:

     * default password in `Pannel Settings` > `User Settings` > `Password` to something strong and secure.

     * default pannel port in `Pannel Settings` > `Pannel Configurations` > `Pannel Port` from `54321` to some random port (the best in the upper end of the range, up to `65535`)

     * default configuration pannel URL in `Pannel Settings` > `Pannel Configurations` > `Panel URL Root Path` to something random, like `/mysecretpannel/` or `/superxray/`.

## Inbounds configuration

Now when default security configuration is done. It is time to configure Xray to work with your Server. There is few steps below you should follow.


More Xray configuration examples can be found [here](https://github.com/XTLS/Xray-examples).

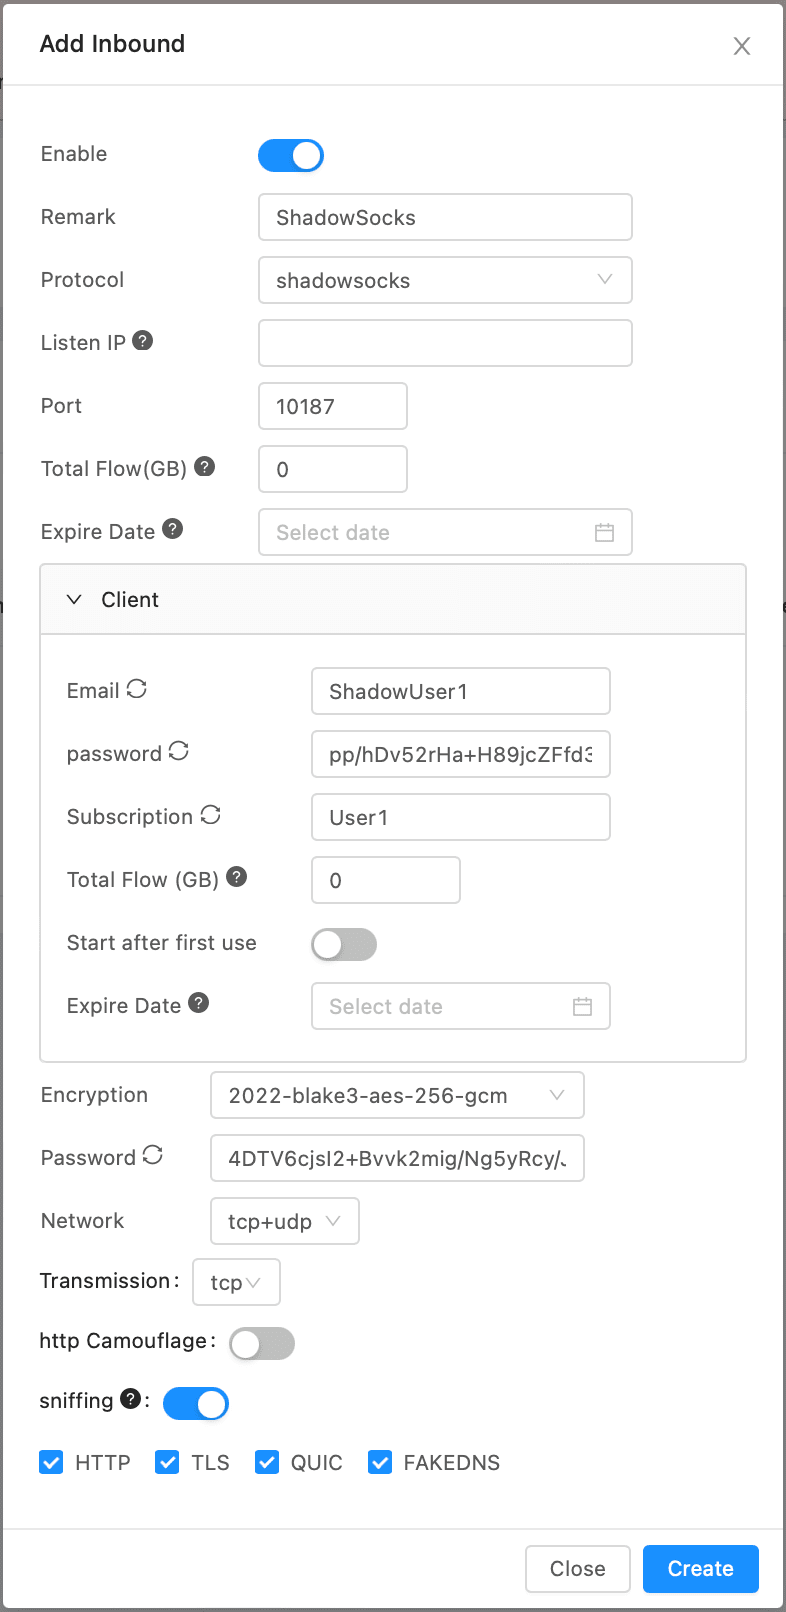
### 1. SHADOWSOCKS Configuration

To create Shadowsocks Inbound you need to:

* Enable Subscriptions:

`Pannel Service` > `Subscriptions` > `Enable Service` > `ON`

`Save` > `Restart Pannel` to apply Subscriptions.

* Add new Inbound:

`Inbounds` > `Add Inbound`:

  * `Remark`: Anything humanreadable to identify this inbound (`ShadowSocks`, for example)

  * `Protocol`: `shadowsocks`

  * `Listen IP`: IP where server will listen for connections. You can leave it empty in this case it will listen on all interfaces.

  * `Listen Port`: Port where server will listen for connections. It is random by default - leave it.

  * `Total Flow GB` and `Expire date` is limit parameters you could sent for this inbound. Leave it empty for unlimited.

  * `Client` >

    * `Email`: Anything humanreadable, to identify this client (`ShadowUser1`, for example)

    * `Password`: Password for desired encryption. It is random by default - leave it.

    * `Subscription`: `User1` Anything humanreadable to identify this Subscription.

    * `Encryption`: for Shadowsocks use any encryption you like which starts with 2022. For example `2022-blake3-aes-256-gcm`

    * `Network`: `tcp,udp` or `tcp` for Shadowsocks

    * `Transmission`: `tcp`

You can use Shadowsocks now, but it is better to continue with VLESS & XTLS-Reality configuration below to bypass [Active probing](https://ensa.fi/active-probing/).

Here how Shadowsocs Configuration looks like:


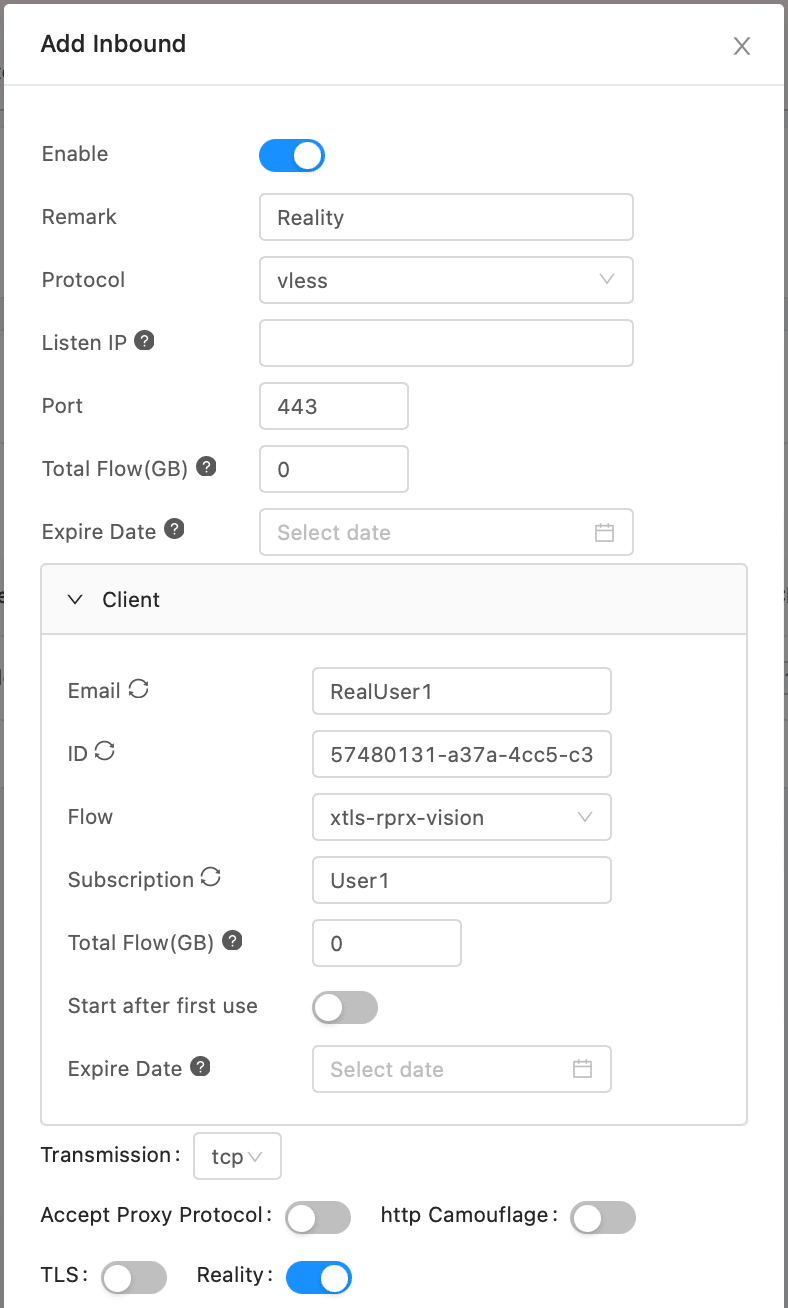
### 2. VLESS & XTLS-Reality Configuration

To create VLESS Inbound you need to:

* Enable Subscriptions:

`Pannel Service` > `Subscriptions` > `Enable Service` > `ON`

`Save` > `Restart Pannel` to apply Subscriptions.

* Add new Inbound:

`Inbounds` > `Add Inbound`:

  * `Remark`: Anything humanreadable to identify this inbound (`Reality`, for example)

  * `Protocol`: `vless`

  * `Listen IP`: IP where server will listen for connections. You can leave it empty in this case it will listen on all interfaces.

  * `Listen Port`: `443` Port where server will listen for connections.

  * `Total Flow GB` and `Expire date` is limit parameters you could set for this inbound. Leave it empty for unlimited.

  * `Client` >

    * `Email`: Anything humanreadable, to identify this client (`RealUser1`, for example)

    * `ID`: Random UUID by default - leave it.

    * `Subscription`: `User1` Keep it same as you set for Shadowsocks.

    * `Accept Proxy Protocol`: `Reality` This is important to enable before setting next options.

    * `Flow`: `xtls-rprx-vision` This option will appear above the `Subscription` option after enabling `Accept Proxy Protocol`.

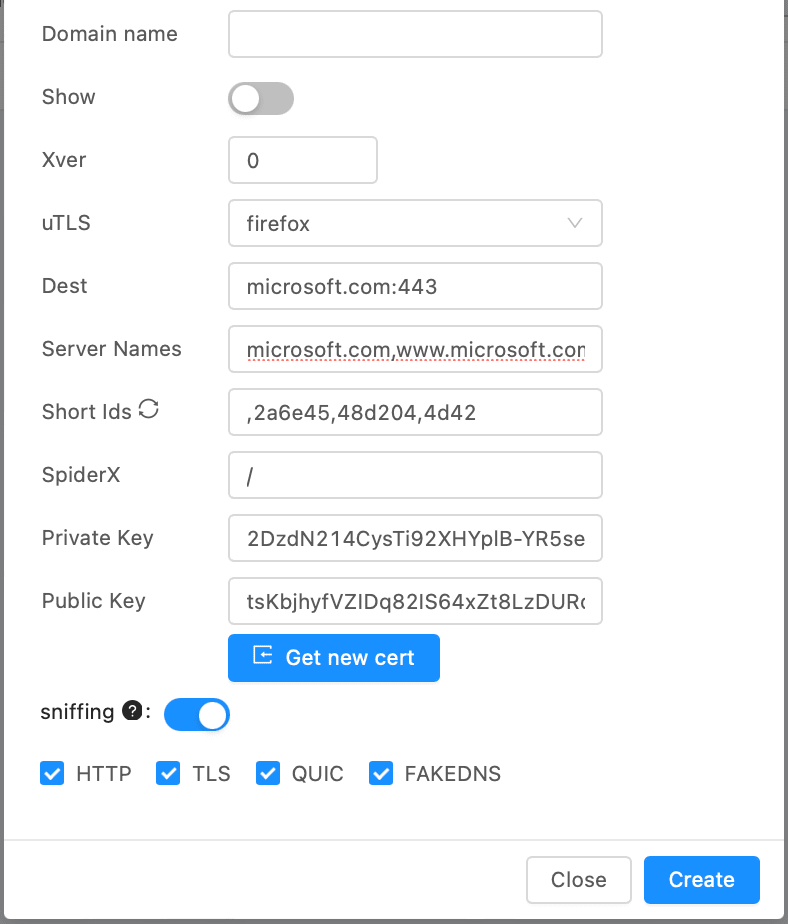
    * `Domain name`: `yourdomain.com` Your domain name. You can leave it empty if you don't have one, so X-UI will automatically insert your IP.

    * `Xver`: `0` Leave it default. IDK what is it for.

    * `uTLS`: `Firefox` Leave it default, `Firefox` or `Chrome` are desirable and most reliable to clients options.

    * `Dest`, `Server Names`: `microsoft.com:443` and `microsoft.com,www.microsoft.com` This is domains under which you will "disguise yourself". This should be some popular external domain, which is not blocked by your SP, Organisation or Goverment (I hope you know consequences and have strong reason for).

    * `Shorts`: Random by default - leave it.

    * `Private Key` and `Public Key`: Click `Get New Cert` button below.

* Save it, and you are done.

Here how Realty Configuration looks like:


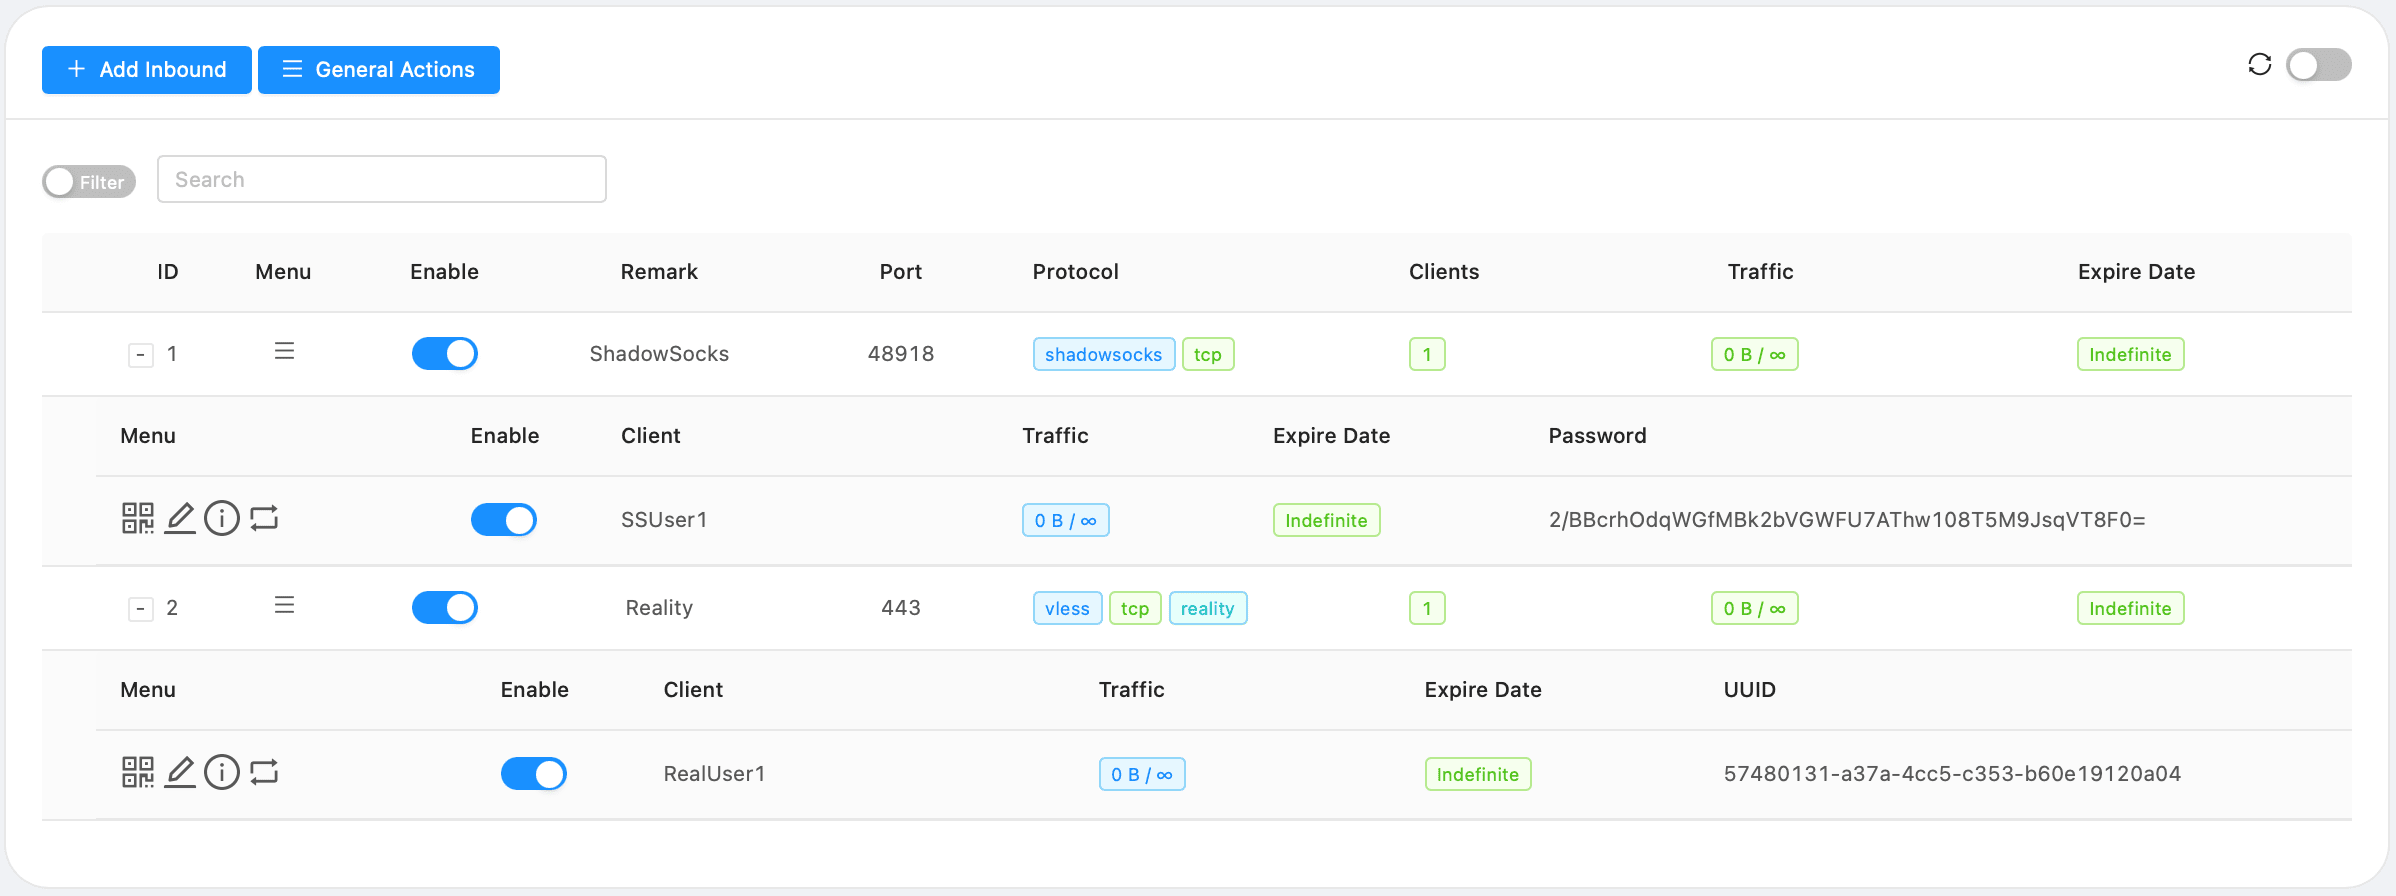
This is what you'll have as a result of our configuration:


## Firewal Security Group Configuration

Based on the ports you've configured in Xray Inbounds, you have to allow inbound traffic on ports `443`, `2098` (if you'll use subscriptions), `` and `other` Inbound ports, if you are using it.

## Additional Options.

Under `Pannel Settings` > `Xray Configuration` you can find some additional options. Such as block BitTorrent traffic for your Clients or enable Ads Blocking or Family-Friendly for them.

You can block connections to specific countries from the list like China, Russia, etc.

In addition you can setup Telegram Bot which will help to manage your Xray Server via Telegram.

## How to connect.

The best way is to click on QR-Code icon for desired `Client` and scan it with one of the Client App. listed below. Yes, it's that simple.

# Xray Clients

Here is the list of Clients you can use with Xray Server.

If you glad to use something different, plesae, let me know, I'll add it to the list.

### Universal Clients

* [**Nekoray/Nekobox**](https://github.com/MatsuriDayo/nekoray) it supports Shadowsocks-2022, VLESS and XTLS-Reality protocols. Easy to use, have nice GUI and available for **Windows**, **Linux**, **Android** and unofficially for MacOS. Special build for **MacOS** is available [here](https://github.com/aaaamirabbas/nekoray-macos/releases).

### Android Clients

* [**Nekobox**](https://play.google.com/store/apps/details?id=moe.nb4a) for Android. Free. [Github](https://github.com/MatsuriDayo/NekoBoxForAndroid/releases).

* [**V2RayNG**](https://play.google.com/store/apps/details?id=com.v2ray.ang&hl=en_US), [Github](https://github.com/2dust/v2rayNG)

Uses XRay as a kernel, supports all the available for Xray protocols.

### MacOS Clients

* [**V2BOX**](https://apps.apple.com/us/app/v2box-v2ray-client/id6446814690) for MacOS. Free.

* [**Nekoray**](https://github.com/aaaamirabbas/nekoray-macos/releases) for MacOS. Free but lame.

### iOS Clients

* [**FoXray**](https://apps.apple.com/us/app/foxray/id6448898396). On [Appstore](https://apps.apple.com/us/app/foxray/id6448898396) for iPhone and iPad. Free.

  Based on XRay-Core, supports all the available protocols: Shadowsocks, VLESS, Socks, VMess, XTLS, Reality, Trojan. With TLS, TCP, HTTP/2, WebSocket, mKCP, gRPC, QUIC.

* [**V2BOX**](https://apps.apple.com/us/app/v2box-v2ray-client/id6446814690). On [Appstore](https://apps.apple.com/us/app/v2box-v2ray-client/id6446814690) for iPhone. Free.

* [**ShadowRocket**](https://apps.apple.com/us/app/shadowrocket/id932747118). On [Appstore](https://apps.apple.com/us/app/shadowrocket/id932747118) for iPhone and iPad. Costs 3,99$.

Supports Shadowsocks-2022, VMess, VLESS, Trojan, TUIC, Hysteria, WireGuard, XTLS-Vision, uTLS.


Or even better - [**donate for Ukraine 🇺🇦**](http://u24.gov.ua)