https://github.com/dab0mb/hotncold
https://github.com/dab0mb/hotncold
Last synced: 10 months ago
JSON representation
- Host: GitHub
- URL: https://github.com/dab0mb/hotncold
- Owner: DAB0mB
- Created: 2019-09-13T22:08:59.000Z (almost 7 years ago)
- Default Branch: master
- Last Pushed: 2021-05-27T11:29:44.000Z (about 5 years ago)
- Last Synced: 2025-07-08T16:54:46.859Z (about 1 year ago)
- Language: JavaScript
- Size: 143 MB
- Stars: 22
- Watchers: 2
- Forks: 6
- Open Issues: 0
-
Metadata Files:
- Readme: README.md
Awesome Lists containing this project
README
# Hot&Cold
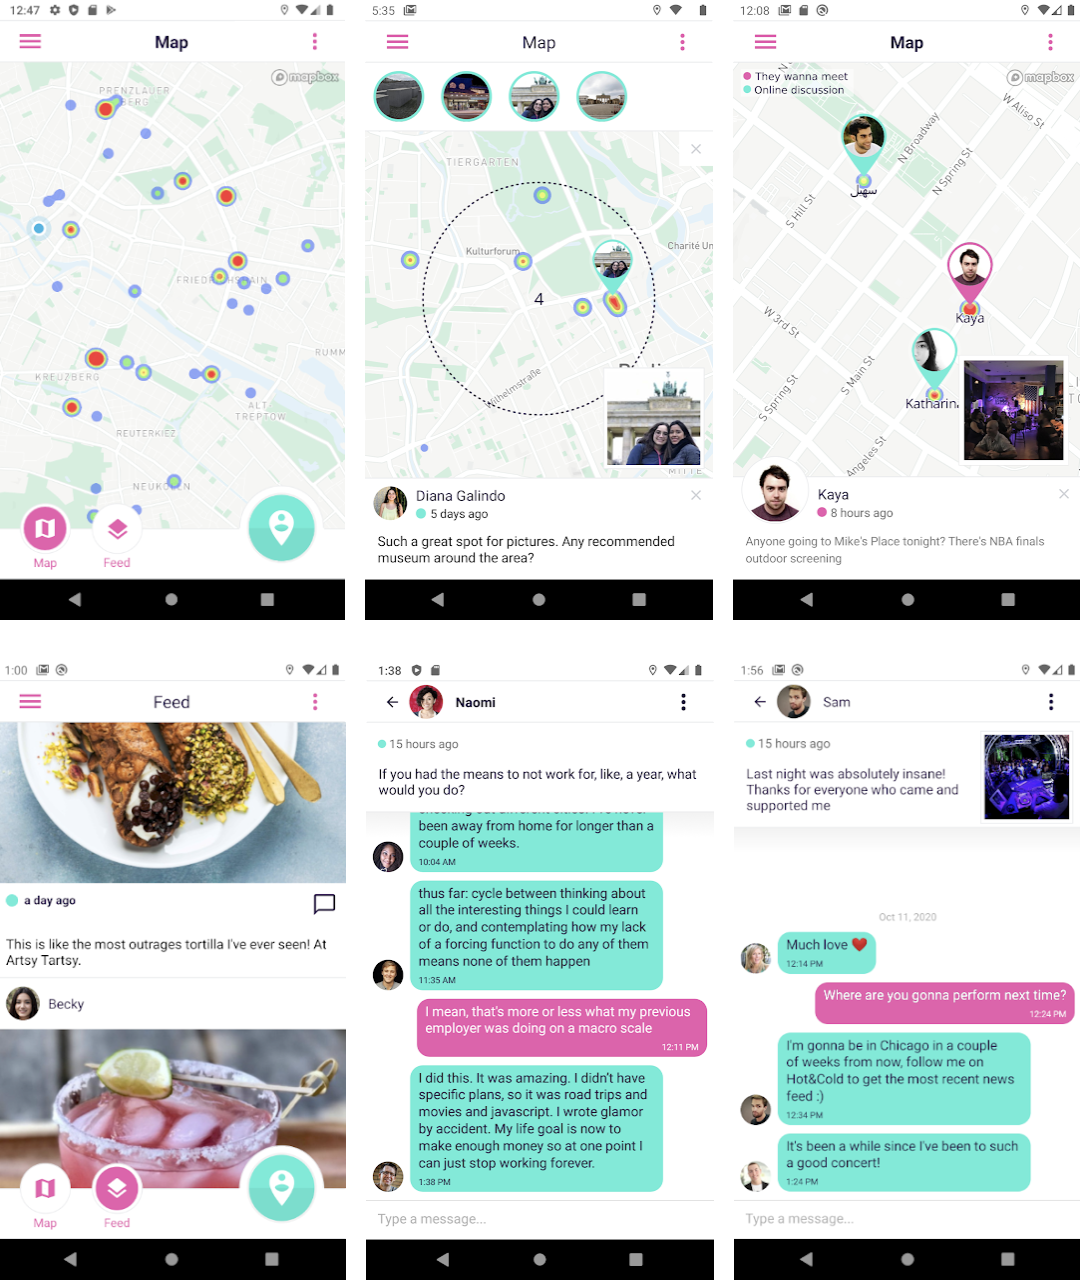
Hot&Cold is an open source, full-stack, heatmap-based social chat app. Featuring:
- [React-Native](https://reactnative.dev/)
- [PostgresSQL](https://www.postgresql.org/)
- [Apollo GraphQL (Client + Server)](https://www.apollographql.com/)
- [MapBox](https://www.mapbox.com/)
- [FireBase](https://firebase.google.com/)
- [Twillio](https://www.twilio.com/)
- [Cloudinary](https://cloudinary.com/)
This is the main repository of the app, but only includes the front-end part of it; [please see its complient back-end project](https://github.com/DAB0mB/HotnCold-server). The app should be working on both Android and iOS, but was developed mostly with Android in mind.
[**The app is currently available for Android on PlayStore**](https://play.google.com/store/apps/details?id=com.hotncold&hl=en_US&gl=US).
## Setup
Configure the following services:
- [MapBox](https://www.mapbox.com/).
- [Firebase](firebase.google.com).
- [Hot&Cold Server](https://github.com/DAB0mB/HotnCold-server).
Add the following fields to `gradle.properties`:
# See the following guide for further info: https://reactnative.dev/docs/signed-apk-android.html
MYAPP_RELEASE_STORE_FILE
MYAPP_RELEASE_KEY_ALIAS
MYAPP_RELEASE_STORE_PASSWORD
MYAPP_RELEASE_KEY_PASSWORD
android.useAndroidX=true
android.enableJetifier=true
FLIPPER_VERSION=0.37.0
If you're developing for iOS, from XCode, go to `product > schema > edit schema > build (hotncold) > pre-actions' and add the following script:
```sh
ENVFILE=.env.development
echo $ENVFILE > /tmp/envfile
```
Define environment variables in `.env.$ENVNAME` file (NEVER COMMIT):
# A public access token to MapBox's API
MAPBOX_ACCESS_TOKEN
# The map style URL given by MapBox's API
MAPBOX_STYLE_URL
# URL to Hot&Cold's server
SERVER_URI
# URL to Hot&Cold's server GraphQL endpoint
GRAPHQL_ENDPOINT
# If specified, pressed notifications will remain
PERSIST_NOTIFICATIONS
# The maximum creation distance of statuses from GPS location in meters
STATUS_CREATION_RADIUS
# Run app with Robot. Robot files will not be bundled if this var is provided
USE_ROBOT
To enable push notifications, download `google-services.json` and `GoogleService-Info.plist` from Firebase console to `android/app` and `ios/hotncold` directories respectively. See [further instructions](https://support.google.com/firebase/answer/7015592?hl=en).
Run the following commands in series:
$ yarn
$ yarn codegen
Make sure you have a device connected with `adb devices`.
## Dev
Run the packager in one tab:
$ yarn start
Trigger the app on a second tab:
$ yarn android
You can also bundle a debug-apk file with warnings remaining (Android only, useful for troubleshooting issues). First, make sure that you have the following extension defined in your `android/app/build.gradle` file:
```gradle
project.ext.react = [
// ...
bundleInDebug: true
]
```
And then run the following:
# Output: android/app/build/outputs/apk/debug/app-debug.apk
$ yarn bundledebug
$ android/gradlew assembleDebug
*Make sure to remove `bundleInDebug` option from your `build.gradle` file for continues work!*
## Test
### Hidden inputs
When signing-in, you can unlock test mode by spam-tapping on the country code field. At some point you it should turn into `-0`, which indicates you've just activated test mode successfully.
There's 2 methods to proceed from this point on: The first one is by filling-out the phone field with 0s, or you can select your country code and fill-out your real number. With the first method you won't receive any text message, authentication will only be done locally, and with the second method, you'll receive an actual text message. Either way, the verification code will appear on screen for testing purposes. Once you continue, the app should function normally; only difference you'll be able to see users-mocks only.
Each supported geographical area should have at least 1 user-mock that should be detectable on the map or by the radar.To get a feedback from a fake user when chatting with it, you can send the word `echo` to get a response. Alternatively, you can specify a delay time (in seconds) by concatenating a parameter e.g. `echo 5`.
### E2E
Hot&Cold uses [Firebase Test Lab](https://firebase.google.com/docs/test-lab/) in conjunction with an internal module called [Robot](./src/robot). The paradigm is that [Robo](https://firebase.google.com/docs/test-lab/android/robo-ux-test) (notice the lack of T), a tool that Firebase uses to simulate input on real Android devices, doesn't work with React-Native. This is because React-Native wraps native Android view elements in a unique way that is not accessible to Robo, hence Robot was created. See this [Meidum post](https://medium.com/@eytanmanor/4bc475f4bb2) about Bobcat (aka Robot) for further info.
RoboT scripts are located under the [`robot/scopes`](./src/robot/scopes) and have direct control over React elements. In addition to having Robot scripts, you need to record a [Robo script](https://firebase.google.com/docs/test-lab/android/robo-ux-test) with Android-Studio, so you can press native modals, such as alerts, date-time pickers, and permissions. *It's required* that the RoboT script will end end with any native modal, so it will be used as an anchor for Robo, otherwise the tests will be aborted mid-session.
Robot `.apk` can be assembled with `yarn assembleRobot` and it will override the `app-release.apk` file.
## Prod
First, follow these instructions:
- [Generate an upload key](https://facebook.github.io/react-native/docs/signed-apk-android#generating-an-upload-key).
- [Setup gradle variables](https://facebook.github.io/react-native/docs/signed-apk-android#setting-up-gradle-variables).
- [Add signing config to gradle config](https://facebook.github.io/react-native/docs/signed-apk-android#adding-signing-config-to-your-apps-gradle-config).
Assemble an `.apk` file:
# Output: android/app/build/outputs/apk/release/app-release.apk
$ android/gradlew assembleRelease
The app can be distributed as is or installed with `adb`:
$ adb install