https://github.com/dannymcgee/unreal_rotarywingaircraft
Helicopters for Unreal Engine
https://github.com/dannymcgee/unreal_rotarywingaircraft
Last synced: about 2 months ago
JSON representation
Helicopters for Unreal Engine
- Host: GitHub
- URL: https://github.com/dannymcgee/unreal_rotarywingaircraft
- Owner: dannymcgee
- License: mit
- Created: 2023-02-18T21:19:15.000Z (over 2 years ago)
- Default Branch: main
- Last Pushed: 2024-08-13T17:12:30.000Z (11 months ago)
- Last Synced: 2025-05-06T21:58:19.586Z (about 2 months ago)
- Language: C++
- Size: 243 KB
- Stars: 24
- Watchers: 2
- Forks: 3
- Open Issues: 2
-
Metadata Files:
- Readme: README.md
- Changelog: CHANGELOG.md
- License: LICENSE
Awesome Lists containing this project
README
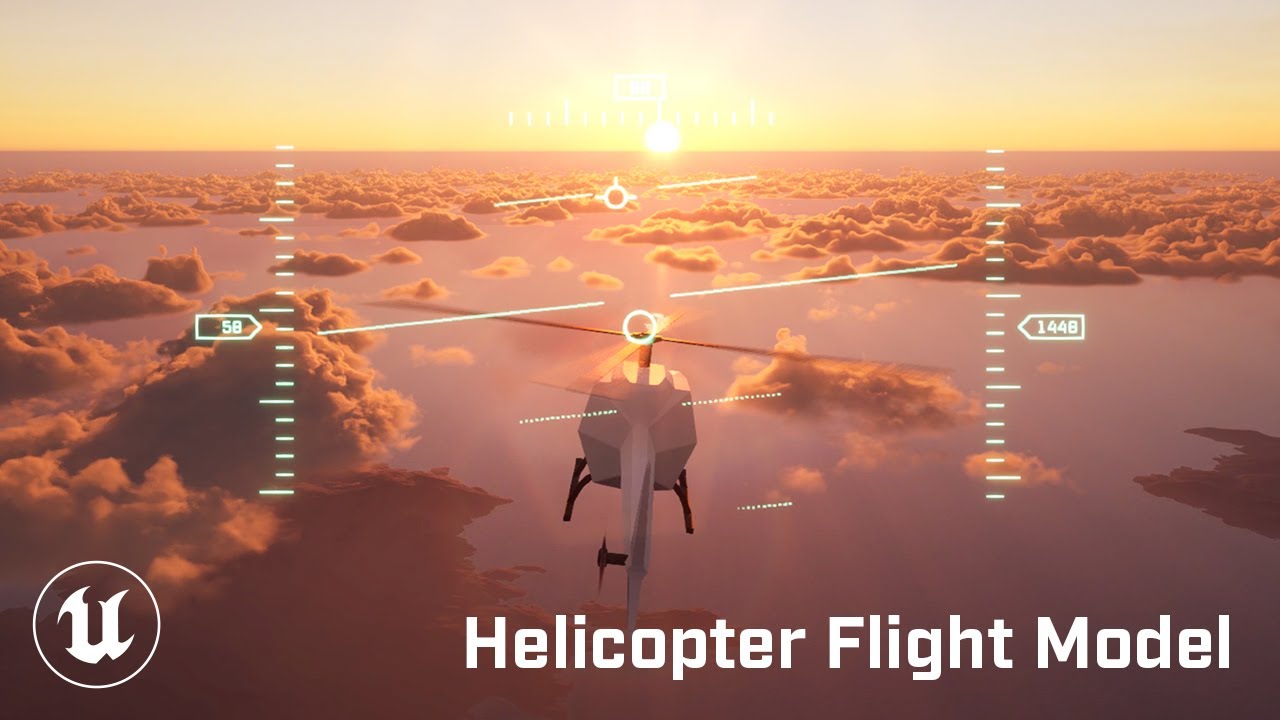
# Rotary-Wing Aircraft Plugin
This plugin provides a Chaos-powered helicopter flight model and modular
aircraft HUD for Unreal Engine 5.
[
](https://www.youtube.com/watch?v=ig98iGbf2Bw "Watch on YouTube")
## Flight Model
The included flight model could best be described as "SimCade". It's intended to
be easy to learn and controllable with basic hardware like a standard console
gamepad, while still feeling plausibly realistic and providing some depth and
challenge for players who want to invest the time to "master" it.
### Features
* Drag simulation with dynamic cross-sectional area measurement
* Simplistic simulation of helicopter-specific phenomena like ground effect
* Designer-tunable parameters for power, agility, and aerodynamic coefficients
* Modular architecture inspired by Epic's Chaos Vehicles plugin
## HUD
The plugin also includes a modular, resolution-independent, DPI-aware aircraft
HUD built from scratch with UMG and dynamic UI materials.
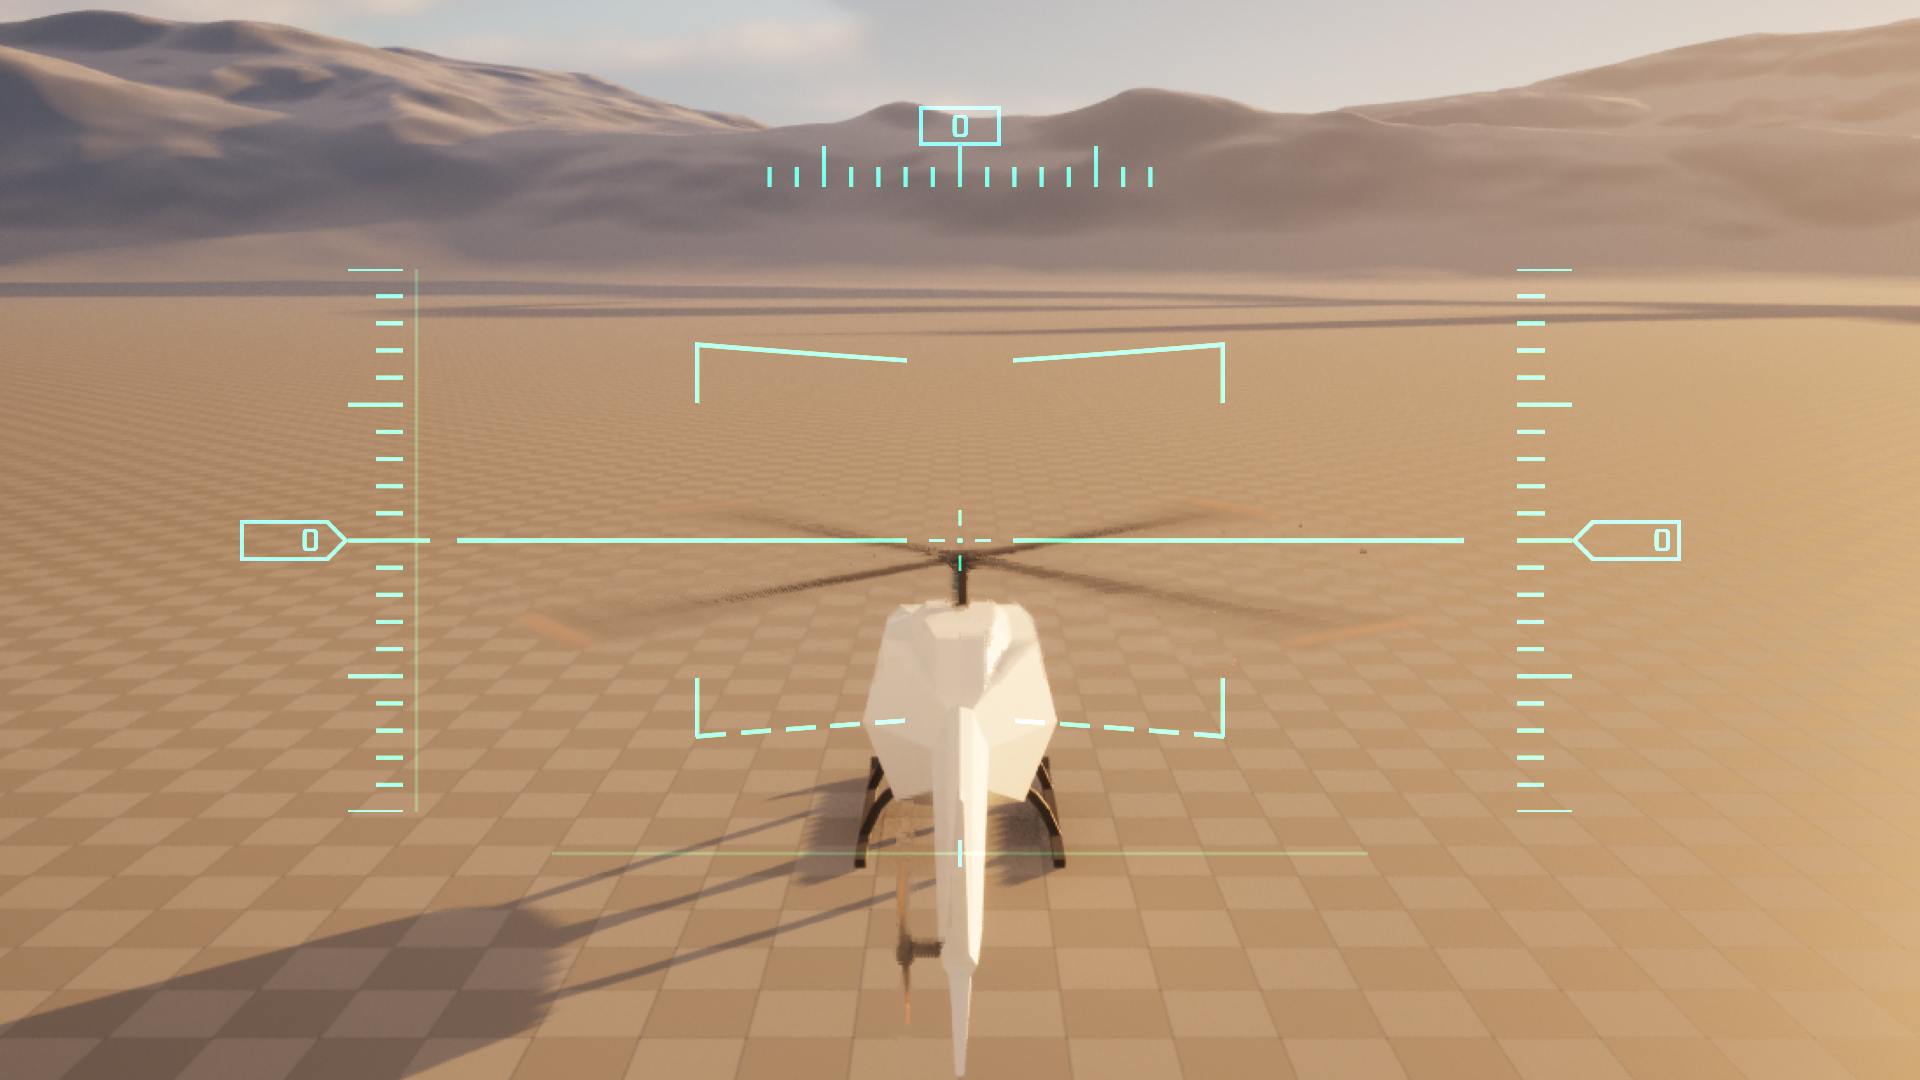
### Features
* Pitch ladder which tracks the aircraft's attitude relative to the horizon,
with lateral markers at 5° intervals. (Currently this is pretty fixed,
with only the line thickness being configurable, but I plan to make this much
more customizable in a future update.)
* Altitude, airspeed, and heading indicators with numeric displays and sliding
"rulers". The "rulers" are built from a generic `SteppedHashMarks` widget with
configuration options for line thickness, orientation, and the number of
coarse and fine subdivisions.
* A "flight path" indicator that displays the current velocity vector of the
aircraft relative to the camera.
* Axis readouts for the Collective and Anti-Torque inputs — particularly
handy when using digital inputs (like buttons or keyboard keys) to control
these axes.
## Getting Started
### Installing the plugin
First, make sure that your project is configured as a C++ project. If necessary,
you can convert a Blueprint project to be C++-compatible by adding a temporary
C++ class to the project. In the editor, select **Tools** > **New C++ Class...**
and follow the steps in the wizard. You don't need to do anything with this
class — you can delete it once you're done (and you can carry on using
Blueprints as usual whether you keep it or not) — this is only necessary
to generate the C++ project files so you can compile the project from source.
If you're already using Git in your project, I would recommend adding this repo
as a submodule. From the root directory:
```sh
git submodule add https://github.com/dannymcgee/Unreal_RotaryWingAircraft.git ./Plugins/Gameplay/RotaryWingAircraft
```
Otherwise, you can clone it into your project in much the same way:
```sh
git clone https://github.com/dannymcgee/Unreal_RotaryWingAircraft.git ./Plugins/Gameplay/RotaryWingAircraft
```
> **IMPORTANT:** Downloading as a ZIP file is **not recommended** unless you only need the C++ source
files. This repo uses Git LFS for binaries (e.g., blueprints), which will not be
included in the ZIP archive.
Add the plugin to your `*.uproject` definition:
```json
{
...
"Plugins": [
...
{
"Name": "RotaryWingAircraft",
"Enabled": true
}
]
}
```
Finally, close out the editor and compile the project in your IDE of choice. If
you're planning on doing lots of C++ programming, I can highly recommend
[Jetbrains Rider](https://www.jetbrains.com/rider/) — otherwise, refer to
Epic's documentation for configuring [Visual Studio](https://docs.unrealengine.com/5.1/en-US/setting-up-visual-studio-development-environment-for-cplusplus-projects-in-unreal-engine/)
or [VS Code](https://docs.unrealengine.com/5.1/en-US/setting-up-visual-studio-code-for-unreal-engine/) for Unreal Engine.
### Taking it for a spin
You can do the following to give the plugin a quick test drive before committing
to use it in your project:
1. Follow the instructions above to install the plugin and compile your project.
1. Navigate to **Project Settings** > **Project** > **Maps & Modes**.
1. Set **Default Pawn Class** to `BP_SampleHeli`.
1. Add a default **Player Start** actor to your scene.
1. Play in Editor
Alternatively, you can clone this barebones [example project](https://github.com/dannymcgee/Unreal_HeliExample)
where the steps above have already been done for you.
### Setting up a new helicopter from scratch
The workflow here is very similar to Epic's Chaos Vehicles.
#### Preparing art assets
* Ensure that your skeletal mesh has bones for all of the rotors that you'd like
to spin in sync with the flight model's engine state.
* Ensure that your mesh faces the +X axis.
* Ensure that your mesh has an assigned Physics Asset with a reasonable physics
body attached to the root bone.
* You may need to manually override the Mass of your physics body to a
reasonable value. For example, the included `SK_SampleHeli_Phys` is set to 900
kg, which is roughly the weight of a laden MH-6 Little Bird.
#### Animation Blueprint
* Create an animation blueprint for your skeletal mesh, and set its parent class
to `HeliAnimInstance`.
* Setup the following nodes in your `AnimGraph`:
```
Mesh Space Ref Pose -> Rotor Controller -> Component to Local -> Output Pose
```
#### Pawn Blueprint
* Create a new Blueprint Class derived from `Heli`.
* Assign your skeletal mesh to `VehicleMesh` and set its **Animation** > **Anim
Class** to the animation blueprint created in the previous step.
* Under **Input**, assign the included `IA_Heli_Cyclic`, `IA_Heli_Collective`,
and `IA_Heli_AntiTorque` actions. You can assign the included
`IMC_Heli_Default` as the Default Mapping Context, or you can create your own
bindings to suit your preferences.
* Add a camera to your own preferences. You can take a look at the included
`BP_SampleHeli` for an example.
* Under **Vehicle Movement** > **Vehicle Setup** > **Rotors**, create a rotor
setup for each of your mesh's rigged rotors. Set **Bone Name** to the name of
the skeleton bone that controls the rotor, and **Torque Normal** to a
normalized vector that corresponds to the axis the rotor blades should spin
around (in component space).
* Create CurveFloat assets for **Altitude Penalty Curve**, **Drag Coefficient
Curve**, and **Aerodynamic Torque Influence**. Check the tooltips for
explanations and axis descriptions, and configure to taste.
Alternatively, if the included `Heli` pawn doesn't meet your needs for some
reason, feel free to create your own Pawn class from scratch and configure it to
use the `HeliMovementComponent`. The movement component class has a very
straightforward, blueprint-friendly API allowing you to set inputs and query for
information about the vehicle's state.