https://github.com/danylovolokh/setup-free-bitbucket-cloud-ci
How to setup a Free CI for Android project based on bitbucket cloud pipelines
https://github.com/danylovolokh/setup-free-bitbucket-cloud-ci
java
Last synced: about 1 year ago
JSON representation
How to setup a Free CI for Android project based on bitbucket cloud pipelines
- Host: GitHub
- URL: https://github.com/danylovolokh/setup-free-bitbucket-cloud-ci
- Owner: danylovolokh
- Created: 2019-03-10T10:36:32.000Z (over 7 years ago)
- Default Branch: master
- Last Pushed: 2019-03-27T11:29:16.000Z (over 7 years ago)
- Last Synced: 2025-04-05T20:11:11.184Z (over 1 year ago)
- Topics: java
- Language: Java
- Size: 215 KB
- Stars: 7
- Watchers: 2
- Forks: 2
- Open Issues: 2
-
Metadata Files:
- Readme: README.md
Awesome Lists containing this project
README
# How to setup a Free CI for Android project based on Bitbucket Cloud Pipelines.
This project is created as a "manual" for setting up a FREE CI (Continuous Integration) based on [Bitbucket Pipelines](https://bitbucket.org/product/features/pipelines)
At the time of writing (10.03.2019) **bitbucket cloud offers you a free 50 build minutes** to get started with Pipelines.
## List of files needed in this project to setup CI
- ./build_info.json
- ./1_update_build_info_json.py
- ./2_update_gradle_build_version.py
- ./3_commit_build_version.py
- ./4_collect_change_log.py
- ./6_upload_apk_file_to_bitbucket_downloads.py
- ./Utils.py
# Steps to build a version with Bitbucket Pipelines
1. Update build number, build version name etc...
2. Update build.gradle
3. Commit and push changes to the repository
4. Collect a change log
5. Build the application
Additional steps:
6. Sign the application with the "release" signing key.
7. Upload the apk files to the storage for future usage.
8. Upload a version to the Fabric Beta for testing purposes.
## 1. Update build number, build version name etc...
We will use *build_info.json* to keep the build history.
> The file *build_info.json* is located in the root of the project.
Example:
```javascript
{
"build_number":"13",
"build_date":"2019-03-10 09:36",
"previous_build_date":"2019-03-10 09:16",
"application_name":"SetupBitbucketCloudCI",
"application_version":"1.0",
"build_tag":"SetupBitbucketCloudCI/1.0/13",
"previous_build_tag":"SetupBitbucketCloudCI/1.0/12",
"repo_url":"ssh://git@bitbucket.org:DanyloVolokh/setupbitbucketcloudci.git",
"git_branch":"master"
}
```
- **build_number** - this value is a build number
- **build_date** - date, when this build was created
- **previous_build_date** - the date of previous build
- **application_name** - to change the application name, change this value
- **application_version** - to change the application version (example: from 1.1 to 2.0) you need to change this value
- **build_tag** - a tag name which will be added to the repository when build is created
- **previous_build_tag** - a tag which was added when previoud build was created
- **repo_url** - link to the repository
- **git_branch** - to work on a different branch besides master you need to change this value
### To update the *build_info.json* we need to execute python script *1_update_build_info_json.py*
> The file *1_update_build_info_json.py* is located in the root of the project.
This script makes following changes to the *build_info.json*:
- increments **build_number**
- changes **build_date** to the current date
- updates **previous_build_date**
- updates **build_tag**
- updates **previous_build_tag**
## 2. Update build.gradle
We need to modify 2 files:
- *build.gradle* file of the "app" module
- *build.gradle* of the root.
> The file *build.gradle* is located in the root of the project.
```
ext {
versionCodeValue = 9999
versionNameValue = "debugApplication"
}
```
> The file *build.gradle* is located in the "app" folder of the project.
```
defaultConfig {
...
versionName versionNameValue
versionCode versionCodeValue
...
}
```
### To update *versionNameValue* and *versionCode* in the *build.gradle* we need to execute python script *2_update_gradle_build_version.py*
> The file *2_update_gradle_build_version.py* is located in the root of the project.
This script takes the *application_name* and *application_version* from *build_info.json*, creates a *versionNameValue* and adds it to the root *build.gradle*. Values in the root *build.gradle* are used as *versionName* and *versionCode* in the *build.gradle* of the "app" module.
> versionNameValue = application_version + '.' + build_number
> versionCodeValue = build_number
## 3. Commit and push changes to the repository
### To commit the changes to build_info.json we need to execute python script *3_commit_build_version.py*
> The file *3_commit_build_version.py* is located in the root of the project.
Please note: we do not commit "build.gradle" files. We only modify the *build_info.json*
## 4. Collect a change log
### To collect the change log we need to execute python script *4_collect_change_log.py*
> The file *4_collect_change_log.py* is located in the root of the project.
Change contains all the commit messages from the commits between this build and the previous build.
In this project we create a separate change log files for every flavor of the application. Then these separate change logs can be used as a "Release Notes" when we upload different versions to the Fabric. Because the only way to distinguish "flavors" in Fabric Beta "Release notes" is to have different release notes, we create separate change log files for each flavor.
After you run *4_collect_change_log.py* 2 new files will be created in the root of the project:
- change_log_external.txt
- change_log_internal.txt
Change log is collected between the *build_tag* and *previous_build_tag*.
Example of the *change_log_external.txt*
```
External
"Added how to commit changes"
"Added how to update build.gradle file"
"Added initial Readme file"
"Fix files that were committed by mistake"
"Update upload to Downloads"
```
## 5. Build the application
Now we are ready to build a "debug" version with bitbucket CI. To be able to build "release" version we need to setup signing key.
In order to build the "debug" version we need to call "./gradlew assembleDebug"
> ./gradlew assembleDebug
# Setup Bitbucket pipelines.
References:
- [Get started with Bitbucket Pipelines](https://confluence.atlassian.com/bitbucket/get-started-with-bitbucket-pipelines-792298921.html)
- [Configure bitbucket-pipelines.yml](https://confluence.atlassian.com/bitbucket/configure-bitbucket-pipelines-yml-792298910.html)
In order to setup bitbucket pipelines you need to add *bitbucket-pipelines.yml* file to the root of the project.
```
pipelines:
custom:
manual_configuration:
- step:
name: Build a version
image: openjdk:8
caches:
- gradle
- android-sdk
- pip
script:
# Download and unzip android sdk
- wget --quiet --output-document=android-sdk.zip https://dl.google.com/android/repository/sdk-tools-linux-3859397.zip
- unzip -o -qq android-sdk.zip -d android-sdk
# Define Android Home and add PATHs
- export ANDROID_HOME="/opt/atlassian/pipelines/agent/build/android-sdk"
- export PATH="$ANDROID_HOME/tools:$ANDROID_HOME/tools/bin:$ANDROID_HOME/platform-tools:$PATH"
# Download packages.
- yes | sdkmanager "platform-tools"
- yes | sdkmanager "platforms;android-27"
- yes | sdkmanager "build-tools;27.0.3"
- yes | sdkmanager "extras;android;m2repository"
- yes | sdkmanager "extras;google;m2repository"
- yes | sdkmanager "extras;google;instantapps"
- yes | sdkmanager --licenses
# Install python
- echo "Install python"
- apt-get update
- apt-get install python-pip -q -y
# Give write access
- chmod a+x ./gradlew
# Clean the project
- ./gradlew clean
# Setup correct origin url
- git config -e
- git config --global user.email "v.danylo@gmail.com"
- git config --global user.name "Danylo Volokh Pipeline"
- git config remote.origin.url https://$BITBUCKET_USER:$BITBUCKET_PASS@bitbucket.org/$BITBUCKET_ACCOUNT/$GIT_REPO_NAME.git
# Change build version
- echo "Update info json"
- python 1_update_build_info_json.py
# Update application version in gradle file
- echo "Change build version"
- python 2_update_gradle_build_version.py
# Change build version after successful build
- echo "Commit build version"
- python 3_commit_build_version.py
# Collect change log
- echo "Collect change log"
- python 4_collect_change_log.py
# Build apk
- ./gradlew assembleDebug
definitions:
caches:
android-sdk: android-sdk
```
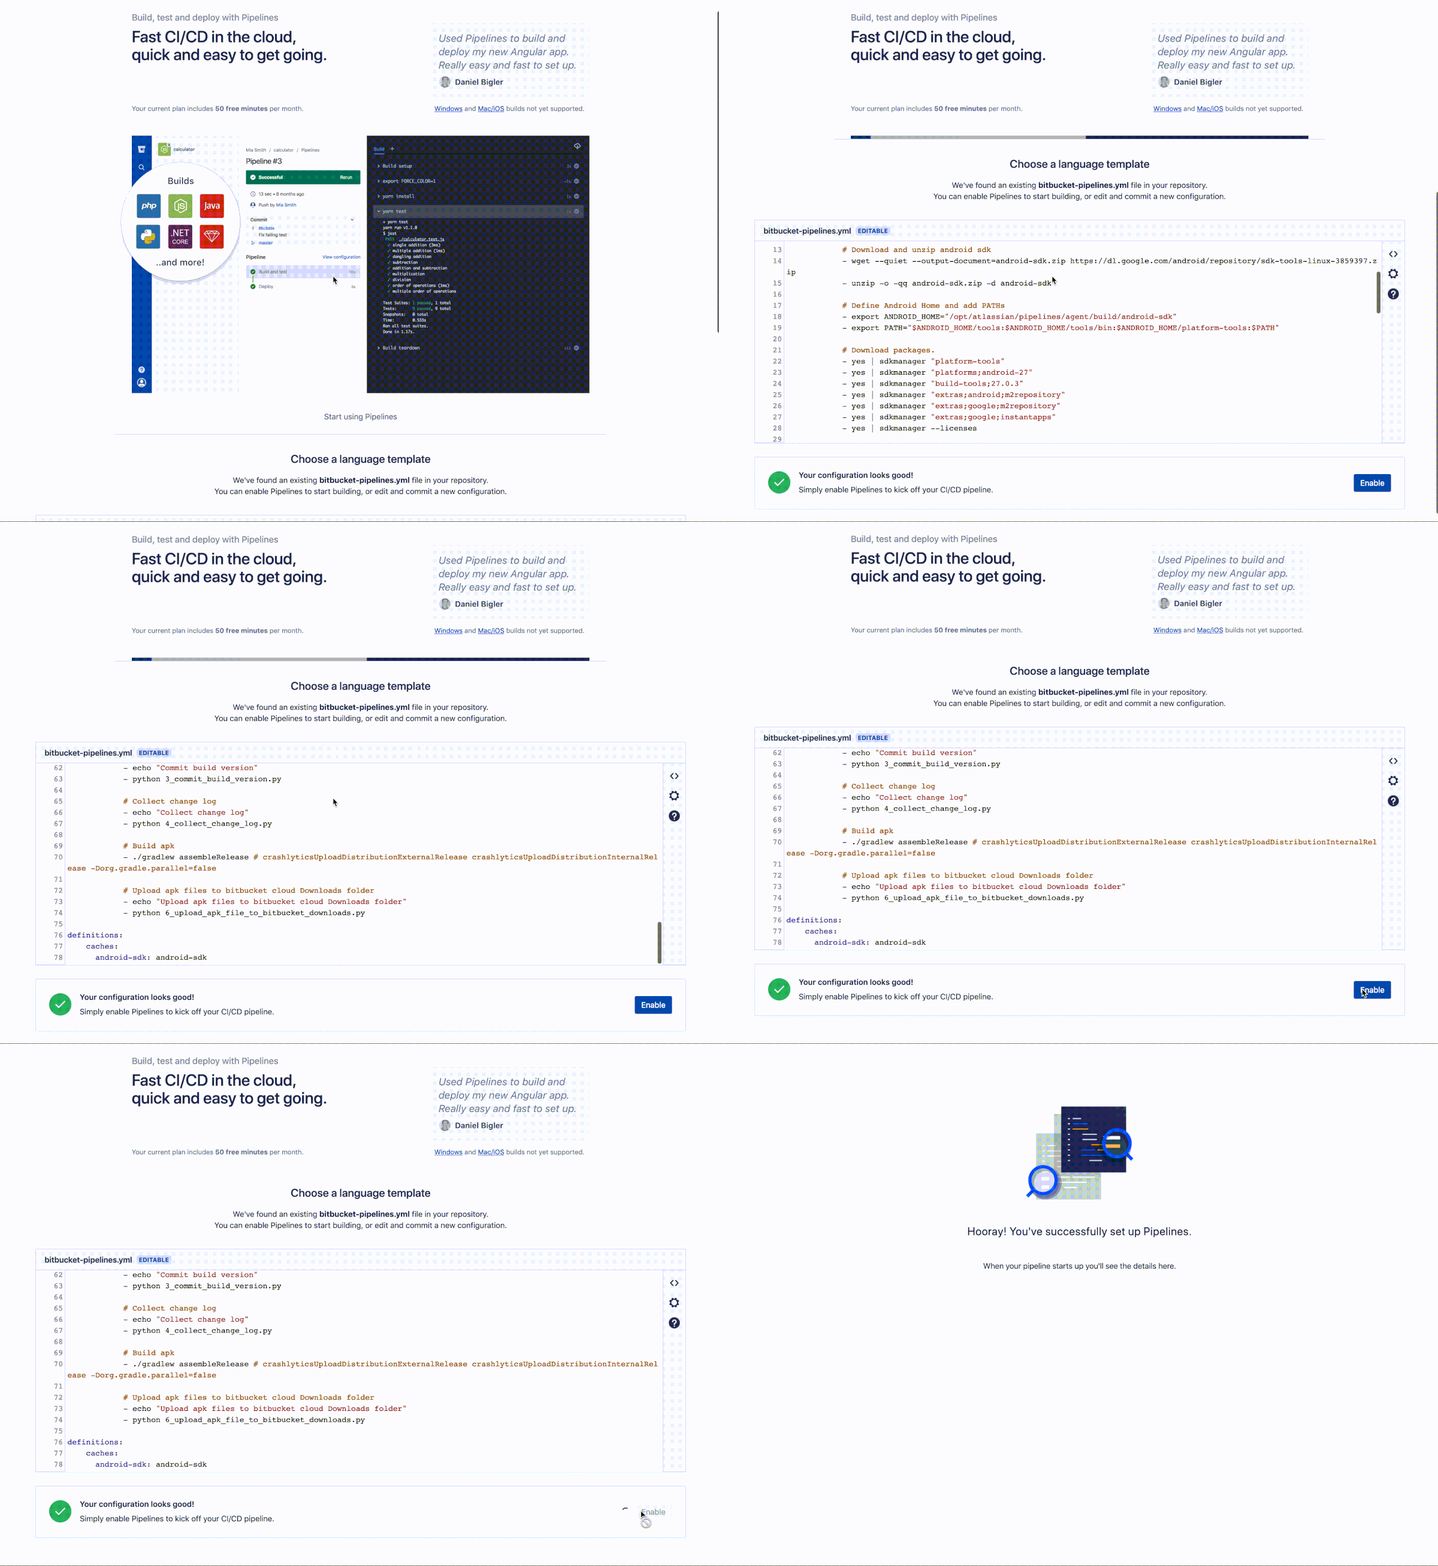
Then you have to enable Bitbucket Pipelines in the Settings of your account "Settings > Pipelines".
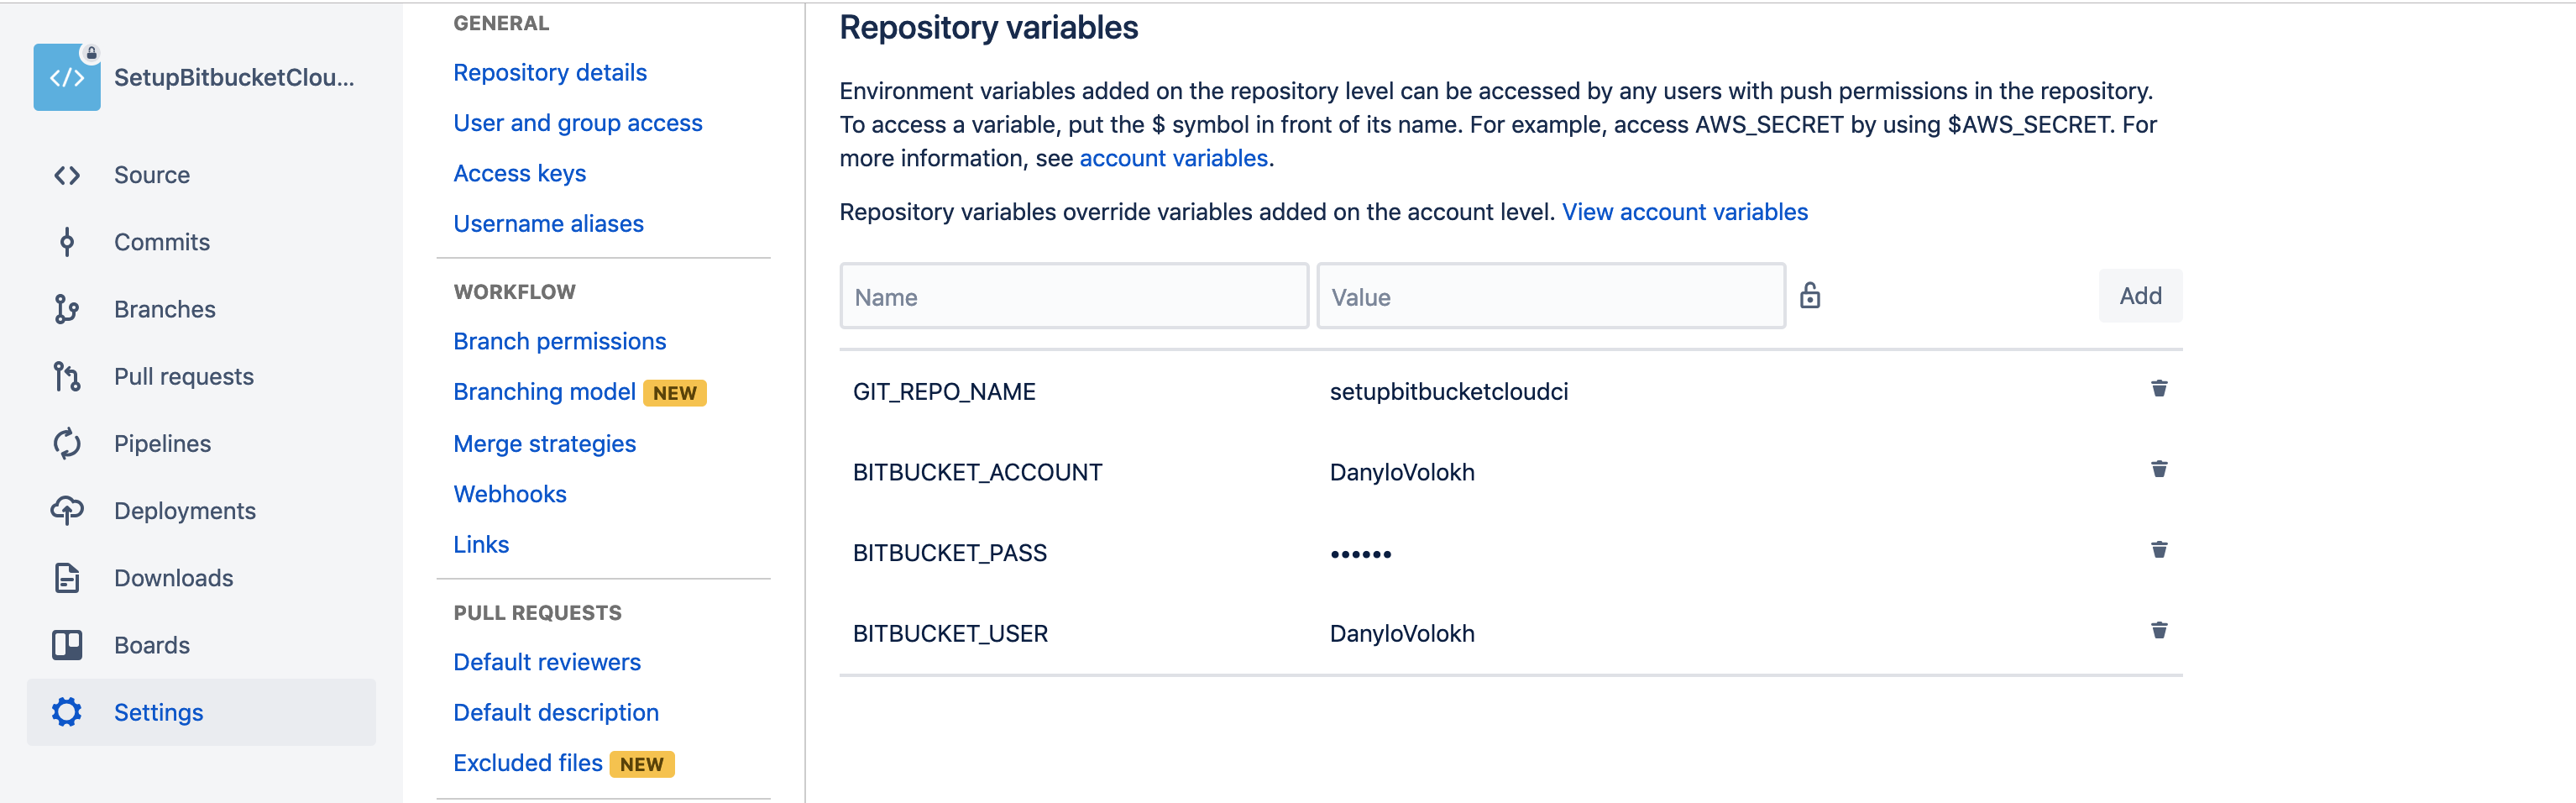
You also need to add a few variables to the "Repository variables" of the Pipelines section in the Settings.
- BITBUCKET_USER - user which has access to write to the master branch
- BITBUCKET_PASS - pasword to this user (password will be encrypted and hidden from everyone else)
- BITBUCKET_ACCOUNT - account on which the repository is stored
- GIT_REPO_NAME - name of the repository
The values above will be used to access the git repository.
Now you are ready to build the "debug" version with Bitbucket Pipelines
# Additional steps
## 6. Sign the application with the "release" signing key.
This is a tricky moment because you need to give the Pipelines an access to your signing key but do not commit it into the repository. The signing key should not be available to all the team members that have access to the repository.
In order to download the signing key into the repository only for the builds with Bitbucket Pipelines we need to create a "secret repository" as a git submodule. This repository will be located in "signing_info_from_another_repository".
1. Create a separate repository with 2 files in the root of the project.
"*playstore.properties*":
```
storeFile=keystore_file
storePassword=store_password
keyAlias=key
keyPassword=keyPassword
```
"*keystore_file*":
This is a keystore file with your signing key.

2. Now we have to add this repository as a git submodule. Call the following command in the main repository.
> git submodule add signing_info_from_another_repository
3. Add signing configuration to the "*app/build.gradle file*"
Add this to the top of the "*app/build.gradle file*"
```
def signingPropertiesFile = new File('./signing_info_from_another_repo/playstore.properties')
def keystoreProperties = new Properties()
if (signingPropertiesFile && signingPropertiesFile.isFile()) {
println "signingPropertiesFile.isFile()"
keystoreProperties.load(new FileInputStream(signingPropertiesFile))
}
```
Add signing cofig to the "*android*" closure:
```
android {
signingConfigs {
debug {
}
release {
def keystoreFilePath = "${rootDir}/signing_info_from_another_repo/${keystoreProperties['storeFile']}"
storeFile = file(keystoreFilePath)
storePassword = keystoreProperties['storePassword']
keyAlias = keystoreProperties['keyAlias']
keyPassword = keystoreProperties['keyPassword']
}
}
buildTypes {
release {
signingConfig signingConfigs.release
}
}
}
```
4. Update *bitbucket-pipelines.yml* file:
Add following code which will clone the signing configuration for the build:
```
# Download signing key
- echo "Download signing key"
- git config --file=.gitmodules submodule.signing_info_from_another_repo.url https://$BITBUCKET_USER:$BITBUCKET_PASS@bitbucket.org/$BITBUCKET_ACCOUNT/$SIGNING_REPO_NAME.git
- git submodule sync
- git submodule update --init signing_info_from_another_repo
```
But this code used following variables:
- BITBUCKET_USER - already added above
- BITBUCKET_PASS - already added above
- BITBUCKET_ACCOUNT - already added above
- SIGNING_REPO_NAME - name to the signing repo name
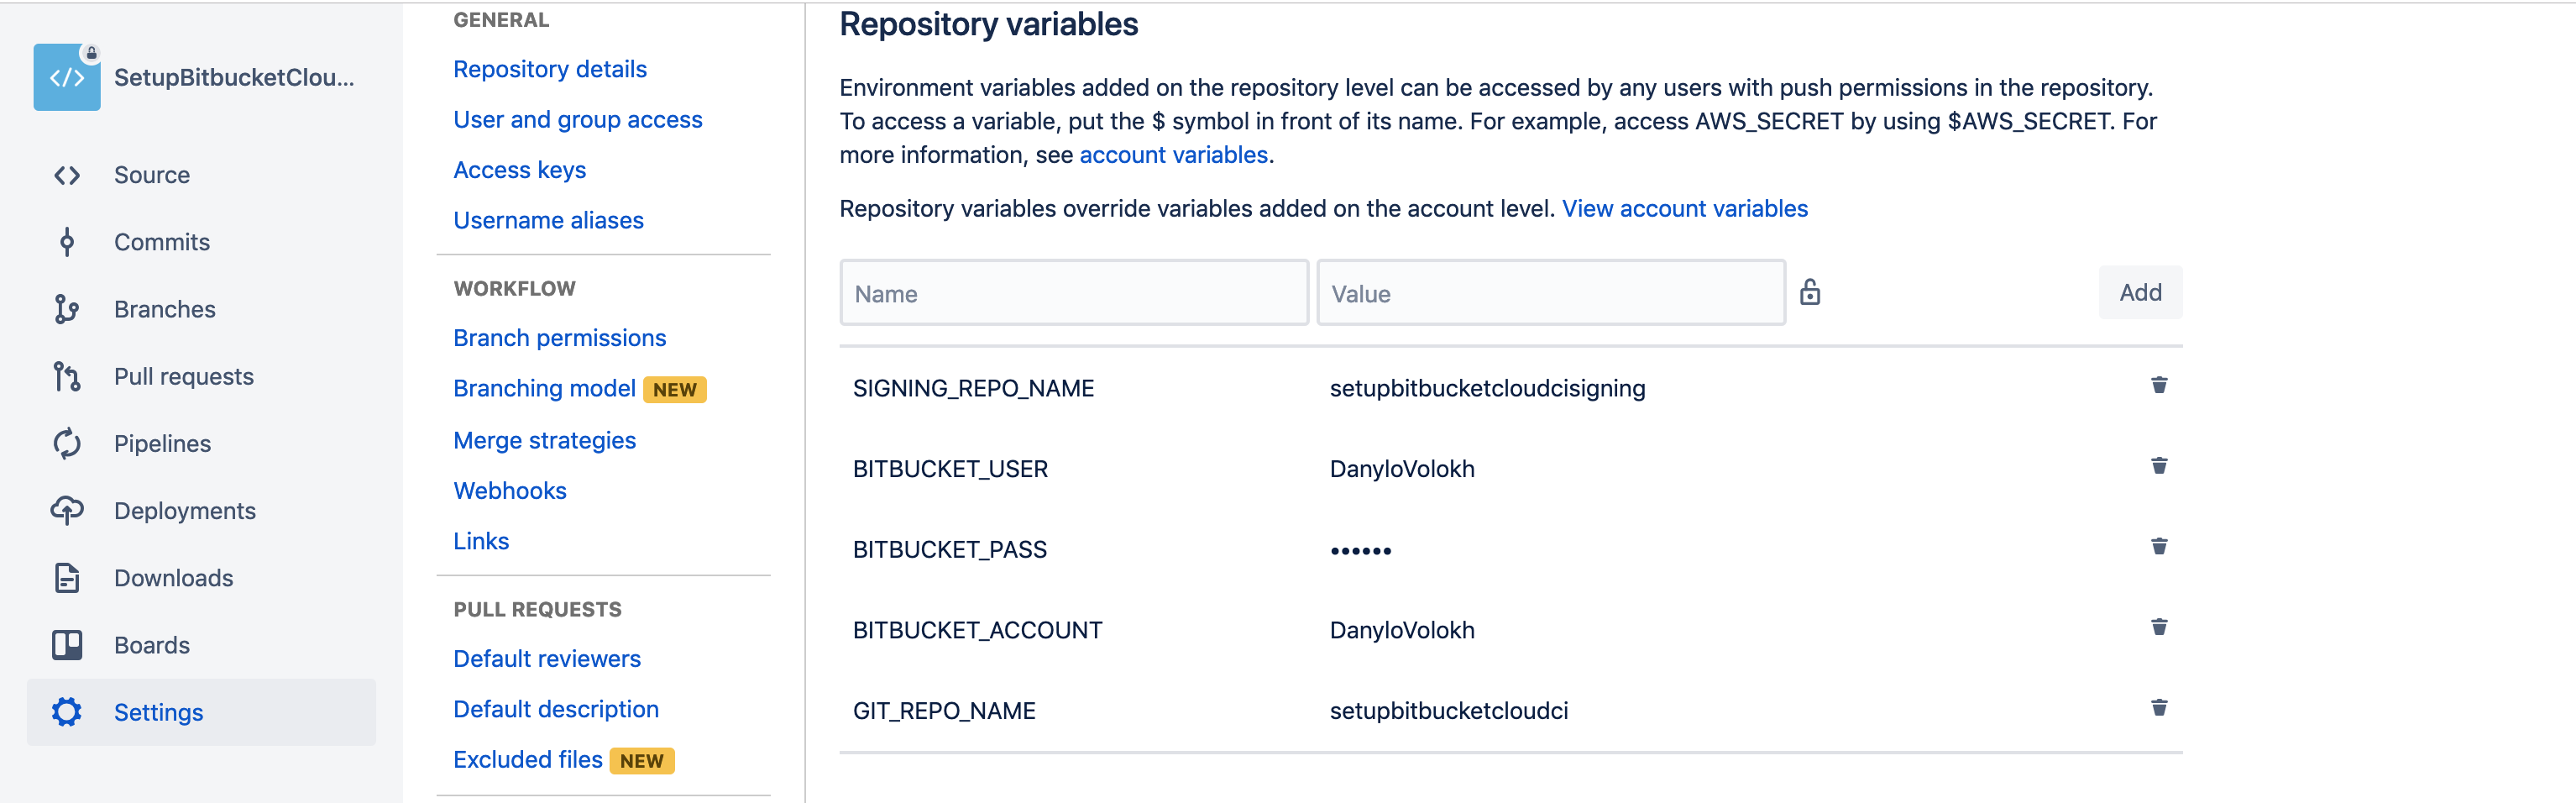
5. change "assembleDebug" to "assembleRelease"
Here is an updated *bitbucket-pipelines.yml* file
```
pipelines:
custom:
manual_configuration:
- step:
name: Build a version
image: openjdk:8
caches:
- gradle
- android-sdk
- pip
script:
# Download and unzip android sdk
...
# Define Android Home and add PATHs
...
# Download packages.
...
# Install python
...
# Give write access
- chmod a+x ./gradlew
# Clean the project
- ./gradlew clean
# Setup correct origin url
...
# Change build version
...
# Update application version in gradle file
...
# Change build version after successful build
...
# Collect change log
...
# Download signing key
- echo "Download signing key"
- git config --file=.gitmodules submodule.signing_info_from_another_repo.url https://$BITBUCKET_USER:$BITBUCKET_PASS@bitbucket.org/$BITBUCKET_ACCOUNT/$SIGNING_REPO_NAME.git
- git submodule sync
- git submodule update --init signing_info_from_another_repo
# Build apk
- ./gradlew assembleRelease
definitions:
caches:
android-sdk: android-sdk
```
Now you are ready to build the "release" version with Bitbucket Pipelines
## 7. Upload the apk files to the storage for future usage.
We can use the Downloads folder of bitbucket cloud to keep the artifacts of our build.
### To upload the apk files of all the flavors we need to execute python script *6_upload_apk_file_to_bitbucket_downloads.py*
> The file *6_upload_apk_file_to_bitbucket_downloads.py* is located in the root of the project.
[Publish and link your build artifacts](https://confluence.atlassian.com/bitbucket/publish-and-link-your-build-artifacts-872137736.html)
This file used default bitbucket API to upload files into the repository.
In order to do that we need:
1. Add one Environment variable to the Account Setting (not the repository settings)
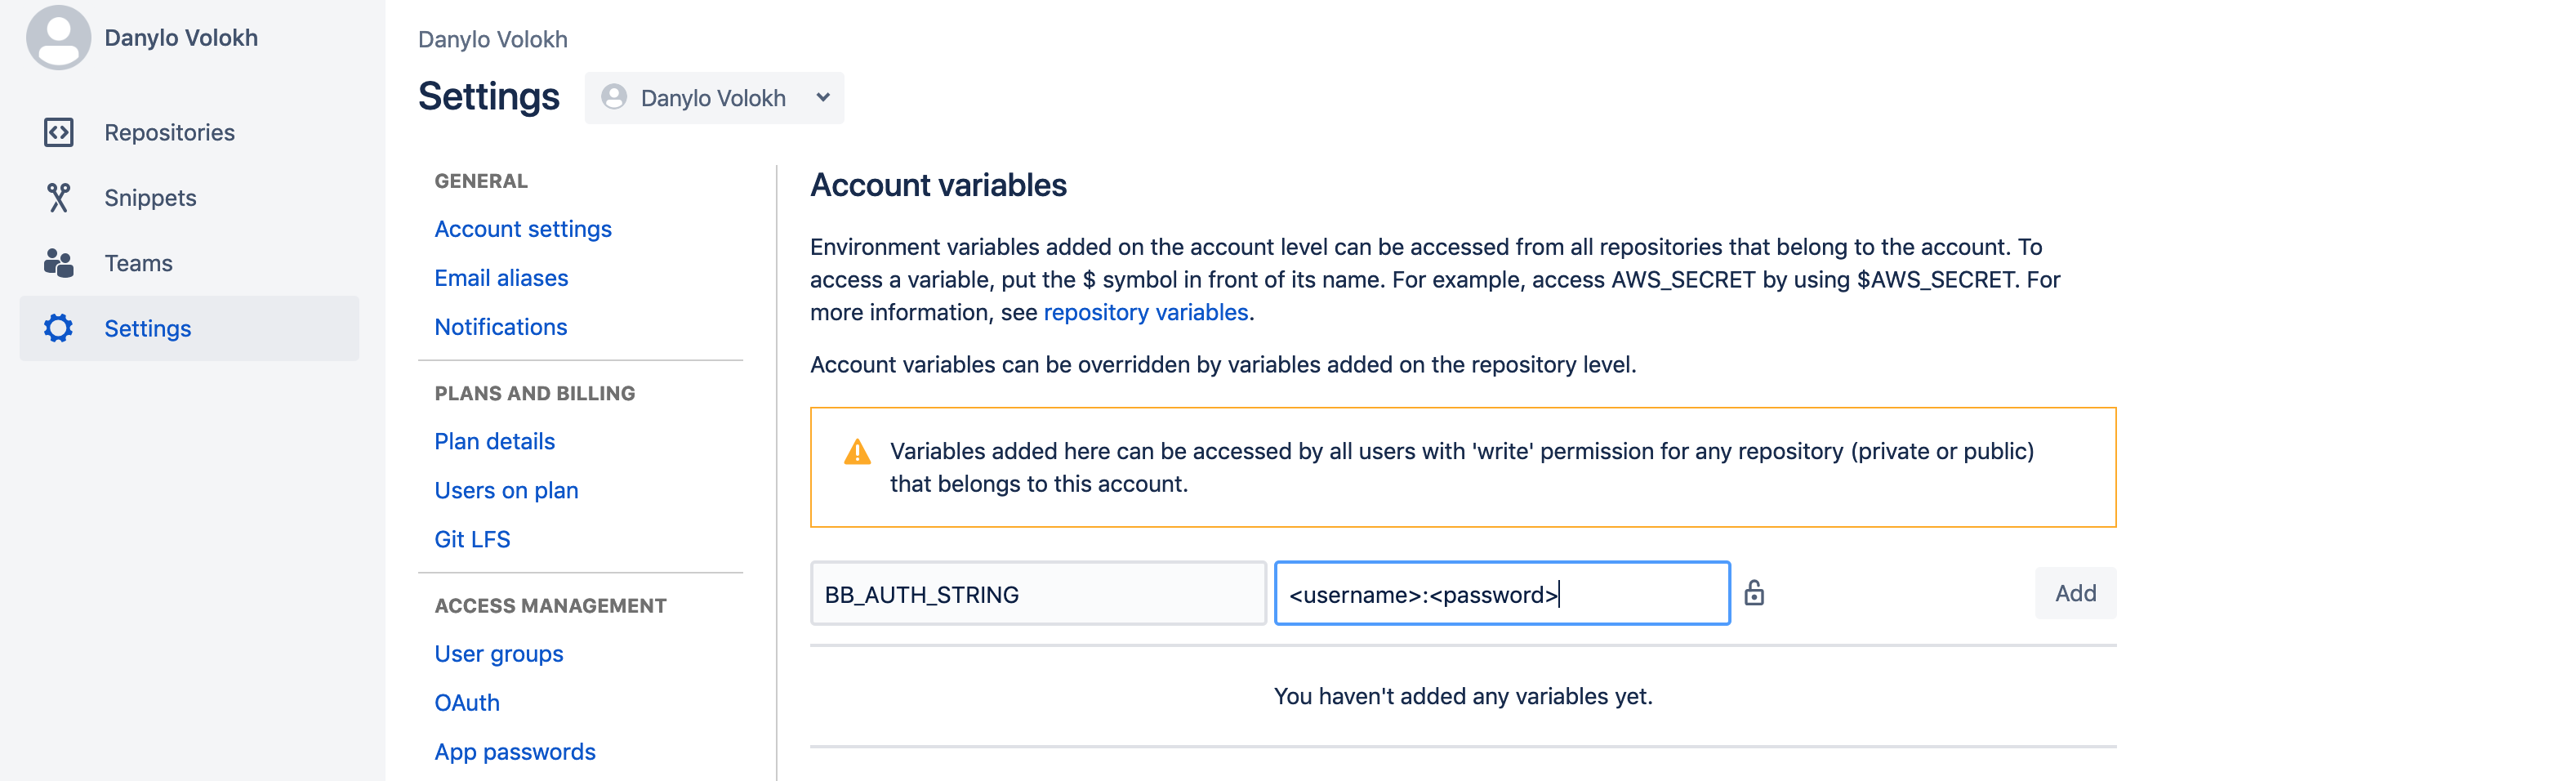
- BB_AUTH_STRING - this variable consists from the account and password separated by the colon ":"
2. Call "*6_upload_apk_file_to_bitbucket_downloads.py*" from *bitbucket-pipelines.yml*
Here is an updated *bitbucket-pipelines.yml* file:
```
pipelines:
custom:
manual_configuration:
- step:
name: Build a version
image: openjdk:8
caches:
- gradle
- android-sdk
- pip
script:
# Download and unzip android sdk
...
# Define Android Home and add PATHs
...
# Download packages.
...
# Install python
...
# Give write access
- chmod a+x ./gradlew
# Clean the project
- ./gradlew clean
# Setup correct origin url
...
# Change build version
...
# Update application version in gradle file
...
# Change build version after successful build
...
# Collect change log
...
# Download signing key
...
# Build apk
- ./gradlew assembleRelease
# Upload apk files to bitbucket cloud Downloads folder
- echo "Upload apk files to bitbucket cloud Downloads folder"
- python 6_upload_apk_file_to_bitbucket_downloads.py
definitions:
caches:
android-sdk: android-sdk
```
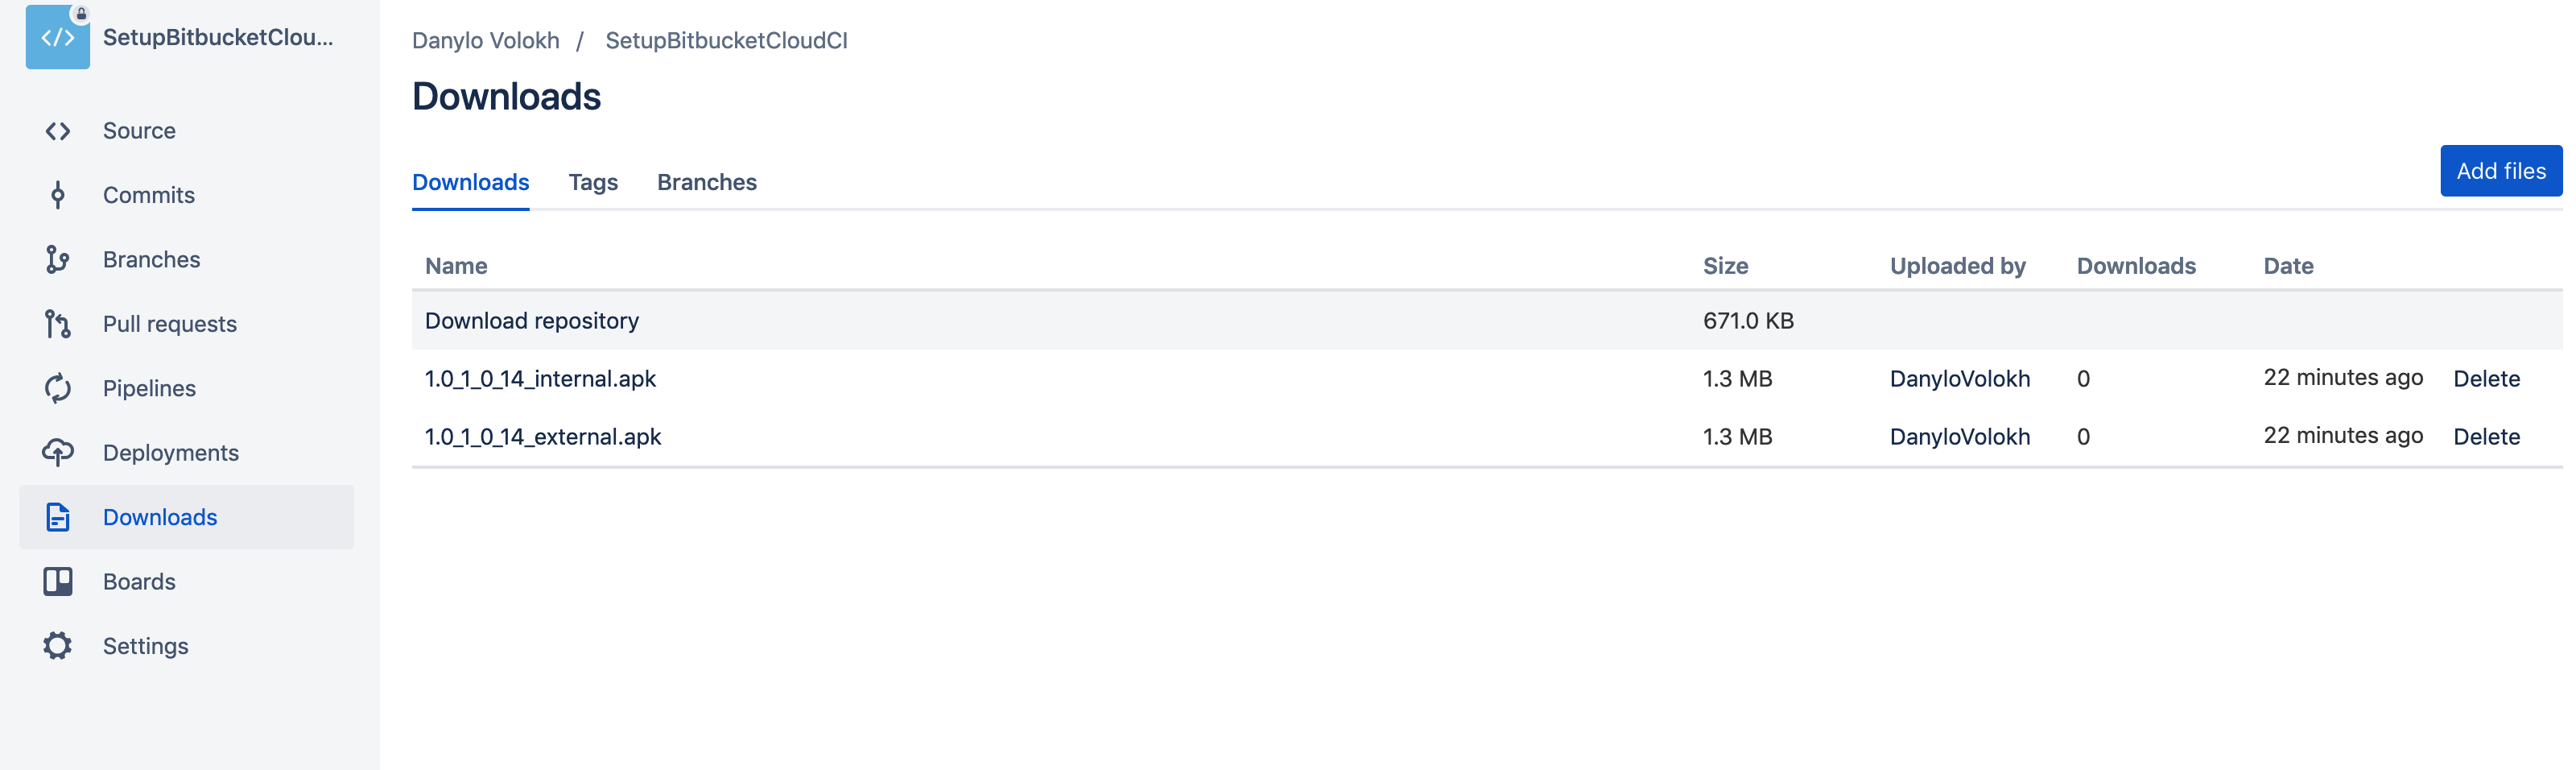
Here is how uploaded files look like in the storage
## 8. Upload a version to the Fabric Beta for testing purposes.
In order to upload a version to Fabric Beta you need to setup the Fabric Beta first.
- [Install Crashlytics via Gradle](https://fabric.io/kits/android/crashlytics/install)
- [Beta Instalation](https://docs.fabric.io/android/beta/installation.html)
If you already upload the files to the Fabric Beta we need to add 2 more changes to the configuration:
1. Change the *bitbucket-pipelines.yml*
add "crashlyticsUploadDistributionExternalRelease crashlyticsUploadDistributionInternalRelease -Dorg.gradle.parallel=false" after the "assembleRelease"
> - ./gradlew assembleRelease crashlyticsUploadDistributionExternalRelease crashlyticsUploadDistributionInternalRelease -Dorg.gradle.parallel=false
2. Change the *app/build.gradle*
We need to add the correct "Release Notes" with every flavor that we upload
```
flavorDimensions "default"
productFlavors {
external {
dimension "default"
ext.betaDistributionReleaseNotesFilePath = "change_log_external.txt"
ext.betaDistributionApkFilePath = "${buildDir}/outputs/apk/internal/release/app-external-release.apk"
ext.betaDistributionGroupAliases = "testing-group-setup-ci"
}
internal {
dimension "default"
ext.betaDistributionReleaseNotesFilePath = "change_log_internal.txt"
ext.betaDistributionApkFilePath = "${buildDir}/outputs/apk/external/release/app-internal-release.apk"
ext.betaDistributionGroupAliases = "testing-group-setup-ci"
}
}
```
# Run the CI
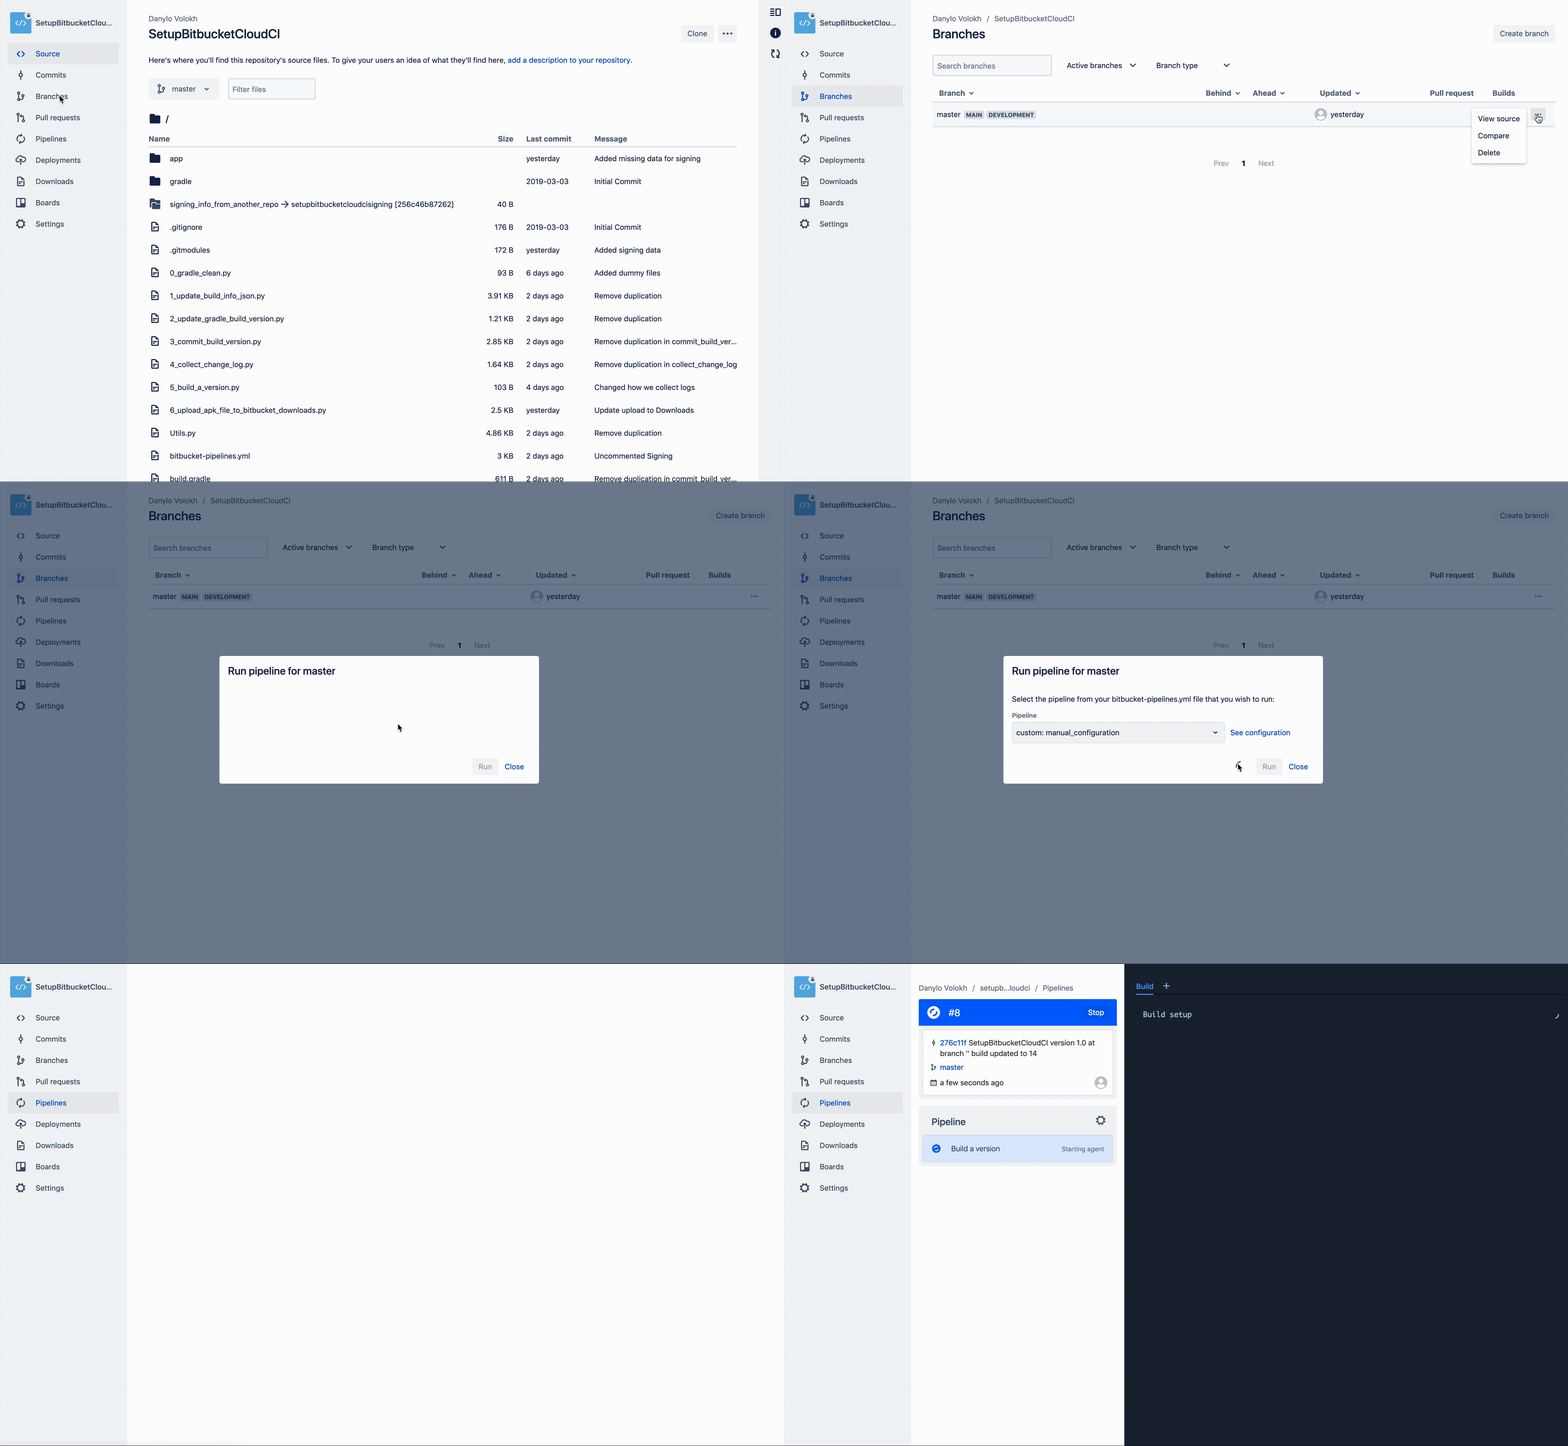
We are all set. Now we can easily run our build server from the bitbucket page:
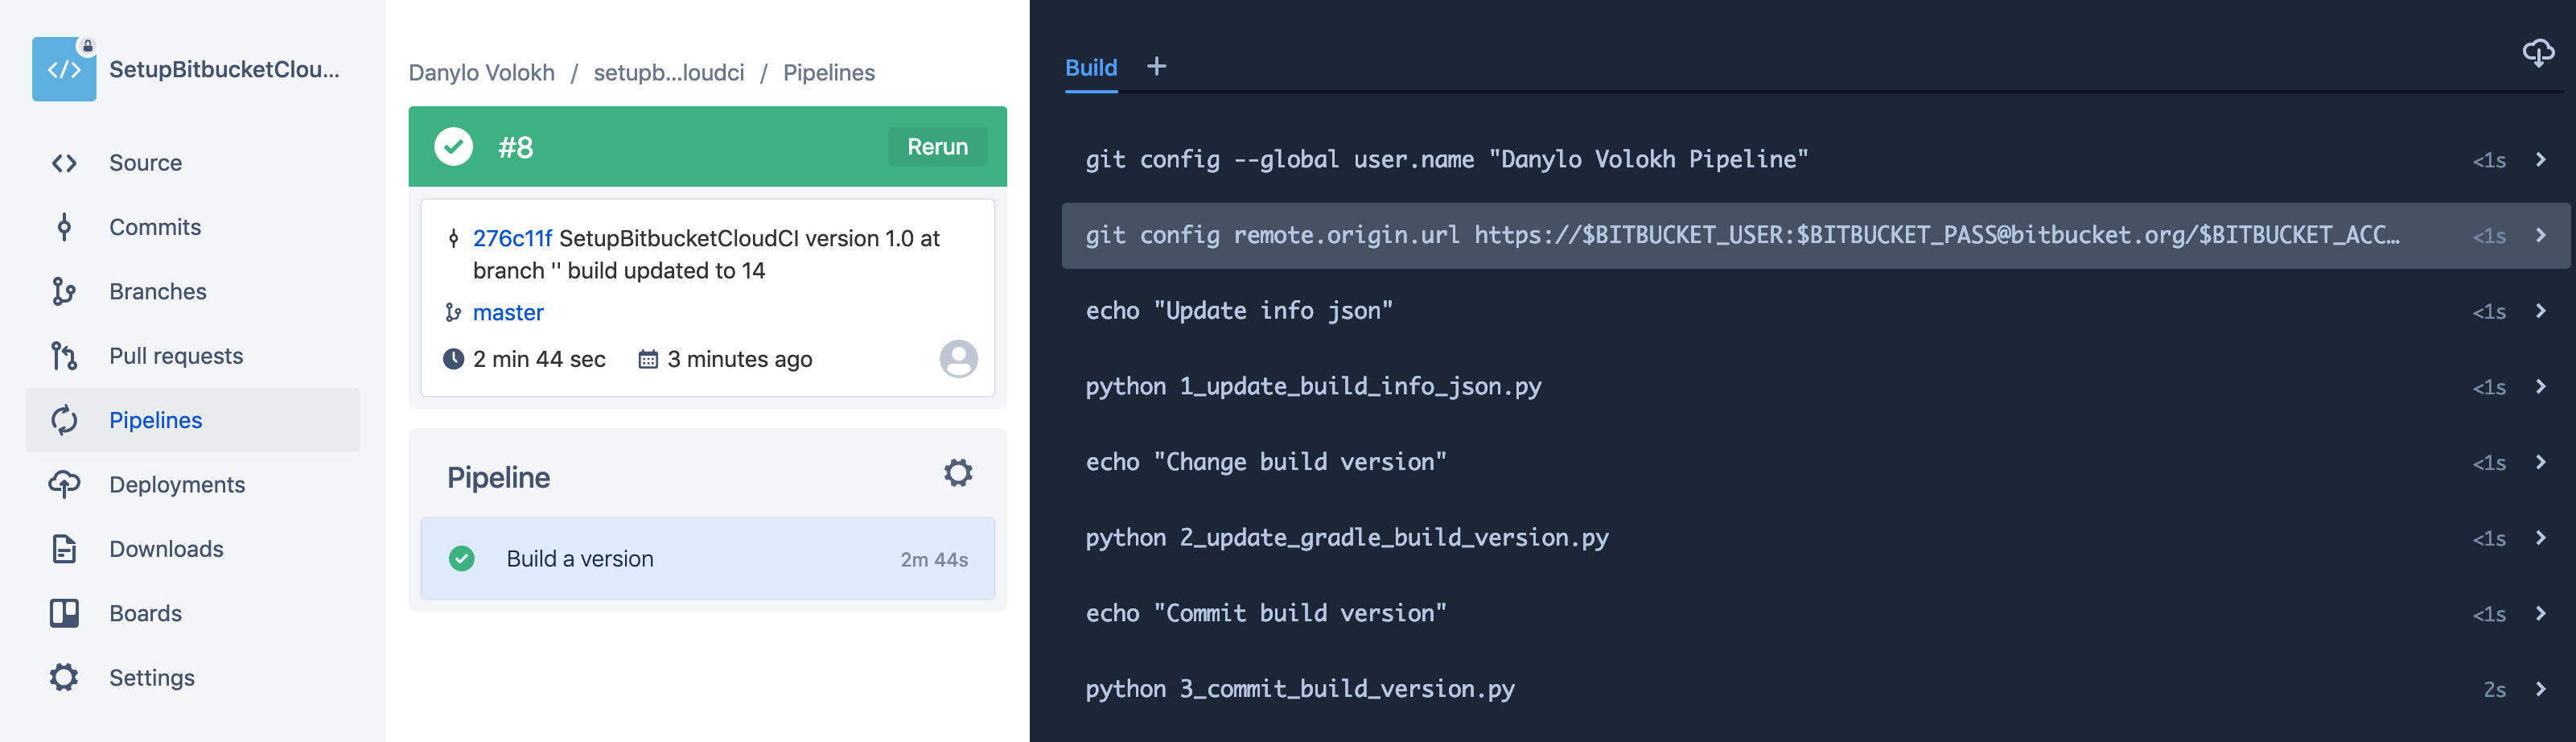
Successful build
# License
Copyright 2019 Danylo Volokh
Licensed under the Apache License, Version 2.0 (the "License");
you may not use this file except in compliance with the License.
You may obtain a copy of the License at
http://www.apache.org/licenses/LICENSE-2.0
Unless required by applicable law or agreed to in writing, software
distributed under the License is distributed on an "AS IS" BASIS,
WITHOUT WARRANTIES OR CONDITIONS OF ANY KIND, either express or implied.
See the License for the specific language governing permissions and
limitations under the License.