https://github.com/dapplets/dapplets-eth-example
Tutorial on how to use Dapplets with Ethereum
https://github.com/dapplets/dapplets-eth-example
Last synced: 4 months ago
JSON representation
Tutorial on how to use Dapplets with Ethereum
- Host: GitHub
- URL: https://github.com/dapplets/dapplets-eth-example
- Owner: dapplets
- License: mit
- Created: 2022-01-14T16:36:57.000Z (over 4 years ago)
- Default Branch: master
- Last Pushed: 2022-07-06T08:27:34.000Z (almost 4 years ago)
- Last Synced: 2025-09-04T07:43:10.908Z (10 months ago)
- Language: HTML
- Size: 3.49 MB
- Stars: 0
- Watchers: 2
- Forks: 0
- Open Issues: 0
-
Metadata Files:
- Readme: README.md
- License: LICENSE
Awesome Lists containing this project
README
# Dapplets × Ethereum example
**Dapplets × Ethereum example** is a [Dapplet](https://dapplets.org) (an Augmentation App) that can parse Twitter tweets and store them in the Ethereum contract. It can also display your saved tweets in the overlay page.
## 1. Introduction
**Dapplets** - applications that interact with web-pages, augment them by inserting different widgets, parsing pages data and adding some new functionality. It may improve user experience of using social media, video services and other sourses.
Dapplets use the **extension** we are creating. It gives a simple api for dapplets developers and big abilities for our community. Our platform is decentralized. We use **Near** and **Ethereum** networks for our registries and contracts, and decentralized storages, like **Swarm**, **IPFS** and **Arweave** for hosting dapplets code and multimedia.
To use our platform at first you need to install the **Dapplets extension**. Currently it's on the alfa-stage and not published to Google Chrome or some other store. To install it follow this steps:
1. Open one of the following browsers: Google Chrome, Firefox, Brave, Tor.
> The following steps are described for Google Chrome. The steps may differ in other browsers.
2. Download the [**Dapplet Browser Extension**](https://github.com/dapplets/dapplet-extension/releases/latest).
3. Open **chrome://extensions** in a new tab.
4. Switch the **Developer mode** on and press **F5** to refresh the page.

5. **Drag and drop** the downloaded file into the extensions page. The extension will install automatically.
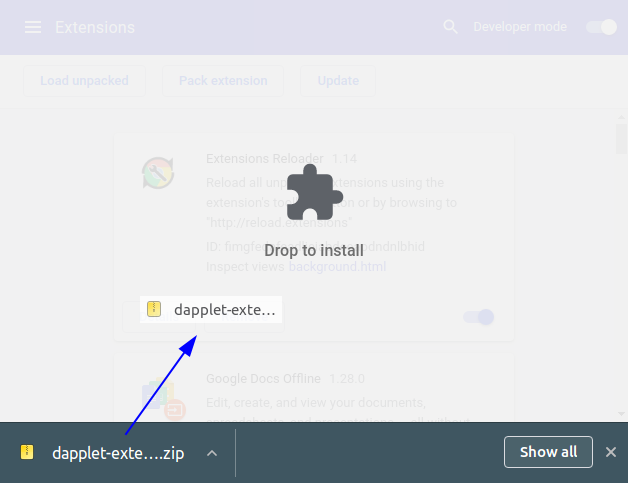
> If you are using Ubuntu or possibly another Linux OS the Dapplets extension can disappear from the Chrome Extensions after restarting the PC. To avoid this unzip the archive and use the `Load unpacked` button to add the extension.
>
> 
>
> 
6. Click to the **Dapplets** extension icon in extension bar. Try **Dapplets × Ethereum example** dapplet.
## 2. Tutorial
Let's study how this dapplet works and why Dapplets is a Ethereum frendly platform.
The goal of the example is to show interaction of Ethereum and Dapplets. If it is your very first meeting with Dapplets we recommend you to try our [documentation.](https://docs.dapplets.org) It contains several exercises that explane how to create dapplets and adapters from simple to complex ones. We are highly recommend to go through the [ex01](https://docs.dapplets.org/docs/extra-button) and [ex04](https://docs.dapplets.org/docs/overlays) examples that describe how to create the simpliest dapplet and the dapplet with the overlay. The knowledges you'll get make easy to understand the current example.
The initial code for this example is here: [exercise](https://github.com/dapplets/dapplets-eth-example)
You can clone this repo. It won't work directly. Try following steps to start it.
Let's look at the **structure**. There are three components: **dapplet**, **overlay** and **contract**.
**Dapplet** is the entry point of the application. It use adapters to interact with web-pages, define conext to augment and widgets to insert. Also the core functions of the extension are available there. We use **Typescript** in our progect.
We define **Overlay** as a place where a user can do something with parsed data, connect to core dapplet's functions through the **dapplet bridge** and manage augmentation parameters. It is an impotrant part of the application but it runs in another environment and published as a separate module. In the most cases we use **React** as one of the most popular frameworks. But you can use a framework that you prefer or the pure javascript or typescript.
**Contract** does not connect directly with other modules and may located outside of the dapplet. But this simple **Ethereum** contract created only for this dapplet. So it's comfortable to place it here.
Let'a look at the each module.
### 2.1. Dapplet
Look at the `/dapplet/src/index.ts`.
At first we create injectable class with decorator `@Injectable` and use `@Inject` to add **Twitter Adapter** as the `adapter` class variable. Also create `activate` method. It runs when selected adapter finds specific context and is loading. It will contain all the main logic.
```typescript
@Injectable
export default class TwitterFeature {
// eslint-disable-next-line @typescript-eslint/no-explicit-any, @typescript-eslint/explicit-module-boundary-types
@Inject('twitter-adapter.dapplet-base.eth') public adapter: any;
async activate(): Promise {
//
}
}
```
Add the button to every tweet. Put this code to the `activate`:
```typescript
const { button } = this.adapter.exports;
this.adapter.attachConfig({
POST: (ctx: any) =>
button({
DEFAULT: {
img: EXAMPLE_IMG,
tooltip: 'Parse Tweet',
exec: () => {
console.log('parsedCtx:', ctx);
},
},
}),
});
```
Look at the code. We get widget `button` from the adapter. Then run adapter's method `attachConfig`. It receives an object with names of contexts, that will be used, as keys. Values are functions, that receives parsed context as the only argument and returns widget or the array of widgets. You may also return `null`, `false` or `undefined`.
**Widget** is a function that receives an object consisting of widget states. State parameters are described in the adapters documentation. **Twitter Adapter** documentation you can find [here](https://docs.dapplets.org/docs/adapters-docs-list#name=twitter-adapter.dapplet-base.eth&title=Twitter%20adapter&version=v0.9.0). In our case we add image to the button and tooltip. `exec` is a function that runs on click. Now we just show the parsed contect in the console.
Run the dapplet:
```bash
npm i
npm start
```
> :warning: Since the browser is blocking pages with problematic security certificates, go to https://localhost:3001/dapplet.json when the application is running and agree to run in **insecure mode**
> :warning: Since the browser is blocking pages with problematic security certificates, go to https://localhost:3000 when the application is running and agree to run in **insecure mode**.
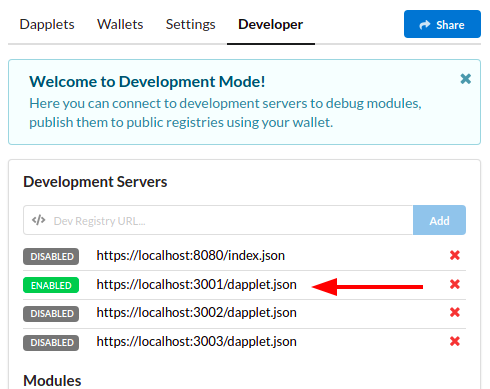
Open the extension. Go to Developer tab and turn on the development server: `https://localhost:3001/dapplet.json`.
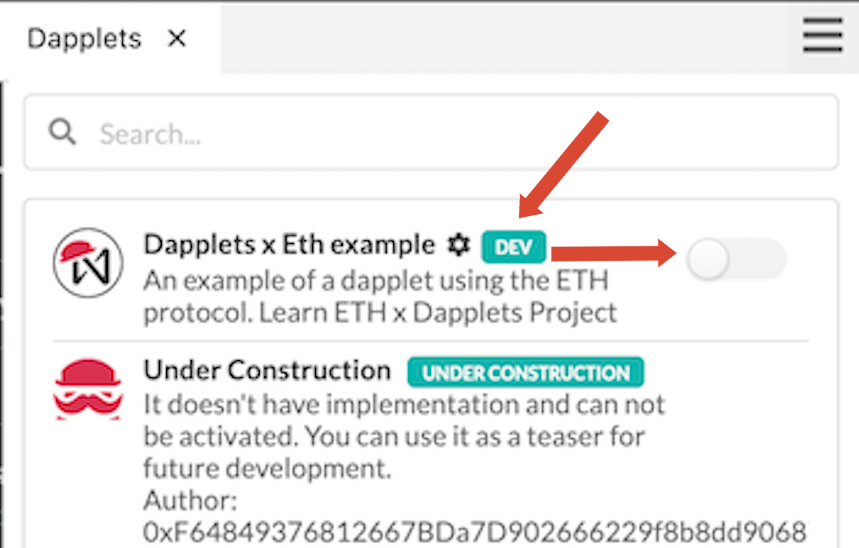
Torn on Dapplets tab. You will see the dev badge near our dapplet. Turn it on.
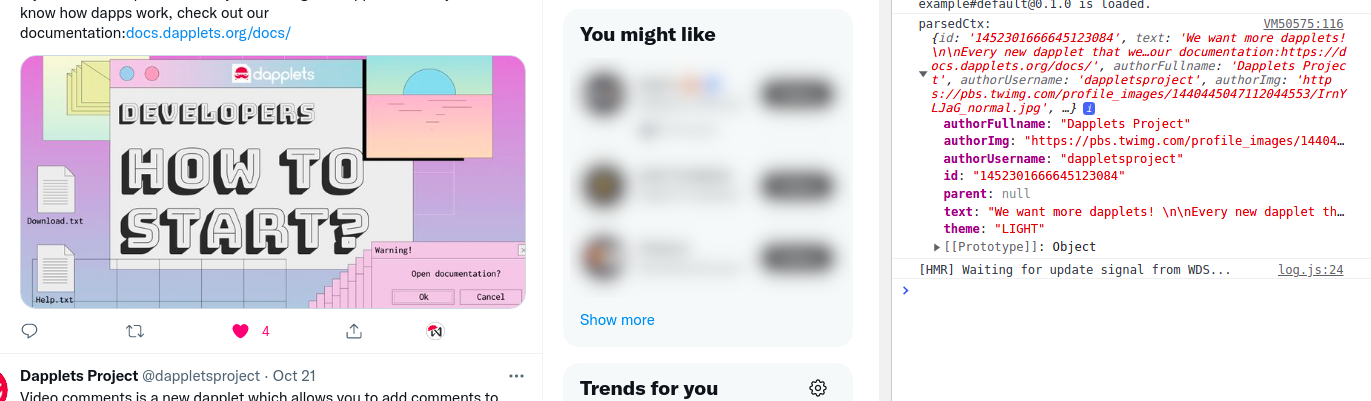
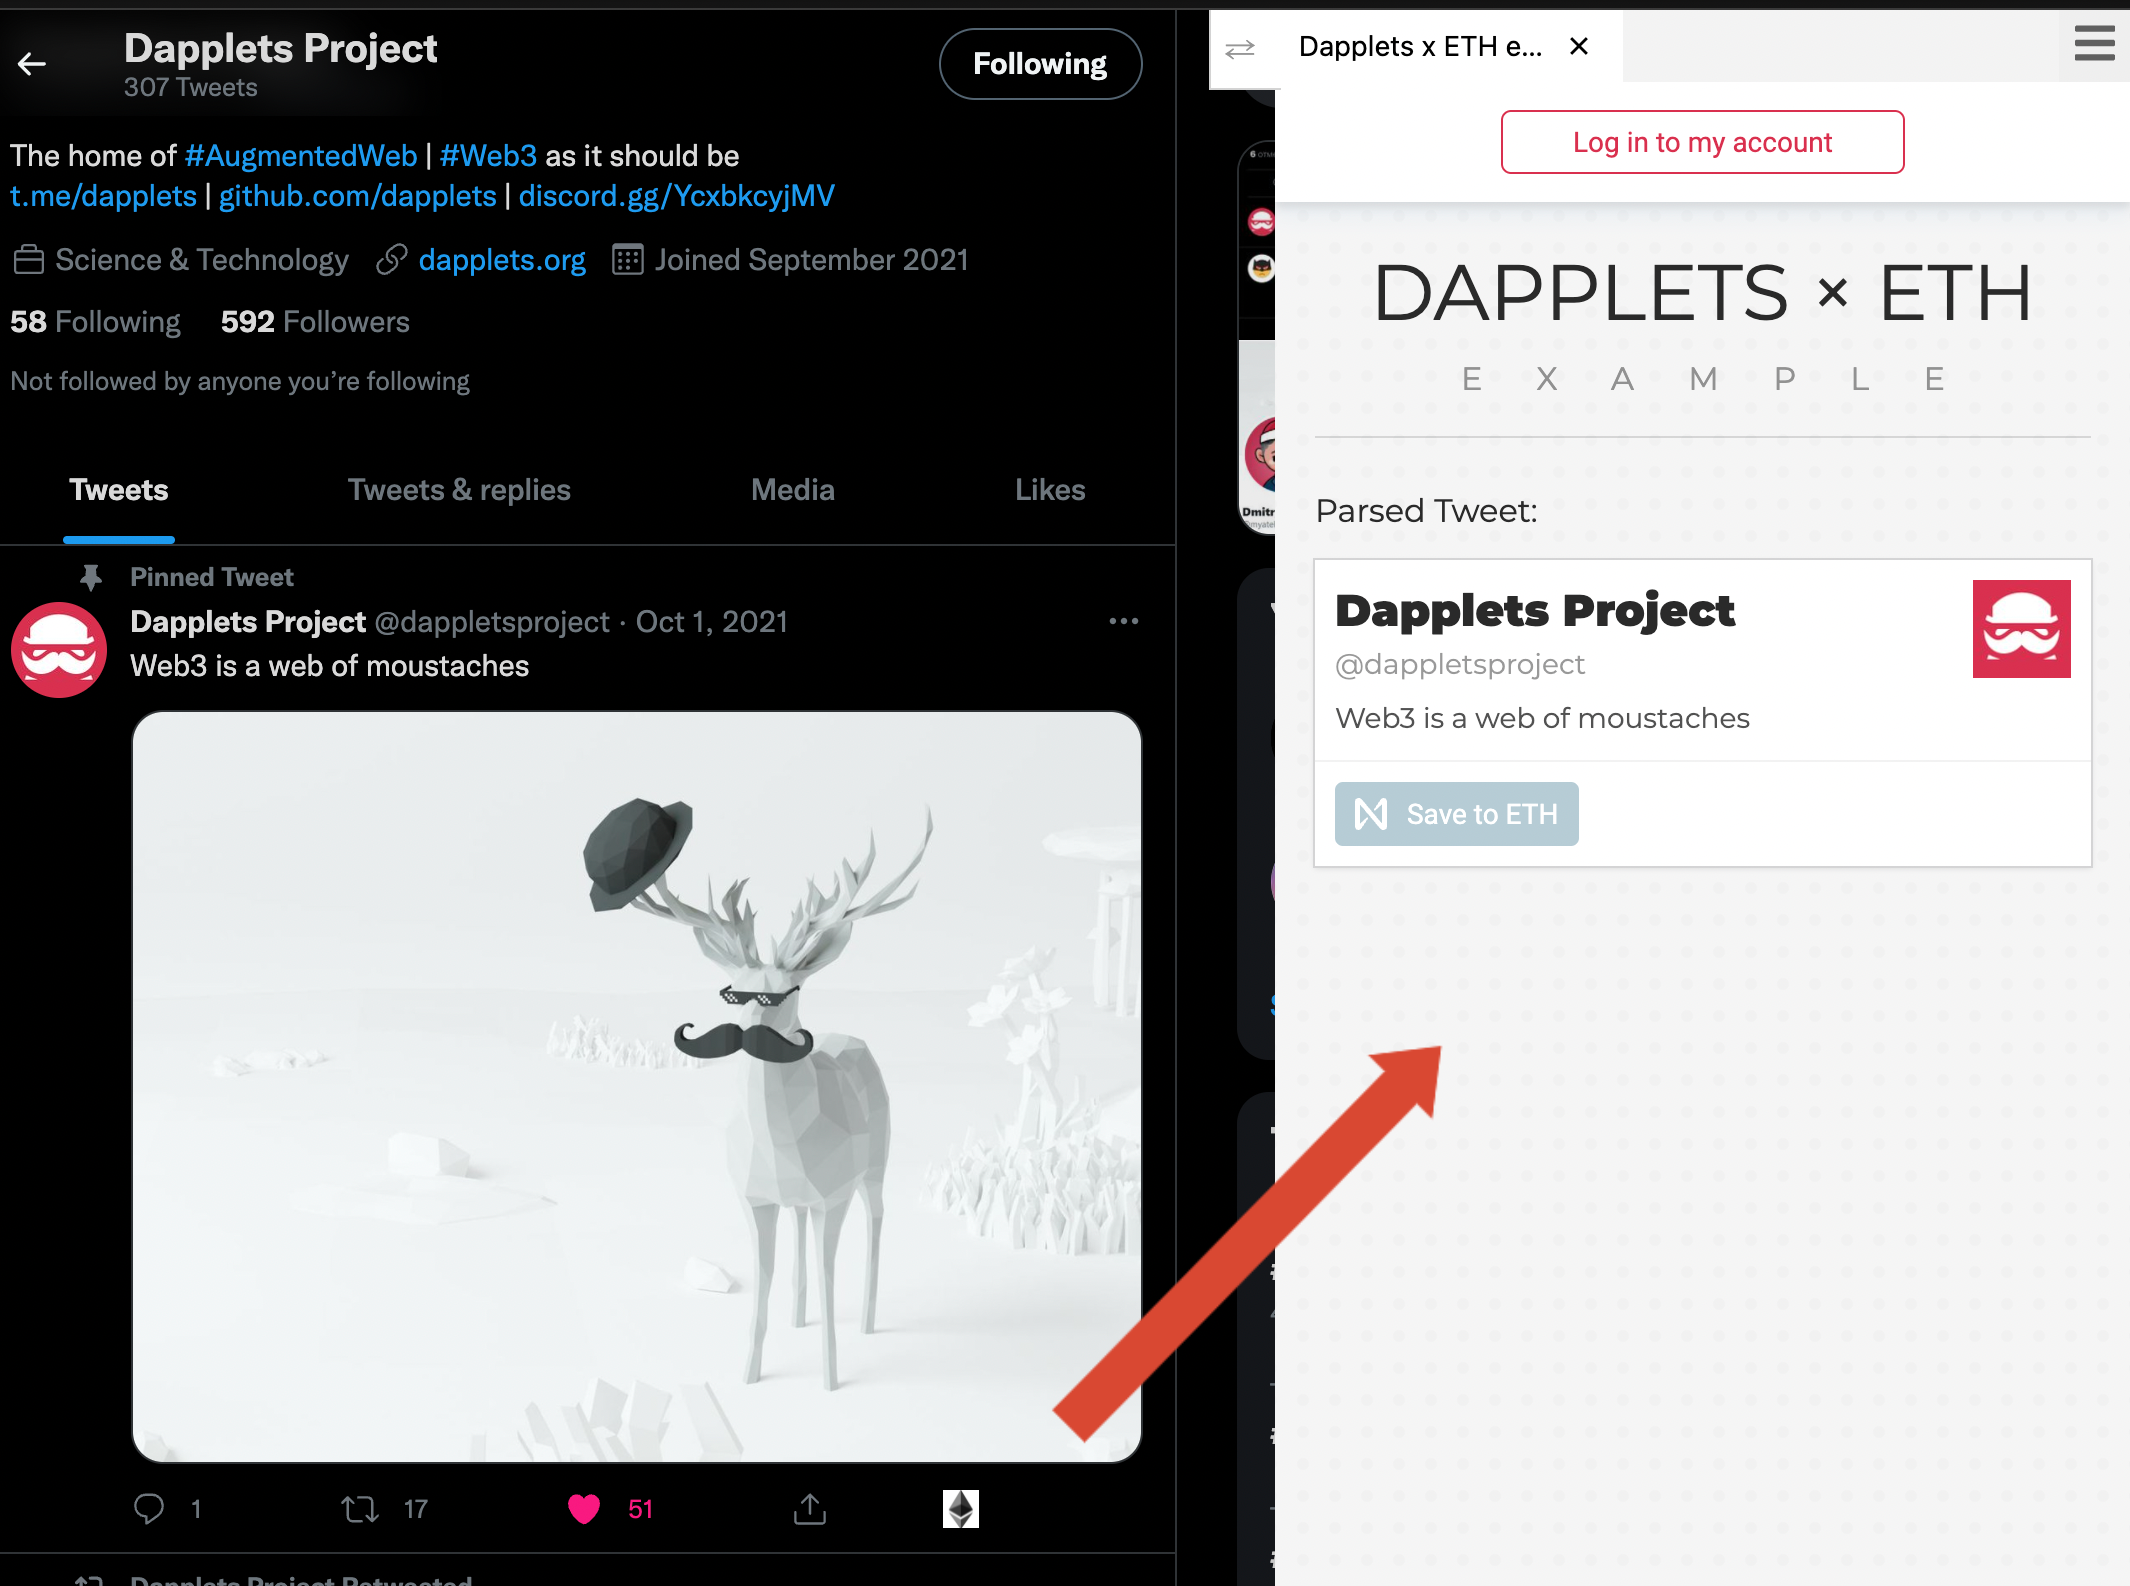
Now you can see additional buttons on tweets. Click on the button and open console. You will see the parsed context of the tweet.
You've done it! Congratulations!!! Go back to the code.
We want to show parsed data not in the console but to the users. We use an overlay for this. But before implementing the overlay, add the interaction logic between the dapplet and the overlay to the dapplet.
Let's change our code. Add private class variable `_overlay` of type `any`. In the `activate` add the following code:
```typescript
if (!this._overlay) {
this._overlay = (Core).overlay({ name: 'overlay', title: 'Dapplets x Ethereum example' });
}
```
Core function `Core.overlay` (typing problems will be fixed soon) receives an object with a **name** of the overlay and overlay **title** and returns the `Overay` object which we save in the `_overlay` variable.
Let's add **openOverlay** method to the class:
```typescript
async openOverlay(props?: any): Promise {
this._overlay.send('data', props);
}
```
In this method we call the method `send` of the overlay. It takes two arguments: the name of this data and the data to send to the overlay.
Add `openOverlay` to `exec` function and pass the parsed context to the overlay. The current code of the dapplet:
```typescript
import {} from '@dapplets/dapplet-extension';
import EXAMPLE_IMG from './icons/eth_dapplet_icon_70.png';
import ABI from './ABI';
import isValidJSON from './helpers';
@Injectable
export default class TwitterFeature {
// eslint-disable-next-line @typescript-eslint/no-explicit-any, @typescript-eslint/explicit-module-boundary-types
@Inject('twitter-adapter.dapplet-base.eth') public adapter: any;
private _overlay: any;
async activate(): Promise {
if (!this._overlay) {
this._overlay = (Core).overlay({
name: 'overlay',
title: 'Dapplets x Ethereum example',
});
}
const { button } = this.adapter.exports;
this.adapter.attachConfig({
POST: (ctx: any) =>
button({
DEFAULT: {
img: EXAMPLE_IMG,
tooltip: 'Parse Tweet',
exec: () => {
console.log('parsedCtx:', ctx);
this.openOverlay(ctx);
},
},
}),
});
}
async openOverlay(props?: any): Promise {
this._overlay.send('data', props);
}
}
```
Open the manifest `./dapplet/dapplet.json`.
```json
{
"name": { "$ref": "package.json#/name" },
"branch": "default",
"version": { "$ref": "package.json#/version" },
"type": "FEATURE",
"title": "Dapplets x Ethereum example",
"description": { "$ref": "package.json#/description" },
"main": { "$ref": "package.json#/main" },
"icon": "src/icons/eth_dapplet_icon_70.png",
"contextIds": ["twitter-adapter.dapplet-base.eth"],
"config": {
"schema": "config/schema.json",
"default": "config/default.json"
},
"overlays": {
"overlay": "https://localhost:3000"
},
"dependencies": {
"twitter-adapter.dapplet-base.eth": "0.9.0"
}
}
```
Here we see the URL of the overlay named `'overlay'` for developers mode. During the publication of the dapplet to the registry the overlay will be published to the decentralized storage.
Also we see the Twitter Adapter in the dependencies with the using version.
Let's go to the overlay.
### 2.2. Overlay
As I wrote above, the overlay can be created the way you want. We use **React** in most of our projects. I will not analyze the entire overlay code, but only the important points for our architectural aspects.
The @dapplets/dapplet-overlay-bridge dependency is used to interact with the overlay.`
To get the data from the dapplet we need the class **Bridge** in the overlay part. Look at the module `./overlay/src/dappletBridge.ts`. Here is the `onData` method where we subscribe on the `'data'` event, which we've described in the dapplet.
```typescript
_subId: number = 0;
onData(callback: (data?: any) => void) {
this.subscribe('data', (data: any) => {
this._subId = Math.trunc(Math.random() * 1_000_000_000);
callback(data);
return this._subId.toString();
});
}
```
Then we use it in the `App.tsx` module.
In the onData method, we subscribe to the data event described in ./dapplet/src/index.ts in the openOverlay class method, passing the "data" event to the overlay and sending the props that is the context of our tweet.
```typescript
/* */
import { bridge } from './dappletBridge';
/* */
export default () => {
const [parsedCtx, setParsedCtx] = useState();
/* */
useEffect(() => {
bridge.onData((data?: ICtx) => {
setParsedCtx(data);
});
/* */
}, []);
/* */
};
```
Now save changes and reload the Twitter page. On button click you will see the overlay with the selected tweet data.
Thats cool! But our goal is to save this data to Ethereum chain and get it back. So let's see the contract.
### 2.3. Ethereum smart contract
It stores an array of serialized tweets data by the current user ID. It has methods for saving, removing and retrieving saved tweets.
Let's see how to connect to the smart contract and use its methods in the dapplet.
Add the folowing code to the `activate` method of the `./dapplet/src/index.ts` module:
```typescript
const contract = await Core.contract('ethereum', '0x7702aE3E1E0a96A428052BF3E4CB94965F5C0d7F', ABI);
```
There is a `Core.contract` method that receives 3 parameters: name of the network ('near' or 'Ethereum'), contract name and object with view and change methods.
Now we will make the contract methods available in the overlay. In order to pass methods through the dapplets bridge, add a `listen` function to the overlay call. Don't be afraid, just copy and paste this code :)
```typescript
if (!this._overlay) {
this._overlay = (Core).overlay({ name: 'overlay', title: 'Dapplets x ETH example' }).listen({
connectWallet: async () => {
try {
const wallet = await Core.wallet({ type: 'ethereum', network: 'goerli' });
await wallet.connect();
const currentAccount = await new Promise((res) =>
wallet.sendAndListen('eth_accounts', [], { result: (_, { data }) => res(data[0]) }),
);
this._overlay.send('connectWallet_done', currentAccount);
} catch (err) {
this._overlay.send('connectWallet_undone', err);
}
},
disconnectWallet: async () => {
try {
const wallet = await Core.wallet({ type: 'ethereum', network: 'goerli' });
await wallet.disconnect();
this._overlay.send('disconnectWallet_done');
} catch (err) {
this._overlay.send('disconnectWallet_undone', err);
}
},
isWalletConnected: async () => {
try {
const wallet = await Core.wallet({ type: 'ethereum', network: 'goerli' });
const isWalletConnected = await wallet.isConnected();
this._overlay.send('isWalletConnected_done', isWalletConnected);
} catch (err) {
this._overlay.send('isWalletConnected_undone', err);
}
},
getCurrentEthAccount: async () => {
try {
const wallet = await Core.wallet({ type: 'ethereum', network: 'goerli' });
const currentAccount = await new Promise((res) =>
wallet.sendAndListen('eth_accounts', [], { result: (_, { data }) => res(data[0]) }),
);
this._overlay.send('getCurrentEthAccount_done', currentAccount);
} catch (err) {
this._overlay.send('getCurrentEthAccount_undone', err);
}
},
getTweets: async (op: any, { type, message }: any) => {
try {
const wallet = await Core.wallet({ type: 'ethereum', network: 'goerli' });
const currentAccount = await new Promise((res) =>
wallet.sendAndListen('eth_accounts', [], { result: (_, { data }) => res(data[0]) }),
);
const tweets = await contract.getTweets(currentAccount);
this._overlay.send('getTweets_done', tweets.filter(isValidJSON));
} catch (err) {
this._overlay.send('getTweets_undone', err);
}
},
addTweet: async (op: any, { type, message }: any) => {
try {
this._overlay.send('addTweet_done');
await contract.addTweet(message.tweet);
console.log(message.tweet);
} catch (err) {
this._overlay.send('addTweet_undone', err);
}
},
removeTweet: async (op: any, { type, message }: any) => {
try {
await contract.removeTweet(message.tweet);
this._overlay.send('removeTweet_done');
console.log(message.tweet);
} catch (err) {
this._overlay.send('removeTweet_undone', err);
}
},
});
}
```
The last three asynchronius functions pass our contract methods to the overlay. The first four functions need to pair the wallet to the dapplet. To get the `Wallet` object we use a method **`Core.wallet`** with named parameters `name` (`near` or `ethereum`) and `network`. Wallet has methods **`isConnected`**, **`connect`**, **`disconnect`** .
Next step is to change `./overlay/src/dappletBridge.ts`. We have to make functions, that was described in the dapplet, available in the overlay. Copy the foolowing code to the **`Bridge`** class:
```typescript
async connectWallet(): Promise {
return this.call(
'connectWallet',
null,
'connectWallet_done',
'connectWallet_undone'
);
}
async disconnectWallet(): Promise {
return this.call(
'disconnectWallet',
null,
'disconnectWallet_done',
'disconnectWallet_undone'
);
}
async isWalletConnected(): Promise {
return this.call(
'isWalletConnected',
null,
'isWalletConnected_done',
'isWalletConnected_undone'
);
}
async getCurrentEthAccount(): Promise {
return this.call(
'getCurrentEthAccount',
null,
'getCurrentEthAccount_done',
'getCurrentEthAccount_undone'
);
}
async getTweets(accountId: string): Promise {
return this.call(
'getTweets',
{ accountId },
'getTweets_done',
'getTweets_undone'
);
}
async addTweet(tweet: string): Promise {
return this.call(
'addTweet',
{ tweet },
'addTweet_done',
'addTweet_undone'
);
}
async removeTweet(tweet: string): Promise {
return this.call(
'removeTweet',
{ tweet },
'removeTweet_done',
'removeTweet_undone'
);
}
public async call(
method: string,
args: any,
callbackEventDone: string,
callbackEventUndone: string
): Promise {
return new Promise((res, rej) => {
this.publish(this._subId.toString(), {
type: method,
message: args,
});
this.subscribe(callbackEventDone, (result: any) => {
this.unsubscribe(callbackEventDone);
this.unsubscribe(callbackEventUndone);
res(result);
});
this.subscribe(callbackEventUndone, () => {
this.unsubscribe(callbackEventUndone);
this.unsubscribe(callbackEventDone);
rej('The transaction was rejected.');
});
});
}
```
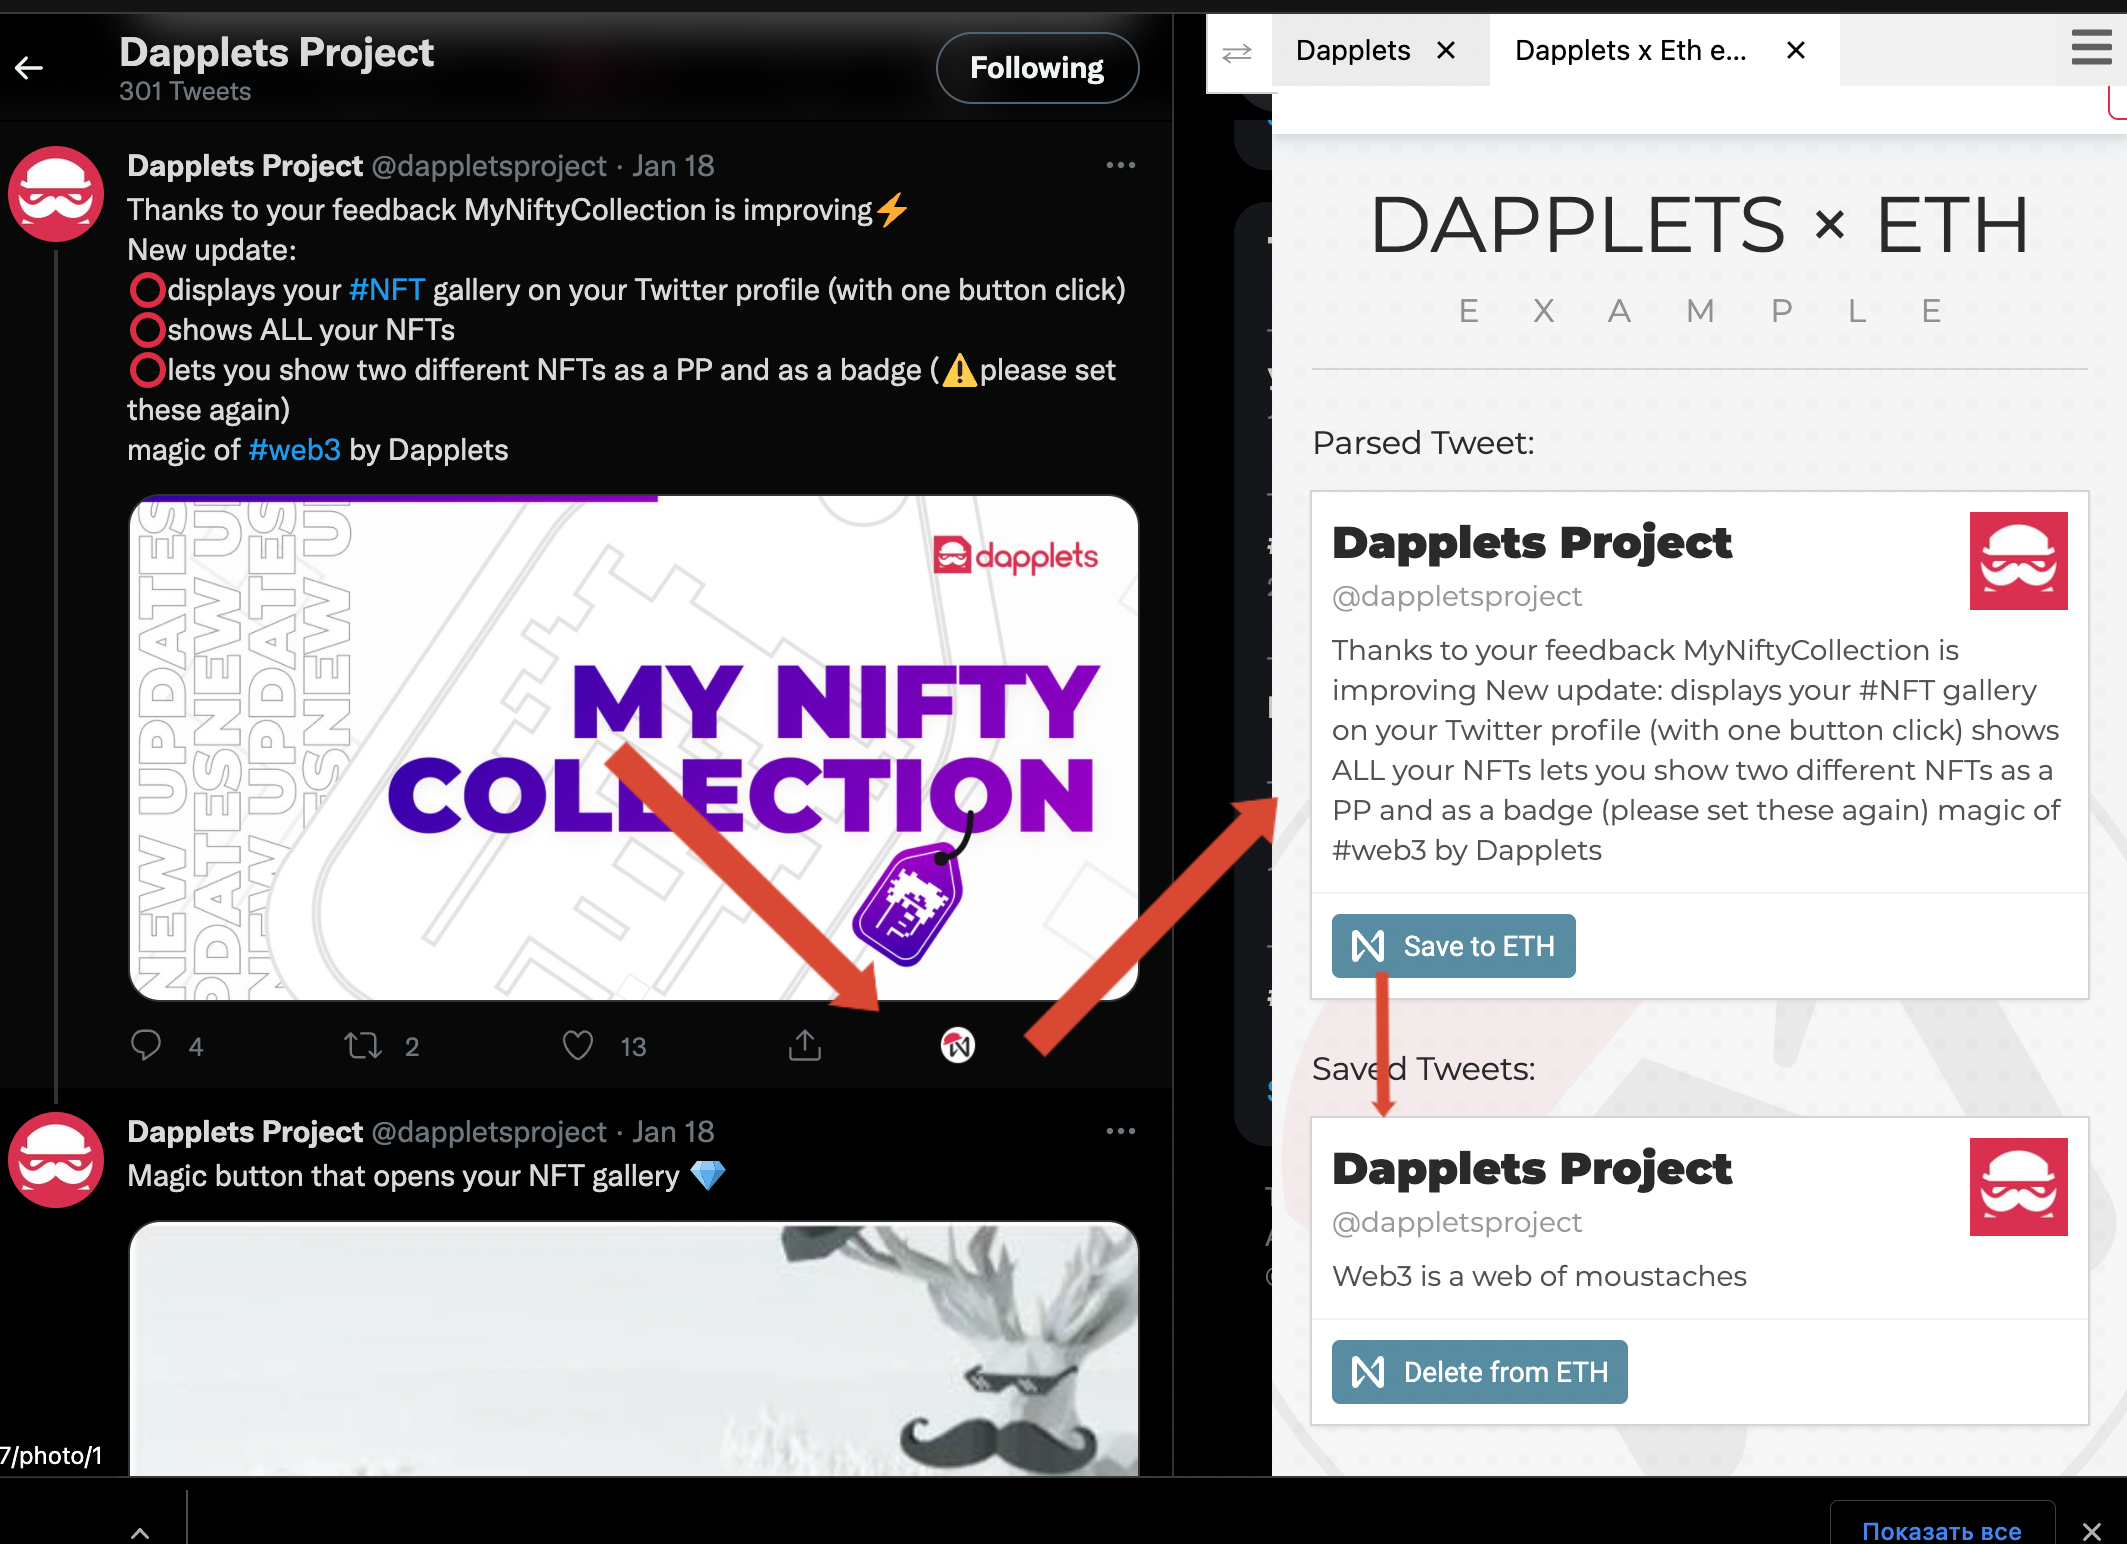
Now we can use contract methods in the overlay modules. We can authorize the dapplet with the Ethereum testnet wallet and save the data of the selected tweets to the smart contract. Also we see the saved data in the overlay.
Uncommit all the commited code in the `./overlay/src/App.tsx`. Save changes and reload the Twitter page.
The cherry on top will be the addition of the ability to view saved tweets without parsing new ones. To do this, it is enough to add the `Core.onAction` method to the `activate` in `./dapplet/src/index.ts` and pass the function of opening the overlay to it.
```typescript
Core.onAction(() => this.openOverlay());
```
Now you will see the home icon near the dapplets name.

Click on the button provides opening of the overlay with saved tweets.
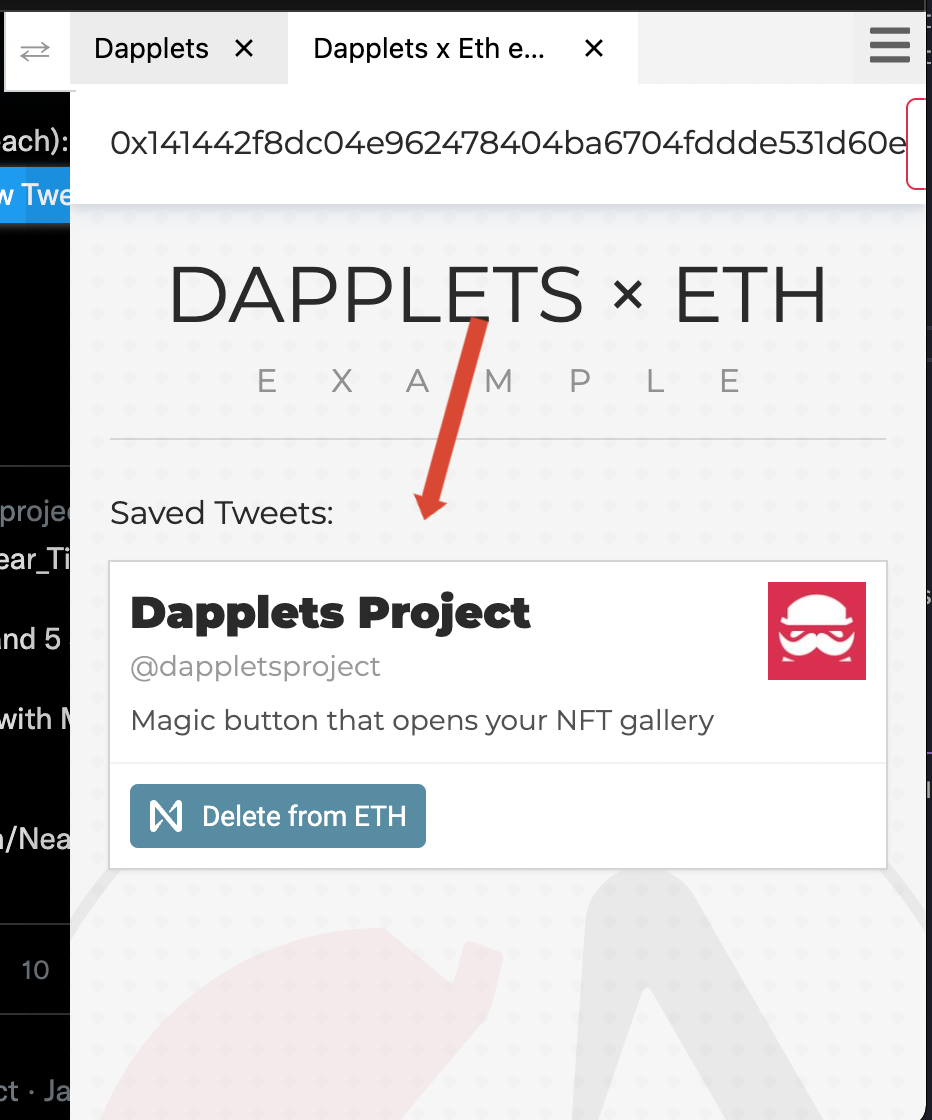
Congratulations to everyone who made it to the end of the tutorial! Hope you succeed.
Here is the result: [dapplets-eth-example](https://github.com/dapplets/dapplets-eth-example)
If something didn't work out for you or you still have questions, welcome to our chats in [Discord](https://discord.gg/YcxbkcyjMV) and [Telegram](https://t.me/dapplets).
Thank you for your time. I hope this new knowledge will be useful to you in developing impressive and successful applications on the Dapplets platform using the capabilities of the Ethereum protocol 🚀✨