https://github.com/datakitchen/dataops-observability-agents
DataOps Observability Integration Agents are part of DataKitchen's Open Source Data Observability. They connect to various ETL, ELT, BI, data science, data visualization, data governance, and data analytic tools. They provide logs, messages, metrics, overall run-time start/stop, subtask status, and scheduling information to DataOps Observability.
https://github.com/datakitchen/dataops-observability-agents
data-engineering data-observability integrations monitoring-plugins
Last synced: 10 months ago
JSON representation
DataOps Observability Integration Agents are part of DataKitchen's Open Source Data Observability. They connect to various ETL, ELT, BI, data science, data visualization, data governance, and data analytic tools. They provide logs, messages, metrics, overall run-time start/stop, subtask status, and scheduling information to DataOps Observability.
- Host: GitHub
- URL: https://github.com/datakitchen/dataops-observability-agents
- Owner: DataKitchen
- License: apache-2.0
- Created: 2024-04-16T16:00:04.000Z (almost 2 years ago)
- Default Branch: main
- Last Pushed: 2025-03-19T14:59:46.000Z (11 months ago)
- Last Synced: 2025-03-19T15:41:59.849Z (11 months ago)
- Topics: data-engineering, data-observability, integrations, monitoring-plugins
- Language: Python
- Homepage: https://datakitchen.io
- Size: 244 KB
- Stars: 27
- Watchers: 2
- Forks: 1
- Open Issues: 3
-
Metadata Files:
- Readme: README.md
- Changelog: changelog.d/template.jinja
- Contributing: CONTRIBUTING.md
- License: LICENSE
Awesome Lists containing this project
README
# DataOps Observability Integration Agents  
*
DataOps Observability Integration Agents are part of DataKitchen's Open Source Data Observability. They connect to various ETL, ELT, BI, data science, data visualization, data governance, and data analytic tools. They provide logs, messages, metrics, overall run-time start/stop, subtask status, and scheduling information to DataOps Observability.
*

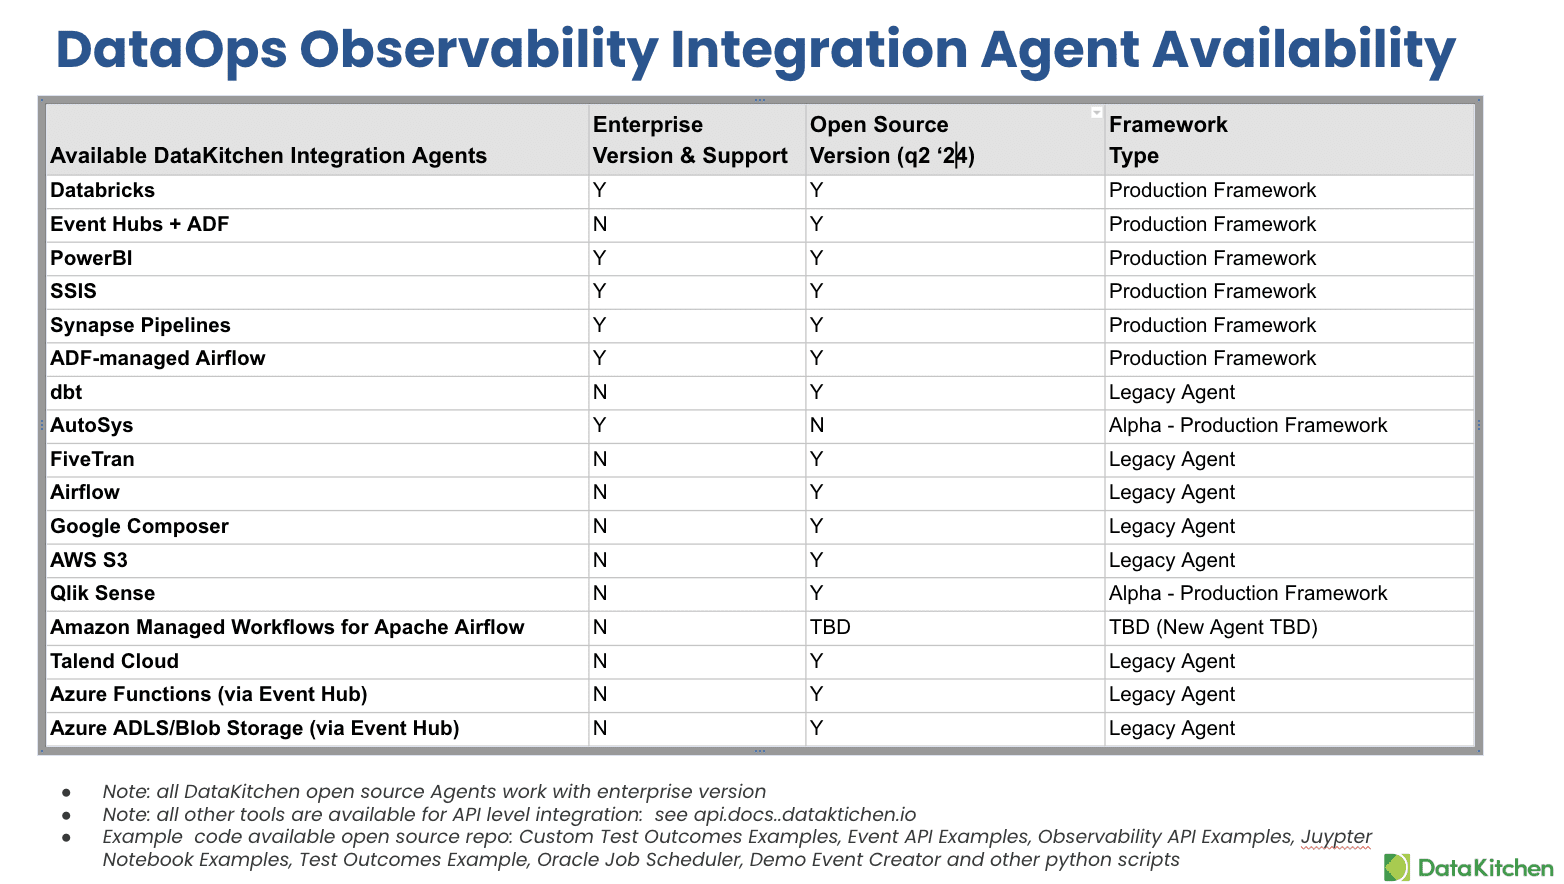
## Current List of Integration Agents

## Setup
Before you begin you will need to clone the repository.
```sh
# Mac with Homebrew
brew install git
# Ubuntu
sudo apt install git
git clone
```
### Developer Environment
Create a development environment by running the following:
```shell
# this project requires python 3.11
cd /your/cloned/repo/
python3.11 -m venv venv
source venv/bin/activate
# Linux
pip install .[dev,release]
# Note: when running on MacOS with zsh shell, enclose the directive in single quotes to stop the shell
# interpreting it as a wild card.
pip install '.[dev,release]'
```
Next, you should set up `pre-commit`.
```shell
pre-commit install
```
## Running tests
### pytest
Tests will work by default from the terminal when run from root.
tests can be run from the root with the following command.
```shell
pytest .
```
### PyCharm
Some fixtures are specified as plugins from the root `conftest.py`. PyCharm by default sets the root to `tests` or the
test directory. You will need to manually set the root for tests that use the plugin.
`Edit Configurations...` --> `Edit Configuration Templates` --> `Python Tests` --> `Pytest` --> `Working directory`.
Change it to be the root of the repo.
A configuration has been saved in `.run/Template Python tests.run.xml`. Hopefully pycharm will pick that up
automatically.
### Sharing data fixtures
A lot of tests require data that be shared. By default, all testlib/**/fixtures files are installed as pytest
plugins. That means the fixture is accessible just by referencing it, and allows us to reference just a single
set of data.
Please use it.
See `/conftest.py` for details.
## Running the quality tools
After setting up your environment and entering `mypy` can be from `invoke`
```shell
inv mypy
```
The rest of the tools can be run as a part of pre-commit, or through `invoke`
```shell
inv lint
```
TIP: You can run these both together like so:
```shell
inv lint mypy
```
## Building an image
To test that the docker image builds, you can run
```shell
# --tag may be specified multiple times.
inv build-image [--tag tag]
```
## Creating a release note
A release note must be created in order to merge into main. You can do so manually after installing the development
tools, or you can use the `invoke mk-note` command which will prompt you for the correct information.
You'll need your ticket number and release type.
Valid release note categories are:
* fixed
* added
* deprecated
* removed
* changed
* chore
these follow the [Keep a Changlog](https://keepachangelog.com/en/1.1.0/) format.
Run the following:
```shell
# e.g., towncrier create AG-17.fixed.md --edit
towncrier create your-ticket.type.md
# or; and follow the prompts
inv mk-note
```
These notes will be consumed by leadership and tech-comms. Be thorough and describe _what_ you did!
Note: `chore` types won't appear on changelog. They also do not require a ticket, just press `enter` when prompted for board name.
## Doing a release
Releases should be done strictly through the build-system. Tagging should be done through the build-system.
On either a build of `main` or a manual build of main, you should see a series of manual jobs in the pipeline.
- Trigger Breaking Release
- Trigger Feature Release
- Trigger Bugfix Release
Choose one (and only one) of these jobs and hit the "play" button.
These will increment the versions and push them to the appropriate release channels.
## Community
### Getting Started Guide
We recommend you start by going through the [Data Observability Overview Demo](https://docs.datakitchen.io/articles/open-source-data-observability/data-observability-overview).
### Support
For support requests, [join the Data Observability Slack](https://data-observability-slack.datakitchen.io/join) and ask post on #support channel.
### Connect
Talk and Learn with other data practitioners who are building with DataKitchen. Share knowledge, get help, and contribute to our open-source project.
Join our community here:
* 🌟 [Star us on GitHub](https://github.com/DataKitchen/data-observability-installer)
* 🐦 [Follow us on Twitter](https://twitter.com/i/flow/login?redirect_after_login=%2Fdatakitchen_io)
* 🕴️ [Follow us on LinkedIn](https://www.linkedin.com/company/datakitchen)
* 📺 [Get Free DataOps Fundamentals Certification](https://info.datakitchen.io/training-certification-dataops-fundamentals)
* 📚 [Read our blog posts](https://datakitchen.io/blog/)
* 👋 [Join us on Slack](https://data-observability-slack.datakitchen.io/join)
* 🗃 [Sign The DataOps Manifesto](https://DataOpsManifesto.org)
* 🗃 [Sign The Data Journey Manifesto](https://DataJourneyManifesto.org)
### Contributing
For details on contributing a new Agent or running the project for development, check out our contributing guide.
### License
DataKitchen DataOps Observability Agents are Apache 2.0 licensed.