https://github.com/datastaxdevs/workshop-microservices-java
Rest API for Todobackend on top of Cassandra
https://github.com/datastaxdevs/workshop-microservices-java
Last synced: about 1 year ago
JSON representation
Rest API for Todobackend on top of Cassandra
- Host: GitHub
- URL: https://github.com/datastaxdevs/workshop-microservices-java
- Owner: datastaxdevs
- Created: 2020-06-08T12:11:08.000Z (about 6 years ago)
- Default Branch: master
- Last Pushed: 2023-02-22T07:48:25.000Z (over 3 years ago)
- Last Synced: 2023-03-04T04:05:52.908Z (over 3 years ago)
- Language: Java
- Homepage:
- Size: 14.6 MB
- Stars: 25
- Watchers: 8
- Forks: 16
- Open Issues: 3
-
Metadata Files:
- Readme: README.md
Awesome Lists containing this project
README
# ✨ Building Microservice for Apache Cassandra™ ✨
[](https://gitpod.io/#https://github.com/DataStax-Academy/microservices-java-workshop-online)
[](http://www.apache.org/licenses/LICENSE-2.0)
[](https://discord.com/widget?id=685554030159593522&theme=dark)
*"In this repository, you'll find everything you need related to the **Cassandra Developer Workshop Build Java Microservices for Apache Cassandra**. [The first live stream will be June 17th](https://www.youtube.com/watch?v=KAcZg6l9QTw). Past this date the `README.MD` will be updated with the recording. Feel free to bookmark this page for future reference, Enjoy"!* - The Developer Advocates Team.

`Cassandra Developer Workshops` are an interactive experience. Advocates share knowledge about Apache Cassandra™ databases and you interact with them through chats *([youtube](https://www.youtube.com/channel/UCAIQY251avaMv7bBv5PCo-A) and [discord](https://discord.com/widget?id=685554030159593522&theme=dark))*, quizzes (menti.com), and exercises.
Today we are creating the Todo Application with storage in Apache Cassandra™.
# Table of Content
For simplicity all exercise instructions are listed in a single `README.MD` document. As it is quite long we provide a table of contents after each chapter so you can go back to it.
| Sections | Material Description
|---|---|
| **Slide deck** | [Slidedeck for the workshop](z-materials/presentation.pdf) |
| **1. Bootstrapping** | [Setup your environment](#1-bootstrapping) |
| **2. Run the Todo Application** | [Run the Todo Application](#2-run-the-todo-application) |
| **3. Create your Astra instance** | [Create your Astra instance](#3-create-your-astra-instance) |
| **4. Connectivity to Astra** | [Connectivity to Cassandra](#4-connectivity-to-astra) |
| **5. CRUD Repository** | [Implement CRUD Repository](#5-crud-repository) |
| **6. CRUD Repository Object Mapper** | [Test Object Mapper](#6-crud-repository-with-object-mapper) |
| **7. CRUD Repository Spring Data** | [Test with Spring DATA](#7-crud-repository-with-spring-data) |
## 1. Bootstrapping
There are 2 ways to do the exercises, **locally** on your computer and with a **cloud-based IDE named Gitpod.** We recommend you to use your laptop in order to save code modifications and come back later. In both cases you should start by cloning the repository and download everything (including slides).
- ### Option A - Work with a 100% Cloud-based Environment ☁️
**✅ Open gitpod** : [Gitpod](https://www.gitpod.io/) is an IDE 100% online based on Eclipse Theia. To initialize your environment simply click on the button below *(CTRL + Click to open in new tab)*
[](https://gitpod.io/#https://github.com/DataStax-Academy/microservices-java-workshop-online)
Target url looks like `https://..gitpod.io/#/workspace/microservices-java-workshop-online`. These URL's are dynamic and we cannot provide clickable links in advance. You will need to copy-paste `.` as we will insert them in each URL during the exercises.
```
⚠️ By default Autosaved is not enabled in Gitpod. Don't forget to save your modifications with CTRL+S
```
**👁️ Expected output**
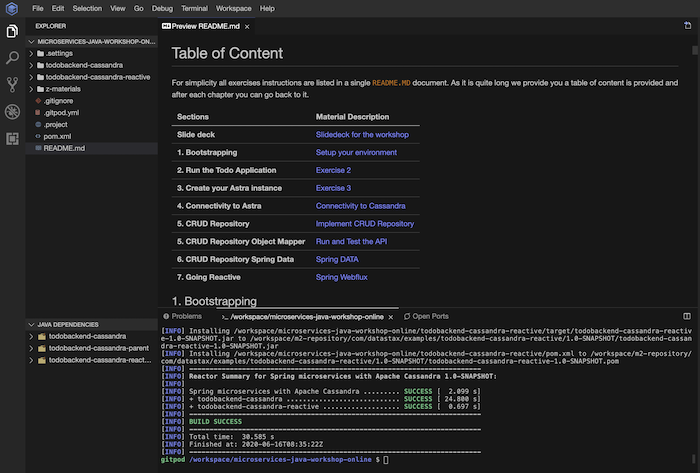
**That's it.** Gitpod provides all tools we will need today including `Maven` and exporting port `8080`. At initialization of the workspace we schedule a `mvn clean install` to download dependencies. You can still download the repository and bookmark it as all materials including slides are included.
- ### Option B - Work with Local Environment 💻
This part is dedicated to people running the exercises on their laptop. You can skip it and go directly to [2. Run the Todo Application](#2-run-the-todo-application) if you are using gitpod.
**✅ (local env) Clone the repository :** : With `git` or through the web UI clone the repo
```bash
# Clone the current repository
git clone https://github.com/DataStax-Academy/microservices-java-workshop-online.git
# Access the proper folder
cd microservices-java-workshop-online
```
**✅ (local env) Install Java (JDK 11 +)** Pick the proper infos based on your operating system
-  Please use the following tutorial [Installation of the JDK on Microsoft Windows Platforms](https://docs.oracle.com/en/java/javase/11/install/installation-jdk-microsoft-windows-platforms.html#GUID-A7E27B90-A28D-4237-9383-A58B416071CA)
-  Please use the following tutorial [Installation of the JDK on Linux Platform Platforms](https://docs.oracle.com/en/java/javase/11/install/installation-jdk-linux-platforms.html#GUID-737A84E4-2EFF-4D38-8E60-3E29D1B884B8)
-  Please use the following tutorial [Installation of the JDK on MACOS Platforms](https://docs.oracle.com/en/java/javase/11/install/installation-jdk-macos.html#GUID-2FE451B0-9572-4E38-A1A5-568B77B146DE) or with [homebrew](https://docs.brew.sh/Installation):
```bash
brew cask install java
```
**✅ (local env) Install Maven**
-  Please use the following tutorial [How to install Maven on Windows](https://mkyong.com/maven/how-to-install-maven-in-windows)
- . For CentOS you can use: `sudo yum install maven`
-  For MacOS you can use `brew install maven`
Validate installation
```bash
mvn -v
```
**👁️ Expected output**
```bash
Apache Maven 3.6.0 (97c98ec64a1fdfee7767ce5ffb20918da4f719f3; 2018-10-24T20:41:47+02:00)
Maven home: /usr/local/Cellar/maven/3.6.0/libexec
Java version: 12, vendor: Oracle Corporation, runtime: /Library/Java/JavaVirtualMachines/openjdk-12.jdk/Contents/Home
Default locale: en_FR, platform encoding: UTF-8
OS name: "mac os x", version: "10.15.3", arch: "x86_64", family: "mac"
```
**✅ (local env) Install an IDE**
Pick and install your favourite Java IDE. Here are some propositions without preference order.
| Tools | Download link
|---|---|
| **Eclipse STS** | 📥[Download Eclipse Spring Tools Suite](https://spring.io/tools#main)
| **Jetbrains IntelliJ** | 📥[Download IntelliJ](https://www.jetbrains.com/idea/download/index.html)
| **Core Eclipse** | 📥[Download Eclipse](https://www.eclipse.org/downloads/)
| **Visual Studio Code** | 📥[Downlowd Visual Code](https://code.visualstudio.com/Download)
[🏠back to table of content](#table-of-content)
## 2. Run the Todo Application
**TodoMVC** is a fabulous community contribution that helps developers compare frameworks on the basis of actual project code, not just claims and anecdotes. TodoMVC is an immensely valuable attempt at a difficult problem - providing a structured way of comparing JS libraries and frameworks.

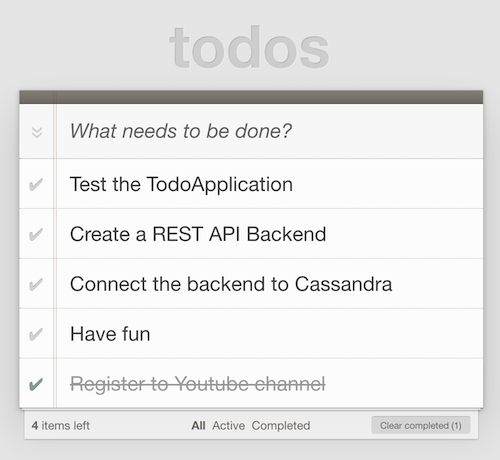
**✅ Step 2a. Visit [TodoMVC.com](http://todomvc.com/) to discover what we are building today** : We want you to see what it look like before starting anything. So simply access the URL [http://todomvc.com/](http://todomvc.com/) and browse. You will see that there are multiple implementations, pick one of those and test it live in your browser.
**Todo-Backend** is a shared example to showcase backend tech stacks. The Todo-Backend project defines a simple web API spec - for managing a todo list. Contributors implement that spec using various tech stacks. Those implementations are cataloged below. A spec runner verifies that each contribution implements the exact same API, by running an automated test suite which defines the API.

There are multiple free implementations available. Some implementations provide endpoints to be tested in `heroku`. [Heroku provide free hosting for a Java application but this is on-demand](https://devcenter.heroku.com/articles/deploying-spring-boot-apps-to-heroku). With `Heroku` The application will be sleeping until you access the endpoint. So it will take 30s for the first person to have the application running. Among the available free endpoints we can list:
- `Endpoint#1` : [https://todo-back-springboot220-java12.herokuapp.com/todos](https://todo-back-springboot220-java12.herokuapp.com/todos)
- `Endpoint#2` : [https://todo-quarkus.herokuapp.com/todos](https://todo-quarkus.herokuapp.com/todos)
- `Endpoint#3` : [https://todo-backend-micronaut.herokuapp.com/todos](https://todo-backend-micronaut.herokuapp.com/todos)
**✅ Step 2b. Test TodoBackEnd Spec Runner** : Locate the [spec runner](https://www.todobackend.com/specs/index.html) and use one of the `endpoints` listed above to evaluate if API matchs the requirements. To do so copy-paste one URL and click `Run Tests`.

*Sample URL*
```
https://www.todobackend.com/specs/index.html?https://todo-back-springboot220-java12.herokuapp.com/todos
```
**👁️ Expected output**

**Note:** *During the live stream you will be hundreds testing the same endpoints so - maybe - we could hit some issues = race conditions.*
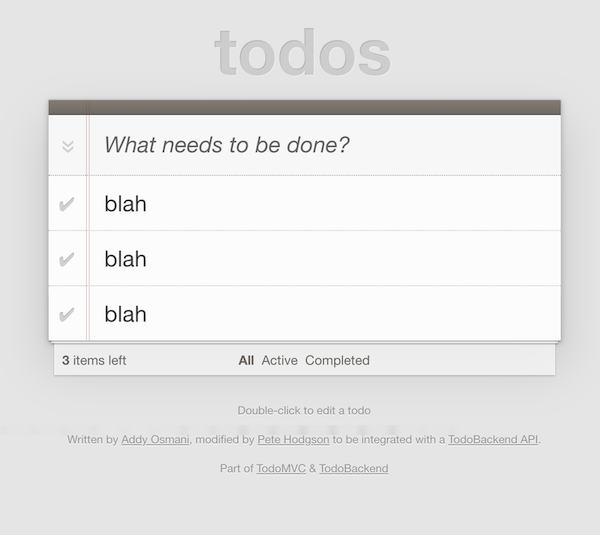
**✅ Step 2c. Test TodoBackEnd Web Client** : todoBackend.com provides a [client](https://www.todobackend.com/client/index.html) to work with the API. As before pick one of the `endpoints` listed before and try the client.

**👁️ Expected output**
Our mission withing the next hour is to implement the *backend API* and store data into Apache Cassandra™. We have you covered by providing the skeleton of the application.
**✅ Step 2d. Start Backend API** : By using a maven command or run application in your IDE
```bash
# Build the project without tests (you did not implemented them yet TDD baby !)
mvn clean install -Dmaven.test.skip=true
# Navigate to the proper folder
cd todobackend-cassandra/
# Start the backend API
mvn spring-boot:run
```
**👁️ Expected output**
```bash
[...]
[INFO] Reactor Summary for Spring microservices with Apache Cassandra 1.0-SNAPSHOT:
[INFO]
[INFO] Spring microservices with Apache Cassandra ......... SUCCESS [ 0.004 s]
[INFO] + todobackend-cassandra ............................ SUCCESS [ 0.122 s]
[INFO] ------------------------------------------------------------------------
[INFO] BUILD SUCCESS
[INFO] ------------------------------------------------------------------------
```
```bash
________ __ __ __ .__
\______ \ _______ __/ \ / \ | __ _____| |__ ____ ______
| | \_/ __ \ \/ /\ \/\/ / |/ / / ___/ | \ / _ \\____ \
| ` \ ___/\ / \ /| < \___ \| Y ( <_> ) |_> >
/_______ /\___ >\_/ \__/\ / |__|_ \/____ >___| /\____/| __/
\/ \/ \/ \/ \/ \/ |__|
Backend API implementation of todobackend.com
We are using SpringBoot and Apache Cassandra
The application is started at http://localhost:8080
14:54:54.773 INFO com.datastax.sample.TodoBackendApplication : Starting TodoBackendApplication on clunhost with PID 75757 (/Users/cedricklunven/dev/WORKSPACES/DATASTAX/microservices-java-workshop-online/wkshop-microservice-2-spring-boot/target/classes started by cedricklunven in /Users/cedricklunven/dev/WORKSPACES/DATASTAX/microservices-java-workshop-online/wkshop-microservice-2-spring-boot)
14:54:54.775 INFO com.datastax.sample.TodoBackendApplication : No active profile set, falling back to default profiles: default
14:55:03.604 INFO com.datastax.sample.TodoBackendApplication : Started TodoBackendApplication in 1.075 seconds (JVM running for 1.492)
```
**✅ Step 2e. Show Api Documentation** : through your browser
- 💻 If you are on your **laptop** : open a browser and navigate to [http://localhost:8080](http://localhost:8080)
- ☁️ If you are on **gitpod** : a popup may show up and redirect you to `https://8080-.<>your_region.gitpod.io` as you can see this an alias for port `8080`.
**👁️ Expected output**
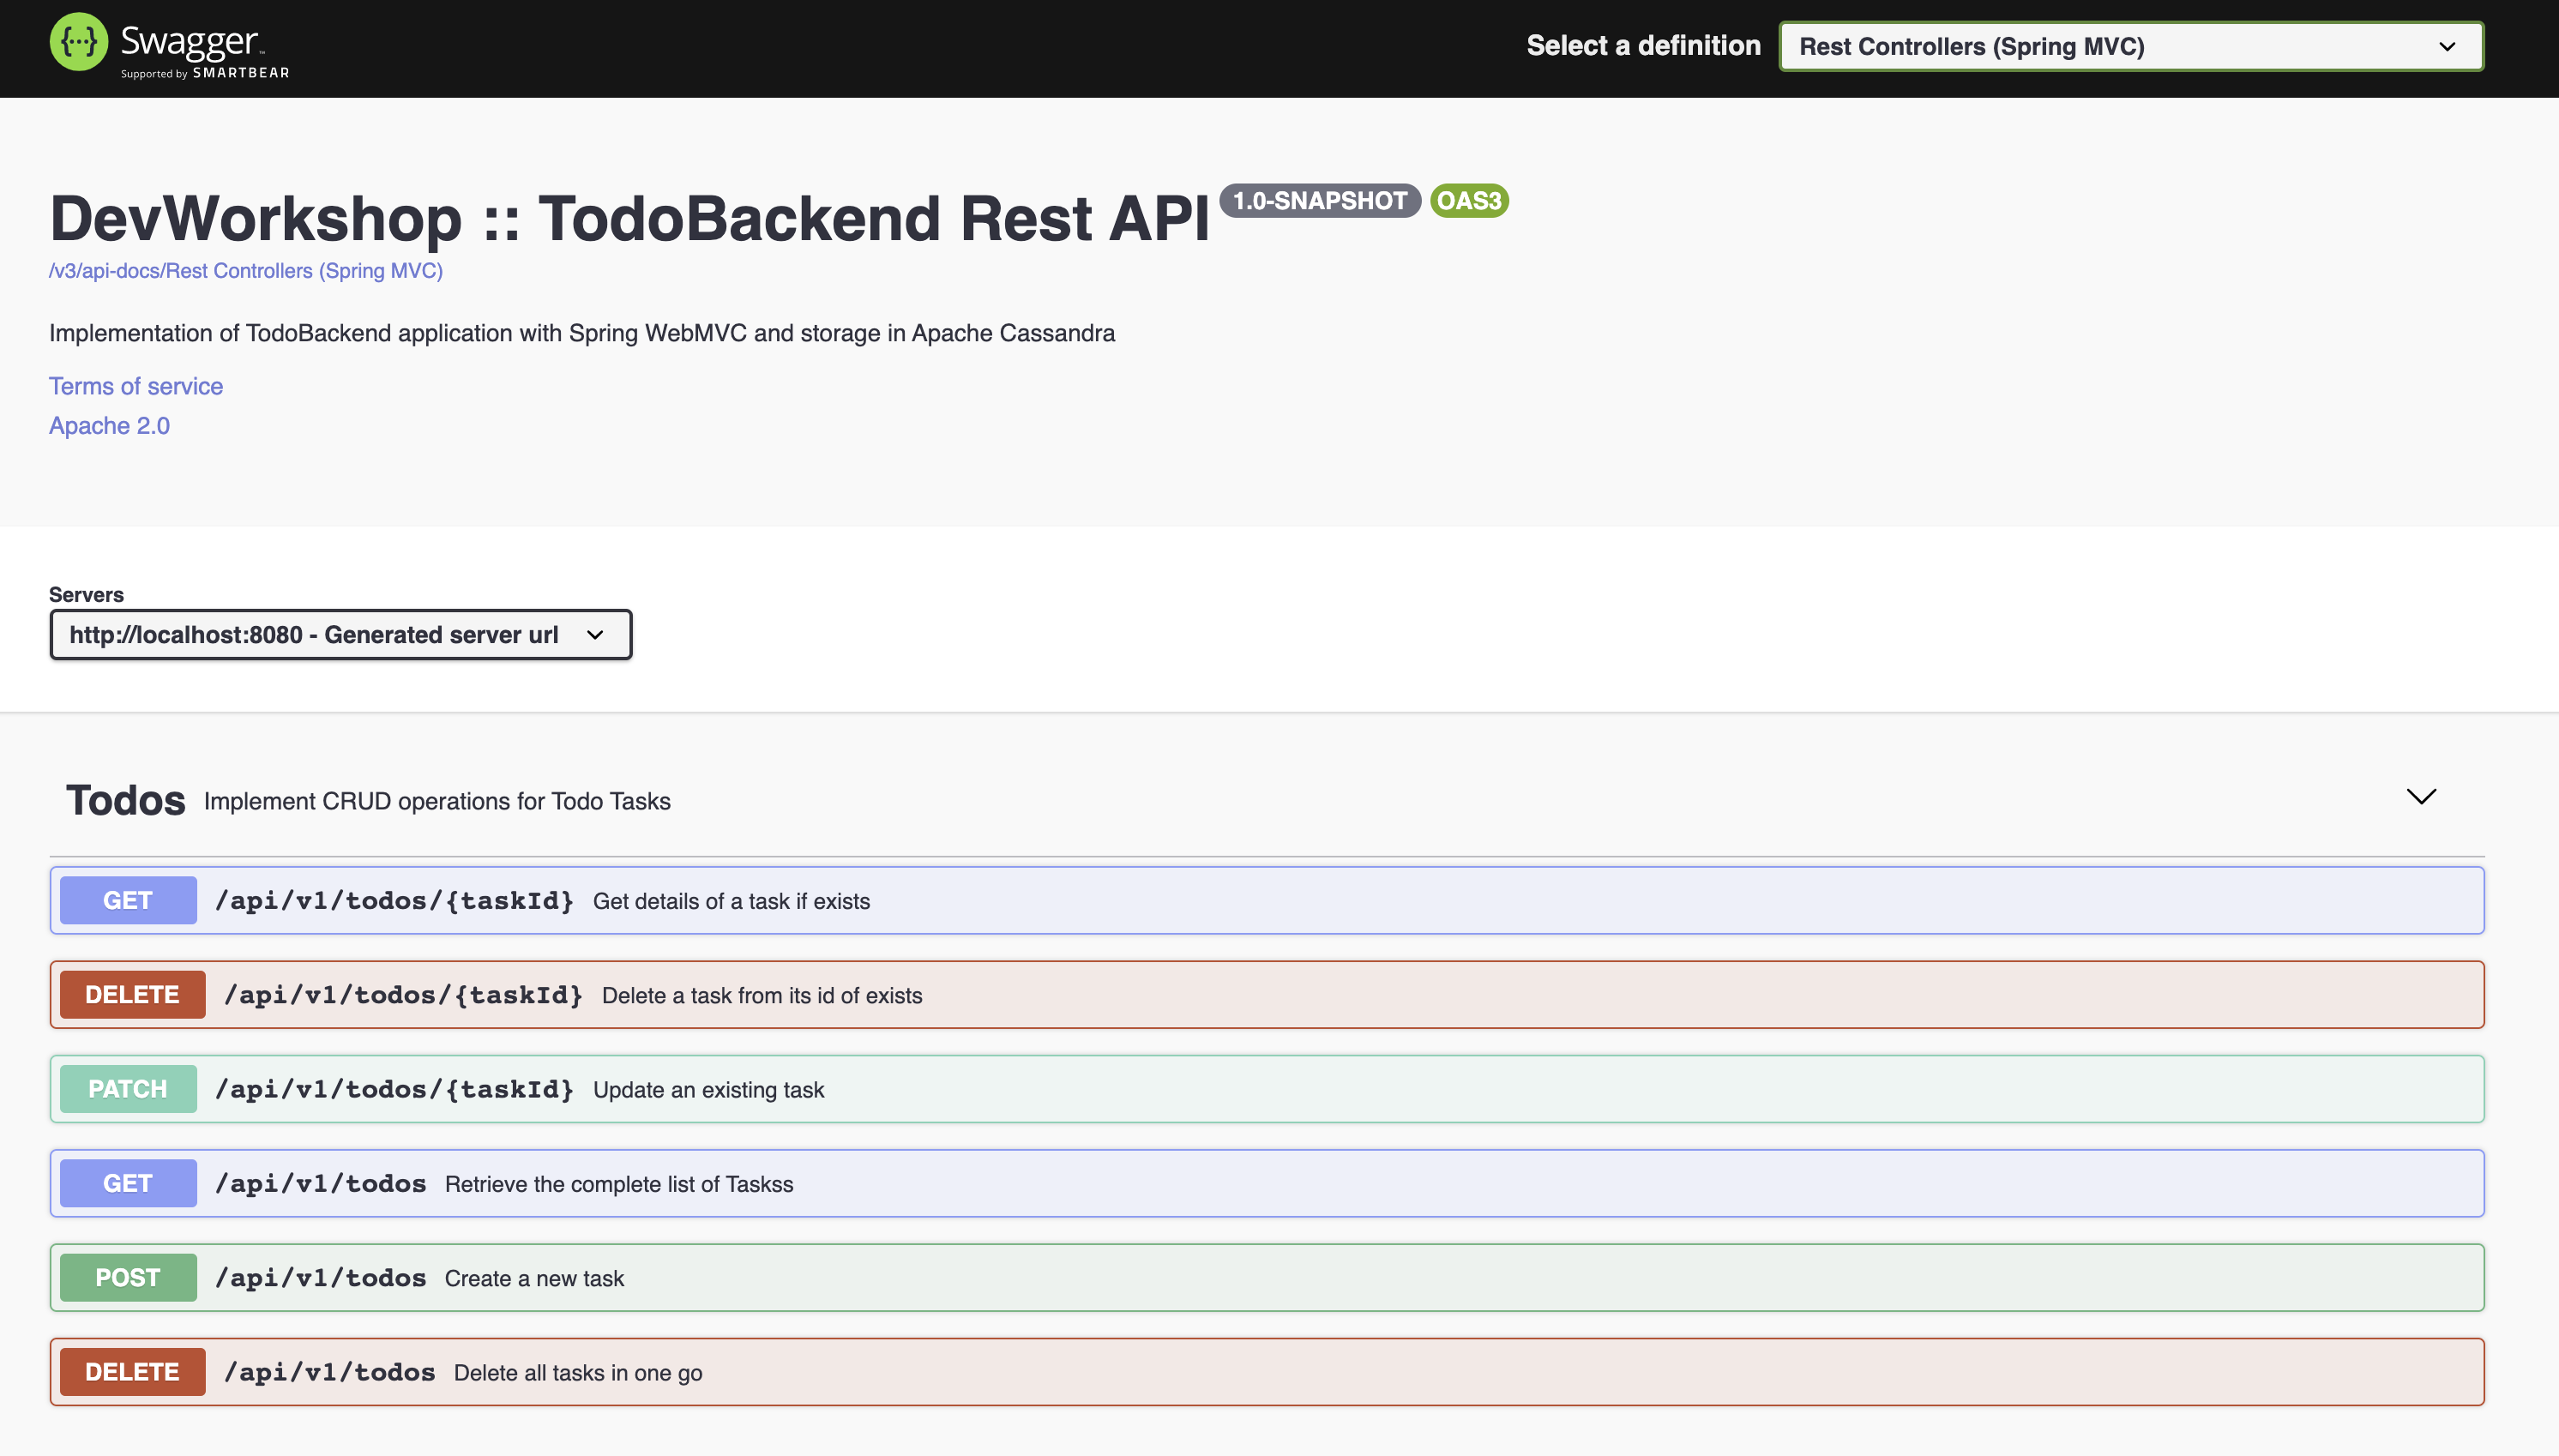
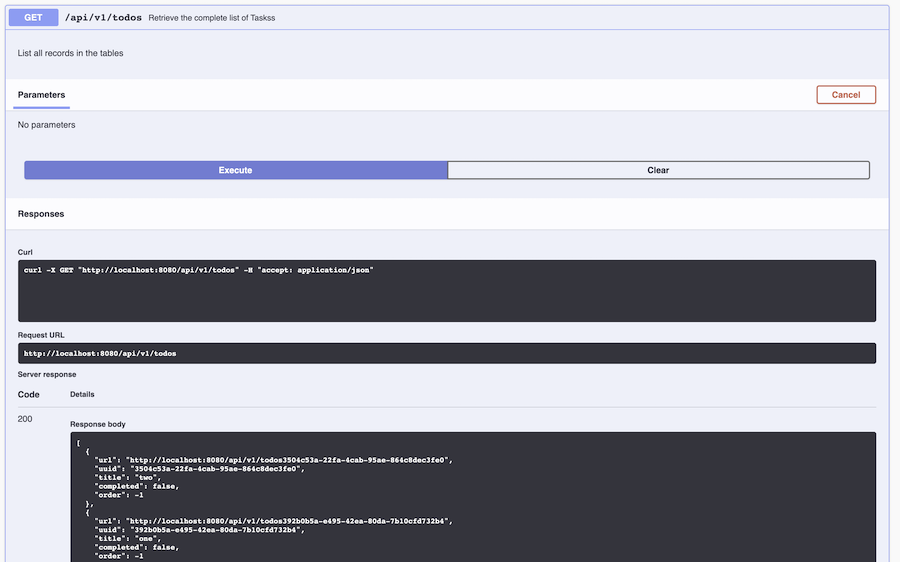
**✅ Step 2f. Test Backend API** :using the OpenAPI generated documentation. You can open the `GET` bloc labeled `/api/v1/todos/` and pick `Try It Out`. Then locate `Execute` to test the API and get a few results.
**Note:** *For some resources `/api/v1/todos/{task-id}` you need to provide a valid UUID as a string. You can get the list of valid ones by invoking the operation `GET /api/v1/todos/` first. The default value `6f6c5b47-4e23-4437-ada8-d0a6f79330a2` should work.*
**👁️ Expected output**
**✅ Step 2g. Test our Backend API against the spec runner** : This REST API store data **In memory** but is 100% valid. We can validate by testing the same spec runner as before.
- 💻 If you are on your **laptop** open a browser and navigate to [https://www.todobackend.com/specs/index.html?http://localhost:8080/api/v1/todos/](https://www.todobackend.com/specs/index.html?http://localhost:8080/api/v1/todos/)
- ☁️ If you are on **gitpod** : a popup may show up and redirect you to `https://8080-.<>your_region.gitpod.io/api/v1/todos/`.
**👁️ Expected output**

**✅ Step 2h. Test our Web Client UI against our Backend API** : This is neat, the client and spec runner both work even with URL like `localhost` because this is some `javascript` code executed at client side.
Back the client UI change the URL to match you backend URL :
- 💻 If your work locally : [https://www.todobackend.com/client/index.html?http://localhost:8080/api/v1/todos/](https://www.todobackend.com/client/index.html?http://localhost:8080/api/v1/todos/)
- ☁️ If you are using gitpod `https://www.todobackend.com/client/index.html?https://8080-.-eu01.gitpod.io/api/v1/todos/`
**👁️ Expected output**

*HAHA OK, I changed a little bit the values but now this is working....*

[🏠 Back to Table of Content](#table-of-content)
## 3. Create your Astra instance
`ASTRA` service is available at url [https://astra.datastax.com](https://astra.datastax.com/)
**✅ Step 3a.Register (if needed) and Sign In to Astra** : You can use your `Github`, `Google` accounts or register with an `email`
- [Registration Page](https://astra.datastax.com/register)

- [Authentication Page](https://astra.datastax.com/)

**✅ Step 3b. Fill the Create New Database Form** : As you don't have have any instances the login will route through the instance creation form. You will find below which values to enter for each field.
- *Initialization Form*

- **Set the Compute Size**: For the work we are doing please use `Free tier`. You instance will be there forever, free of charge. If you already have a free tier db that you created in a previous workshop (`killrvideo`) you can reuse it.
- **Select region**: This is the region where your database will reside physically (choose one close to you or your users). For people in EMEA please use `europe-west-1` idea here is to reduce latency.
- **Fill in the database name** - Proposed value `dev-workshop-db`. You can use any alphanumeric value it is not part of the connection fields. Now it will be part of a file downloaded later and you should avoid capital letters.
With the 3 fields below you can pick any name, simply REMIND them, they will be required both to connect and do the exercises.
- **Fill in the keyspace name** - Proposed value `todoapp` (no spaces, alpha numeric)
- **Fill in the user name** - `todouser`. Note the user name is case-sensitive. Please use the case we suggest here.
- **Fill in the user password** - `todopassword`. Fill in both the password and the confirmation fields. Note that the password is also case-sensitive. Please use the case we suggest here.
- **Launch the database**. Review all the fields to make sure they are as shown, and click the Launch Database button.
**👁️ Expected output**

**✅ Step 3c. View your Database and connect** : View your database. It may take 2-3 minutes for your database to spin up. You will receive an email at that point. But, go ahead and continue with the rest of the exercise now.
**👁️ Expected output**
*Initializing*

*Database is ready*

**✅ Step 3d. Open DataStax Studio** : Locate `Launch Developer Studio` on the bottom left part of the screen and click on `Launch now`. Please enter the same credentials you used for instance creation.

- **Fill in the Database User name** - `todouser`. Note the user name is case-sensitive. Please use the case we suggest here.
- **Fill in the password** - `todopassword`. Fill in both the password and the confirmation fields. Note that the password is also case-sensitive. Please use the case we suggest here.
**👁️ Expected output**

> **⚠️ Important**
> ```
> The instructor will show you on screen how to create a token
> but will have to destroy to token immediately for security reasons.
> ```
**✅ Step 3e. Import a notebook** : DataStax studio should now be opened.
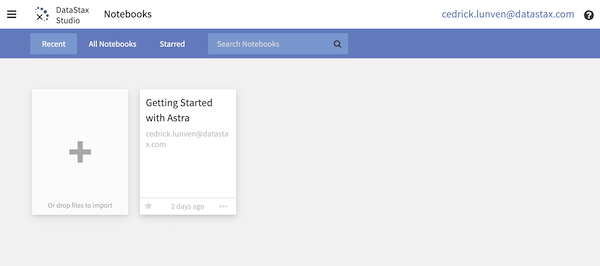
- Download locally the file `datastax-studio-notebook.tar` located in `z-materials/notebooks/datastax-studio-notebook.tar` [here](https://github.com/DataStax-Academy/microservices-java-workshop-online/blob/master/z-materials/notebooks/datastax-studio-notebook.tar?raw=true)
- Import the file in studio with a drag and drop in the Datastax studio window
*Importing*

*File is now opened*


[🏠 Back to Table of Content](#table-of-content)
## 4. Connectivity to Astra
With our `Cassandra-as-a-service` instance ready let's connect from our application.
**✅ Step 4a. Download the secure connect bundle** : Go to home page. Process to a `refresh` (F5) of the page (the download link will be valid 5 min we want to be sure we don't reach the timeout). Locate link `Download secure connect bundle` and click. You should download a file named `secure-connect-.zip`. Please remind the location of the file.

Save the file in a path you will remind, again we will need it for the next exercises.
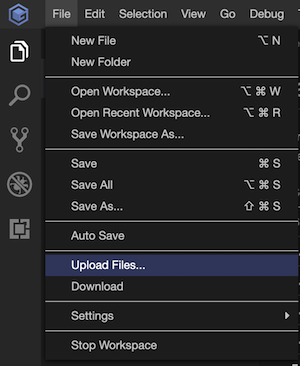
**✅ Step 4b. Upload the zip in `gitpod`** : If you are working with gitpod the `secure connect bundle` needs to be uploaded there.
- Select the root folder, name of the project and go to `File > Upload Files...`, locate the `zip` and import. *(in our tests the menu `File>Upload` Files only when a folder is selected).*
- You can now see the file in the resources tree
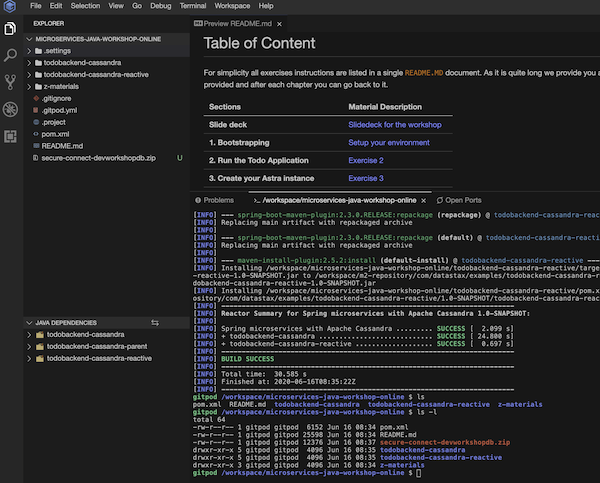
The file path is located at `/workspace/microservices-java-workshop-online/secure-connect-dev-workshop-db.zip` (because my db name is `dev-workshop-db`).
**✅ Step 4c. Fix unit test `ConnectivityToAstraExplicitTest.java`**
- Unit Tests are located in `src/test/java` [HERE](./todobackend-cassandra/src/test/java/com/datastax/samples/astra). Open the file `ConnectivityToAstraExplicitTest` and fill the properties with your Astra informations.
*Do not copy-paste - this is a sample for me.*
```java
public static String ASTRA_ZIP_FILE = "/Users/cedricklunven/Downloads/secure-connect-dev-workshop-db.zip";
public static String ASTRA_USERNAME = "todouser";
public static String ASTRA_PASSWORD = "todopassword";
public static String ASTRA_KEYSPACE = "todoapp";
```
```
⚠️ By default Autosaved is not enabled in Gitpod. Don't forget to save your modifications with CTRL+S
```
- You can now run the UNIT TEST with your IDE or Maven in a terminal (easier with gitpod
```bash
mvn test -Dtest=com.datastax.samples.astra.ConnectivityToAstraExplicitTest#should_connect_to_Astra_static
```
**👁️ Expected output**
```bash
ConnectivityToAstraExplicitTest: + [OK] - Connection Established to Astra with Keyspace todoapp
```
**✅ Step 4d. Fix unit test `ConnectivityToAstraWithConfTest.java`**
Providing the parameter in static way is useful for tests but we can do better but externalizing to a configuration file in `src/test/resources`: **`application_test.conf`** Open the file and edit with your Astra informations.
*Do not copy-paste*
```yaml
datastax-java-driver {
basic {
request {
timeout = 5 seconds
consistency = LOCAL_QUORUM
page-size = 5000
}
session-keyspace = todoapp
cloud {
secure-connect-bundle = /workspace/microservices-java-workshop-online/secure-connect-dev-workshop-db.zip
}
}
advanced {
auth-provider {
class = PlainTextAuthProvider
username = todouser
password = todopassword
}
}
}
```
```
⚠️ By default Autosaved is not enabled in Gitpod. Don't forget to save your modifications with CTRL+S
```
- You can now run the UNIT TEST with your IDE or Maven in a terminal (easier with gitpod)
```bash
mvn test -Dtest=com.datastax.samples.astra.ConnectivityToAstraWithConfTest#should_connect_to_Astra_withConfig
```

[🏠back to table of content](#table-of-content)
## 5. CRUD Repository
It is now time to define the data model in Apache Cassandra. With the explanations coming from the slides you know this is the table we are looking for :
```sql
CREATE TABLE todoapp.todo_tasks (
uid uuid PRIMARY KEY,
completed boolean,
offset int,
title text
);
```
**✅ Step 5a. Run test `CreateSchemaInAstraTest`** : There are multiple ways to create the table : `DataStax Studio`, `CQL Console` in Astra or even any `Cqlsh` instance with the proper conf file. We will go the Java way with an Integration test. You don't have to code here the test will reuse the same file. Locate [CreateSchemaInAstraTest](./todobackend-cassandra/src/test/java/com/datastax/samples/astra/CreateSchemaInAstraTest.java) browse the code before executing:
- Run the test
```bash
mvn test -Dtest=com.datastax.samples.astra.CreateSchemaInAstraTest#should_create_expected_table
```
**👁️ Expected output**
```bash
CreateSchemaInAstraTest: Connection Established to Astra with Keyspace 'todoapp'
CreateSchemaInAstraTest: Table 'todo_tasks' has been created (if needed).
```
**✅ Step 5b. Check that table `todoapp.todo_tasks` now exist**: You can go back to Astra in the notebook we have imported or the `CqlConsole` and execute. This is the reason we made you import the noteboolk it is
quite visual and you can execute some `CQL` commands easily.
```sql
describe keyspace todoapp
```
**👁️ Expected output STUDIO**
- Locate the notebook

- Execute the command

**👁️ Expected output CQLCONSOLE**
- Locate the console

- Execute the command

**✅ Step 5c. Fix Unit Test `CrudWithCassandraDriverIntegrationTest`:** We will insert values into the table and extract values from it.
Locate [CrudWithCassandraDriverIntegrationTest](./todobackend-cassandra/src/test/java/com/datastax/samples/astra/CrudWithCassandraDriverIntegrationTest.java#L66) class and specially method `test_Insert()`. Fix the test and execute it with the following commands.
- Execute your test (solution is provided at the bottom of the class)
```bash
mvn test -Dtest=com.datastax.samples.astra.CrudWithCassandraDriverIntegrationTest#test_Insert
```
*Here is the solution*
```java
SimpleStatement stmtInsertTask = SimpleStatement.builder(""
+ "INSERT INTO todo_tasks(uid, title, offset, completed)"
+ "VALUES (?, ?, ?, ?)")
.addPositionalValue(sampleUID)
.addPositionalValue(sampleTitle)
.addPositionalValue(sampleOrder)
.addPositionalValue(sampleComplete)
.build();
cqlSession.execute(stmtInsertTask);
```
```
⚠️ By default Autosaved is not enabled in Gitpod. Don't forget to save your modifications with CTRL+S
```
- There is another test in the same class to test all CRUD operations you can test:
```bash
mvn test -Dtest=com.datastax.samples.astra.CrudWithCassandraDriverIntegrationTest#should_create_task_with_new_uid
```
**✅ Step 5d. Create bean `CqlSession` in the application**:
- Locate the file `CassandraDriverConfig` [here](./todobackend-cassandra/src/main/java/com/datastax/sample/conf/CassandraDriverConfig.java) and uncomment the annotation `@Configuration`. As you can see we delegate the configuration to a file. If we don't provide a `DriverConfigLoader` it will use `application.conf`
- Copy-paste the content of file `src/test/resources/application_test.conf` to `src/main/resources/application.conf`
```bash
cp todobackend-cassandra/src/test/resources/application_test.conf todobackend-cassandra/src/main//resources/application.conf
```
```
⚠️ By default Autosaved is not enabled in Gitpod. Don't forget to save your modifications with CTRL+S
```
**✅ Step 5e. Change injection dependency in `TodoListRestController`**
- [`TodoListRepository`](./todobackend-cassandra/src/main/java/com/datastax/sample/repository/TodoListRepository.java) is an interface to design the CRUD operations for tasks. Locate the controller [`TodoListRestController`](./todobackend-cassandra/src/main/java/com/datastax/sample/resources/TodoListRestController.java).
- As you can see we are specifically picking `todobackend.repo.inmemory`. Change it to `todobackend.repo.cassandra-driver` by commenting/uncommenting proper lines.
**👁️ Expected code **
```java
@Autowired
//@Qualifier("todobackend.repo.inmemory")
@Qualifier("todobackend.repo.cassandra-driver")
// @Qualifier("todobackend.repo.cassandra-object-mapper")
// @Qualifier("todobackend.repo.spring-data-cassandra")
private TodoListRepository todoRepository;
```
Now we now how we will switch from one implementation to another. Take a look at class [`TodoListRepositoryCassandraDriverImpl`](./todobackend-cassandra/src/main/java/com/datastax/sample/repository/TodoListRepositoryCassandraDriverImpl.java) implementing the `TodoListRepository` to see how we proceed.
**✅ Step 5f. Restart the application**: Use the `CTRL+C` shortcut on the terminal window to stop running the application and restart.
**✅ Step 5g. Test the application connected to ASTRA.** we wills now reuse the provided client to work with our backend API now connected to ASTRA !.
- 💻 If your work locally : [https://www.todobackend.com/client/index.html?http://localhost:8080/api/v1/todos/](https://www.todobackend.com/client/index.html?http://localhost:8080/api/v1/todos/)
- ☁️ If you are using gitpod `https://www.todobackend.com/client/index.html?https://8080-.-eu01.gitpod.io/api/v1/todos/`

[🏠back to table of content](#table-of-content)
## 6. CRUD Repository with Object Mapper
**✅ Step 6a. Check that the `ObjectMapper` repository is working** : We test want to test class [`CrudWithObjectMapperTest`](./todobackend-cassandra/src/test/java/com/datastax/samples/astra/CrudWithObjectMapperTest.java).
```bash
mvn test -Dtest=com.datastax.samples.astra.CrudWithObjectMapperTest
```
**✅ Step 6b. Change injection dependency in `TodoListRestController`**: We switch from one implementation to another. Take a look at class [`TodoListRepositoryObjectMapperImpl`](./todobackend-cassandra/src/main/java/com/datastax/sample/repository/TodoListRepositoryObjectMapperImpl.java) implementing the `TodoListRepository` to see how we proceed.
- In controller [`TodoListRestController`](./todobackend-cassandra/src/main/java/com/datastax/sample/resources/TodoListRestController.java) change from `@Qualifier("todobackend.repo.cassandra-driver")` to `@Qualifier("todobackend.repo.cassandra-object-mapper")` by commenting/uncommenting proper lines.
**👁️ Expected code **
```java
@Autowired
//@Qualifier("todobackend.repo.inmemory")
//@Qualifier("todobackend.repo.cassandra-driver")
@Qualifier("todobackend.repo.cassandra-object-mapper")
// @Qualifier("todobackend.repo.spring-data-cassandra")
private TodoListRepository todoRepository;
```
**✅ Step 6b. Restart the application**: Use the `CTRL+C` shortcut on the terminal window to stop running the application and restart.
**✅ Step 6c. Test the application connected to ASTRA.** we wil now reuse the provided clientto work with our backend API now connected to ASTRA !.
- 💻 If your work locally : [https://www.todobackend.com/client/index.html?http://localhost:8080/api/v1/todos/](https://www.todobackend.com/client/index.html?http://localhost:8080/api/v1/todos/)
- ☁️ If you are using gitpod `https://www.todobackend.com/client/index.html?https://8080-.-eu01.gitpod.io/api/v1/todos/`

[🏠back to table of content](#table-of-content)
## 7. CRUD Repository with Spring Data
Spring-Data is like `ObjectMapper` and help reducing boilerplate code. You define entities and interfaces, the code under the hood is generated for you.
**✅ 7.a Add Spring Data Dependency**: In the `pom.xml` file of project `todobackend-cassandra` uncomment Spring Data dependency.
```xml
org.springframework.boot
spring-boot-starter-data-cassandra
```
**Note** *As soon as the library is imported it will look for a bean `CqlSession` and if nothing existing it will try to connect to localhost. As the workshop started with the store InMemory we decided to comment this at beginning at the workshop.*
Now we now how we will switch from one implementation to another. Take a look at class [`TodoListRepositorySpringDataImpl`](./todobackend-cassandra/src/main/java/com/datastax/sample/repository/TodoListRepositorySpringDataImpl.java) implementing the `TodoListRepository` to see how we proceed.
**✅ 7.b Uncomment all the source code we will need**: With the new dependency we can now uncomment part of the code working with Spring-Data.
- Uncomment code in class [`TaskSpringData`](./todobackend-cassandra/src/main/java/com/datastax/sample/springdata/TaskSpringData.java)
```java
// Uncomment Imports
import org.springframework.data.cassandra.core.cql.PrimaryKeyType;
import org.springframework.data.cassandra.core.mapping.CassandraType;
import org.springframework.data.cassandra.core.mapping.CassandraType.Name;
import org.springframework.data.cassandra.core.mapping.Column;
import org.springframework.data.cassandra.core.mapping.PrimaryKeyColumn;
import org.springframework.data.cassandra.core.mapping.Table;
[...]
// Uncomment annotations
@Table(value = TodoAppSchema.TABLE_TODO_TASKS)
[...]
@PrimaryKeyColumn(
name = TodoAppSchema.TASK_COL_UID, ordinal = 0,
type = PrimaryKeyType.PARTITIONED)
@CassandraType(type = Name.UUID)
private UUID uuid;
[...]
```
- Uncomment code in class [`TaskSpringDataRepository`](./todobackend-cassandra/src/main/java/com/datastax/sample/springdata/TaskSpringDataRepository.java)
```java
// Uncomment Imports
import org.springframework.data.cassandra.repository.CassandraRepository;
import org.springframework.data.cassandra.repository.Query;
[...]
// Uncomment bloc
@Repository("todobackend.repo.spring")
public interface TaskSpringDataRepository extends TodoAppSchema, CassandraRepository {
@Query("SELECT * FROM " + TodoAppSchema.TABLE_TODO_TASKS +
" WHERE " + TodoAppSchema.TASK_COL_UID + " = ?0")
Optional findByTaskByIdO(UUID taskid);
}
```
- Uncomment code in class [`TodoListRepositorySpringDataImpl`](./todobackend-cassandra/src/main/java/com/datastax/sample/repository/TodoListRepositorySpringDataImpl.java)
```java
import com.datastax.sample.springdata.TaskSpringDataRepository;
// Uncomment bloc
@Repository("todobackend.repo.spring-data-cassandra")
public class TodoListRepositorySpringDataImpl implements TodoListRepository {
private TaskSpringDataRepository taskDao;
public TodoListRepositorySpringDataImpl(TaskSpringDataRepository taskDao) {
this.taskDao = taskDao;
}
@Override
public List findAll() {
return taskDao.findAll().stream()
.map(TaskSpringData::mapAsTask)
.collect(Collectors.toList());
}
@Override
public void deleteAll() {
taskDao.deleteAll();
}
@Override
public Optional findById(UUID uid) {
if (null == uid) return Optional.empty();
Optional entity = taskDao.findById(uid);
if (entity.isEmpty()) return Optional.empty();
return Optional.ofNullable(entity.get().mapAsTask());
}
@Override
public void upsert(Task dto) {
if (null != dto) {
taskDao.save(new TaskSpringData(dto));
}
}
@Override
public void delete(UUID uid) {
TaskSpringData tsd = new TaskSpringData();
tsd.setUuid(uid);
taskDao.delete(tsd);
}
}
```
**✅ Step 7c. Change injection dependency in `TodoListRestController`**: We have create other implementations for you this time using Spring Data.
- In controller [`TodoListRestController`](./todobackend-cassandra/src/main/java/com/datastax/sample/resources/TodoListRestController.java) nowChange `@Qualifier` to `todobackend.repo.spring-data-cassandra` by commenting/uncommenting proper lines.
**👁️ Expected code**:
```java
@Autowired
//@Qualifier("todobackend.repo.inmemory")
//@Qualifier("todobackend.repo.cassandra-driver")
//@Qualifier("todobackend.repo.cassandra-object-mapper")
@Qualifier("todobackend.repo.spring-data-cassandra")
private TodoListRepository todoRepository;
```
**✅ Step 7d. Restart the application**: Use the `CTRL+C` shortcut on the terminal window to stop running the application and restart.
**✅ Step 7e. Test the application connected to ASTRA.** we wil now reuse the provided clientto work with our backend API now connected to ASTRA !.
- 💻 If your work locally : [https://www.todobackend.com/client/index.html?http://localhost:8080/api/v1/todos/](https://www.todobackend.com/client/index.html?http://localhost:8080/api/v1/todos/)
- ☁️ If you are using gitpod `https://www.todobackend.com/client/index.html?https://8080-.-eu01.gitpod.io/api/v1/todos/`

[🏠back to table of content](#table-of-content)
THE END.