https://github.com/dhi13man/auto_vpn_connect
A Python script that allows users to automatically connect to VPNs with minimal effort.
https://github.com/dhi13man/auto_vpn_connect
automation cli openvpn openvpn-client pritunl pritunl-vpn pyotp python python3 vpn vpn-client
Last synced: 12 months ago
JSON representation
A Python script that allows users to automatically connect to VPNs with minimal effort.
- Host: GitHub
- URL: https://github.com/dhi13man/auto_vpn_connect
- Owner: Dhi13man
- License: mit
- Created: 2023-03-01T04:35:22.000Z (over 3 years ago)
- Default Branch: main
- Last Pushed: 2024-06-17T16:40:55.000Z (about 2 years ago)
- Last Synced: 2025-07-23T02:03:14.057Z (12 months ago)
- Topics: automation, cli, openvpn, openvpn-client, pritunl, pritunl-vpn, pyotp, python, python3, vpn, vpn-client
- Language: Python
- Homepage:
- Size: 56.9 MB
- Stars: 8
- Watchers: 1
- Forks: 0
- Open Issues: 0
-
Metadata Files:
- Readme: README.md
- Changelog: CHANGELOG.md
- Contributing: CONTRIBUTING.md
- License: LICENSE
Awesome Lists containing this project
README
# auto_vpn_connect
[](https://github.com/Dhi13man/auto_vpn_connect/blob/main/LICENSE)
[](https://github.com/Dhi13man/auto_vpn_connect/graphs/contributors)
[](https://github.com/Dhi13man/auto_vpn_connect/network/members)
[](https://github.com/Dhi13man/auto_vpn_connect/stargazers)
[](https://github.com/Dhi13man/auto_vpn_connect/commits/main)
[](https://github.com/Dhi13man/auto_vpn_connect/actions)
[](https://www.python.org/)
[](https://www.buymeacoffee.com/dhi13man)
This is a Python script that allows users to automatically connect to VPNs with minimal effort. VPNs supported as of now:
1. [Pritunl VPN Client](https://docs.pritunl.com/docs/command-line-interface)
2. [Palo Alto Global Protect](https://docs.paloaltonetworks.com/globalprotect)
1. For a more lightweight script that only solves the Global Protect VPN use case, check out my [global_protect_controller](https://github.com/Dhi13man/global_protect_controller) project.
## Usage
### Steps
1. Go to the [releases](https://github.com/Dhi13man/auto_vpn_connect/releases) page and download the latest release binary, or clone this repository.
2. In the same directory as the script, or inside the root of the repository, create (or edit) a file called `vpn_data.json` and fill it with the following information (replace the values with your own):
```json
{
"config": {
"PRITUNL": {
"vpn_type": "PRITUNL",
"cli_path": "/Applications/Pritunl.app/Contents/Resources/pritunl-client"
},
"GLOBAL_PROTECT": {
"vpn_type": "GLOBAL_PROTECT",
"service_load_command": "launchctl load /Library/LaunchAgents/com.paloaltonetworks.gp.pangpa.plist",
"service_unload_command": "launchctl unload /Library/LaunchAgents/com.paloaltonetworks.gp.pangpa.plist",
"process_kill_command": "pkill -9 -f GlobalProtect"
}
},
"vpn_list": [
{
"vpn_id": "",
"vpn_type": "PRITUNL",
"pin": ""
},
{
"vpn_id": "",
"vpn_type": "PRITUNL",
"pin": "",
"totp_url": ""
},
{
"vpn_id": "",
"vpn_type": "PRITUNL",
"pin": "",
"token": ""
},
{
"vpn_id": "GlobalProtect",
"vpn_type": "GLOBAL_PROTECT"
}
]
}
```
3. After ensuring that the `vpn_data.json` is proper, run the downloaded binary, or the script with `python3 -m .` from the root of the repository along with the proper switches.
### Finding the VPN Data
#### Pritunl VPN Client
1. _`vpn_list.{item}.vpn_id`_: In the Pritunl VPN Client, go to the `Settings` of the respective VPN Profile to find the VPN ID or use the `pritunl-client` CLI command `list` to get the list of VPNs and their IDs.
```bash
/Applications/Pritunl.app/Contents/Resources/pritunl-client list
```
2. _`vpn_list.{item}.pin`_: This is the PIN that you use to connect to the VPN. If there is no PIN, leave the field blank.
3. _`vpn_list.{item}.totp_url`_: This is the URL in the payload of the TOTP QR code that you use to connect to the VPN. If there is no TOTP QR code, leave the field blank.
4. _`vpn_list.{item}.token`_: This is the token that you use to connect to the VPN. If there is no token, leave the field blank.
5. _`vpn_list.{item}.vpn_type`_: This is the type of VPN that you are connecting to. For Pritunl VPN client, this will be `PRITUNL`.
6. _`config.PRITUNL.cli_path`_: This is the path to the Pritunl VPN Client CLI. If the Pritunl VPN Client is installed in the default location, leave the field blank.
Further resources:
1. [Pritunl VPN Client CLI](https://docs.pritunl.com/docs/command-line-interface)
2. [Pritunl VPN Client UI](https://client.pritunl.com/)
##### Pritunl VPN Client Screenshots
| 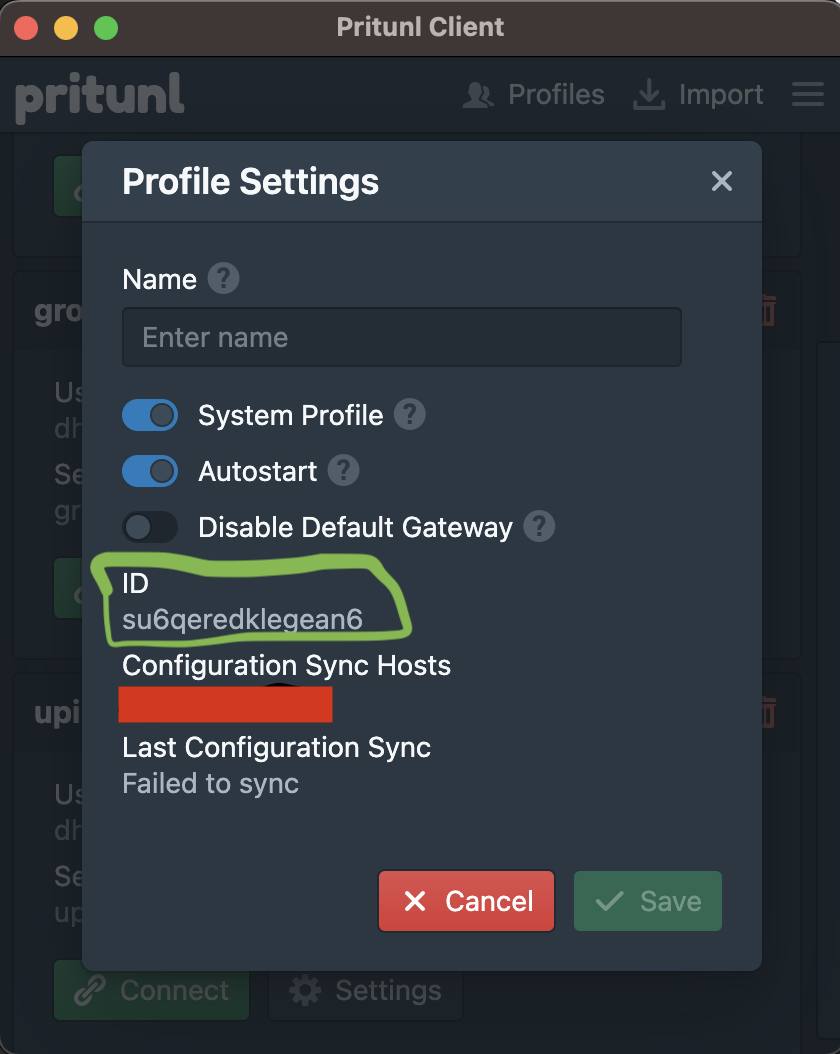 |  |
|:--:|:--:|
| VPN ID in Pritunl Client UI | VPN ID in Pritunl Client CLI |
| 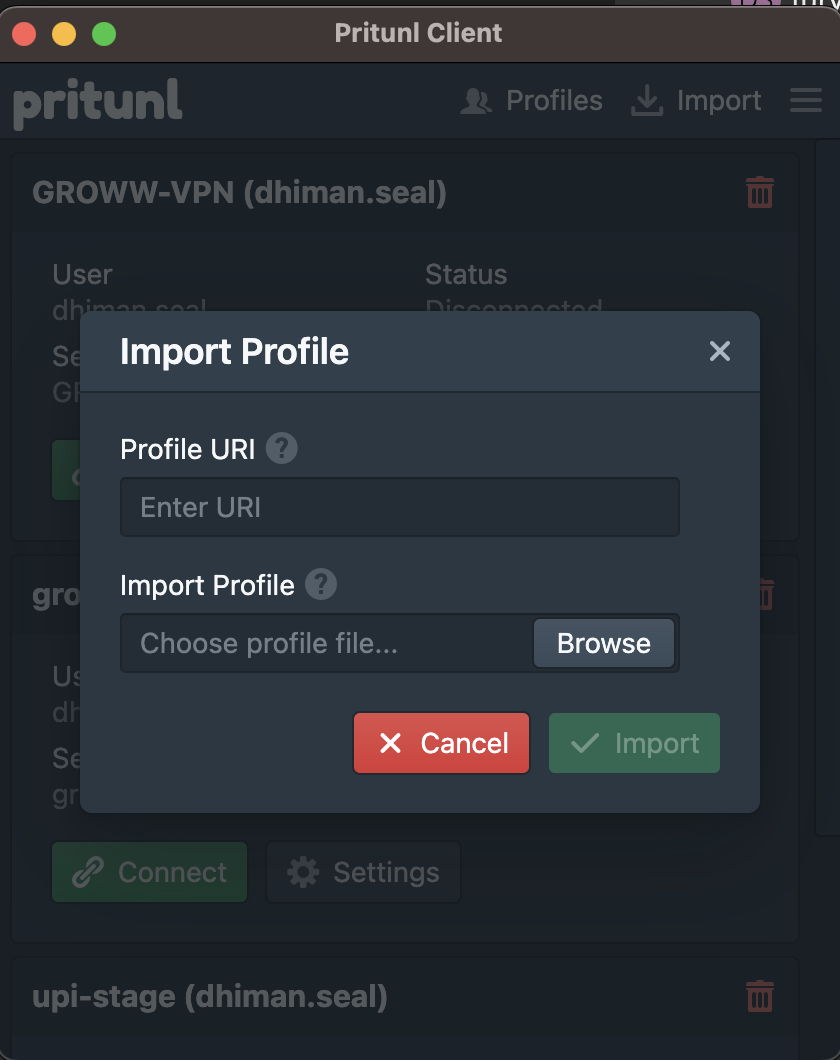 |  |
|:--:|:--:|
| Add VPN in Pritunl Client UI | Add VPN using Pritunl Client CLI |
#### Global Protect VPN Client
Global Protect VPN does not have the hassle of managing multiple connections. You only have to put in a config with a dummy VPN ID as shown in the example above and then sign in with SSO whenever you use the CLI to connect to it. Disconnecting from Global Protect will require no additional input.
### User Switches
1. _Action Switch_ `-a` / `--action` (optional): The action switch allows the user to specify the action that the script should perform. If the action switch is not specified, the script will run in interactive mode, which will prompt the user to select an action.
```bash
cd
./auto_vpn_connect --action
```
```bash
cd
python3 -m . -a
```
Running with action switch will run the script with the specified action. The available actions are:
- `c`: Connects to the VPNs
- `d`: Disconnects from the VPNs
- `w`: Runs the script in watch mode, which will automatically re-attempt connecting to the VPNs when they disconnect.
2. _VPN Data Path Switch_ `-p` / `--path` (optional): The VPN Data Path Switch allows the user to specify the absolute path to the `vpn_data.json` file. If the switch is not specified, the script will look for the file in the directory it is run from, or in the root of the repository, if the script is run from the root of the cloned repository.
```bash
cd
./auto_vpn_connect -p
```
```bash
cd
python3 -m . --path
```
3. _Verbose Switch_ `-v` / `--verbose` (optional): The verbose switch allows the user to specify whether the script should print verbose output. If the switch is not specified, the script will run in non-verbose mode.
```bash
cd
./auto_vpn_connect --verbose true
```
```bash
cd
python3 -m . -v true
```
### Examples
```bash
cd
./auto_vpn_connect --action c --path /vpn_data.json --verbose true
```
```bash
cd
python3 -m . --action w --path /vpn_data.json --verbose false
```
```bash
cd
./auto_vpn_connect --action d
```
## Development
### Setup
1. Clone the repository
2. Install the [Development Dependencies](#dependencies) with `pip3 install -r requirements.txt`
3. Run `python3 -m .` from the root of the repository
### Dependencies
#### Development Dependencies
- [Python 3.10+](https://www.python.org/downloads/): Used for developing the script
- [pyotp](https://pypi.org/project/pyotp/): Used for generating OTPs
#### External Dependencies
- [Pritunl VPN Client](https://docs.pritunl.com/docs/command-line-interface): Used for connecting, disconnecting to VPNs (only supported VPN Client type as of now)
## Build
This project uses [PyInstaller](https://www.pyinstaller.org/) to build the binary. To build the binary, run the following command from the root of the repository:
```bash
pyinstaller --onefile --windowed __main__.py
```
This will create a `dist` folder in the root of the repository, which will contain the binary without any dependencies.
The binary can be run from anywhere following the [Usage](#usage) instructions.
## Contributing
Please read [CONTRIBUTING.md](CONTRIBUTING.md) for details on our code of conduct, and the process for submitting pull requests to us.
## Screenshots
| 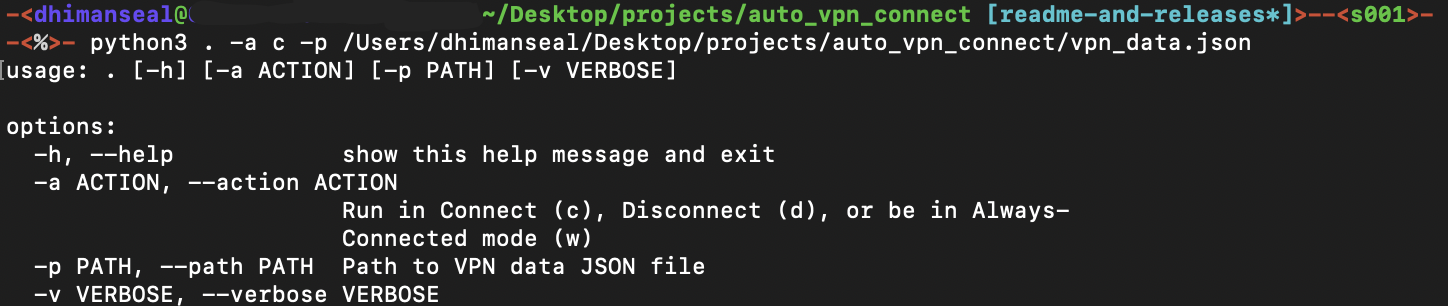 |
|:--:|
| Connect using Repository, with VPN Data Config Path Provided |
| 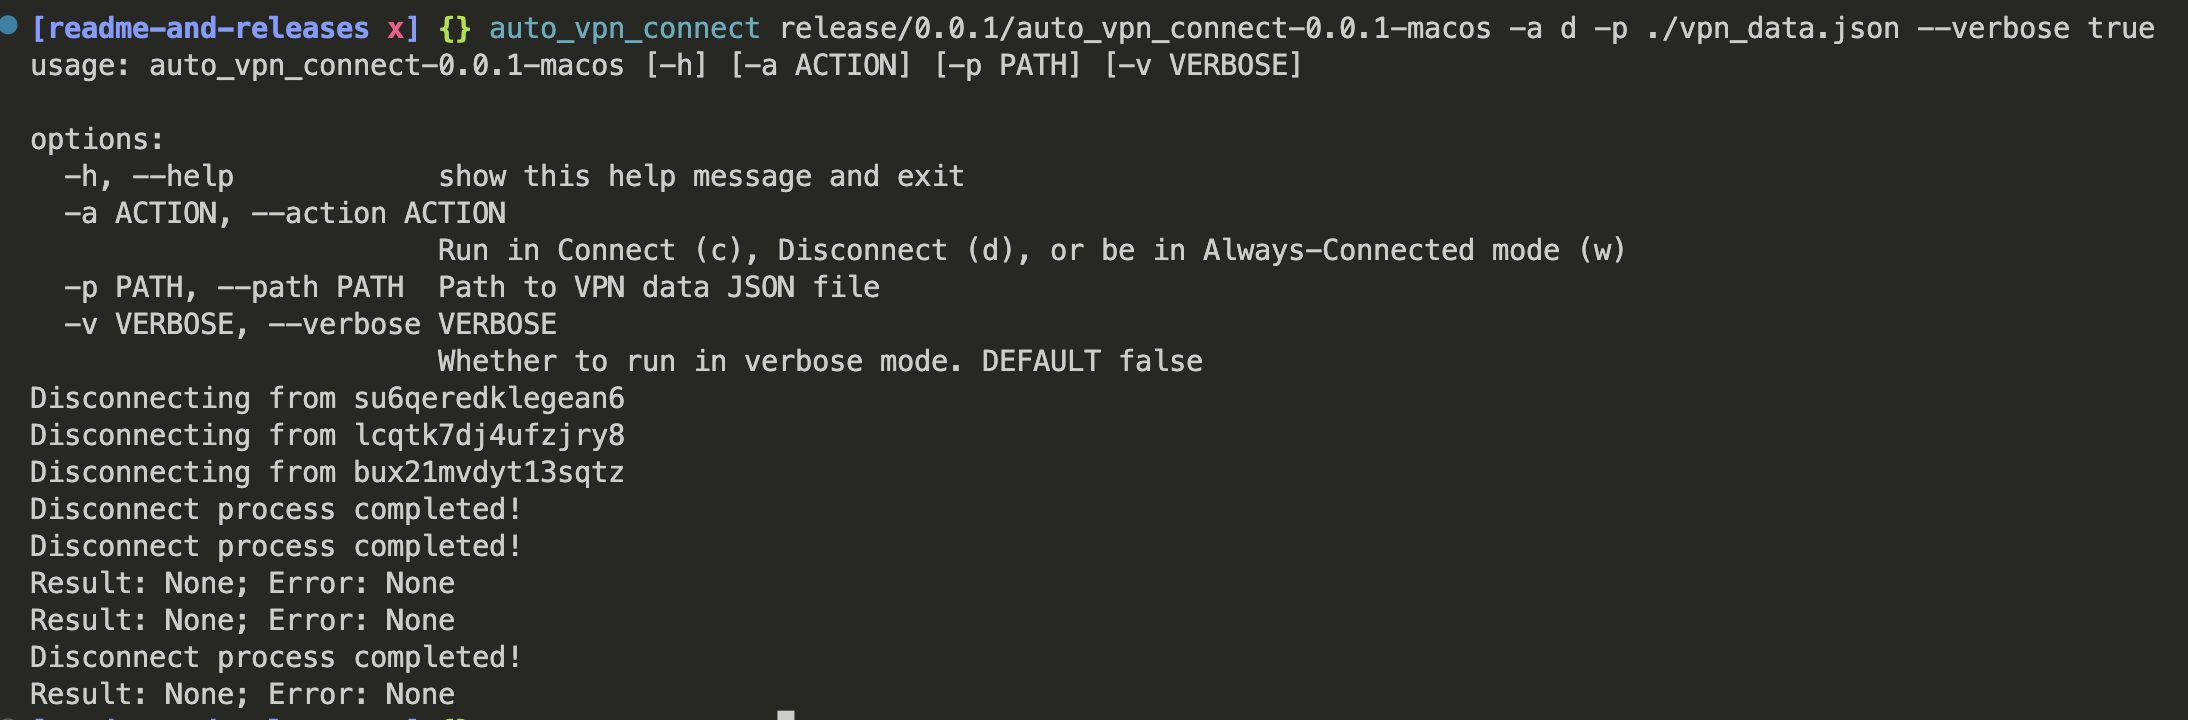 |
|:--:|
| Disconnect using CLI, in Verbose Mode |