https://github.com/diegovictor/comix-notifier
Reads comix.com.br's mangas pages configured, it use regex to find the last volume from each title and if it is a new volume, notify users.
https://github.com/diegovictor/comix-notifier
aws comics comix dynamodb eventbridge javascript js lambda mangas notifications regex serverless serverless-framework sns ts typescript webscraping
Last synced: 12 months ago
JSON representation
Reads comix.com.br's mangas pages configured, it use regex to find the last volume from each title and if it is a new volume, notify users.
- Host: GitHub
- URL: https://github.com/diegovictor/comix-notifier
- Owner: DiegoVictor
- License: mit
- Created: 2022-04-07T01:21:43.000Z (over 4 years ago)
- Default Branch: main
- Last Pushed: 2025-05-29T04:03:26.000Z (about 1 year ago)
- Last Synced: 2025-05-29T05:18:19.669Z (about 1 year ago)
- Topics: aws, comics, comix, dynamodb, eventbridge, javascript, js, lambda, mangas, notifications, regex, serverless, serverless-framework, sns, ts, typescript, webscraping
- Language: TypeScript
- Homepage:
- Size: 2.02 MB
- Stars: 5
- Watchers: 2
- Forks: 1
- Open Issues: 0
-
Metadata Files:
- Readme: README.md
- License: LICENSE
Awesome Lists containing this project
README
# Comix Notifier
[](https://app.circleci.com/pipelines/github/DiegoVictor/comix-notifier?branch=main)
[](https://aws.amazon.com/dynamodb)
[](https://www.serverless.com/)
[](https://eslint.org/)
[](https://github.com/airbnb/javascript)
[](https://jestjs.io/)
[](https://expo.io/)
[](https://www.typescriptlang.org/)
[](https://codecov.io/gh/DiegoVictor/comix-notifier)
[](https://raw.githubusercontent.com/DiegoVictor/comix-notifier/main/LICENSE)
[](http://makeapullrequest.com)
[](https://insomnia.rest/run/?label=Comix%20Notifier&uri=https%3A%2F%2Fraw.githubusercontent.com%2FDiegoVictor%2Fcomix-notifier%2Fmain%2FInsomnia_2022-04-19.json)
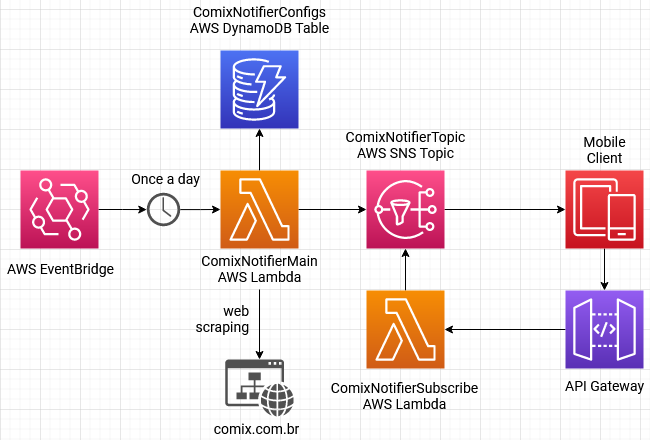
This application scrapes the [Comix Book Shop](http://www.comix.com.br) website, it finds the last volume of each mangá configured in the database and it sends push notifications to the mobile application (inside `app` folder) through a topic to users that subscribed to it.
## Table of Contents
* [Requirements](#requirements)
* [Installing](#installing)
* [Configuring](#configuring)
* [.env](#env)
* [Usage](#usage)
* [API Key](#api-key)
* [Routes](#routes)
* [Requests](#requests)
* [Running the tests](#running-the-tests)
* [Coverage report](#coverage-report)
# Requirements
* Node.js ^16.6.1
* Serveless Framework
* AWS Account
* [SNS](https://aws.amazon.com/sns/)
* [DynamoDB](https://aws.amazon.com/dynamodb/)
* [Lambda](https://aws.amazon.com/lambda)
* [API Gateway](https://aws.amazon.com/api-gateway/)
* [EventBridge](https://aws.amazon.com/eventbridge/)
* Firebase Account
* [Firebase Cloud Messaging](https://firebase.google.com/docs/cloud-messaging)
# Installing
Easy peasy lemon squeezy:
```
$ yarn
```
Or:
```
$ npm install
```
> Was installed and configured the [`eslint`](https://eslint.org/) and [`prettier`](https://prettier.io/) to keep the code clean and patterned.
## Configuring
The application sends and receives notifications (API and mobile application, respectively), to configure it properly you need to do some configurations.
* First, [create a project into Firebase](https://firebase.google.com/docs/android/setup#create-firebase-project), then download `google-services.json` file inside the `app` folder from the project configuration page (*General* Tab) and copy the API Cloud Messaging Token (or create one if not exists) from *Cloud Messaging* Tab.
* Access your AWS account, open the [SNS panel](https://console.aws.amazon.com/sns/v3/home) and [create a platform application](https://docs.aws.amazon.com/sns/latest/dg/mobile-push-send-register.html) with the following name `Comix-Notifier`, select `Firebase Cloud Messaging (FCM)` as the platform and paste the API Cloud Messaging Token that you copied previously.
> If you would like to use another name just remember to update the platform's ARN key in the `serverless.ts` (`custom.platformApplicationArn`).
Install the AWS Layers before to deploy:
```
$ cd layers/nodejs
$ npm install
```
Or:
```
$ cd layers/nodejs
$ yarn
```
Now you are ready to deploy the API, just run:
```
$ sls deploy
```
After the deploy concludes, configure the lambda's URL outputed by the deploy process into the [`.env`](#env) file.
### .env
Rename the `.env.example` in the `app` directory to `.env` and configure the URL for the subscription lambda, it should be outputed at the end of the deploy process.
|key|description|default
|---|---|---
|SUBSCRIPTION_URL|Subscription lambda URL.| -
# Usage
In order to be able to subscribe to the topic and start to receive push notifications you will need to:
* [Create an API Key](https://docs.aws.amazon.com/pt_br/apigateway/latest/developerguide/api-gateway-setup-api-key-with-console.html#api-gateway-usage-plan-create-apikey), then [create and configure a usage plan](https://docs.aws.amazon.com/pt_br/apigateway/latest/developerguide/api-gateway-create-usage-plans-with-console.html#api-gateway-usage-plan-create) to it. Copy the key, this will be necessary in the next steps and don't forget to associate the API's stage to the created plan! .
Install the mobile app, the first build must be through USB connection, so connect your device (or just open your emulator) and run:
```
$ cd app
$ npx react-native run-android
```
> For iOS use `ios` instead of `android`, but this app was tested only with Android through USB connection and [Android Studio Emulator](https://developer.android.com/studio/run/managing-avds), is strongly recommended to use the same system.
In the next times you can just start the Metro Bundler server:
```
$ yarn start
```
Or:
```
$ npx expo run:android
```
After install the app, follow the instructions on the screen.
> You'll use the API Key here.
## API Key
The `/subscribe` route expect an API Key in the `x-api-key` request header.
> You can see more about this route in the [routes](#routes) section.
```
POST https://kj1q0nigu8.execute-api.us-east-1.amazonaws.com/dev/subscribe x-api-key: rJvz2XWV611PycVISNd2T43pCB4X1g5n7E8iyT58
```
> To get one API Key you need to [generate one in API Gateway](https://docs.aws.amazon.com/pt_br/apigateway/latest/developerguide/api-gateway-setup-api-key-with-console.html#api-gateway-usage-plan-create-apikey).
## Routes
|route|HTTP Method|params|description|auth method
|:---|:---:|:---:|:---:|:---:
|`/subscribe`|POST|Body with device FCM (Firebase Cloud Messaging) `token`|Subscribe the device for push notifications.|[API Key](#api-key)
### Requests
* `POST /subscribe`
Request body:
```json
{
"token": "ff7XgLfwSGaVFS05iayn58:APA91bEJ508hqz8hr2EZttm845wn9plsRdJTArMDukr4xTUwdKq_G9qYZCnRIi7lK0M5OeMrnws-DKNNd__TNvnOLmekSNNcBXg3I08oAxT_wksoONXJVz0S12joypaq0-w7IEY6q7Pc"
}
```
# Running the tests
[Jest](https://jestjs.io/) was the choice to test the app, to run:
```
$ yarn test
```
Or:
```
$ npm run test
```
> Run the command in the root folder
## Coverage report
You can see the coverage report inside `tests/coverage`. They are automatically created after the tests run.