https://github.com/dmlc/decord
An efficient video loader for deep learning with smart shuffling that's super easy to digest
https://github.com/dmlc/decord
video-loader
Last synced: about 1 year ago
JSON representation
An efficient video loader for deep learning with smart shuffling that's super easy to digest
- Host: GitHub
- URL: https://github.com/dmlc/decord
- Owner: dmlc
- License: apache-2.0
- Created: 2019-01-18T23:07:31.000Z (over 7 years ago)
- Default Branch: master
- Last Pushed: 2024-07-17T04:18:40.000Z (about 2 years ago)
- Last Synced: 2025-04-09T02:11:12.241Z (over 1 year ago)
- Topics: video-loader
- Language: C++
- Homepage:
- Size: 19.5 MB
- Stars: 2,102
- Watchers: 29
- Forks: 175
- Open Issues: 194
-
Metadata Files:
- Readme: README.md
- License: LICENSE
Awesome Lists containing this project
- awesome-situational-awareness - [Decord
- awesomeLibrary - decord - An efficient video loader for deep learning with smart shuffling that's super easy to digest (语言资源库 / python)
- awesome-action-recognition - [Decord
- awesome-python-data-science - Decord - An efficient video loader for deep learning with smart shuffling that's super easy to digest. (Computer Vision / Others)
- awesome-human-activity-recognition - Decord - Efficient GPU-accelerated video reader for deep learning training pipelines. (Tools and Utilities / Surveys)
README
# Decord


[](https://pypi.python.org/pypi/decord)
[](http://pepy.tech/project/decord)

`Decord` is a reverse procedure of `Record`. It provides convenient video slicing methods based on a thin wrapper on top of hardware accelerated video decoders, e.g.
- FFMPEG/LibAV(Done)
- Nvidia Codecs(Done)
- Intel Codecs
`Decord` was designed to handle awkward video shuffling experience in order to provide smooth experiences similar to random image loader for deep learning.
`Decord` is also able to decode audio from both video and audio files. One can slice video and audio together to get a synchronized result; hence providing a one-stop solution for both video and audio decoding.
Table of contents
=================
- [Benchmark](#preliminary-benchmark)
- [Installation](#installation)
- [Usage](#usage)
- [Bridge for Deep Learning frameworks](#bridges-for-deep-learning-frameworks)
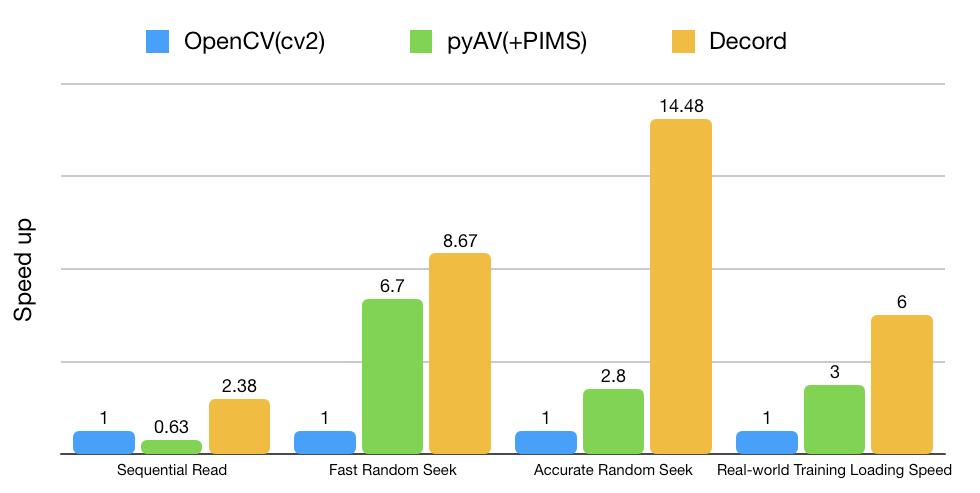
## Preliminary benchmark
Decord is good at handling random access patterns, which is rather common during neural network training.
## Installation
### Install via pip
Simply use
```bash
pip install decord
```
Supported platforms:
- [x] Linux
- [x] Mac OS >= 10.12, python>=3.5
- [x] Windows
**Note that only CPU versions are provided with PYPI now. Please build from source to enable GPU acclerator.**
### Install from source
#### Linux
Install the system packages for building the shared library, for Debian/Ubuntu users, run:
```bash
# official PPA comes with ffmpeg 2.8, which lacks tons of features, we use ffmpeg 4.0 here
sudo add-apt-repository ppa:jonathonf/ffmpeg-4 # for ubuntu20.04 official PPA is already version 4.2, you may skip this step
sudo apt-get update
sudo apt-get install -y build-essential python3-dev python3-setuptools make cmake
sudo apt-get install -y ffmpeg libavcodec-dev libavfilter-dev libavformat-dev libavutil-dev
# note: make sure you have cmake 3.8 or later, you can install from cmake official website if it's too old
```
Clone the repo recursively(important)
```bash
git clone --recursive https://github.com/dmlc/decord
```
Build the shared library in source root directory:
```bash
cd decord
mkdir build && cd build
cmake .. -DUSE_CUDA=0 -DCMAKE_BUILD_TYPE=Release
make
```
you can specify `-DUSE_CUDA=ON` or `-DUSE_CUDA=/path/to/cuda` or `-DUSE_CUDA=ON` `-DCMAKE_CUDA_COMPILER=/path/to/cuda/nvcc` to enable NVDEC hardware accelerated decoding:
```bash
cmake .. -DUSE_CUDA=ON -DCMAKE_BUILD_TYPE=Release
```
Note that if you encountered the an issue with `libnvcuvid.so` (e.g., see [#102](https://github.com/dmlc/decord/issues/102)), it's probably due to the missing link for
`libnvcuvid.so`, you can manually find it (`ldconfig -p | grep libnvcuvid`) and link the library to `CUDA_TOOLKIT_ROOT_DIR\lib64` to allow `decord` smoothly detect and link the correct library.
To specify a customized FFMPEG library path, use `-DFFMPEG_DIR=/path/to/ffmpeg".
Install python bindings:
```bash
cd ../python
# option 1: add python path to $PYTHONPATH, you will need to install numpy separately
pwd=$PWD
echo "PYTHONPATH=$PYTHONPATH:$pwd" >> ~/.bashrc
source ~/.bashrc
# option 2: install with setuptools
python3 setup.py install --user
```
#### Mac OS
Installation on macOS is similar to Linux. But macOS users need to install building tools like clang, GNU Make, cmake first.
Tools like clang and GNU Make are packaged in _Command Line Tools_ for macOS. To install:
```bash
xcode-select --install
```
To install other needed packages like cmake, we recommend first installing Homebrew, which is a popular package manager for macOS. Detailed instructions can be found on its [homepage](https://brew.sh/).
After installation of Homebrew, install cmake and ffmpeg by:
```bash
brew install cmake ffmpeg
# note: make sure you have cmake 3.8 or later, you can install from cmake official website if it's too old
```
Clone the repo recursively(important)
```bash
git clone --recursive https://github.com/dmlc/decord
```
Then go to root directory build shared library:
```bash
cd decord
mkdir build && cd build
cmake .. -DCMAKE_BUILD_TYPE=Release
make
```
Install python bindings:
```bash
cd ../python
# option 1: add python path to $PYTHONPATH, you will need to install numpy separately
pwd=$PWD
echo "PYTHONPATH=$PYTHONPATH:$pwd" >> ~/.bash_profile
source ~/.bash_profile
# option 2: install with setuptools
python3 setup.py install --user
```
#### Windows
For windows, you will need CMake and Visual Studio for C++ compilation.
- First, install `git`, `cmake`, `ffmpeg` and `python`. You can use [Chocolatey](https://chocolatey.org/) to manage packages similar to Linux/Mac OS.
- Second, install [`Visual Studio 2017 Community`](https://visualstudio.microsoft.com/), this my take some time.
When dependencies are ready, open command line prompt:
```bash
cd your-workspace
git clone --recursive https://github.com/dmlc/decord
cd decord
mkdir build
cd build
cmake -DCMAKE_CXX_FLAGS="/DDECORD_EXPORTS" -DCMAKE_CONFIGURATION_TYPES="Release" -G "Visual Studio 15 2017 Win64" ..
# open `decord.sln` and build project
```
## Usage
Decord provides minimal API set for bootstraping. You can also check out jupyter notebook [examples](examples/).
### VideoReader
VideoReader is used to access frames directly from video files.
```python
from decord import VideoReader
from decord import cpu, gpu
vr = VideoReader('examples/flipping_a_pancake.mkv', ctx=cpu(0))
# a file like object works as well, for in-memory decoding
with open('examples/flipping_a_pancake.mkv', 'rb') as f:
vr = VideoReader(f, ctx=cpu(0))
print('video frames:', len(vr))
# 1. the simplest way is to directly access frames
for i in range(len(vr)):
# the video reader will handle seeking and skipping in the most efficient manner
frame = vr[i]
print(frame.shape)
# To get multiple frames at once, use get_batch
# this is the efficient way to obtain a long list of frames
frames = vr.get_batch([1, 3, 5, 7, 9])
print(frames.shape)
# (5, 240, 320, 3)
# duplicate frame indices will be accepted and handled internally to avoid duplicate decoding
frames2 = vr.get_batch([1, 2, 3, 2, 3, 4, 3, 4, 5]).asnumpy()
print(frames2.shape)
# (9, 240, 320, 3)
# 2. you can do cv2 style reading as well
# skip 100 frames
vr.skip_frames(100)
# seek to start
vr.seek(0)
batch = vr.next()
print('frame shape:', batch.shape)
print('numpy frames:', batch.asnumpy())
```
### VideoLoader
VideoLoader is designed for training deep learning models with tons of video files.
It provides smart video shuffle techniques in order to provide high random access performance (We know that seeking in video is super slow and redundant).
The optimizations are underlying in the C++ code, which are invisible to user.
```python
from decord import VideoLoader
from decord import cpu, gpu
vl = VideoLoader(['1.mp4', '2.avi', '3.mpeg'], ctx=[cpu(0)], shape=(2, 320, 240, 3), interval=1, skip=5, shuffle=1)
print('Total batches:', len(vl))
for batch in vl:
print(batch[0].shape)
```
Shuffling video can be tricky, thus we provide various modes:
```python
shuffle = -1 # smart shuffle mode, based on video properties, (not implemented yet)
shuffle = 0 # all sequential, no seeking, following initial filename order
shuffle = 1 # random filename order, no random access for each video, very efficient
shuffle = 2 # random order
shuffle = 3 # random frame access in each video only
```
### AudioReader
AudioReader is used to access samples directly from both video(if there's an audio track) and audio files.
```python
from decord import AudioReader
from decord import cpu, gpu
# You can specify the desired sample rate and channel layout
# For channels there are two options: default to the original layout or mono
ar = AudioReader('example.mp3', ctx=cpu(0), sample_rate=44100, mono=False)
print('Shape of audio samples: ', ar.shape())
# To access the audio samples
print('The first sample: ', ar[0])
print('The first five samples: ', ar[0:5])
print('Get a batch of samples: ', ar.get_batch([1,3,5]))
```
### AVReader
AVReader is a wraper for both AudioReader and VideoReader. It enables you to slice the video and audio simultaneously.
```python
from decord import AVReader
from decord import cpu, gpu
av = AVReader('example.mov', ctx=cpu(0))
# To access both the video frames and corresponding audio samples
audio, video = av[0:20]
# Each element in audio will be a batch of samples corresponding to a frame of video
print('Frame #: ', len(audio))
print('Shape of the audio samples of the first frame: ', audio[0].shape)
print('Shape of the first frame: ', video.asnumpy()[0].shape)
# Similarly, to get a batch
audio2, video2 = av.get_batch([1,3,5])
```
## Bridges for deep learning frameworks:
It's important to have a bridge from decord to popular deep learning frameworks for training/inference
- Apache MXNet (Done)
- Pytorch (Done)
- TensorFlow (Done)
Using bridges for deep learning frameworks are simple, for example, one can set the default tensor output to `mxnet.ndarray`:
```python
import decord
vr = decord.VideoReader('examples/flipping_a_pancake.mkv')
print('native output:', type(vr[0]), vr[0].shape)
# native output: , (240, 426, 3)
# you only need to set the output type once
decord.bridge.set_bridge('mxnet')
print(type(vr[0], vr[0].shape))
# (240, 426, 3)
# or pytorch and tensorflow(>=2.2.0)
decord.bridge.set_bridge('torch')
decord.bridge.set_bridge('tensorflow')
# or back to decord native format
decord.bridge.set_bridge('native')
```