Ecosyste.ms: Awesome
An open API service indexing awesome lists of open source software.
https://github.com/dutta-alankar/AstroPlasma
A Cloudy database with functions to quickly interpolate physical state of astrophysical plasma without detailed Plasma modelling
https://github.com/dutta-alankar/AstroPlasma
astronomy astrophysics cloudy-models plasma-modeling python
Last synced: 4 months ago
JSON representation
A Cloudy database with functions to quickly interpolate physical state of astrophysical plasma without detailed Plasma modelling
- Host: GitHub
- URL: https://github.com/dutta-alankar/AstroPlasma
- Owner: dutta-alankar
- License: mit
- Created: 2023-01-05T14:21:01.000Z (about 2 years ago)
- Default Branch: main
- Last Pushed: 2024-04-29T02:38:44.000Z (10 months ago)
- Last Synced: 2024-04-29T07:14:26.356Z (10 months ago)
- Topics: astronomy, astrophysics, cloudy-models, plasma-modeling, python
- Language: Python
- Homepage:
- Size: 4.26 MB
- Stars: 5
- Watchers: 2
- Forks: 3
- Open Issues: 1
-
Metadata Files:
- Readme: README.md
- License: LICENSE
- Codemeta: codemeta.json
Awesome Lists containing this project
README


> A *Cloudy* database with functions to quickly interpolate the physical state of astrophysical plasma without detailed plasma modeling
Running Cloudy models on the fly, especially when there are a lot of models to run with different parameters, can become extremely expensive. `AstroPlasma` aims to provide a workaround using a library of pre-computed cloudy models to generate most of the common plasma properties for a large range of parameter space by interpolation. Owing to a simple and easy-to-use interface, `AstroPlasma` also provides an abstraction layer enabling the user to get the plasma properties without worrying much about the details of plasma modeling. We find this extremely useful while building models and predicting observables like column densities in different kinds of astrophysical systems.
[](https://github.com/dutta-alankar/AstroPlasma)
[](https://www.python.org/downloads/release/python-310/)

 |
 |

 |

[](https://github.com/psf/black) |
[](https://github.com/charliermarsh/ruff) |
[](https://python-poetry.org/)
[](https://results.pre-commit.ci/latest/github/dutta-alankar/AstroPlasma/main)
[](https://www.repostatus.org/#active)

## Install
This is just a one-time process. `AstroPlasma` has been tested with `Python 3.10`
### Get the AstroPlasma code:
```
git clone https://github.com/dutta-alankar/AstroPlasma.git
```
### Setting up dependencies
Change to the code directory
```
cd AstroPlasma
```
#### Prepare Python virtual environment
The instructions here can be followed to set up a virtual environment (named `.venv` here) and install AstroPlasma and its dependencies:
```
python -m venv .venv
source .venv/bin/activate
python -m pip install --editable .
```
#### Install the dependencies:
For user,
```bash
python -m pip install -r requirements/requirements.txt
```
For developer,
```bash
python -m pip install -r requirements/requirements-dev.txt
```
For running `Cloudy` scripts,
```bash
python -m pip install -r requirements/requirements-all.txt
```
> **Note**: `Python.h` from the `python3.10-dev` package must be available for installing `mpi4py` dependency required by the `Cloudy` scripts.
At any point later, in order to use AstroPlasma, just activate this virtual environment:
```
source venv/bin/activate
```
#### Alternative setup using `poetry`
Alternatively, one can use `poetry` to install and setup `AstroPlasma`
> Install `poetry` following the installation instructions [here](https://python-poetry.org/docs/#installation).
> Do the following depending on requirements:
- For user, `poetry install`
- For developer, `poetry install --with dev,test`
- For running `Cloudy` scripts, `poetry install --with cloudy_run`. Note that `Python.h` from the `python3.10-dev` package must be available for installing `mpi4py` dependency required by the `Cloudy` scripts.
> Later at any time activate the virtual environment using `poetry shell` from inside the repo.
> As a one-time process, install `AstroPlasma` in this virtual environment using `python -m pip install --editable .`.
### Download the database
Once `AstroPlasma` and its dependencies are set up, the simplest way to get the entire database locally is to run the following script in Python with the virtual environment activated. Before running the following script, the environment variable `export PARALLEL_DOWNLOAD_JOBS=8` needs to be set. Here, one can replace `8` with any number that sets how many files in the database will be downloaded from the web simultaneously.
```python
from astro_plasma import download_all
download_all()
```
Alternatively, one can use a custom data location as well. Please see the relevant *Note* provided near the end of this README.
# User Guide
## The following are code snippets that demonstrate the basic usage of `AstroPlasma`
> **Info**: A `jupyter-notebook` of this User Guide can be found in the `example-scripts` directory.
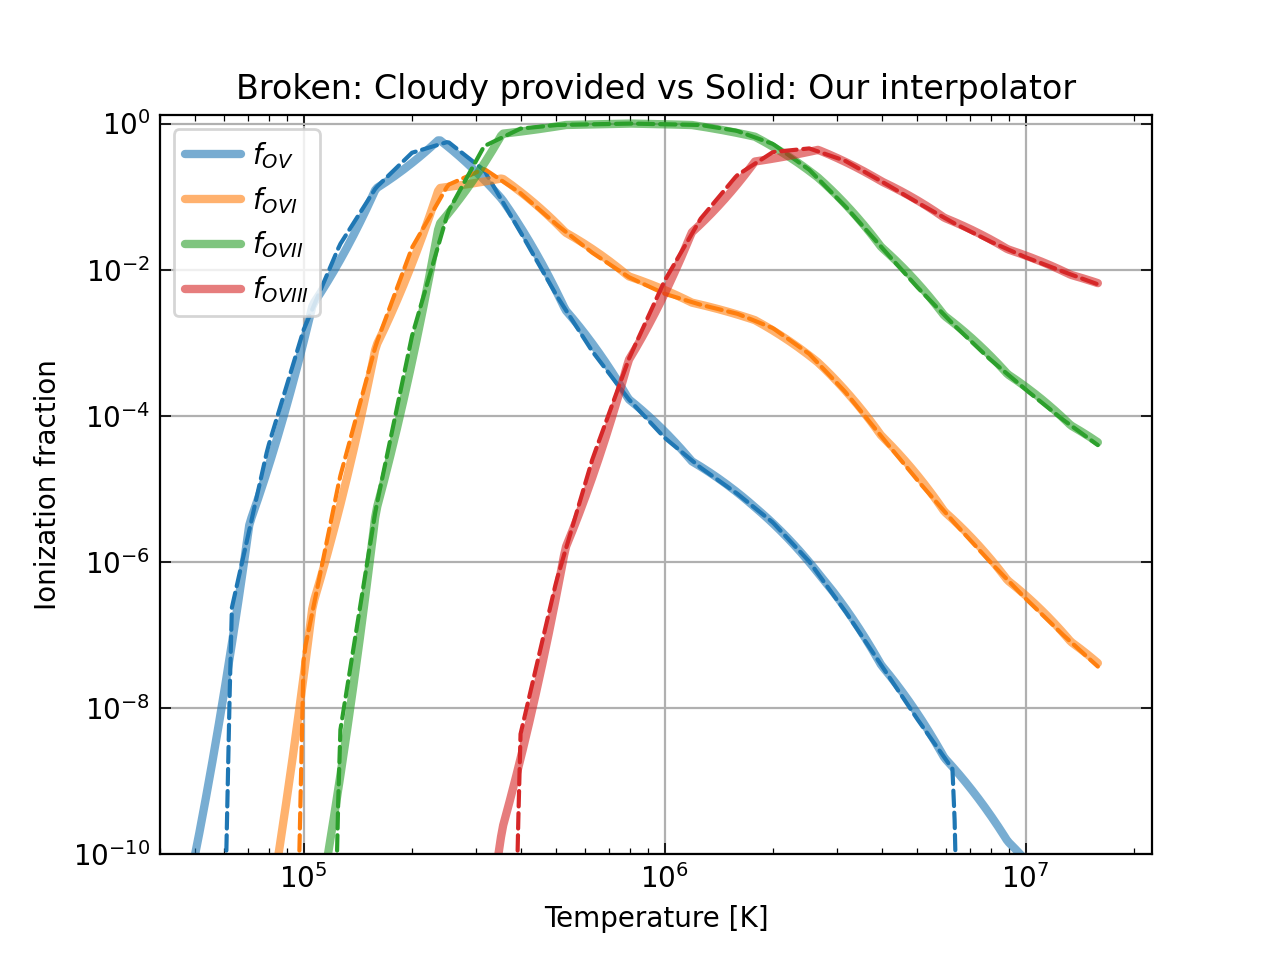
### Ionization modeling
This is how one would use astro_plasma to calculate the ionization state of any typical astrophysical plasma. This would be useful in any modeling that depends on calculating the ionization of the plasma. Determining temperature from density and calculating the free electron density in the plasma are a few examples of applications of `AstroPlasma`.
```python
# Import AstroPlasma Ionization module
from astro_plasma import Ionization
from astro_plasma.core.utils import AtmElement # for element naming using symbols (optional)
```
#### Let us calculate ionization fraction of $\bf{OVI\ (O^{5+}})$
In `AstroPlasma` elements are labeled by their atomic number.
- Atomic number of the desired element is passed to the `element` argument in several functions of `AstroPlasma`. For example, Oxygen corresponds to `element=8`.
- For the ionization state, `AstroPlasma` labels them according to the value passed to the `ion` argument. For example, ionization state III, corresponds to `ion=3`.
- Summarizing, to know the ionization state of $\bf{OVI}$, one needs to pass `element=8` and `ion=6`.
```python
fIon = Ionization.interpolate_ion_frac
```
Now, we are going to define typical physical values that characterize an astrophysical plasma.
```python
nH = 1.2e-04 # Hydrogen number density in cm^-3
temperature = 4.2e+05 # Temperature of the plasma in kelvin
metallicity = 0.99 # Metallicity of plasma with respect to solar
redshift = 0.001 # Cosmological redshift
mode = "CIE"
```
**Note**: The mode passed in the above code refers to the equilibrium state of the plasma. Right now, `AstroPlasma` only supports two equilibrium conditions, namely, *collisional ionization equilibrium* (`CIE` in code) and *photo-ionization equilibrium* (`PIE` in code).
For *photo-ionization equilibrium*, the photo-ionizing backgrounds that are used in the calculation of the *Cloudy* interpolation tables are *Haardt-Madau (2012)* extra-galactic UV/X-ray diffuse background and *Cosmic Microwave Background (CMB)* at any given redshift.
```python
# Let's get the ionization of OVI
element = AtmElement.Oxygen
ion = 6
fOVI = fIon(nH = nH,
temperature = temperature,
metallicity = metallicity,
redshift = redshift,
element = element,
ion = ion,
mode = mode,
) # This value is in log10
fOVI = pow(10, fOVI)
print(f"f_OVI = {fOVI:.3e}")
```
**Note**:
- The ionization fraction returned by `AstroPlasma` is on the **log10** scale.
- Currently, we **do not** support vectorization of these functions and indivdual values must be passed and **not** arrays. This can lead to errors or un-defined behavior.
- You can provide `element` and `ion` in 4 ways
```python
# Using atomic number and ion count (int version of roman)
fIon(element=8, ion=6) # OVI
# Using the symbol of the element
fIon(element='O', ion=6) # OVI
# Using AtmElement for element
fIon(element=AtmElement.Oxygen, ion=6) # OVI
# Using element and ion in one string
# In this case explicit value of ion will be ignored
fIon(element='OVI')
```
> **Note** *We recommend using the last two methods as we think it is the most convenient to use and read.*
One can also caluculate other plasma quantities as follows
#### The total free electron density
```python
num_dens = Ionization.interpolate_num_dens
ne = num_dens(nH = nH,
temperature = temperature,
metallicity = metallicity,
redshift = redshift,
mode = mode,
part_type = "electron",
)
print(f"Free electron density = {ne:.3e} cm^-3")
```
In order to get
- **total particle number density**, use `part_type = "all"`
- **total ion number density**, use `part_type = "ion"`
- **total neutral particle number density**, use `part_type = "neutral"`
- **any particular ion number density**, use `element = ""` (similar to `fIon`)
```python
num_dens = Ionization.interpolate_num_dens
n = num_dens(nH = nH,
temperature = temperature,
metallicity = metallicity,
redshift = redshift,
mode = mode,
part_type = "all",
)
ni = num_dens(nH = nH,
temperature = temperature,
metallicity = metallicity,
redshift = redshift,
mode = mode,
part_type = "ion",
)
nn = num_dens(nH = nH,
temperature = temperature,
metallicity = metallicity,
redshift = redshift,
mode = mode,
part_type = "neutral",
)
nHI = num_dens(nH = nH,
temperature = temperature,
metallicity = metallicity,
redshift = redshift,
mode = mode,
element = "HI",
)
print(f"Total particle density = {n:.3e} cm^-3")
print(f"Total ion density = {ni:.3e} cm^-3")
print(f"Total neutral particle density = {nn:.3e} cm^-3")
print(f"Total HI particle density = {nHI:.3e} cm^-3")
```
Although it is straightforward to obtain mean particle mass, we provide functions to do so for the convenience of the user. We use the following relation for calculating these quantities.
$$\rho = n \mu m_p = n_e \mu_e m_p = n_i \mu_i m_p = n_H m_H X^{-1}$$
```python
mean_mass = Ionization.interpolate_mu
mu = mean_mass(nH = nH,
temperature = temperature,
metallicity = metallicity,
redshift = redshift,
mode = mode,
part_type = "all",
)
mu_e = mean_mass(nH = nH,
temperature = temperature,
metallicity = metallicity,
redshift = redshift,
mode = mode,
part_type = "electron",
)
mu_i = mean_mass(nH = nH,
temperature = temperature,
metallicity = metallicity,
redshift = redshift,
mode = mode,
part_type = "ion",
)
print(f"Mean particle mass = {mu:.2f} mp")
print(f"Mean free electron mass = {mu_e:.2f} mp")
print(f"Mean ion mass = {mu_i:.2f} mp")
```
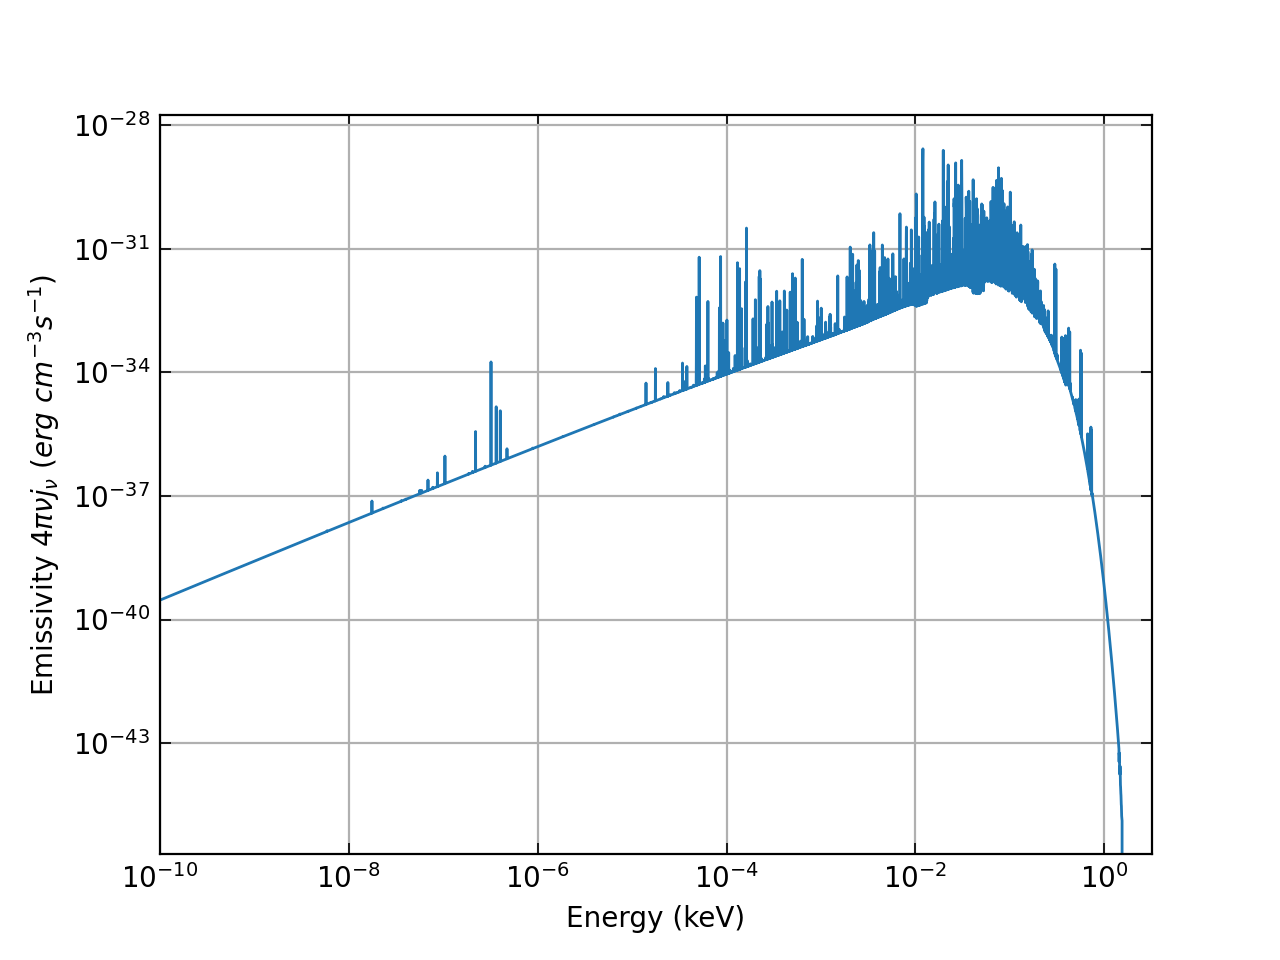
### Emission spectrum
`AstroPlasma` can be used in determing the emission spectrum emitted from a *one-zone* plasma. Here's the code that does that. This can be used as a starting point for modeling plasma emission from astrophysical objects like the *circumgalactic medium* or *galaxy clusters* by stacking emission from multiple such one-zones.
```python
# Import AstroPlasma EmissionSpectrum module
from astro_plasma import EmissionSpectrum
```
```python
gen_spectrum = EmissionSpectrum.interpolate_spectrum
# Generate spectrum
spectrum = gen_spectrum(nH = nH,
temperature = temperature,
metallicity = metallicity,
redshift = redshift,
mode = mode
)
```
Let us plot the spectrum generated by `AstroPlasma`
```python
import matplotlib
import matplotlib.pyplot as plt
plt.loglog(spectrum[:,0], spectrum[:,1])
plt.xlabel(r"Energy (keV)")
plt.ylabel(r"Emissivity $4 \pi \nu j_{\nu}$ ($erg\ cm^{-3} s^{-1}$)")
plt.xlim(xmin = 1.0e-10, xmax=3.2)
plt.show()
```
> **Note**: `AstroPlasma` assumes by default that the data is located at `/data/`.
The user can change this to something else using `Ionization.base_dir = ""` or `EmissionSpectrum.base_dir = ""`, where these new directories must contain the valid `hdf5` data files.
> **Note**: One can also use the `pypoetry` tool to install and create an `in-place` virtual environment for this repo.
> **Note**: We haven't made the server online yet. As a temporary measure, please download and use the data hosted [here](https://indianinstituteofscience-my.sharepoint.com/:f:/g/personal/alankardutta_iisc_ac_in/EhdL9SYY45FOq7zjrWGD0NQBcy3pn6oTP2B9pGhxPwLnkQ?e=E956ug):
```
https://indianinstituteofscience-my.sharepoint.com/:f:/g/personal/alankardutta_iisc_ac_in/EhdL9SYY45FOq7zjrWGD0NQBcy3pn6oTP2B9pGhxPwLnkQ?e=E956ug
```
### Downloading files on demand
We made it easy for you in the code to download only the required files on the go using our built-in service (Cloudy Interpolator web application).
To activate this feature, you should create a `.env` file in the project root directory and provide the following information.
```sh
ASTROPLASMA_SERVER=http://web-server-url-here
```
Alternatively, you can export the environment variable
```sh
# bash / sh
export ASTROPLASMA_SERVER=http://web-server-url-here
# csh
setenv ASTROPLASMA_SERVER http://web-server-url-here
```
All the environment variables you can configure (either in env file or via export)
|Environment Variable|Description|
|:----:|:----:|
|ASTROPLASMA_SERVER|Base URL of the web server to enable file downloading. To get this information, you can open issue [here](https://github.com/dutta-alankar/AstroPlasma/issues/new?title=[REQUEST]%20Access%20to%20the%20pre-computed%20dataset&body=Hi,%20I%20want%20to%20access%20the%20webserver%20to%20download%20the%20dataset%0A%0AName:%20John%20Doe%0AEmail:%[email protected])|
|PARALLEL_DOWNLOAD_JOBS|Parallel jobs spawned to download the files. The default value is 3. You can increase or decrease based on the download bandwidth of your network connection.|
|CHUNK_SIZE|Download the chunk size of the dataset files. The default is `4096`. If your download is aborted because of the unstable network, try decreasing this value.|
## Note to contributors
If you wish to contribute, fork this repo and open pull requests to the `dev` branch of this repo. Once everything gets tested and is found working, the new code will be merged with the `master` branch.
For a successful merge, the code must at least pass all the pre-existing tests. It is recommended to run `pre-commit` locally before pushing your changes to the repo for a proposed PR. To do so just run `pre-commit run --all-files`.
> **Note** It is recommended that the git pre-commit hook be installed using `pre-commit install` to check all the staged files.
### Instructions on generating `Cloudy` database
All the codes required to generate the `Cloudy` database are in the `cloudy-codes` directory. This part of the code is not as clean and user-friendly as the rest of `AstroPlasma` because it is unnecessary for an average user. Although I plan to improve this as well in the near future. I have tested this using `Cloudy 17` ([link here to know more on `Cloudy`](https://pa.as.uky.edu/gary/cloudy-project))
#### Setting up and compiling `Cloudy`
- export `CLOUDY_DATA_PATH` to the `data` directory of `Cloudy` (for example, `c17.03/data`)
- I have tested my building the library using Makefiles in `source/sys_gcc_shared` directory of `Cloudy`. Run `make` from inside this directory. If `make` succeeds then `cloudy.exe` and a shared library `libcloudy.so` will get compiled.
#### Using `Cloudy` with codes hosted in `AstroPlasma` repo
- `AstroPlasma` has three directories inside `cloudy-codes`
- `ionFrac` : Generates the ionization database.
- `emmSpec` : Generates the emission spectra database (TODO: Work required to make compiled executable enabling faster calculation to generate the database).
- `coolingFunction` : Generates cooling function for optically thin radiative cooling in equilibrium. This is an *extra* feature not directly used in `AstroPlasma`
- Generating *ionization* data
- Copy `libcloudy.so` to `AstroPlasma/cloudy-codes/ionFrac/src`
- From inside `AstroPlasma/cloudy-codes/ionFrac/src` directory, execute `bash ./compile-script.sh`. This will compile and generate the executables that creates the ionization data.
- export `AstroPlasma/cloudy-codes/ionFrac/src` to `LD_LIBRARY_PATH`
- Inside the `AstroPlasma/cloudy-codes/ionFrac/generateIonFraction-parallel.py` script, change the parameters (`total_size`, `batch_dim`, `nH`, `temperature`, `metallicity`, `redshift`) to desired resolution and range.
- Now one can run this script in parallel using `mpiexec -n python generateIonFraction-parallel.py`. I have tested this using `Python 3.11.6` with `mpi4py`, `numpy`, `h5py` and `colorama` packages installed.
**Note for cluster usres**: A sample `slurm` command that can be copied and executed from the terminal of a cluster is also provided in `slurm-python-job`. However, this needed tweaking according to the specifics of the cluster. Since this job runs interactively, it is advisable to use something like gnu `screen` or `tmux` to run this in a detached terminal, as using these tools, interruptions in the connection to the cluster won't kill the job. Also, the user needs to make sure that the binaries compiled should be compiled for the compute nodes and not the login nodes if they are of different configurations. One can see the progress of the run in the log files generated by slurm. For example, `tail -F ~/AstroPlasma/cloudy-codes/ionFrac/IonCloudy-2325.log` enables you to see the running job status with jobID `2325` in this example.
- Upon successful run, several ascii files with `ionization` in their name will get generated in a directory called `auto` that is created in `AstroPlasma/cloudy-codes/ionFrac/src`. The final `hdf5` files for the database is created in the `data` directory in`AstroPlasma/cloudy-codes/ionFrac/src`. This directory should be copied to `AstroPlasma/astro_plasma/data/` and renamed as `ionization`.
- Generating *emission* data
- The steps are similar to the above. But in this case, both `libcloudy.so` and `cloudy.exe` files need to be copied to `AstroPlasma/cloudy-codes/emmSpec/` from the `source/sys_gcc_shared` directory of `Cloudy`.
- Generating optically thin radiative *Cooling* table
- This is not used by `AstroPlasma` as of now but is a useful feature of `Cloudy` and hence included in the repo.
- Copy `libcloudy.so` to `AstroPlasma/cloudy-codes/coolingFunction/`
- From inside `AstroPlasma/cloudy-codes/coolingFunction/` directory, execute `bash ./compile-script.sh`. This will compile and generate the executables that can create the cooling tables.
- Currently, there are two types of cooling tables available: one with plasma in equilibrium background radiation (PIE) and one without any background radiation (CIE). If you are unsure which one to use, *I would recommend PIE*.
- export `AstroPlasma/cloudy-codes/coolingFunction` to `LD_LIBRARY_PATH`.
- To generate the cooling table run `./hazy_coolingcurve_
- The name of the cooling table created is `cooltable__Z=.dat`.
- Useful to note that the cooling loss rate from the tabulated Λ(T) in the file is nH2Λ(T), where nH=ρXH/mH. Here ρ is density and nH is total Hydrogen number density of the plasma. Usually, XH=0.7154. The unit of Λ(T) in the table is erg cm3 s-1. The photoionization background considered here is `Haardt-Madau 2012` at redshift 0.
Good luck generating the database! I understand that this can be daunting and non-intuitive for a beginner. If you encounter any issues, please don't hesitate to contact me for help!