https://github.com/edgartec97/user-task-api
Project developed in NestJS with Docker and multiple services and architecture for a maintainable, scalable, and highly efficient application, making the most of the necessary resources.
https://github.com/edgartec97/user-task-api
clean-architecture docker docker-compose domain-driven-design nestjs postgresql typeorm typescript
Last synced: 3 months ago
JSON representation
Project developed in NestJS with Docker and multiple services and architecture for a maintainable, scalable, and highly efficient application, making the most of the necessary resources.
- Host: GitHub
- URL: https://github.com/edgartec97/user-task-api
- Owner: EdgarTec97
- Created: 2025-07-15T17:23:29.000Z (12 months ago)
- Default Branch: main
- Last Pushed: 2025-07-18T19:00:49.000Z (12 months ago)
- Last Synced: 2026-01-03T17:18:24.287Z (6 months ago)
- Topics: clean-architecture, docker, docker-compose, domain-driven-design, nestjs, postgresql, typeorm, typescript
- Language: TypeScript
- Homepage:
- Size: 911 KB
- Stars: 0
- Watchers: 0
- Forks: 0
- Open Issues: 0
-
Metadata Files:
- Readme: README.md
Awesome Lists containing this project
README
# User Task API (Challenge)
This is a comprehensive documentation for the application. It outlines the necessary technologies, setup instructions, and architectural overview.
## Technologies
To run and develop this project, the following technologies are required:
- **Node.js**: `>=20.0.0 <21.0.0`
- **Docker**: `v28`
- **Docker Compose**: `v2`
- **NestJS**: `v11`
## Setup Instructions
Follow these steps to set up and run the project locally:
1. **Install Dependencies**
Use pnpm to install all project dependencies:
```bash
pnpm install
```
2. **Start Service Containers**
Bring up the necessary service containers (PostgreSQL, Redis, Kafka, Zookeeper) using Docker Compose:
```bash
pnpm containers:up
```
3. **Build the Application**
Compile the NestJS application:
```bash
pnpm build
```
4. **Generate Database Migrations**
Generate a new database migration. Replace `GeneralMigration` with a descriptive name for your migration:
```bash
pnpm migrate generate GeneralMigration
```
5. **Run Database Migrations**
Apply the pending database migrations to your PostgreSQL database:
```bash
pnpm migrate up
```
6. **Start the Application in Production Mode**
Launch the NestJS application in production mode:
```bash
pnpm start:prod
```
### Running the Application with Docker
If you prefer to run the application directly within a Docker container, you can use the following command after setting up the service containers:
```bash
pnpm containers:app
```
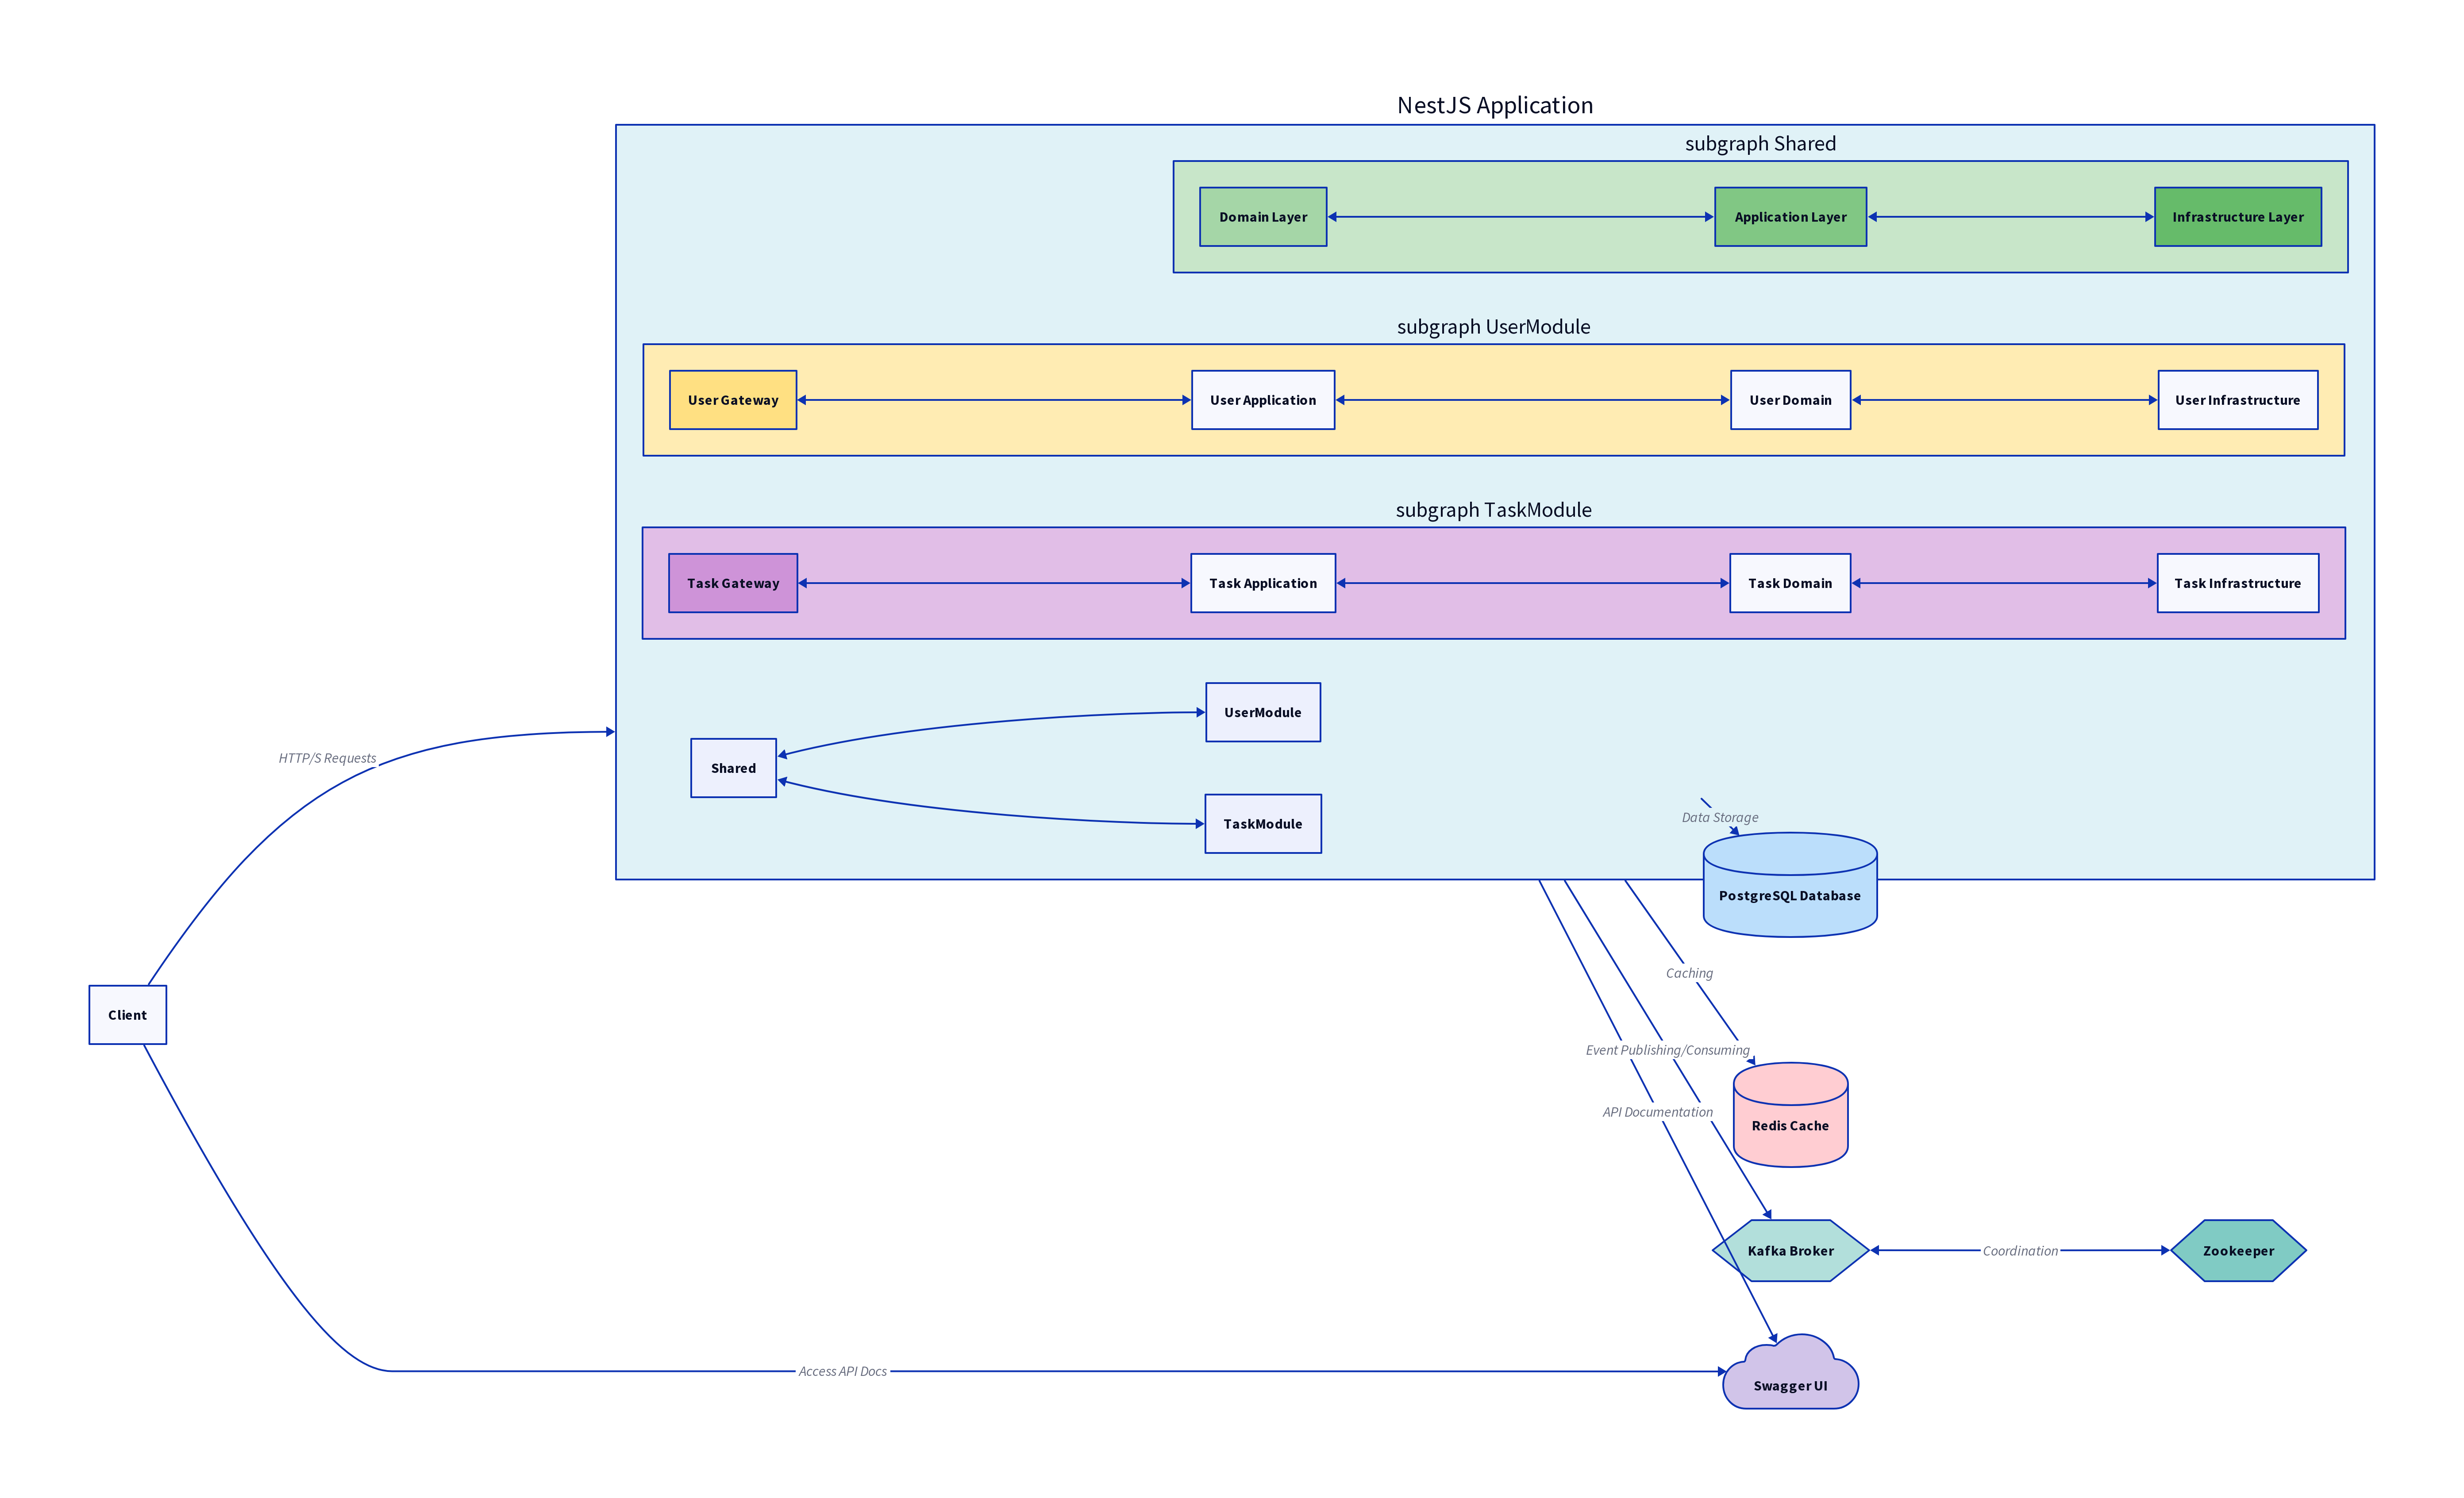
## Architecture
This project is built following a **Clean Architecture** approach, emphasizing separation of concerns and testability. It adopts a **modular design** with **Hexagonal Architecture** and **Domain-Driven Design (DDD)** principles.
### Core Principles
- **Clean Architecture**: The architecture is organized into concentric layers, with the innermost layers being independent of the outermost layers. This ensures that business rules are not coupled to external frameworks or databases.
- **Modular Design**: The application is divided into distinct, self-contained modules (e.g., `user`, `task`), each responsible for a specific domain area. This promotes maintainability and scalability.
- **Hexagonal Architecture (Ports and Adapters)**: This pattern ensures that the application's core logic is isolated from external concerns like databases, UI, or third-party services. The core application interacts with the outside world through 'ports' (interfaces), and 'adapters' implement these ports for specific technologies.
- **Domain-Driven Design (DDD)**: The design focuses on a rich understanding of the domain, with concepts like Entities, Value Objects, Aggregates, and Domain Services being central to the codebase.
### Layered Structure
The project's directory structure reflects its architectural layers. You will observe a distinct layering, particularly within the `shared` module and other domain-specific modules.
#### Shared Module Layers
The `shared` module, which contains common functionalities and foundational elements, is structured into three primary layers:
1. **Domain Layer (`src/shared/domain`)**:
This is the core of the application, containing the enterprise-wide business rules. It is independent of any external concerns. This layer includes:
- **Entities**: Represent business objects with a distinct identity.
- **Value Objects**: Describe characteristics of a thing.
- **Domain Services**: Operations that don't naturally fit within an Entity or Value Object.
- **Repositories Interfaces**: Define contracts for data persistence, without specifying implementation details.
```
src/shared/domain/
├── exceptions/
├── interfaces/
├── models/
└── value-objects/
```
2. **Application Layer (`src/shared/application`)**:
This layer orchestrates the domain objects to perform specific use cases. It contains application-specific business rules and depends on the Domain layer but is independent of the Infrastructure layer. This layer typically includes:
- **Application Services**: Coordinate domain objects to fulfill use cases.
- **DTOs (Data Transfer Objects)**: Used for data input and output.
- **Queries and Commands**: Part of CQRS (Command Query Responsibility Segregation) pattern, separating read and write models.
```
src/shared/application/
├── commands/
├── dtos/
├── queries/
└── services/
```
3. **Infrastructure Layer (`src/shared/infrastructure`)**:
This layer deals with external concerns such as databases, external APIs, and frameworks. It implements the interfaces defined in the Domain layer. This layer includes:
- **Persistence Implementations**: Concrete implementations of repository interfaces (e.g., TypeORM repositories for PostgreSQL).
- **External Service Integrations**: Adapters for interacting with third-party services.
- **Framework-specific code**: NestJS modules, providers, and controllers that handle HTTP requests and responses.
```
src/shared/infrastructure/
├── database/
├── openapi/
├── services/
└── utils/
```
#### Module-Specific Gateway Layer
Beyond the `shared` module, other domain-specific modules (e.g., `user`, `task`) introduce an additional layer called `gateway`. This layer is specifically designed to handle external incoming information, primarily HTTP requests.
- **Gateway Layer (`src/[module]/v1/gateway`)**:
This layer acts as the entry point for external interactions. It is responsible for:
- **Request Handling**: Receiving and validating incoming HTTP requests.
- **Data Transformation**: Converting external request data into application-layer DTOs.
- **Response Formatting**: Transforming application-layer output into appropriate HTTP responses.
- **API Endpoints**: Defining the routes and controllers for the module's API.
For example, within the `user` module, you would find:
```
src/user/v1/gateway/
├── controllers/
├── dtos/
└── guards/
```
This structure ensures that the core application logic remains decoupled from the specifics of the web framework, allowing for easier changes to the presentation layer if needed.
### Additional Architectural Features
Depending on evolving requirements, the following capabilities can be seamlessly integrated without disrupting existing modules:
#### Scheduled Tasks with Cron Jobs
The project can leverage the `@nestjs/schedule` package to run background tasks at fixed intervals (e.g., cleanup scripts, report generation, or periodic synchronizations).
```typescript
// src/task/application/jobs/sample.job.ts
import { Injectable } from '@nestjs/common';
import { Cron, CronExpression } from '@nestjs/schedule';
@Injectable()
export class SampleCronJob {
// Runs every day at midnight
@Cron(CronExpression.EVERY_DAY_AT_MIDNIGHT)
handleCron(): void {
// Business logic here
console.log('🕛 Running daily task at midnight');
}
}
```
To enable cron jobs, register the **ScheduleModule** in your feature module:
```typescript
// src/task/task.module.ts
import { Module } from '@nestjs/common';
import { ScheduleModule } from '@nestjs/schedule';
import { SampleCronJob } from './application/jobs/sample.job';
@Module({
imports: [ScheduleModule.forRoot()],
providers: [SampleCronJob],
})
export class TaskModule {}
```
> **Tip:** Cron jobs adhere to the same modular and DDD boundaries—keep job logic in the _application_ layer and only orchestrate domain services.
#### CQRS with CommandBus and QueryBus
If read and write workloads must scale independently, **CQRS (Command Query Responsibility Segregation)** can be adopted using NestJS's `@nestjs/cqrs` package. This separates write operations (commands) from read operations (queries) while maintaining a clean domain model.
```typescript
// src/user/application/commands/create-user.command.ts
export class CreateUserCommand {
constructor(
public readonly email: string,
public readonly password: string,
) {}
}
// src/user/application/handlers/create-user.handler.ts
import { CommandHandler, ICommandHandler } from '@nestjs/cqrs';
import { CreateUserCommand } from '../commands/create-user.command';
@CommandHandler(CreateUserCommand)
export class CreateUserHandler implements ICommandHandler {
async execute(command: CreateUserCommand): Promise {
const { email, password } = command;
// TODO: delegate to domain service / aggregate
}
}
// src/user/application/queries/get-user.query.ts
export class GetUserQuery {
constructor(public readonly id: string) {}
}
// src/user/application/handlers/get-user.handler.ts
import { QueryHandler, IQueryHandler } from '@nestjs/cqrs';
import { GetUserQuery } from '../queries/get-user.query';
@QueryHandler(GetUserQuery)
export class GetUserHandler implements IQueryHandler {
async execute(query: GetUserQuery): Promise {
const { id } = query;
// TODO: fetch and return user data
return {} as UserDto;
}
}
// src/user/user.module.ts
import { Module } from '@nestjs/common';
import { CqrsModule } from '@nestjs/cqrs';
import { CreateUserHandler } from './application/handlers/create-user.handler';
import { GetUserHandler } from './application/handlers/get-user.handler';
@Module({
imports: [CqrsModule],
providers: [CreateUserHandler, GetUserHandler],
})
export class UserModule {}
// Example usage inside a controller
await this.commandBus.execute(new CreateUserCommand(email, password));
const user = await this.queryBus.execute(new GetUserQuery(id));
```
By introducing CQRS only where necessary (high‑throughput write paths or complex read models), the codebase stays lightweight while providing the flexibility to evolve into more sophisticated patterns (event sourcing, snapshotting) later.
### Services Used
This project leverages several external services to provide robust and scalable functionality:
- **PostgreSQL**:
Used as the primary relational database for storing and managing application data. It provides reliability, data integrity, and powerful querying capabilities.
_Configuration in `docker-compose.yml`:_
```yaml
postgres:
container_name: postgres_${PROJECT_NAME}
image: postgres:14.5-alpine
environment:
- POSTGRES_DB=${POSTGRES_DB}
- POSTGRES_USER=${POSTGRES_USER}
- POSTGRES_ROL=${POSTGRES_ROL}
- POSTGRES_PASSWORD=${POSTGRES_PASSWORD}
- PGDATA=/data/postgres
volumes:
- postgres:/data/postgres
ports:
- \'${POSTGRES_PORT}:5432\'
networks:
- users-api
restart: always
```
- **Redis**:
Integrated for caching information from certain flows. This significantly improves response times and overall application performance by reducing the load on the primary database.
_Configuration in `docker-compose.yml`:_
```yaml
redis:
container_name: redis-${PROJECT_NAME}
image: bitnami/redis:6.2.7
restart: always
environment:
- REDIS_PASSWORD=${REDIS_PASSWORD}
volumes:
- redis:/var/lib/redis
- redis-config:/usr/local/etc/redis/redis.conf
ports:
- ${REDIS_PORT}:6379
networks:
- users-api
```
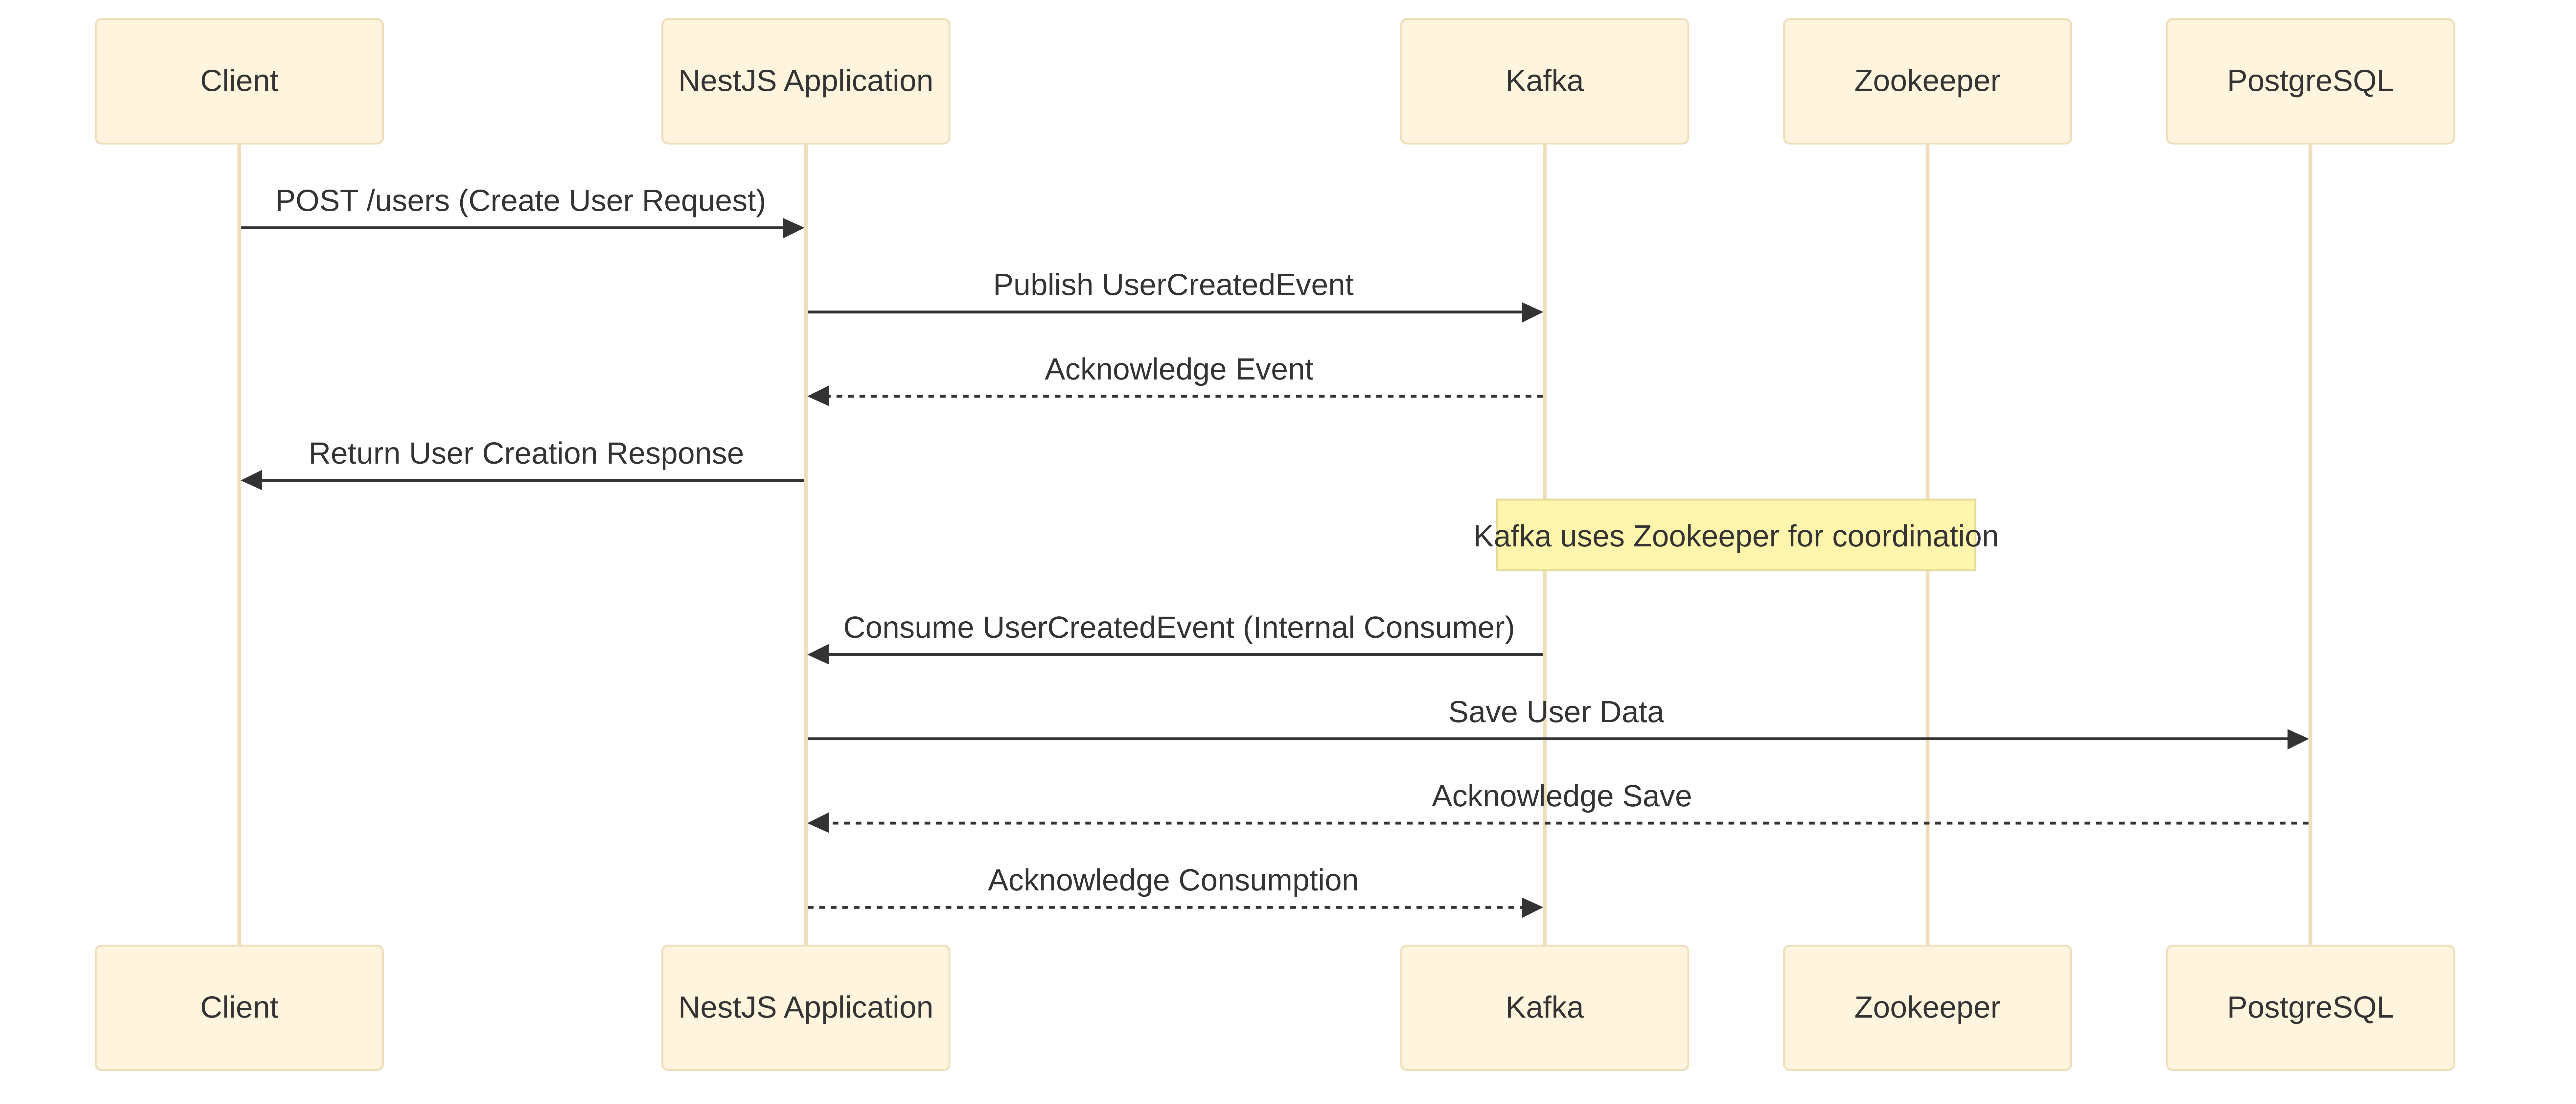
- **Kafka & Zookeeper**:
These are used to implement an **event-driven architecture**, specifically for the user creation flow. Kafka acts as a distributed streaming platform, enabling asynchronous communication and decoupling of services, while Zookeeper manages Kafka brokers.
_Configuration in `docker-compose.yml`:_
```yaml
zookeeper:
container_name: zookeeper-${PROJECT_NAME}
image: \'bitnami/zookeeper:3.8.0\'
restart: always
ports:
- ${ZOOKEEPER_PORT}:2181
networks:
- users-api
volumes:
- kafka:/data/zookeeper
environment:
- ALLOW_ANONYMOUS_LOGIN=yes
kafka:
container_name: kafka-${PROJECT_NAME}
image: \'bitnami/kafka:3.1.0\'
restart: always
ports:
- ${KAFKA_PORT}:9092
environment:
- KAFKA_CFG_ZOOKEEPER_CONNECT=zookeeper:${ZOOKEEPER_PORT}
- KAFKA_CFG_ADVERTISED_LISTENERS=PLAINTEXT://localhost:${KAFKA_PORT}
- ALLOW_PLAINTEXT_LISTENER=yes
networks:
- users-api
volumes:
- kafka:/data/kafka
```
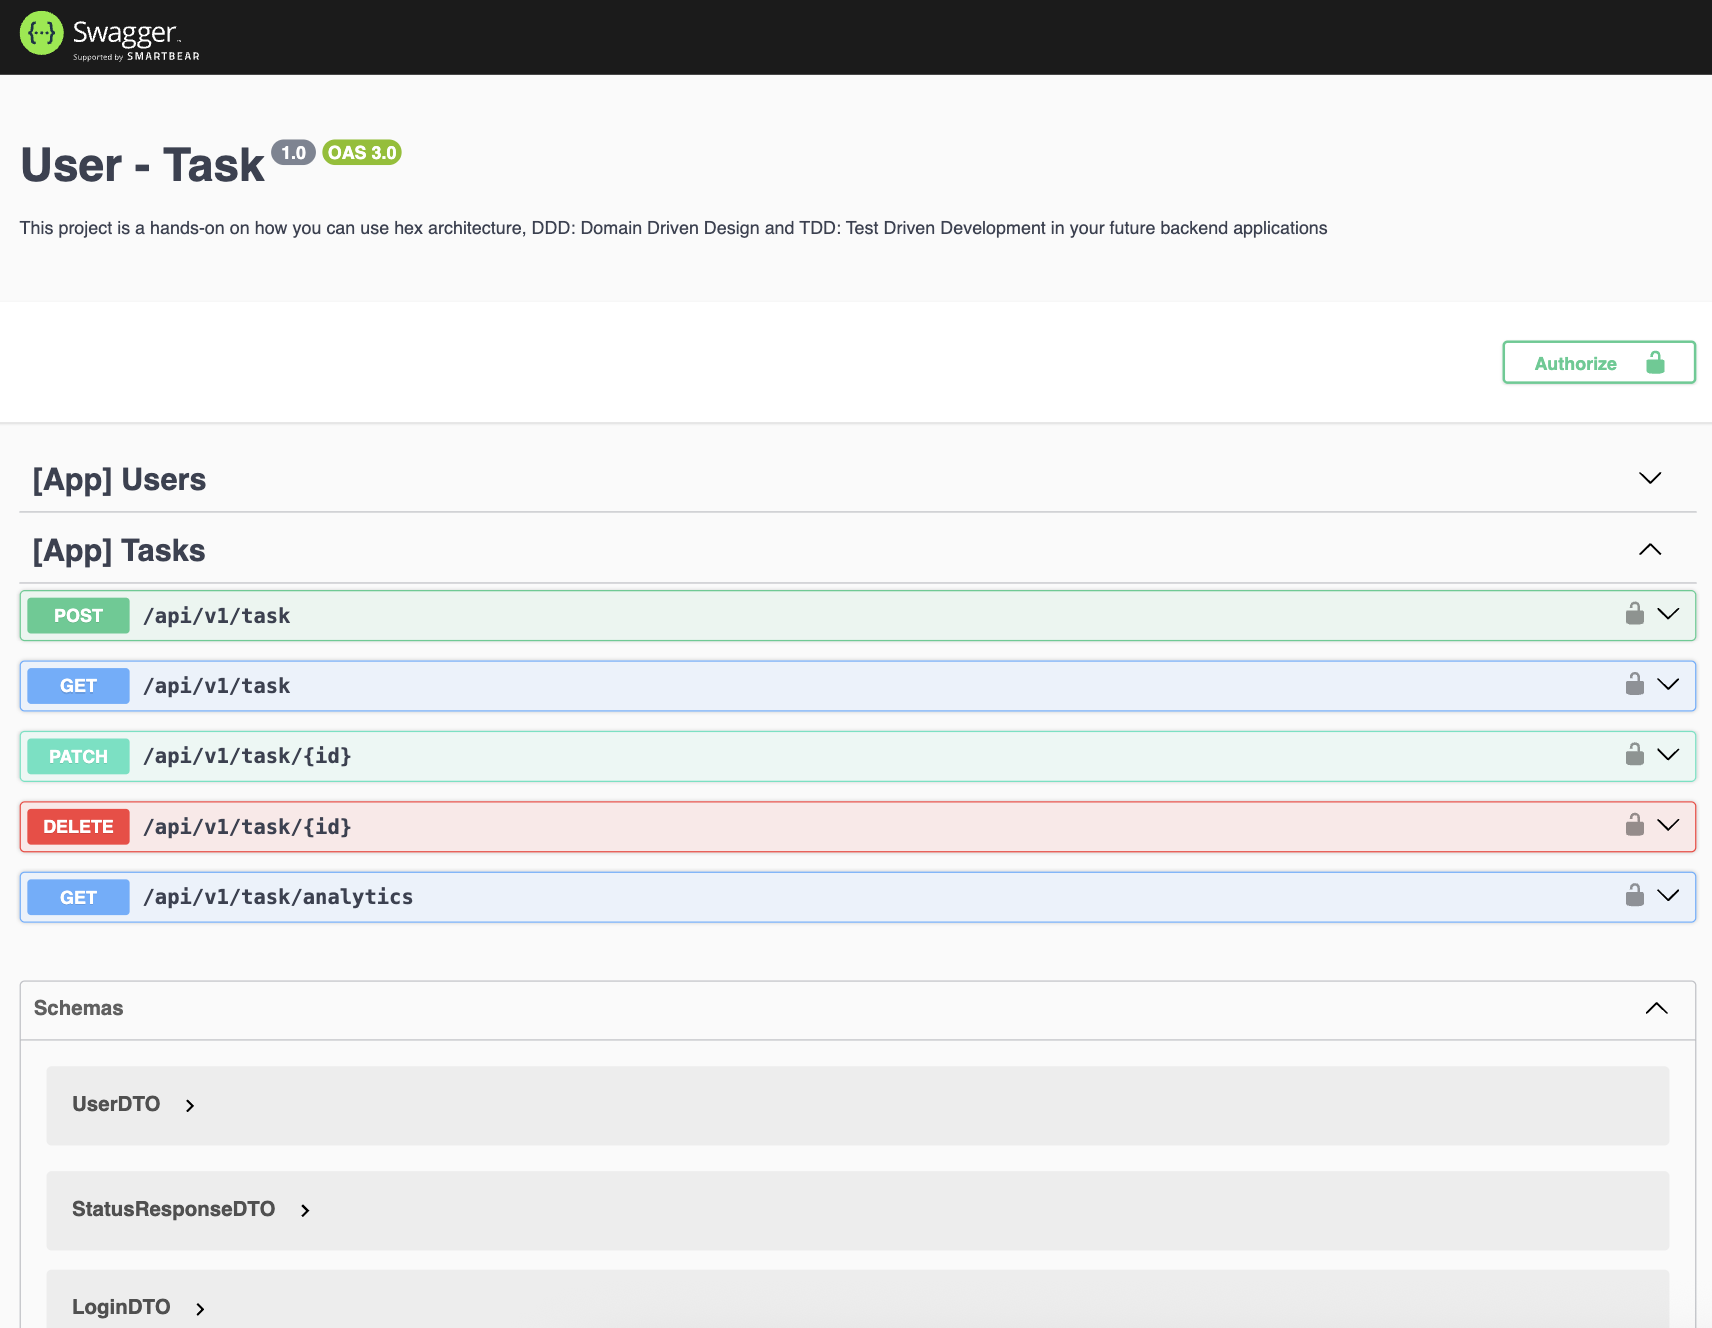
- **Swagger**:
Used for comprehensive API documentation. Once the application is running, you can access the interactive API documentation at the `/api` endpoint. This allows developers to understand, test, and interact with the API endpoints easily.
_Integration in `src/main.ts`:_
```typescript
import { NestFactory } from \'@nestjs/core\';
import { ConfigService } from \'@nestjs/config\';
import { AppModule } from \'@/app.module\';
import { SwaggerAPI } from \'@/shared/infrastructure/openapi/swagger.api\';
async function bootstrap() {
const app = await NestFactory.create(AppModule);
const config: ConfigService = app.get(ConfigService);
const port: number = config.get(\'PORT\') || 3000;
app.enableCors();
SwaggerAPI.setup(app);
await app.listen(port);
return port;
}
bootstrap()
.then((port: number) => console.log(`Application is running on port:${port}`))
.catch((error) => console.error(\'Error starting the application:\', error));
```
## Further Documentation
This section will be expanded with more details based on further code analysis. This may include:
- Detailed API Endpoints and Usage
- Environment Variables
- Testing Guidelines
- Deployment Information
- Contribution Guidelines
## Environment Variables
This project uses environment variables for configuration. A `.env` file should be created in the root directory of the project, based on the `.env.example` (if available) or the variables used in `docker-compose.yml` and the application code. Below are the key environment variables identified:
- `PROJECT_NAME`: Name of the project, used for naming Docker containers.
- `PROJECT_PORT`: Port on which the NestJS application will run.
- `POSTGRES_DB`: Database name for PostgreSQL.
- `POSTGRES_USER`: Username for PostgreSQL database access.
- `POSTGRES_ROL`: Role for PostgreSQL database access.
- `POSTGRES_PASSWORD`: Password for PostgreSQL database access.
- `POSTGRES_PORT`: Port for PostgreSQL database.
- `PGADMIN_DEFAULT_EMAIL`: Default email for pgAdmin login.
- `PGADMIN_DEFAULT_PASSWORD`: Default password for pgAdmin login.
- `REDIS_PASSWORD`: Password for Redis.
- `REDIS_PORT`: Port for Redis.
- `REDIS_COMMANDER_USER`: Username for Redis Commander.
- `REDIS_COMMANDER_PASSWORD`: Password for Redis Commander.
- `ZOOKEEPER_PORT`: Port for Zookeeper.
- `KAFKA_PORT`: Port for Kafka.
It is crucial to configure these variables correctly for the application and its services to function as expected.
## Advanced Clustering Flow
> **Purpose:** Scale a Node/Nest application horizontally—one worker per CPU core—while an **internal load‑balancing master** evenly distributes incoming traffic.
> Result: a resilient architecture capable of handling **high‑throughput** workloads with minimal latency spikes.
### How It Works
1. **Primary (Master) Process**
- Detects the total number of logical CPU cores (`os.cpus().length`).
- Forks a **worker** for each core via Node’s native `cluster` module.
- Acts as an **internal load balancer**, accepting incoming connections and routing them to the least‑busy worker in a round‑robin fashion.
- Listens for the `'exit'` event; any crashed worker is **automatically respawned** to maintain full capacity.
2. **Worker Processes**
- Each worker boots a full instance of your NestJS application (or any Node server).
- All workers share the **same TCP port**, but their sockets are managed by the master, preventing port conflicts.
- If a worker encounters an unhandled exception and exits, the master transparently replaces it without downtime.
### Benefits
| Feature | Impact |
| ----------------------- | ---------------------------------------------------------- |
| Multi‑core utilisation | Leverages **all CPU cores** instead of a single thread. |
| Built‑in load balancing | Master process balances requests without external proxies. |
| Fault tolerance | Automatic worker **respawn** maintains availability. |
| Zero code changes | Application logic remains agnostic to clustering. |
### When to Use
- APIs expected to receive **thousands of concurrent requests**.
- Workloads with **CPU‑bound** or blocking operations where a single event loop becomes a bottleneck.
- Environments where external load balancers (e.g., Nginx, HAProxy) are not yet introduced but horizontal scaling is required.
### Quick Start
````ts
// main.ts
import { NestFactory } from '@nestjs/core';
import { AppModule } from './app.module';
import { AppClusterService } from './app-cluster.service';
async function bootstrap(): Promise {
const app = await NestFactory.create(AppModule);
const port = Number(process.env.PORT) || 3000;
await app.listen(port);
return port;
}
AppClusterService.clusterize(bootstrap);
## Testing
The project includes a comprehensive suite of tests to ensure code quality and functionality. Jest is used as the testing framework.
- **Run all tests**:
```bash
pnpm test
````
- **Run tests in watch mode** (re-runs tests when files change):
```bash
pnpm test:watch
```
- **Generate test coverage report**:
```bash
pnpm test:cov
```
- **Run end-to-end tests**:
```bash
pnpm test:e2e
```
- **Debug tests**:
```bash
pnpm test:debug
```
## 💻 Swagger API
## 💻 Workflow API
## 💻 Architecture API