https://github.com/ediminator/homematicip-hcu
This is a custom integration for Home Assistant that connects directly to your Homematic IP Home Control Unit (HCU) over your local network. It allows you to control and monitor your Homematic IP devices without relying on the cloud.
https://github.com/ediminator/homematicip-hcu
eq3 hcu hcu-plugin home-assistant homematic-ip
Last synced: about 2 months ago
JSON representation
This is a custom integration for Home Assistant that connects directly to your Homematic IP Home Control Unit (HCU) over your local network. It allows you to control and monitor your Homematic IP devices without relying on the cloud.
- Host: GitHub
- URL: https://github.com/ediminator/homematicip-hcu
- Owner: Ediminator
- Created: 2025-09-17T02:25:35.000Z (11 months ago)
- Default Branch: main
- Last Pushed: 2026-06-03T20:25:21.000Z (about 2 months ago)
- Last Synced: 2026-06-03T21:13:49.672Z (about 2 months ago)
- Topics: eq3, hcu, hcu-plugin, home-assistant, homematic-ip
- Language: Python
- Homepage:
- Size: 2.02 MB
- Stars: 69
- Watchers: 7
- Forks: 5
- Open Issues: 6
-
Metadata Files:
- Readme: README.md
- Changelog: CHANGELOG.md
- Contributing: CONTRIBUTING.md
- Funding: .github/FUNDING.yml
Awesome Lists containing this project
README
# Homematic IP Local (HCU) Integration for Home Assistant
[](https://github.com/hacs/integration)
**Local control** for your Homematic IP devices via the Home Control Unit (HCU). No cloud required!
This integration connects directly to your HCU's local API, providing real-time control and status updates for all your Homematic IP devices through Home Assistant.
> **This is a passion project built entirely in personal spare time.** Its continued development depends on the community — every bug report, diagnostics file, and piece of user feedback directly shapes what gets supported and improved next. If this integration adds value to your setup, please consider giving back by sharing diagnostics, testing new features, or opening an issue on GitHub.
---
## 📋 Table of Contents
- [Features](#-features)
- [Connection Modes](#-connection-modes)
- [Requirements](#-requirements)
- [Installation](#-installation)
- [Configuration](#-configuration-options)
- [Group Types](#-group-types)
- [Working with Buttons & Remote Controls](#-working-with-buttons--remote-controls)
- [Available Actions](#-available-actions)
- [User Message to HCU](#user-message-to-hcu)
- [Use Internal On Time](#-use-internal-on-time)
- [Ramp Time](#-ramp-time)
- [Diagnostics & Troubleshooting](#-diagnostics--troubleshooting)
- [FAQ](#-faq)
- [Support](#-support)
---
## 🌟 Features
- **🏠 Local Control**: Direct communication with your HCU - no cloud dependency
- **⚡ Real-time Updates**: Instant device state changes via WebSocket
- **🔌 Full Device Support**: Switches, lights, sensors, climate, covers, locks, and more
- **🎛️ Advanced Climate Control**: Heating profiles, party mode, vacation mode
- **🔘 Event-Based Buttons**: Stateless button devices trigger automation events
- **🛡️ Security Integration**: Alarm control panel for your security system
- **🔧 Extensive Services**: Play sounds, control rules, manage heating schedules
- **📊 Diagnostics**: Built-in diagnostics for troubleshooting and device support
- **🏗️ Group Support**: Automatic discovery of heating, switching, cover, and advanced system groups
---
## 🏗️ Group Types
The integration automatically discovers and exposes Homematic IP "groups" — virtual devices that the HCU uses to orchestrate physical hardware.
### Standard Groups (always visible)
| Group Type | Platform | Description |
|---|---|---|
| `HEATING` | `climate` | Room thermostat control with profiles, eco/party mode |
| `SWITCHING` | `switch` | User-created Direct Connection switch groups |
| `LIGHT` | `light` | User-created Direct Connection light groups |
| `SHUTTER` / `EXTENDED_LINKED_SHUTTER` | `cover` | Roller shutter and blind groups |
| `EXTENDED_LINKED_SWITCHING` | `switch` | Extended linked switching groups |
### Advanced Groups (conditionally visible)
These groups only appear when the HCU has assigned physical devices to them. If they show up, it means they are active in your system.
| Group Type | Platform | What it does |
|---|---|---|
| `HEATING_COOLING_DEMAND_BOILER` | `binary_sensor` | Aggregates all thermostat valve positions to indicate if the boiler needs to fire |
| `HEATING_COOLING_DEMAND_PUMP` | `binary_sensor` | Indicates if the heating circulation pump should be running |
| `HOT_WATER` | `switch` | Controls hot water profiles (requires a physical hot water actuator) |
> **💡 Tip:** Even without a Homematic IP boiler actuator (HmIP-WHS2), you can use the Heat Demand binary sensor to control a third-party relay (Shelly, Zigbee plug) connected to your boiler via Home Assistant automations.
---
## 🔌 Connection Modes
The integration supports three connection modes. The mode is selected during setup and can be changed at any time via **Settings → Integrations → Homematic IP HCU → Reconfigure**.
| | DualBridge (App + Plugin) | App User | Plugin User |
|---|---|---|---|
| **Setup** | Both | Press blue button on the HCU | Activation key from HCU WebUI → Developer Mode |
| **Developer Mode required** | ✅ Yes (for Plugin features) | ❌ No | ✅ Yes |
| **Door Locks (Access Authorization)** | ✅ Yes | ✅ Yes | ✅ Yes |
| **Device Configuration** ¹ | ✅ Yes | ✅ Yes | ❌ No |
| **User Messages to Homematic IP app** | ✅ Yes | ❌ No | ✅ Yes |
| **Discover / Control responses** | ✅ Yes | ❌ No | ✅ Yes |
| **Recommendation** | ⭐ Recommended — full feature set | Simple setup, full device support | Plugin features only |
> ¹ Device Configuration includes per-device parameters settable via the App User REST API, e.g. `powerUpSwitchState` for actuators.
### Which mode should I use?
- **DualBridge** is the recommended choice. It combines the REST-based state loading of the App User with the plugin-specific features (user messages, discover/control) of the Plugin User.
- **App User only** is the simplest setup — no Developer Mode needed. Choose this if you don't need plugin features.
- **Plugin User only** is suitable if you only want plugin features and no App User REST access.
---
## 📦 Requirements
- **Home Assistant** 2024.1.0 or newer
- **Homematic IP Home Control Unit (HCU)** with firmware 1.x or later
- **Local network access** to your HCU
---
## 🚀 Installation
### Step 1: Install via HACS
[](https://my.home-assistant.io/redirect/hacs_repository/?owner=Ediminator&repository=hacs-homematicip-hcu&category=Integration)
Or, add it manually:
1. Open **HACS** in your Home Assistant sidebar
2. Click on **Integrations**
3. Click the **three dots** (⋮) in the top right corner
4. Select **Custom repositories**
5. Add the following details:
- **Repository:** `https://github.com/Ediminator/hacs-homematicip-hcu/`
- **Category:** `Integration`
6. Click **ADD**
7. Close the custom repositories window
8. Search for **"Homematic IP Local (HCU)"** in HACS
9. Click **DOWNLOAD** and confirm
10. **Restart Home Assistant** when prompted
---
### Step 2: Enable the HCU Local API
Before adding the integration, you must enable the local API on your HCU.
1. Open your HCU's web interface (HCUweb) in a browser:
- Try `https://hcu1-XXXX.local` (replace `XXXX` with the last 4 digits of your HCU's SGTIN)
- Or use your HCU's IP address: `https://YOUR_HCU_IP`
- **Note:** You may see a security warning about the certificate - this is normal, click "Advanced" and proceed
2. Log in to your HCU
3. Navigate to **Developer Mode** in the menu
4. Toggle the switch to **activate Developer Mode**
5. Toggle the switch to **Expose the Connect API WebSocket**
- ⚠️ **Important:** Sometimes the toggle is already activated even on first setup. Please **deactivate and activate the toggle** to ensure it's properly enabled.
6. Leave this page open - you'll need it in the next step!
---
### Step 3: Add the Integration in Home Assistant
💡 **Tip before Adding Integration:** If your **Home Assistant Area** names match your **Homematic IP Room** names (e.g., Living room = Living room), **newly discovered devices** will be created directly in the correct Home Assistant Area **automatically**.
1. In Home Assistant, go to **Settings** → **Devices & Services**
2. Click the **+ ADD INTEGRATION** button (bottom right)
3. Search for `Homematic IP Local (HCU)` and select it
4. **First Dialog - Connection Details:**
- Enter your **HCU's IP address** (e.g., `192.168.1.100`)
- Leave the ports at their default values unless you changed them:
- Authentication Port: `6969`
- WebSocket Port: `9001`
- Click **SUBMIT**
5. **Second Dialog - Authorization:**
- Switch back to your HCU's web interface (from Step 2)
- Click the **"Generate activation key"** button
- A temporary key will appear (valid for a few minutes)
- **Copy the entire key** and paste it into Home Assistant
- Click **SUBMIT**
6. The integration will now connect and discover all your devices! This may take a few moments.
7. You should see a success message and your devices will start appearing in Home Assistant
---
### Step 4: Configure Door Lock PIN (Optional)
If you have a Homematic IP door lock (e.g., HmIP-DLD), you need to provide its PIN for the integration to control it.
> 💡 **Why?** The HCU requires a PIN for all lock operations for security reasons.
1. Go to **Settings** → **Devices & Services**
2. Find the **Homematic IP Local (HCU)** card
3. Click **CONFIGURE**
4. Enter your door lock's **Authorization PIN**
5. Click **SUBMIT**
Your door lock will now be available for control in Home Assistant!
---
## 🔧 Configuration Options
After installation, you can adjust some settings:
1. Go to **Settings** → **Devices & Services**
2. Find the **Homematic IP Local (HCU)** card
3. Click **CONFIGURE**
### Available Options:
- **Comfort Temperature:** Default temperature (in °C) used when switching from OFF to HEAT mode
- **Third-Party Device Filters:** Show/hide devices from manufacturers other than eQ-3
- **Group Filters** Show/hide groups
---
## 🔘 Working with Buttons & Remote Controls
**⭐ This is the most common question, so read this section carefully!**
### Understanding Button Devices
Stateless button devices (wall switches, remote controls, etc.) work differently from regular switches in Home Assistant:
**❌ You will NOT see:**
- Button entities in your entity list
- Buttons in the device card
- Toggle switches for each button
**✅ You WILL get:**
- Events fired on the Home Assistant event bus
- Full control via automations
- Support for multi-button scenarios
**Why?** Stateless buttons don't maintain an on/off state - they only send momentary press signals. Home Assistant's standard approach for these devices is to use events, which provides much more flexibility for automations.
---
### Supported Button Devices
This integration supports button events for:
**Wall Switches:**
- HmIP-WGS (Wall-mounted Glass Switch)
- HmIP-WRC2 (2-button Wall Remote)
- HmIP-WRC6 (6-button Wall Remote)
- HmIP-WRCC2 (Wall Remote with Display)
- HmIP-BRC2 (2-button Remote Control)
- And more...
**Remote Controls:**
- HmIP-KRC4 (4-button Key Ring Remote)
- HmIP-RC8 (8-button Remote)
- HmIP-KRCK (Key Ring Remote with Display)
- And more...
**Contact Interfaces (when configured as buttons):**
- HmIP-FCI1 (Flush-mount Contact Interface 1)
- HmIP-FCI6 (Flush-mount Contact Interface 6)
- HmIP-SCI (Shutter Contact Interface)
---
### Step-by-Step: Testing Your Buttons
Before creating automations, verify your buttons are working:
#### 1. Create a pseudo automation in the HCU with an empty action to enable button press events.
- Important: You must create both key types if you want to use both short and long presses.
#### 2. Open the Events Monitor
1. Go to **Developer Tools** → **Events** (in the sidebar)
2. In the "Listen to events" section, type: `hcu_integration_event`
3. Click **START LISTENING**
#### 3. Press Your Buttons
- Press any button on your Homematic IP device
- You should immediately see an event appear in the event monitor
#### 4. Understand the Event Data
When a button is pressed, you'll see something like this:
```yaml
event_type: hcu_integration_event
data:
device_id: 3014F711A00048240995D6BC
subtype: "1"
type: KEY_PRESS_SHORT
origin: LOCAL
time_fired: 2025-10-26T10:30:45.123456+00:00
```
**What each field means:**
- `device_id`: The unique ID of your button device (SGTIN)
- `subtype`: Which button was pressed (1, 2, 3, etc.)
- **⚠️ Note (since v2.0.0):** Use subtype instead of channel to identify which button was pressed.
- `type`: The type of the button event (`ring`, `press`, `press_short`, `press_long`, `press_long_start` or `press_long_stop`)
- **⚠️ Note (since v2.0.0):** type are now lowercase and no longer prefixed with a "key_")
- `ring`: fires once when the doorbell is pressed
- `press_short`: fires once on a short press
- `press_long_start`: fires once at the beginning of a long press
- `press_long`: fires repeatedly (~every 250 ms) while the button is held
- `press_long_stop`: fires once when the button is released after a long press
#### 4. Note Down Your Device ID and Channels
**Important:** You'll need these values for your automations!
- Write down your `device_id`
- Note which `subtype` corresponds to each physical button
**💡 Tip:** You can find your device_id more easily in the diagnostics file - see the [Diagnostics section](#-diagnostics--troubleshooting) below.
---
### Creating Button Automations
Now that you've confirmed your buttons work, let's create automations!
#### Method 0: Device Triggers (Easiest — since v2.0.0)
Starting with v2.0.0, this integration supports **Home Assistant Device Triggers**. This is the simplest way to create button automations — no YAML required.
1. Go to **Settings** → **Automations & Scenes**
2. Click **+ CREATE AUTOMATION** → **Create new automation**
3. **Add Trigger:**
- Click **ADD TRIGGER**
- Select **Device**
- Choose your Homematic IP button device
- Select the trigger type, e.g. `Button 1 - Short press`
4. **Add Action** and **Save**
**Supported trigger types for buttons:** `press`, `press_short`, `press_long`, `press_long_start`, `press_long_stop`
**Supported trigger types for doorbell:** `ring`
> 💡 **Tip:** Device Triggers use the same underlying events as the YAML method — they are just a convenient UI wrapper.
---
#### Method 1: Visual Editor (Recommended for Beginners)
**Example: Turn on a light when button 1 is pressed**
1. Go to **Settings** → **Automations & Scenes**
2. Click **+ CREATE AUTOMATION** → **Create new automation**
3. **Add Trigger:**
- Click **ADD TRIGGER**
- Select **Event**
- Event type: `hcu_integration_event`
4. **Add Condition:**
- Click **ADD CONDITION**
- Select **Template**
- Template:
```jinja
{{ trigger.event.data.device_id == '3014F711A00048240995D6BC' and trigger.event.data.subtype == '1' and trigger.event.data.type == 'press_short' }}
```
- Replace the `device_id` and `subtype` with your values!
5. **Add Action:**
- Click **ADD ACTION**
- Select **Call service**
- Service: `light.turn_on`
- Target: Choose your light
6. **Save** your automation with a descriptive name
---
#### Method 2: YAML (For Advanced Users)
**Example 1: Simple Toggle**
```yaml
alias: Living Room - Button 1 Toggle Light
description: Toggle living room light with wall switch button 1
mode: single
triggers:
- event_type: hcu_integration_event
event_data:
device_id: 3014F711A00048240995D6BC
subtype: "1"
type: press_short
trigger: event
actions:
- target:
entity_id: light.living_room
action: light.toggle
```
**Example 2: Multi-Button Control (Choose Action by Button)**
```yaml
alias: Kitchen Remote - 4 Buttons
description: Control multiple lights with a 4-button remote
mode: single
triggers:
- event_type: hcu_integration_event
event_data:
device_id: 3014F711A00048240995D6BC
trigger: event
actions:
- choose:
- conditions:
- condition: template
value_template: "{{ trigger.event.data.subtype == '1' and trigger.event.data.type == 'press_short' }}"
sequence:
- target:
entity_id: light.kitchen_main
action: light.turn_on
- conditions:
- condition: template
value_template: "{{ trigger.event.data.subtype == '2' and trigger.event.data.type == 'press_short' }}"
sequence:
- target:
entity_id: light.kitchen_main
action: light.turn_off
- conditions:
- condition: template
value_template: "{{ trigger.event.data.subtype == '3' and trigger.event.data.type == 'press_short' }}"
sequence:
- target:
entity_id: light.kitchen_cabinet
action: light.turn_on
- conditions:
- condition: template
value_template: "{{ trigger.event.data.subtype == '4' and trigger.event.data.type == 'press_short' }}"
sequence:
- target:
entity_id: light.kitchen_cabinet
action: light.turn_off
```
**Example 3: Same Button for On/Off (Double Press Detection)**
```yaml
alias: Bedroom - Button 1 with Double Press
description: Single press = dim light, double press = full brightness
mode: restart
triggers:
- event_type: hcu_integration_event
event_data:
device_id: 3014F711A00048240995D6BC
subtype: "1"
type: press_short
trigger: event
actions:
- if:
- condition: state
entity_id: timer.button_press_timer
state: active
then:
# Second press detected within 1 second
- target:
entity_id: light.bedroom
data:
brightness: 255
action: light.turn_on
- target:
entity_id: timer.button_press_timer
action: timer.cancel
else:
# First press - start timer
- target:
entity_id: timer.button_press_timer
data:
duration: "00:00:01"
action: timer.start
- wait_for_trigger:
- entity_id: timer.button_press_timer
to: idle
trigger: state
timeout: "00:00:01"
# Timer expired - this was a single press
- if:
- condition: state
entity_id: timer.button_press_timer
state: idle
then:
- target:
entity_id: light.bedroom
data:
brightness: 128
action: light.turn_on
```
*Note: For double-press detection, create a timer helper first:*
1. Go to **Settings** → **Devices & Services** → **Helpers**
2. Click **+ CREATE HELPER** → **Timer**
3. Name: "Button Press Timer"
4. Duration: "00:00:01"
**Example 4: Switch or Dim (Using Short and Long Press Events)**
```
alias: Offic - Switch or Dim the light
triggers:
- event_type: hcu_integration_event
event_data:
device_id: 3014F711A00048240995D6BC
subtype: "1"
trigger: event
actions:
- choose:
- conditions:
- condition: template
value_template: "{{ trigger.event.data.type == 'press_short' }}"
sequence:
- target:
entity_id: light.light_office
action: light.toggle
- conditions:
- condition: template
value_template: "{{ trigger.event.data.type == 'press_long' }}"
sequence:
- repeat:
while:
- condition: template
value_template: |
{{ trigger.event.data.type == 'press_long' }}
sequence:
- data:
entity_id: light.light_office
brightness_step: 10
action: light.turn_on
- delay: "0.2"
mode: restart
```
---
### Finding Your Device ID and Channels
**Easiest Method: Use Diagnostics**
1. Go to **Settings** → **Devices & Services**
2. Find the **Homematic IP Local (HCU)** card and click it
3. Find your button device in the list and click it
4. Click the **three dots** (⋮) in the top right
5. Select **Download diagnostics** (or just look at the device info on the page)
6. The device ID (SGTIN) is shown clearly
**Manual Method: Diagnostics File**
1. Download the full integration diagnostics:
- Settings → Devices & Services
- Click on the Homematic IP Local (HCU) card
- Three dots (⋮) → Download diagnostics
2. Open the JSON file and search for your device name
3. Look for the structure:
```json
"3014F711A00048240995D6BC": {
"label": "Living Room Wall Switch",
"functionalChannels": {
"0": { "functionalChannelType": "DEVICE_BASE" },
"1": { "functionalChannelType": "SINGLE_KEY_CHANNEL" },
"2": { "functionalChannelType": "SINGLE_KEY_CHANNEL" },
"3": { "functionalChannelType": "SINGLE_KEY_CHANNEL" },
"4": { "functionalChannelType": "SINGLE_KEY_CHANNEL" }
}
}
```
4. Note:
- The long string is your `device_id`
- Channels 1, 2, 3, 4 are your buttons (ignore channel 0 - it's always the maintenance channel)
---
## User Message to HCU
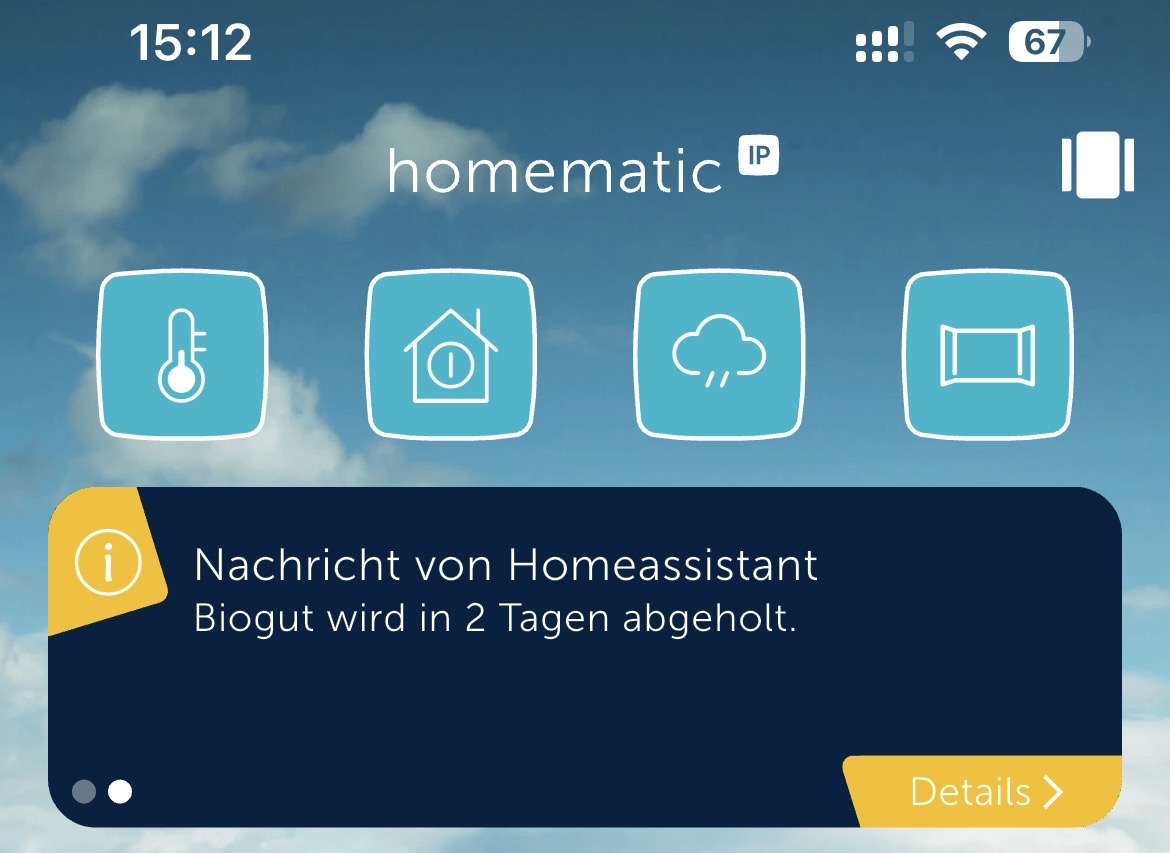
With the actions **hcu_integration.create_user_message_request** and **hcu_integration.delete_user_message_request**, you can create and delete user messages in the Homematic IP app.
More Information under **[Available Actions](#-available-actions)**
### Listening for User Message Acknowledgements
When a user acknowledges a message in the Homematic IP app, the HCU sends a `USER_MESSAGE_ACK_EVENT` back to the integration. The integration fires this as a Home Assistant bus event:
**Event name:** `hcu_integration_user_message_ack`
**Payload:**
| Field | Description |
|---|---|
| `user_message_id` | The ID of the acknowledged message |
| `ack_type` | The user's response: `OK`, `YES`, or `NO` |
**Example automation trigger:**
```yaml
trigger:
- platform: event
event_type: hcu_integration_user_message_ack
event_data:
user_message_id: MY_MESSAGE_ID
ack_type: "YES"
```
You can access the payload values in actions via:
```yaml
{{ trigger.event.data.user_message_id }}
{{ trigger.event.data.ack_type }}
```
> **Note:** `ack_type` is only meaningful for messages created with `behavior_type: ACKNOWLEDGEABLE_BY_YES_NO`. For `ACKNOWLEDGEABLE_BY_OK` messages it will always be `OK`.
---
## 📊 Diagnostics & Troubleshooting
### Downloading Diagnostics
Diagnostics files are **extremely valuable** for troubleshooting and adding support for new devices.
**When to download diagnostics:**
- Before reporting an issue on GitHub
- When buttons aren't working (v1.8.1 or later fixes most button issues)
- When a device isn't working correctly
- To help add support for a new device type
**How to Download:**
1. Go to **Settings** → **Devices & Services**
2. Find the **Homematic IP Local (HCU)** integration card
3. Click on the card to open the integration details
4. In the top right, click the **three dots** (⋮)
5. Select **Download diagnostics**
6. Your browser downloads: `hcu_integration-XXXX.json`
**What's in the file?**
- Complete device inventory and current states
- Heating groups and configurations
- Entity mappings
- Device capabilities
**Privacy:** Sensitive data like PINs and tokens are automatically redacted (`**REDACTED**`).
---
### Debug Logging
For detailed troubleshooting, especially for button events:
#### Method 1: Quick Debug (Recommended)
1. Go to **Settings** → **Devices & Services**
2. Find **Homematic IP Local (HCU)** card
3. Click the **three dots** (⋮)
4. Click **Enable debug logging**
5. Reproduce the issue (e.g., press your buttons)
6. Click the **three dots** (⋮) again
7. Click **Disable debug logging**
8. Your browser immediately downloads the log file
**Look for these log entries for button debugging:**
- `Button press detected via timestamp change` - Timestamp-based detection (old devices)
- `Button press detected for stateless channel` - Event-based detection (HmIP-WGS, HmIP-WRC6, etc.)
#### Method 2: Permanent Logging
For persistent debug logging:
1. Edit your `configuration.yaml`:
```yaml
logger:
default: info
logs:
custom_components.hcu_integration: debug
```
2. Restart Home Assistant
3. View logs in **Settings** → **System** → **Logs**
---
## 🎮 Available Actions
### `hcu_integration.play_sound`
Play a sound on compatible notification devices (e.g., HmIP-MP3P).
**Example:**
```yaml
action: hcu_integration.play_sound
target:
entity_id: switch.doorbell
data:
sound_file: "ALARM_01"
volume: 0.8
duration: 10
```
### `hcu_integration.set_rule_state`
Enable or disable automation rules within the HCU.
**Example:**
```yaml
action: hcu_integration.set_rule_state
data:
rule_id: "00000000-0000-0000-0000-000000000000"
enabled: true
```
### `hcu_integration.activate_party_mode`
Temporarily override heating schedule for a specific room.
**Example:**
```yaml
action: hcu_integration.activate_party_mode
target:
entity_id: climate.living_room
data:
temperature: 22
duration: 14400 # 4 hours in seconds
```
### `hcu_integration.activate_vacation_mode`
System-wide vacation mode for all heating groups.
**Example:**
```yaml
action: hcu_integration.activate_vacation_mode
data:
temperature: 15
end_time: "2025-12-24 18:00"
```
### `hcu_integration.activate_eco_mode`
Activate permanent absence (Eco) mode.
**Example:**
```yaml
action: hcu_integration.activate_eco_mode
```
### `hcu_integration.deactivate_absence_mode`
Deactivate any active absence mode.
**Example:**
```yaml
action: hcu_integration.deactivate_absence_mode
```
### `hcu_integration.set_cooling_mode`
Activates or deactivates cooling mode for all heating groups.
```yaml
action: hcu_integration.set_cooling_mode
data:
cooling: true
```
### `hcu_integration.send_api_command`
Send raw api command to hcu.
**Example:**
```yaml
action: hcu_integration.send_api_command
data:
path: /hmip/device/control/setOpticalSignal
body:
opticalSignalBehaviour: FLASH_MIDDLE
simpleRGBColorState: PURPLE
dimLevel: 0.42
channelIndex: 8
deviceId: 3014F711A00478E0C9A5E3456
```
### `hcu_integration.create_user_message_request`
Create a User Message that is displayed in the Homematic IP app. See the EQ3 API documentation for details.
**Example:**
```yaml
action: hcu_integration.create_user_message_request
data:
body:
message_category: INFO
user_message_id: USER_MESSAGE
title: Message from Home Assistant
message: "Test Message with Entity States {{ states('sensor.State') }}."
behavior_type: NOT_DISMISSIBLE
```
or
```yaml
action: hcu_integration.create_user_message_request
data:
body:
message_category: INFO
user_message_id: USER_MESSAGE
title:
en: Message from Home Assistant
de: Nachricht von Home Assistant
message:
en: "Test Message with Entity States {{ states('sensor.State') }}."
de: "Test Nachricht mit Entität Status {{ states('sensor.Status') }}."
behavior_type: NOT_DISMISSIBLE
```
### `hcu_integration.delete_user_message_request`
Delete a previously created User Message from the Homematic IP app.
**Example:**
```yaml
action: hcu_integration.delete_user_message_request
data:
user_message_id: USER_MESSAGE
```
---
## 🔄 Updating the Integration
When a new version is released:
1. Open **HACS**
2. Go to **Integrations**
3. Find **Homematic IP Local (HCU)**
4. If an update is available, click **UPDATE**
5. **Restart Home Assistant**
**Important:** Always check the CHANGELOG before updating for any breaking changes or new requirements.
---
## ❓ FAQ
### Can I use both the cloud integration and this local integration?
Not recommended. Running both simultaneously may cause conflicts. Choose one approach.
### My device isn't appearing in Home Assistant
1. Verify the device appears in the HCU web interface
2. Check if it's a third-party device (may be filtered)
3. Download diagnostics and check if the device is listed
4. Create an issue on GitHub with your diagnostics file
### The integration says "Failed to connect"
- Verify the HCU's IP address is correct
- Ensure Developer Mode is enabled on the HCU
- Check "Expose the Connect API WebSocket" is enabled
- Verify ports 6969 and 9001 are accessible
- Try accessing the HCU web interface from the same machine running Home Assistant
### Can I control the HCU itself (reboot, updates, etc.)?
No, this integration only controls devices connected to the HCU. HCU management must be done through the HCU web interface.
---
## ⏱️ Use Internal On Time
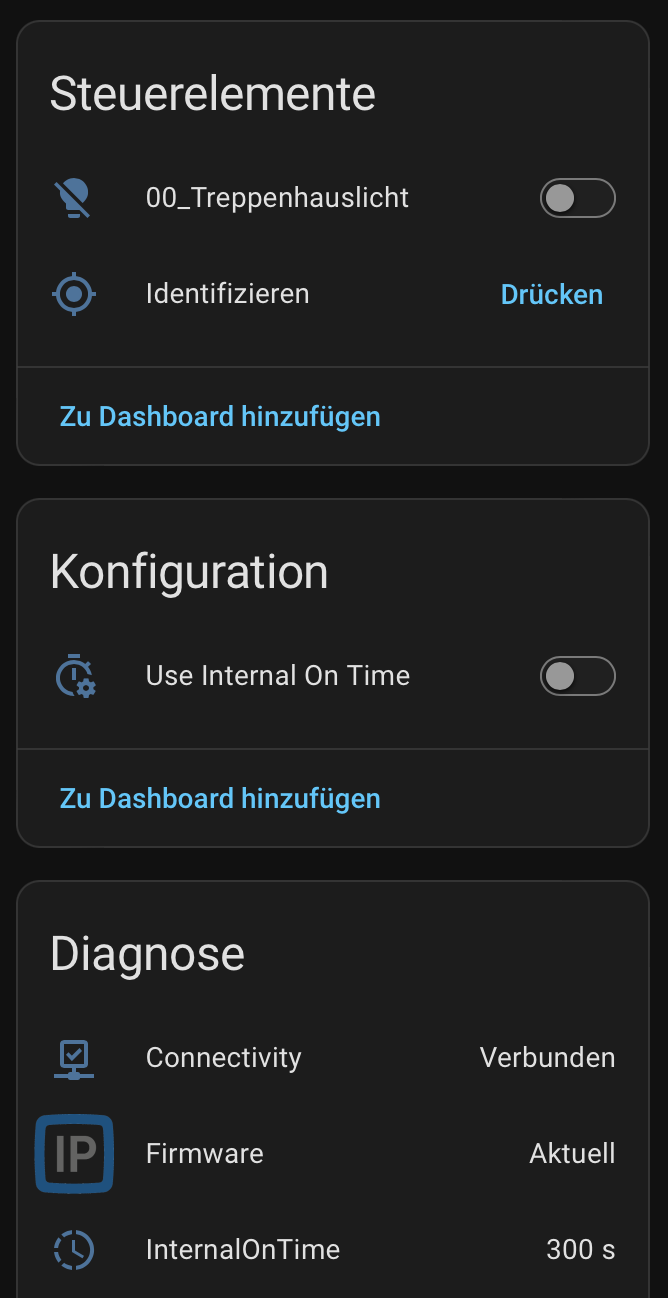
Some switch and light channels in the Homematic IP app allow you to configure an **on-time** for the internal button — the duration after which the device turns itself off automatically.
This integration exposes a **"Use Internal On Time"** config switch entity per channel. When enabled, any `turn_on` command sent through Home Assistant will pass the configured `onTime` to the device, causing it to switch off automatically after the set duration — without needing a separate timer or automation.
**Typical use cases:**
- Staircase lighting (e.g. HmIP-DRSI1)
- Water valves (e.g. HmIP-MOD-OC8)
- Any channel where a fixed on-duration is configured in the Homematic IP app
**Notes:**
- The entity is **disabled by default** and only appears on channels that have an `onTime` value configured in the Homematic IP app.
- Configure the on-time in the Homematic IP app first, then enable the entity in Home Assistant.
- The enabled state is persisted across Home Assistant restarts.
---
## 💡 Ramp Time
Some dimming actor channels support a **ramp time** — the duration in seconds over which the device transitions from its current brightness level to the target level when turning on or off.
This integration exposes a **"Ramp Time"** config number entity per dimming channel. When set to a value greater than `0`, any `turn_on` or `turn_off` command sent through Home Assistant will automatically pass the configured duration as `rampTime` to the device — without needing an explicit `transition` value in every service call.
**Typical use cases:**
- Soft fade-in/fade-out for ceiling or ambient lights
- Consistent transition behaviour across automations and dashboards without per-call configuration
**Notes:**
- The entity is **disabled by default**. Enable it in Home Assistant for the channels where you want a fixed ramp time.
- Valid range: `0.1–16383` seconds. A value of `0` disables the feature (no ramp time is passed to the device).
- If a service call already includes an explicit `transition` value, that value always takes precedence over the configured ramp time.
- The configured value is persisted across Home Assistant restarts.
---
## 💬 Support
- **Issues & Bug Reports:** [GitHub Issues](https://github.com/Ediminator/hacs-homematicip-hcu/issues)
- **Discussions:** [GitHub Discussions](https://github.com/Ediminator/hacs-homematicip-hcu/discussions)
**When asking for help:**
1. Always include your Home Assistant version
2. Include your integration version
3. Attach diagnostics file when possible
4. Enable debug logging and include relevant log excerpts
5. Clearly describe what you expected vs. what happened
---
## 📜 License
This project is provided as-is for personal use. Please check the repository for license details.
---
## 🙏 Credits
Created and maintained by [@Ediminator](https://github.com/Ediminator)
Special thanks to all contributors and users who provide diagnostics files and feedback to improve the integration!
---
**Remember:** When in doubt, download diagnostics - it makes troubleshooting much faster! 🚀