https://github.com/ediwang/elf
The ASP.NET Core URL forward service runs on Microsoft Azure
https://github.com/ediwang/elf
asp-net-core azure azure-app-service blazor-webassembly dotnet-core
Last synced: over 1 year ago
JSON representation
The ASP.NET Core URL forward service runs on Microsoft Azure
- Host: GitHub
- URL: https://github.com/ediwang/elf
- Owner: EdiWang
- License: mit
- Created: 2019-06-05T02:23:59.000Z (about 7 years ago)
- Default Branch: master
- Last Pushed: 2025-03-27T13:05:41.000Z (over 1 year ago)
- Last Synced: 2025-04-01T23:35:55.601Z (over 1 year ago)
- Topics: asp-net-core, azure, azure-app-service, blazor-webassembly, dotnet-core
- Language: C#
- Homepage: https://go.edi.wang
- Size: 5.04 MB
- Stars: 80
- Watchers: 6
- Forks: 22
- Open Issues: 3
-
Metadata Files:
- Readme: README.md
- License: LICENSE
Awesome Lists containing this project
README
# Elf
[](https://github.com/EdiWang/Elf/actions/workflows/docker-api.yml)

The link forward service used by https://go.edi.wang. It generates static URLs for redirecting third party URLs. It's similar to, but **NOT a URL shorter**.
- Use a static token to adapt changes to origin url.
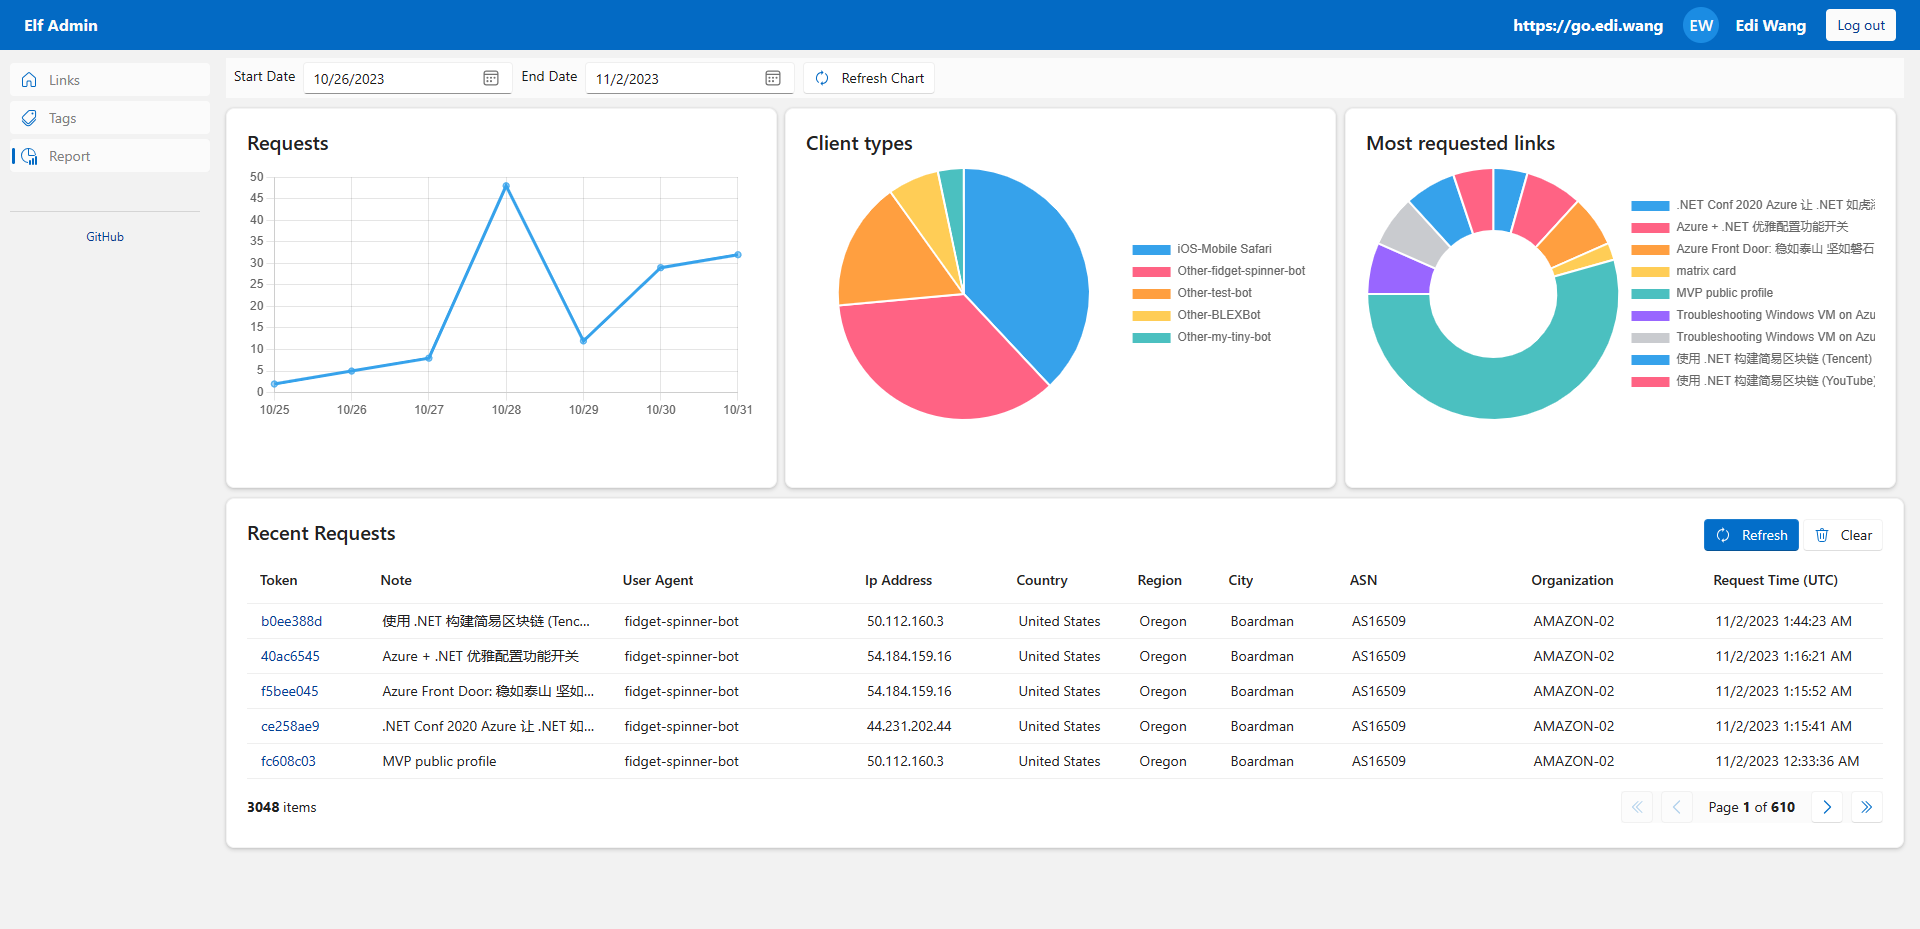
- Track user click to generate report.
e.g.:
Raw URL:
```
https://www.somewebsite.com/a-very-long-and-complicated-link-that-can-also-change?with=parameters
```
will be translate to `https://yourdomain/fw/token` or `https://yourdomain/aka/name`
## Features
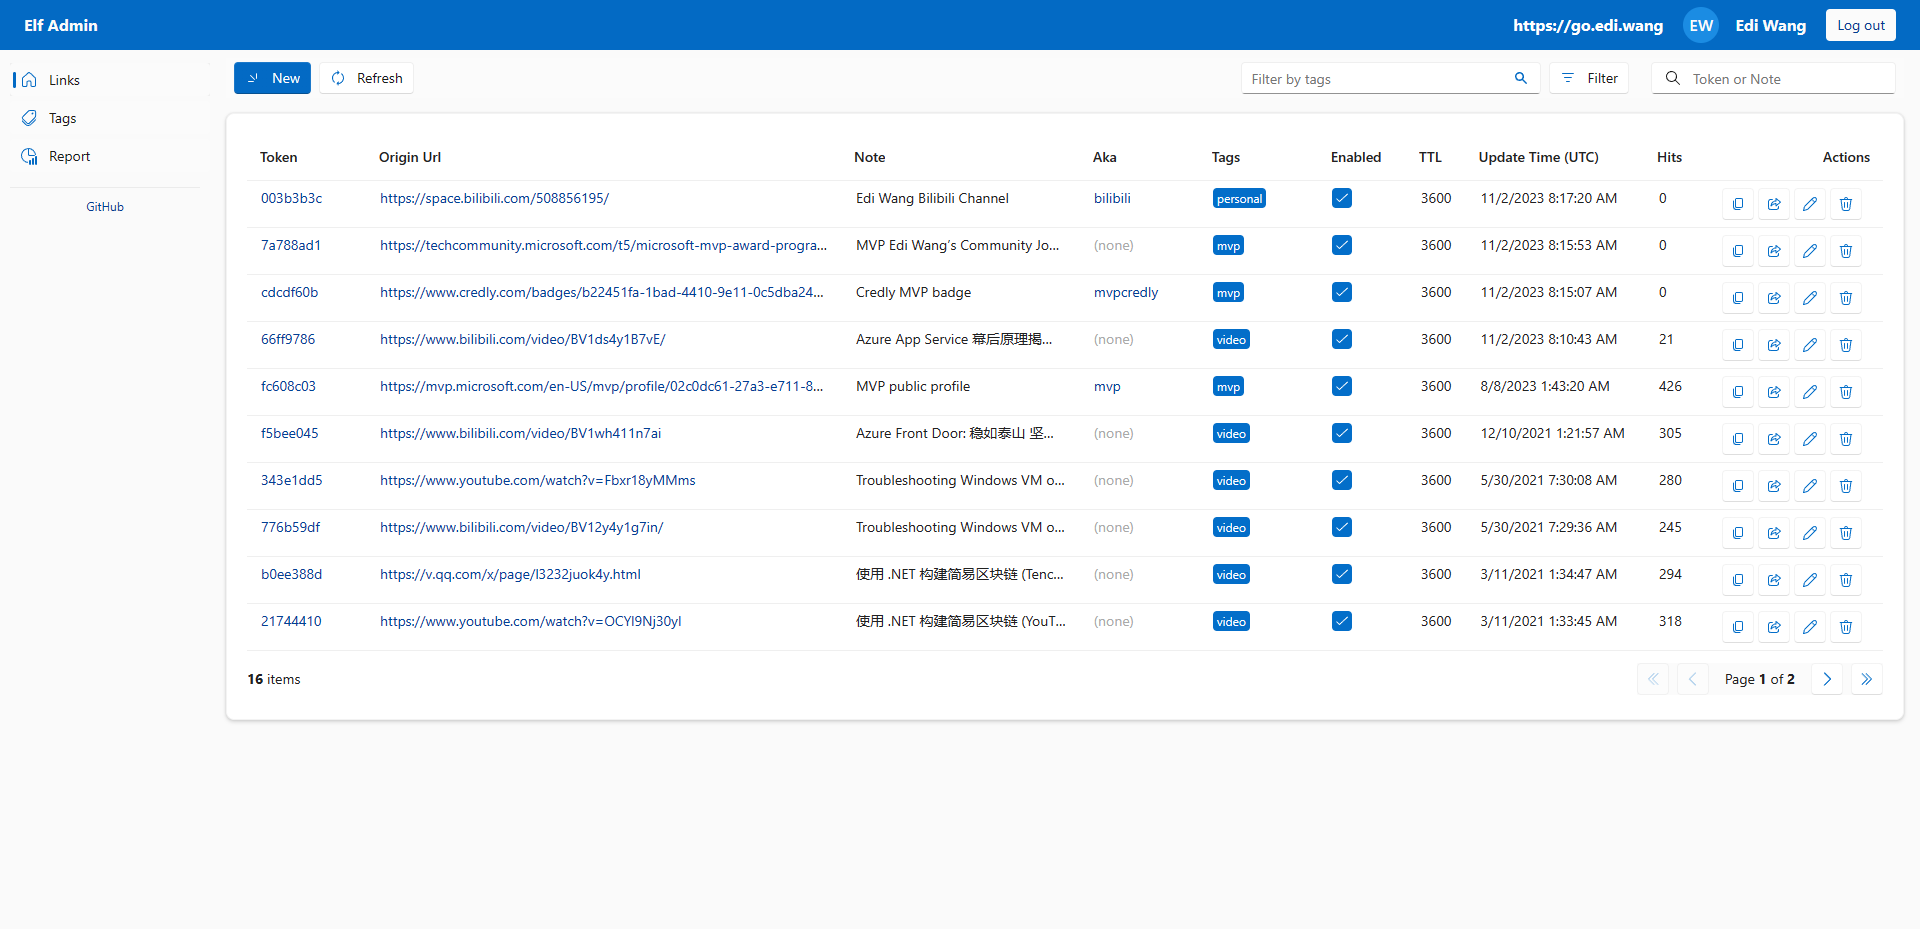
Forward Link, Create/Manage/Share Link, View Report.
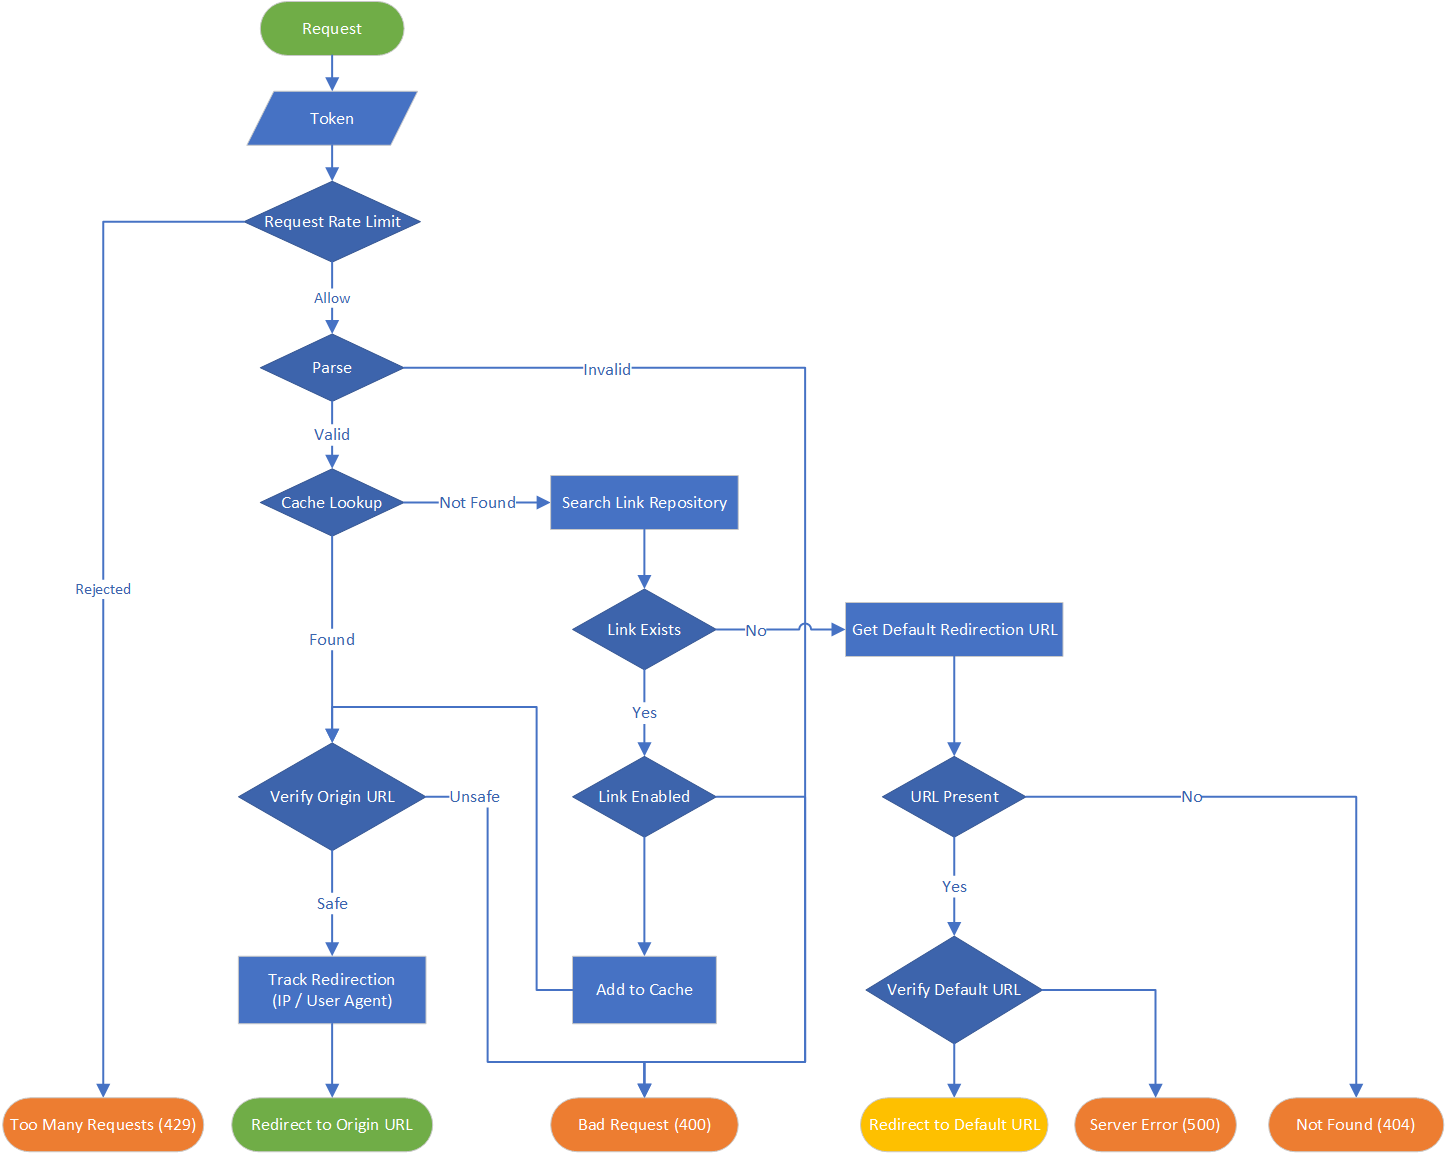
## Forward Logic
## Docker Deployment
https://hub.docker.com/r/ediwang/elf
You can also follow the next section to build and run the project yourself.
## Build and Run API
Tools | Alternative
--- | ---
[.NET 9 SDK](http://dot.net) | N/A
[Visual Studio 2022](https://visualstudio.microsoft.com/) | [Visual Studio Code](https://code.visualstudio.com/)
[Azure SQL Database](https://azure.microsoft.com/en-us/services/sql-database/) | [SQL Server 2022](https://www.microsoft.com/en-us/sql-server/sql-server-2022) / LocalDB (Dev Only)
For a quick Azure deployment, you can use the automation script ```Azure-Deployment\Deploy.ps1``` to setup a ready-to-run Elf in a couple of minutes. (Azure CLI is required to run the script)
### Setup Database
[Create an Azure SQL Database](https://docs.microsoft.com/en-us/azure/sql-database/sql-database-single-database-get-started?WT.mc_id=AZ-MVP-5002809) or a SQL Server 2019+ database. e.g. elf
Update the connection string "**ElfDatabase**" in **appsettings.[env].json**
```json
"ConnectionStrings": {
"ElfDatabase": "Server=(localdb)\\MSSQLLocalDB;Database=elf;Trusted_Connection=True;"
}
```
### Build Source
Build and run `./src/API/Elf.sln`
### Authentication
Register an App in **[Microsoft Entra ID (Azure Active Directory)]((https://azure.microsoft.com/en-us/services/active-directory/))**
- Set an **Application ID URI** as unique for this app
- Expose an API with name `access_as_user` and with **Admins and users** type
- Change `accessTokenAcceptedVersion` to `2` in Manifest blade
- Copy "**appId**" to set as **EntraID:ClientId** in **appsettings.json** file
```json
"EntraID": {
"Domain": "{YOUR-VALUE}",
"TenantId": "{YOUR-VALUE}",
"ClientId": "{YOUR-VALUE}",
}
```
### Azure Cache for Redis (Optional)
To use Redis, follow these steps:
1. Create an [Azure Cache for Redis instance](https://docs.microsoft.com/en-us/azure/azure-cache-for-redis/cache-overview?WT.mc_id=AZ-MVP-5002809)
2. Copy the connection string in "Access keys"
3. Set the connection string in `ConnectionStrings:RedisConnection` in `appsettings.json` or environment variable
4. Restart the application
## Build and Run Admin Portal
### Pre-requests
- Visual Studio / VSCode / .NET CLI or any editor you like
### Configure Microsoft Entra ID
1. Navigate to the [Azure portal](https://portal.azure.com) and select the **Microsoft Entra ID** service.
2. Select **New registration**.
3. In the **Register an application page**, enter your application's information:
- In the **Name** section, for example `elf-admin`.
- Under **Supported account types**, select **Accounts in this organizational directory only**.
- In the **Redirect URI (optional)** section, select **Single-page application** and enter redirect URI: `https://localhost:7160/authentication/login-callback` for local debug and whatever URL you use in production.
4. Select **Register** to create the application.
5. In the app's registration screen, find and note the **Application (client) ID**.
6. In the app's registration screen, click on the **API permissions** blade.
- Click the **Add a permission** button and then,
- Ensure that the **My APIs** tab is selected.
- In the list of APIs, select the API you created.
- In the **Delegated permissions** section, select the **access_as_user** in the list.
- Click on the **Add permissions**.
### Configure API endpoint
1. Open `./src/Admin/Constants.cs`, replace `APIAddress`, `APIAppUrlGuid` with your own values.
2. Open `./src/Admin/wwwroot/appsettings.json`, replace `Authority`, `ClientId` with your own values.
### Run
```bash
cd ./src/Admin/
dotnet run
```