https://github.com/elementtech/kgaming
https://github.com/elementtech/kgaming
Last synced: 3 months ago
JSON representation
- Host: GitHub
- URL: https://github.com/elementtech/kgaming
- Owner: ElementTech
- Created: 2024-01-31T18:15:31.000Z (over 2 years ago)
- Default Branch: main
- Last Pushed: 2024-04-20T21:24:06.000Z (about 2 years ago)
- Last Synced: 2025-03-14T18:48:57.725Z (over 1 year ago)
- Language: HCL
- Size: 112 KB
- Stars: 0
- Watchers: 1
- Forks: 0
- Open Issues: 1
-
Metadata Files:
- Readme: README.md
Awesome Lists containing this project
README
# ArgoCD on Amazon EKS
This tutorial guides you through deploying an Amazon EKS cluster with addons configured via ArgoCD, employing the [GitOps Bridge Pattern](https://github.com/gitops-bridge-dev).
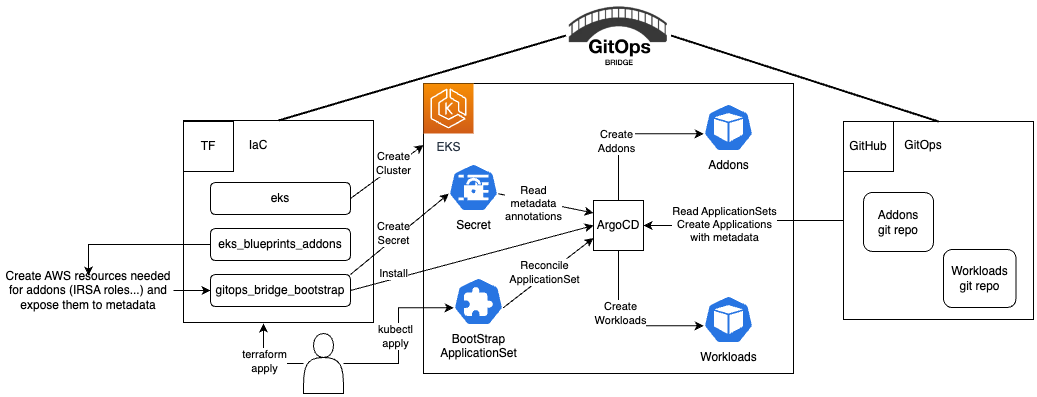
The [GitOps Bridge Pattern](https://github.com/gitops-bridge-dev) enables Kubernetes administrators to utilize Infrastructure as Code (IaC) and GitOps tools for deploying Kubernetes Addons and Workloads. Addons often depend on Cloud resources that are external to the cluster. The configuration metadata for these external resources is required by the Addons' Helm charts. While IaC is used to create these cloud resources, it is not used to install the Helm charts. Instead, the IaC tool stores this metadata either within GitOps resources in the cluster or in a Git repository. The GitOps tool then extracts these metadata values and passes them to the Helm chart during the Addon installation process. This mechanism forms the bridge between IaC and GitOps, hence the term "GitOps Bridge."
Additional examples available on the [GitOps Bridge Pattern](https://github.com/gitops-bridge-dev):
- [argocd-ingress](https://github.com/gitops-bridge-dev/gitops-bridge/tree/main/argocd/iac/terraform/examples/eks/argocd-ingress)
- [aws-secrets-manager](https://github.com/gitops-bridge-dev/gitops-bridge/tree/main/argocd/iac/terraform/examples/eks/aws-secrets-manager)
- [crossplane](https://github.com/gitops-bridge-dev/gitops-bridge/tree/main/argocd/iac/terraform/examples/eks/crossplane)
- [external-secrets](https://github.com/gitops-bridge-dev/gitops-bridge/tree/main/argocd/iac/terraform/examples/eks/external-secrets)
- [multi-cluster/distributed](https://github.com/gitops-bridge-dev/gitops-bridge/tree/main/argocd/iac/terraform/examples/eks/multi-cluster/distributed)
- [multi-cluster/hub-spoke](https://github.com/gitops-bridge-dev/gitops-bridge/tree/main/argocd/iac/terraform/examples/eks/multi-cluster/hub-spoke)
- [multi-cluster/hub-spoke-shared](https://github.com/gitops-bridge-dev/gitops-bridge/tree/main/argocd/iac/terraform/examples/eks/multi-cluster/hub-spoke-shared)
- [private-git](https://github.com/gitops-bridge-dev/gitops-bridge/tree/main/argocd/iac/terraform/examples/eks/private-git)
## Prerequisites
Before you begin, make sure you have the following command line tools installed:
- git
- terraform
- kubectl
- argocd
## (Optional) Fork the GitOps git repositories
See the appendix section [Fork GitOps Repositories](#fork-gitops-repositories) for more info on the terraform variables to override.
## Deploy the EKS Cluster
Initialize Terraform and deploy the EKS cluster:
```shell
terraform init
terraform apply -target="module.vpc" -auto-approve
terraform apply -target="module.eks" -auto-approve
terraform apply -auto-approve
```
To retrieve `kubectl` config, execute the terraform output command:
```shell
terraform output -raw configure_kubectl
```
The expected output will have two lines you run in your terminal
```text
export KUBECONFIG="/tmp/getting-started-gitops"
aws eks --region us-east-1 update-kubeconfig --name getting-started-gitops
```
>The first line sets the `KUBECONFIG` environment variable to a temporary file
that includes the cluster name. The second line uses the `aws` CLI to populate
that temporary file with the `kubectl` configuration. This approach offers the
advantage of not altering your existing `kubectl` context, allowing you to work
in other terminal windows without interference.
Terraform will add GitOps Bridge Metadata to the ArgoCD secret.
The annotations contain metadata for the addons' Helm charts and ArgoCD ApplicationSets.
```shell
kubectl get secret -n argocd -l argocd.argoproj.io/secret-type=cluster -o json | jq '.items[0].metadata.annotations'
```
The output looks like the following:
```json
{
"addons_repo_basepath": "argocd/",
"addons_repo_path": "bootstrap/control-plane/addons",
"addons_repo_revision": "main",
"addons_repo_url": "https://github.com/aws-samples/eks-blueprints-add-ons",
"aws_account_id": "0123456789",
"aws_cluster_name": "getting-started-gitops",
"aws_load_balancer_controller_iam_role_arn": "arn:aws:iam::0123456789:role/alb-controller",
"aws_load_balancer_controller_namespace": "kube-system",
"aws_load_balancer_controller_service_account": "aws-load-balancer-controller-sa",
"aws_region": "us-west-2",
"aws_vpc_id": "vpc-001d3f00151bbb731",
"cluster_name": "in-cluster",
"environment": "dev",
"workload_repo_basepath": "patterns/gitops/",
"workload_repo_path": "getting-started-argocd/k8s",
"workload_repo_revision": "main",
"workload_repo_url": "https://github.com/csantanapr/terraform-aws-eks-blueprints"
}
```
The labels offer a straightforward way to enable or disable an addon in ArgoCD for the cluster.
```shell
kubectl get secret -n argocd -l argocd.argoproj.io/secret-type=cluster -o json | jq '.items[0].metadata.labels' | grep -v false | jq .
```
The output looks like the following:
```json
{
"argocd.argoproj.io/secret-type": "cluster",
"aws_cluster_name": "getting-started-gitops",
"cluster_name": "in-cluster",
"enable_argocd": "true",
"enable_aws_load_balancer_controller": "true",
"enable_metrics_server": "true",
"environment": "dev",
"kubernetes_version": "1.28"
}
```
## Deploy the Addons
Bootstrap the addons using ArgoCD:
```shell
kubectl apply -f bootstrap/addons.yaml
```
### Monitor GitOps Progress for Addons
Wait until all the ArgoCD applications' `HEALTH STATUS` is `Healthy`.
Use `Ctrl+C` or `Cmd+C` to exit the `watch` command. ArgoCD Applications
can take a couple of minutes in order to achieve the Healthy status.
```shell
kubectl get applications -n argocd -w
```
The expected output should look like the following:
```text
NAME SYNC STATUS HEALTH STATUS
addon-in-cluster-argo-cd Synced Healthy
addon-in-cluster-aws-load-balancer-controller Synced Healthy
addon-in-cluster-metrics-server Synced Healthy
cluster-addons Synced Healthy
```
### Verify the Addons
Verify that the addons are ready:
```shell
kubectl get deployment -n kube-system \
aws-load-balancer-controller \
metrics-server
kubectl get deploy -n argocd \
argo-cd-argocd-applicationset-controller \
argo-cd-argocd-repo-server \
argo-cd-argocd-server
```
The expected output should look like the following:
```text
NAME READY UP-TO-DATE AVAILABLE AGE
aws-load-balancer-controller 2/2 2 2 7m21s
metrics-server 1/1 1 1 7m41s
argo-cd-argocd-applicationset-controller 1/1 1 1 109m
argo-cd-argocd-repo-server 1/1 1 1 109m
argo-cd-argocd-server 1/1 1 1 109m
```
## (Optional) Access ArgoCD
Access to the ArgoCD's UI is completely optional, if you want to do it,
run the commands shown in the Terraform output as the example below:
```shell
terraform output -raw access_argocd
```
The expected output should contain the `kubectl` config followed by `kubectl` command to retrieve
the URL, username, password to login into ArgoCD UI or CLI.
```text
echo "ArgoCD Username: admin"
echo "ArgoCD Password: $(kubectl get secrets argocd-initial-admin-secret -n argocd --template="{{index .data.password | base64decode}}")"
echo "ArgoCD URL: https://$(kubectl get svc -n argocd argo-cd-argocd-server -o jsonpath='{.status.loadBalancer.ingress[0].hostname}')"
```
## Deploy the Workloads
Deploy a sample application located in [k8s/game-2048.yaml](k8s/game-2048.yaml) using ArgoCD:
```shell
kubectl apply -f bootstrap/workloads.yaml
```
### Monitor GitOps Progress for Workloads
Wait until all the ArgoCD applications' `HEALTH STATUS` is `Healthy`.
Use `Ctrl+C` or `Cmd+C` to exit the `watch` command. ArgoCD Applications
can take a couple of minutes in order to achieve the Healthy status.
```shell
watch kubectl get -n argocd applications workloads
```
The expected output should look like the following:
```text
NAME SYNC STATUS HEALTH STATUS
workloads Synced Healthy
```
### Verify the Application
Verify that the application configuration is present and the pod is running:
```shell
kubectl get -n game-2048 deployments,service,ep,ingress
```
The expected output should look like the following:
```text
NAME READY UP-TO-DATE AVAILABLE AGE
deployment.apps/game-2048 1/1 1 1 7h59m
NAME TYPE CLUSTER-IP EXTERNAL-IP PORT(S) AGE
service/game-2048 ClusterIP 172.20.155.47 80/TCP 7h59m
NAME ENDPOINTS AGE
endpoints/game-2048 10.0.13.64:80 7h59m
NAME CLASS HOSTS ADDRESS PORTS AGE
ingress/game-2048 alb * k8s-<>.us-west-2.elb.amazonaws.com 80 7h59m
```
AWS Load Balancer can take a couple of minutes in order to be created.
Run the following command and wait until and event for ingress `game-2048` contains `Successfully reconciled`.
Use `Ctrl+C` or `Cmd+C`to exit the `watch` command.
```shell
kubectl events -n game-2048 --for ingress/game-2048 --watch
```
The expected output should look like the following:
```text
LAST SEEN TYPE REASON OBJECT MESSAGE
11m Normal SuccessfullyReconciled Ingress/game-2048 Successfully reconciled
```
### Access the Application using AWS Load Balancer
Verify the application endpoint health using `wget`:
```shell
kubectl exec -n game-2048 deploy/game-2048 -- \
wget -S --spider $(kubectl get -n game-2048 ingress game-2048 -o jsonpath='{.status.loadBalancer.ingress[0].hostname}')
```
The expected output should look like the following:
```text
HTTP/1.1 200 OK
Date: Wed, 01 Nov 2023 22:44:57 GMT
Content-Type: text/html
Content-Length: 3988
```
>A success response should contain `HTTP/1.1 200 OK`.
Retrieve the ingress URL to access the application in your local web browser.
```shell
echo "Application URL: http://$(kubectl get -n game-2048 ingress game-2048 -o jsonpath='{.status.loadBalancer.ingress[0].hostname}')"
```
### Container Metrics
Check the application's CPU and memory metrics:
```shell
kubectl top pods -n game-2048
```
The expected output should look like the following:
```text
NAME CPU(cores) MEMORY(bytes)
game-2048-66fb78b995-hqbjv 1m 2Mi
```
Check the CPU and memory metrics for all pods for Addons and Workloads:
```shell
kubectl top pods -A
```
The expected output should look like the following:
```text
NAMESPACE NAME CPU(cores) MEMORY(bytes)
argocd argo-cd-argocd-application-controller-0 43m 138Mi
argocd argo-cd-argocd-applicationset-controller-5db688844c-79skp 1m 25Mi
argocd argo-cd-argocd-dex-server-cd48d7bc-x7flf 1m 16Mi
argocd argo-cd-argocd-notifications-controller-7d7ccc6b9d-dg9r6 1m 17Mi
argocd argo-cd-argocd-redis-7f89c69877-6mmcj 2m 3Mi
argocd argo-cd-argocd-repo-server-644b9b5668-m9ddg 8m 62Mi
argocd argo-cd-argocd-server-57cbbd6f94-lp4wx 2m 26Mi
game-2048 game-2048-66fb78b995-hqbjv 1m 2Mi
kube-system aws-load-balancer-controller-8488df87c-4nxv6 2m 26Mi
kube-system aws-load-balancer-controller-8488df87c-zs4p6 1m 19Mi
kube-system aws-node-ck6vq 3m 57Mi
kube-system aws-node-fvvsg 3m 56Mi
kube-system coredns-59754897cf-5rlxp 1m 13Mi
kube-system coredns-59754897cf-fn7jb 1m 13Mi
kube-system kube-proxy-lzbdc 1m 11Mi
kube-system kube-proxy-pdvlm 1m 12Mi
kube-system metrics-server-5b76987ff-5gzsv 4m 17Mi
```
## Destroy the EKS Cluster
To tear down all the resources and the EKS cluster, run the following command:
```shell
./destroy.sh
```
## Appendix
## Fork GitOps Repositories
To modify the `values.yaml` file for addons or the workload manifest files (.ie yaml), you'll need to fork two repositories: [aws-samples/eks-blueprints-add-ons](https://github.com/aws-samples/eks-blueprints-add-ons) for addons and [github.com/aws-ia/terraform-aws-eks-blueprints](https://github.com/aws-ia/terraform-aws-eks-blueprints) for workloads located in this pattern directory.
After forking, update the following environment variables to point to your forks, replacing the default values.
```shell
export TF_VAR_gitops_addons_org=https://github.com/aws-samples
export TF_VAR_gitops_addons_repo=eks-blueprints-add-ons
export TF_VAR_gitops_addons_revision=main
export TF_VAR_gitops_workload_org=https://github.com/aws-ia
export TF_VAR_gitops_workload_repo=terraform-aws-eks-blueprints
export TF_VAR_gitops_workload_revision=main
```