https://github.com/erisa/discord-oidc-worker
Sign into Discord on Cloudflare Access, powered by Cloudflare Workers!
https://github.com/erisa/discord-oidc-worker
cloudflare-access cloudflare-workers discord oauth2 oidc-provider workers zero-trust
Last synced: 3 months ago
JSON representation
Sign into Discord on Cloudflare Access, powered by Cloudflare Workers!
- Host: GitHub
- URL: https://github.com/erisa/discord-oidc-worker
- Owner: Erisa
- License: mit
- Created: 2022-12-24T03:25:06.000Z (over 2 years ago)
- Default Branch: main
- Last Pushed: 2025-02-02T19:42:54.000Z (5 months ago)
- Last Synced: 2025-03-28T16:07:02.224Z (4 months ago)
- Topics: cloudflare-access, cloudflare-workers, discord, oauth2, oidc-provider, workers, zero-trust
- Language: JavaScript
- Homepage:
- Size: 92.8 KB
- Stars: 168
- Watchers: 2
- Forks: 29
- Open Issues: 5
-
Metadata Files:
- Readme: README.md
- License: LICENSE
Awesome Lists containing this project
README
# Discord OIDC Provider for Cloudflare Access
Simply put: Allows you to authorise with Cloudflare Access using your Discord account via a Cloudflare Worker. Wraps OIDC around the Discord OAuth2 API to achieve this, storing signing keys in KV.
Process flow was inspired by [kimcore/discord-oidc](https://github.com/kimcore/discord-oidc) but rewritten entirely for [Cloudflare Workers](https://workers.cloudflare.com/) and [Hono](https://honojs.dev/).
Some ideas were also taken from [eidam/cf-access-workers-oidc](https://github.com/eidam/cf-access-workers-oidc).
Show them some love!
## Setup
Requirements:
- A Cloudflare Access account - make sure you've gone through the onboarding flow and have a `NAME.cloudflareaccess.com` subddomain.
- A [Discord developer application](https://discord.com/developers/applications) to use for OAuth2.
- Add a redirect URI `https://YOURNAME.cloudflareaccess.com/cdn-cgi/access/callback` to the Discord application.
- An installation of Node.js
Steps:
- Clone the repository and `cd` into it: `git clone https://github.com/Erisa/discord-oidc-worker.git && cd discord-oidc-worker`
- Install dependencies: `npm install`
- Create a KV namespace on Cloudflare [here](https://dash.cloudflare.com/?to=/:account/workers/kv/namespaces).
- Edit `wrangler.toml` to use your new KV namespace ID.
- Copy `config.sample.json` to `config.json`.
- Add your Discord application ID and OAuth2 secret to `config.json`.
- Edit your Cloudflare Access subdomain into `config.json` under `redirectURL`. This should be the same URL you added to Discord.
- Publish the Worker with `npx wrangler publish`!
## Usage
- Go to the [Cloudflare Zero Trust dashboard](https://one.dash.cloudflare.com)
- Navigate to Settings > Authentication, select "Add new" under Login methods, select OpenID Connect.
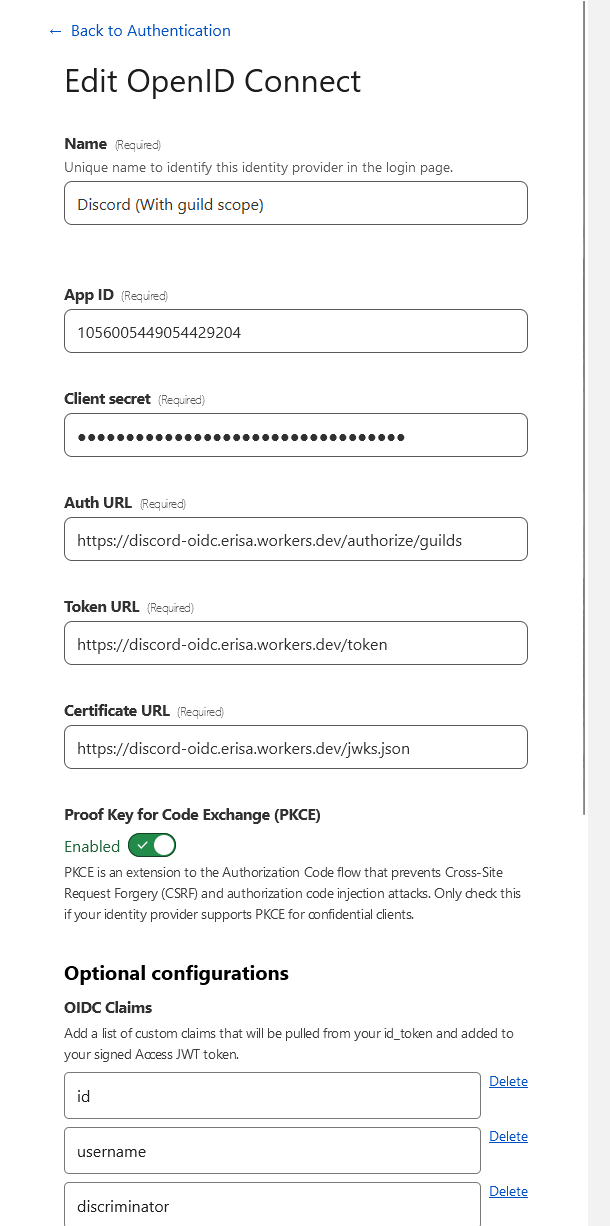
- Fill the following fields:
- Name: Whatever you want, e.g. `Discord`
- App ID: Your Discord application ID.
- Client secret: Your Discord application OAuth2 secret.
- Auth URL: `https://discord-oidc.YOURNAME.workers.dev/authorize/email` or swap out `/email` for `/guilds` to include the Guilds scope.
- Token URL: `https://discord-oidc.YOURNAME.workers.dev/token`
- Certificate URL: `https://discord-oidc.YOURNAME.workers.dev/jwks.json`
- Proof Key for Code Exchange (PKCE): Enabled
- OIDC Claims:
- Email is included automatically without being set here.
- It would be recommended to add `id` here, as the users unique Discord user ID.
- `preferred_username` will map to the users username and discrim if they have one e.g. `Erisa#9999` or `erisachu`
- `name` will map to the non-unique Display Name of the user, or username if there is none. E.g. `Erisa`. Basically a safer form of `global_name`, which might sometimes be null.
- If the Auth URL is `/guilds` then the `guilds` claim can be used to provide a list of guild IDs.
- Anything else from here will work: https://discord.com/developers/docs/resources/user#user-object-user-structure
- See the Examples section below for help with constructing policies.
## Usage with roles
- Follow the above setup, making sure to use the `/guilds` auth URL.
- Create a Discord Bot for the OAuth2 application, generate an OAuth2 URL with the `bot` scope and use it to invite the bot to your server.
- The bot does not need any permissions, it just needs to exist in the server.
- Generate a bot token and paste it into `npx wrangler secret put DISCORD_TOKEN`.
- Populate `config.json` with a list of server IDs that you wish to check user roles for. **Make sure the bot is a member of all servers in this list**.
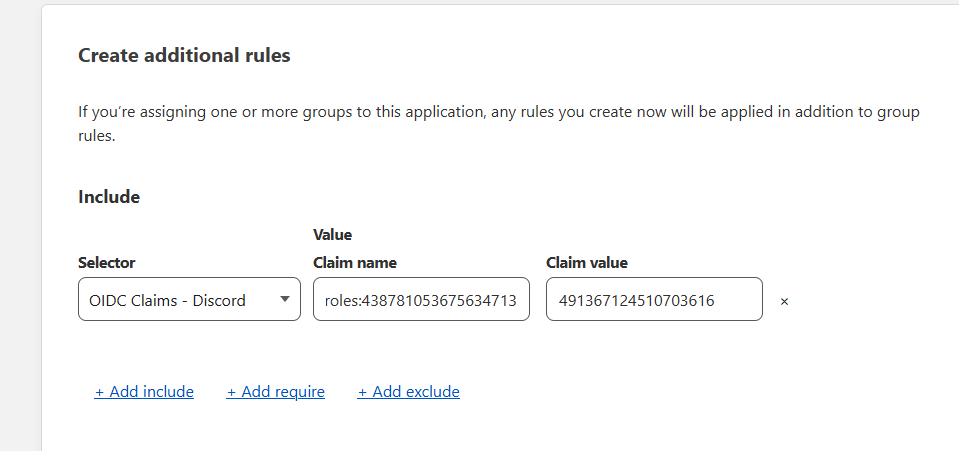
- Edit the OIDC provider in Cloudflare Access and add the server IDs as claims prefixed with `roles:`, e.g. `roles:438781053675634713`
- When creating a policy, reference the `roles:` claims as the name, and use the role ID as the claim value. This will match users in that server who have that role.
Example config for a roles setup:
```json
{
"clientId": "1056005449054429204",
"clientSecret": "aaaaaaaaaaaaa",
"redirectURL": "https://erisa.cloudflareaccess.com/cdn-cgi/access/callback",
"serversToCheckRolesFor": [
"438781053675634713"
]
}
```
## Examples
My setup, as an example:


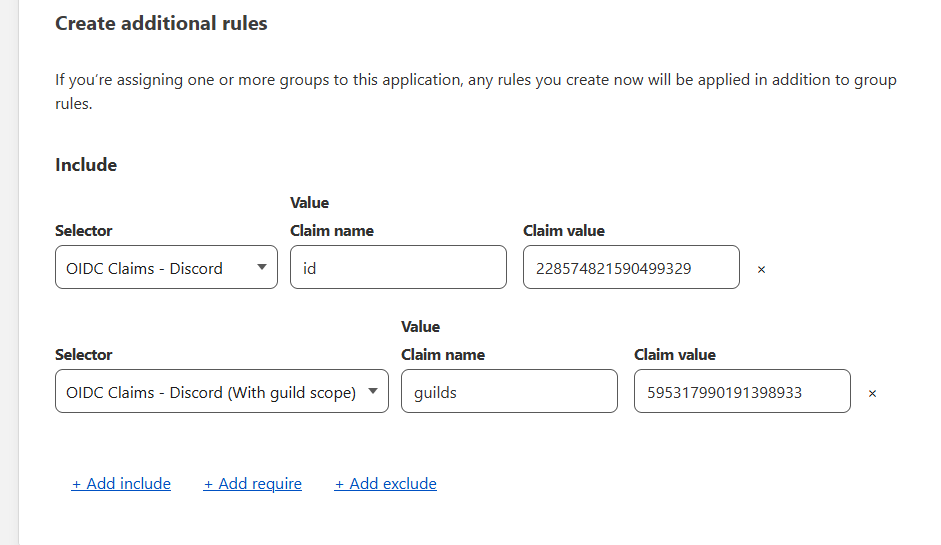
To use this in a policy, simply enable it as an Identity provider in your Access application and then create a rule using `OIDC Claims` and the relevant claim above. Make sure the claim has been added to your provider in the steps above.
With roles:

This example would allow me to access the application if I was myself on Discord or if I was a member of a specific server:

## Security
If you find a security vulnerability in this repository, do NOT create an Issue or Pull Request. Please contact me through email or message (There are links on my GitHub profile). If you create an issue for an active security vulnerability I will save the information and delete the issue.
Alternatively, you can try out a new GitHub feature for Security Advisories: https://github.com/Erisa/discord-oidc-worker/security