https://github.com/ermjs/electron-starter
This Electron starter application is designed to help beginners get started with Electron development. It includes improved security codes, a ready IPC communication setup, the Material Icons library, and the Bulma.css framework. With these features, you can quickly build a secure and modern desktop application using web technologies.
https://github.com/ermjs/electron-starter
electron electron-ipc-async electron-ipc-communication javascript nodejs
Last synced: about 1 month ago
JSON representation
This Electron starter application is designed to help beginners get started with Electron development. It includes improved security codes, a ready IPC communication setup, the Material Icons library, and the Bulma.css framework. With these features, you can quickly build a secure and modern desktop application using web technologies.
- Host: GitHub
- URL: https://github.com/ermjs/electron-starter
- Owner: ermjs
- License: mit
- Created: 2023-09-28T13:41:02.000Z (over 2 years ago)
- Default Branch: main
- Last Pushed: 2025-03-27T08:59:39.000Z (about 1 year ago)
- Last Synced: 2025-07-08T22:03:20.943Z (12 months ago)
- Topics: electron, electron-ipc-async, electron-ipc-communication, javascript, nodejs
- Language: JavaScript
- Homepage:
- Size: 580 KB
- Stars: 0
- Watchers: 1
- Forks: 0
- Open Issues: 0
-
Metadata Files:
- Readme: README.md
- License: LICENSE
Awesome Lists containing this project
README
# Electron Starter


This is a starter Electron application that is great for beginners who want to get started with Electron development. It includes the following features:
- Improved security codes
- Ready IPC communication setup
- Material Icons library
- Bulma.css framework
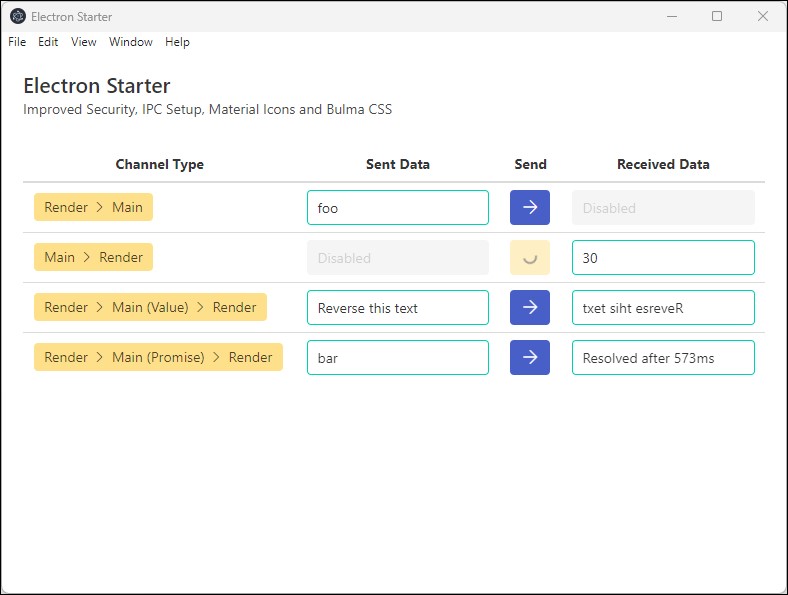
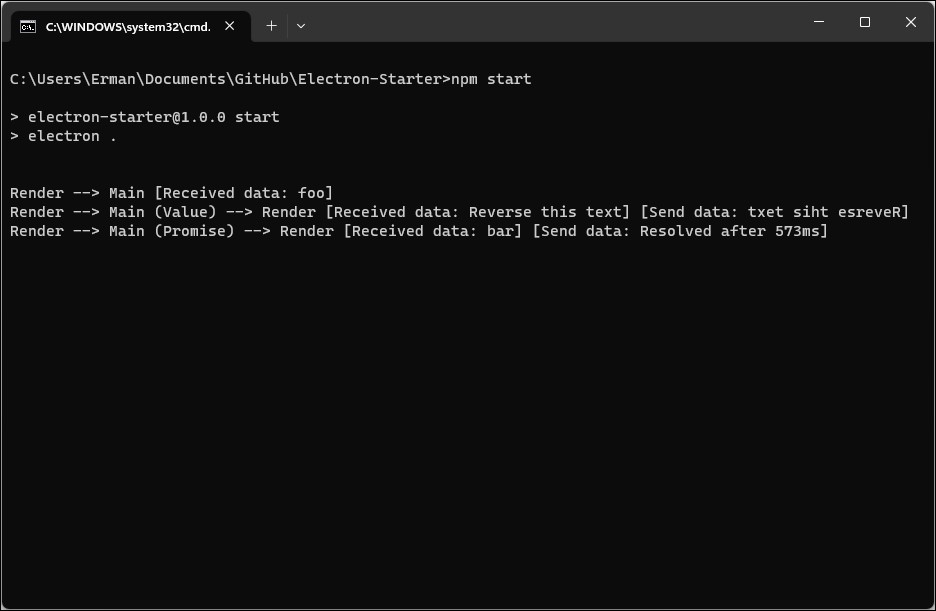
## Screenshots
Here are some screenshots of the Electron Starter:
## Getting Started
To get started with this application, simply clone the repository and run the following commands:
```bash
git clone https://github.com/ermjs/Electron-Starter.git
cd Electron-Starter
npm install
npm start
```
This will install all the necessary dependencies and start the application.
## Features
### Improved Security Codes
This application includes improved security codes to help keep your application secure.
In `main.js` file check for `nodeIntegration` and `contextIsolation` properties.
Search these settings for better understanding about Electron security.
### Ready IPC Communication Setup
The application also includes a ready IPC communication setup, which makes it easy to communicate between the main process and the renderer process.
Check `channels` in `main.js`, `preload.js` and `renderer.js` these communication technique will lead you to use correct way of understanding IPC communication.
There are 4 different ways to communicate `renderer.js` with `main.js`.
1. Renderer to Main
```js
// renderer.js
window.ipcRender.send('channel-1', data); // Data is optional.
// main.js
ipcMain.on('channel-1', (event, data) => { console.log(data); });
```
2. Main to Renderer
```js
// main.js
mainWindow.webContents.send('channel-2', data); // Data is optional.
// renderer.js
window.ipcRender.receive('channel-2', (data) => { console.log(data); });
```
3. Renderer to Main (Value) return to Renderer
```js
// renderer.js
window.ipcRender.invoke('channel-3', data).then((result) => { console.log(result); });
// main.js
ipcMain.handle('channel-3', (event, data) => { return data; });
```
4. Renderer to Main (Promise) return to Renderer
```js
// renderer.js
window.ipcRender.invoke('channel-4', data).then((result) => { console.log(result); });
// main.js
ipcMain.handle('channel-4', async (event, data) => {
const myPromise = new Promise((resolve, reject) => {
setTimeout(() => {
resolve({test: 'foo'});
}, 300);
});
return await myPromise.then((result) => { return result; });
});
```
As a final step you will need to configure `preload.js` file. It is a great way to use `White-listed channels` for ease of use of IPC.
```js
// preload.js
// Import the necessary Electron components
const contextBridge = require('electron').contextBridge;
const ipcRenderer = require('electron').ipcRenderer;
// White-listed channels
const ipc = {
// From render to main
'render': {
'send': [
'channel-1'
],
// From main to render
'receive': [
'channel-2'
],
// From render to main and back again
'sendReceive': [
'channel-3',
'channel-4'
]
}
};
// Exposed protected methods in the render process
contextBridge.exposeInMainWorld(
// Allowed 'ipcRenderer' methods
'ipcRender', {
// From render to main
send: (channel, args) => {
let validChannels = ipc.render.send;
if (validChannels.includes(channel)) {
ipcRenderer.send(channel, args);
}
},
// From main to render
receive: (channel, listener) => {
let validChannels = ipc.render.receive;
if (validChannels.includes(channel)) {
// Deliberately strip event as it includes `sender`
ipcRenderer.on(channel, (event, ...args) => listener(...args));
}
},
// From render to main and back again
invoke: (channel, args) => {
let validChannels = ipc.render.sendReceive;
if (validChannels.includes(channel)) {
return ipcRenderer.invoke(channel, args);
}
}
}
);
```
### Material Icons Library
The Material Icons library is included in this application, which makes it easy to add icons to your application.
Check `navigate_next` usage in `index.html`.
Go to [Material Icons](https://fonts.google.com/icons) page for more icons.
### Bulma.css Framework
The Bulma.css framework is also included in this application, which provides a great starting point for building responsive and modern user interfaces.
### Package and Distribute
I strongly recommend to use `Electron Forge` for packaging.
Install Electron Forge.
```bash
npm install --save-dev @electron-forge/cli
```
Importing an Existing Project.
```bash
npm exec --package=@electron-forge/cli -c "electron-forge import"
```
After installation `Electron Forge` will update `package.json` file.
When you type `npm start`, `Electron Forge Start` will start, not Electron.
So I separate `Electron Start` from `Electron Forge Start`.
Call `npm start` for Electron start.
Call `npm run start-forge` for Electron Forge start.
```js
// package.json
{
"name": "Electron-Starter",
"version": "1.0.0",
"description": "",
"main": "main.js",
"author": "erman999",
"license": "MIT",
"scripts": {
"start": "electron .", // Here
"start-forge": "electron-forge start", // and here
"package": "electron-forge package",
"make": "electron-forge make"
},
"devDependencies": {
"@electron-forge/cli": "^6.4.2",
"@electron-forge/maker-deb": "^6.4.2",
"@electron-forge/maker-rpm": "^6.4.2",
"@electron-forge/maker-squirrel": "^6.4.2",
"@electron-forge/maker-zip": "^6.4.2",
"@electron-forge/plugin-auto-unpack-natives": "^6.4.2",
"electron": "^26.0.0"
},
"dependencies": {
"electron-squirrel-startup": "^1.0.0",
}
}
```
Electron forge will also create `forge.config.js` file for packaging configurations. Here is an example usage of config file.
`packagerConfig.icon` doesn't require file extension. Electron will automatically package your app with correct icon format.
```js
// forge.config.js
module.exports = {
packagerConfig: {
asar: true,
name: 'Electron Starter',
productName: 'Electron Starter',
executableName: 'Electron Starter',
ignore: ['./folderName'],
extraResource: ['./folderName'],
icon: './img/icons/icon'
},
rebuildConfig: {},
makers: [
{
name: '@electron-forge/maker-squirrel',
config: {
setupIcon: './img/icons/icon.ico'
},
},
{
name: '@electron-forge/maker-zip',
platforms: ['win32', 'darwin'],
},
{
name: '@electron-forge/maker-deb',
config: {},
},
{
name: '@electron-forge/maker-rpm',
config: {},
},
],
plugins: [
{
name: '@electron-forge/plugin-auto-unpack-natives',
config: {},
},
],
};
```
When distributing a package for Windows it's recommend to use `Squirrel.Windows` (which gives you `YourApp Setup.exe` executable).
Install Electron Squirrel.
```bash
npm install electron-squirrel-startup
```
Also add below line to very top of `main.js` file. I usually add after declaring `app` constant.
```js
// main.js
if (require('electron-squirrel-startup')) app.quit();
```
Top of `main.js` file should look like this.
```js
// main.js
const { app, BrowserWindow, ipcMain } = require('electron');
const path = require('node:path');
// *** Here ***
if (require('electron-squirrel-startup')) app.quit();
```
*If you don't add this line to your `main.js` file. Your app will start during installation and you will probably see some errors. This piece of code prevents users to see some kind of weird errors.*
After you finish configuration. Run `npm run make` to create your packages.
You will see created packages in `out` folder.
### Uninstalling Application
Neither Electron nor Squirrel have uninstaller.
Best option is to use Windows native uninstaller.
It's usually called as `Program and Features` and for newer Windows versions it's under `Settings -> Apps -> Installed Apps`.
After you uninstall your application some files will still remain in `AppData` folder.
You can find exact addresses for remaining files below.
```
C:\Users\\AppData\Local\electron_starter
C:\Users\\AppData\Roaming\electron-starter
```
### Optional: Prevent App to Close When Close Button Clicked and Restore App From Tray
You need to define `Menu` and `Tray` objects like below.
```js
// main.js
const { app, BrowserWindow, ipcMain, Menu, Tray } = require('electron');
```
Prevent window from closing when close button clicked.
Add below `close` event listener to `createWindow` function after you declare `mainWindow` object.
```js
// main.js
function createWindow () {
mainWindow = new BrowserWindow({...});
// ...
// Here
mainWindow.on('close', function (event) {
event.preventDefault();
mainWindow.hide();
});
}
```
Declare a global tray variable.
```js
// main.js
let tray = null;
```
Then add below code in `app.whenReady` function.
```js
// main.js
app.whenReady().then(() => {
// Create Tray object
tray = new Tray(path.join(__dirname, 'node.ico'));
// Prepare context menu
const contextMenu = Menu.buildFromTemplate([
{ label: 'Show App', click: function() {
mainWindow.show();
} },
{ label: 'Quit', click: function() {
mainWindow.destroy();
app.quit();
} }
]);
// Change here as you wish
tray.setToolTip('This is Electron Starter');
// Set tray context menu
tray.setContextMenu(contextMenu);
// Other codes...
});
```
### Optional: Auto Start App
In order to start app on system startup, add below code after `app` declaration.
```js
app.setLoginItemSettings({
openAtLogin: true
});
```
`Windows` -> If users don't want app to start on system startup, they can disable it from `Task Manager -> Startup Apps`.
However, this operation won't delete created registy from the system.
So, if you don't event want to see it on the `Startup Apps` list, check below registry addresses and delete related registy.
Press `Win + R` and type `regedit` and click `OK` button.
```
HKEY_CURRENT_USER\SOFTWARE\Microsoft\Windows\CurrentVersion\Run
HKEY_LOCAL_MACHINE\SOFTWARE\Microsoft\Windows\CurrentVersion\Run
HKEY_CURRENT_USER\SOFTWARE\WOW6432Node\Microsoft\Windows\CurrentVersion\Run
HKEY_LOCAL_MACHINE\SOFTWARE\WOW6432Node\Microsoft\Windows\CurrentVersion\Run
```
### Optional: Windows Refresh Icon Cache
ie4uinit.exe -show
## Contributing
If you find any issues with this application or would like to contribute, please feel free to submit a pull request or open an issue.
## License
This application is licensed under the MIT License. See the [LICENSE](LICENSE) file for more information.
## Acknowledgments
This application was inspired by [electron-quick-start](https://github.com/electron/electron-quick-start).