Ecosyste.ms: Awesome
An open API service indexing awesome lists of open source software.
https://github.com/eryajf/vdoing-template
Vdoing主题博客模板
https://github.com/eryajf/vdoing-template
blog eryajf github-pages template
Last synced: 2 days ago
JSON representation
Vdoing主题博客模板
- Host: GitHub
- URL: https://github.com/eryajf/vdoing-template
- Owner: eryajf
- License: mit
- Created: 2022-07-21T03:09:52.000Z (over 2 years ago)
- Default Branch: main
- Last Pushed: 2024-10-10T05:16:41.000Z (about 1 month ago)
- Last Synced: 2024-10-30T04:50:18.428Z (16 days ago)
- Topics: blog, eryajf, github-pages, template
- Language: JavaScript
- Homepage: https://eryajf.github.io/vdoing-template/
- Size: 8.54 MB
- Stars: 220
- Watchers: 3
- Forks: 26
- Open Issues: 9
-
Metadata Files:
- Readme: README.md
- License: LICENSE
Awesome Lists containing this project
README
vdoing-template
[](https://github.com/eryajf)
[](https://github.com/eryajf/vdoing-template)
[](https://github.com/eryajf/vdoing-template/issues)
[](https://github.com/eryajf/vdoing-template/pulls)
[](https://github.com/eryajf/vdoing-template/stargazers)
[](https://github.com/eryajf/vdoing-template/blob/main/LICENSE)
[](https://github.com/eryajf/vdoing-template)
[](https://eryajf.github.io/vdoing-template/)
📖 Vdoing博客主题静态部署模板 📖

⚗️ 功能亮点:
- 三步配置生成一个属于自己的免费个人博客。
- 使用[Vdoing](https://github.com/xugaoyi/vuepress-theme-vdoing)主题,感谢作者写出如此简洁美观的博客主题。
- 模板已内置集成全文搜索能力。
- 模板已内置集成基于 GitHub Issue 的 vssue 评论系统。
- 本地 Markdown 编写文档,提交到远程之后`GitHub Actions`自动构建发布。
🦩 以下仅需简短的几步配置,就可以配置拥有一个免费的个人博客。准备好了吗,来吧!
## 效果展示
首页效果图:
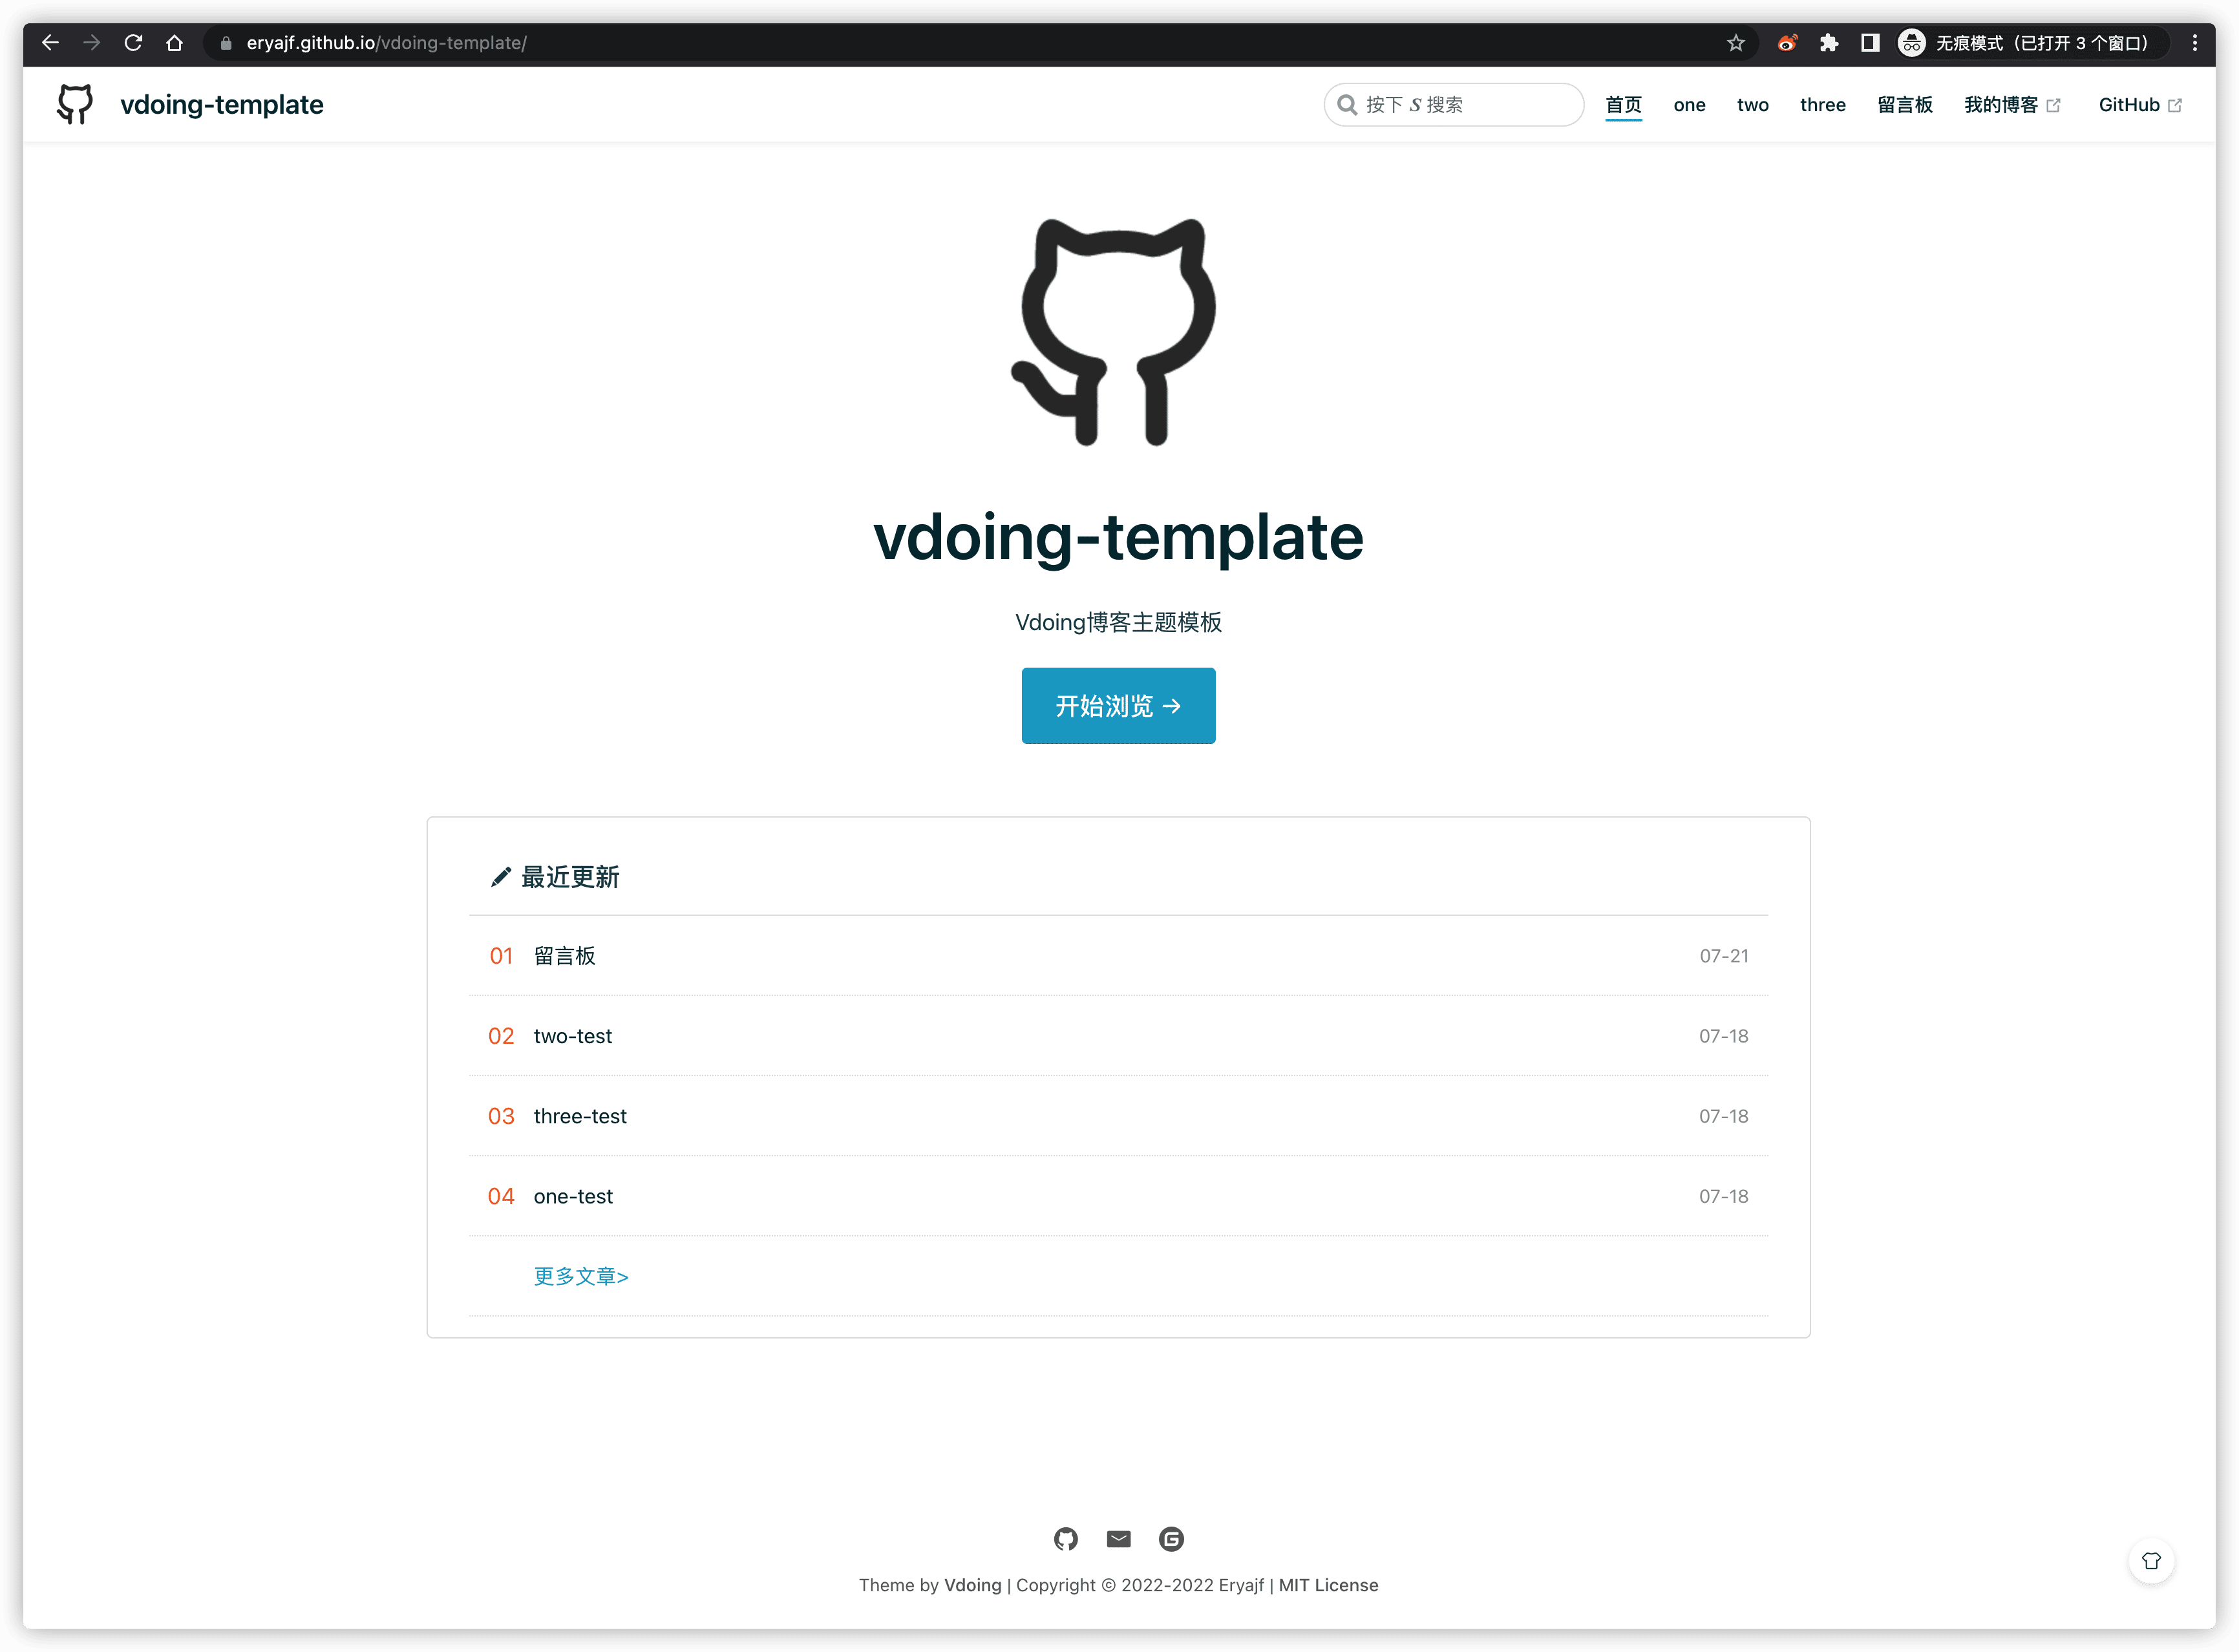
内部文章效果:

如果你也想要一个这种效果的博客,请往下看,只需简单几个配置步骤,即可免费拥有。
## 初始配置
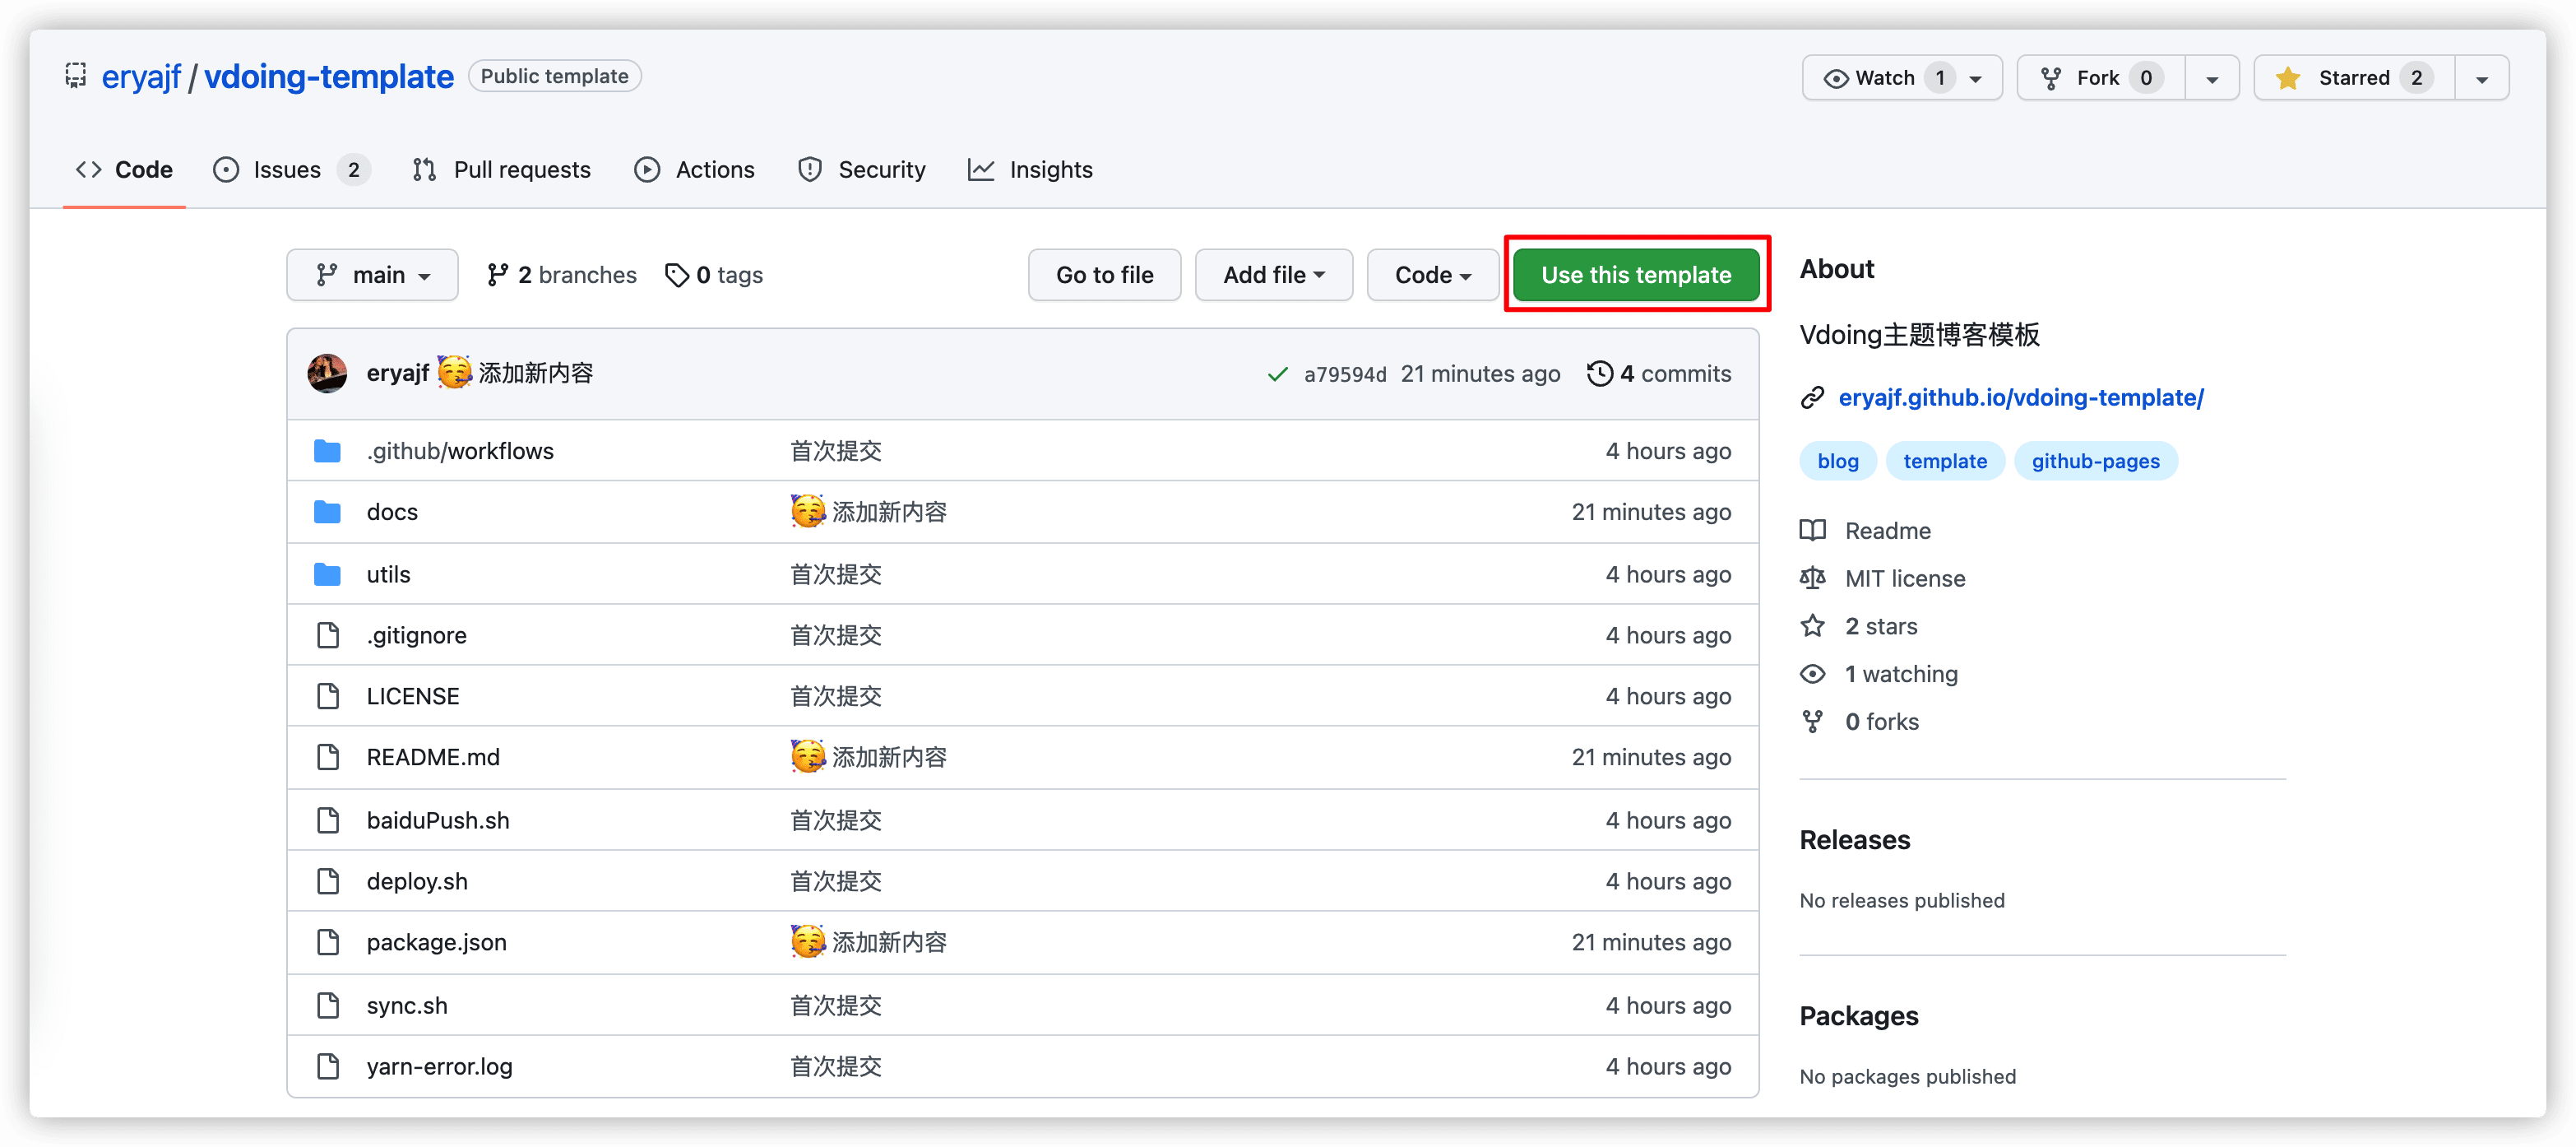
首先访问模板仓库:[vdoing-template](https://github.com/eryajf/vdoing-template)。点击此仓库右侧的 `Use this template`
然后根据自己的实际情况,给仓库起名字:
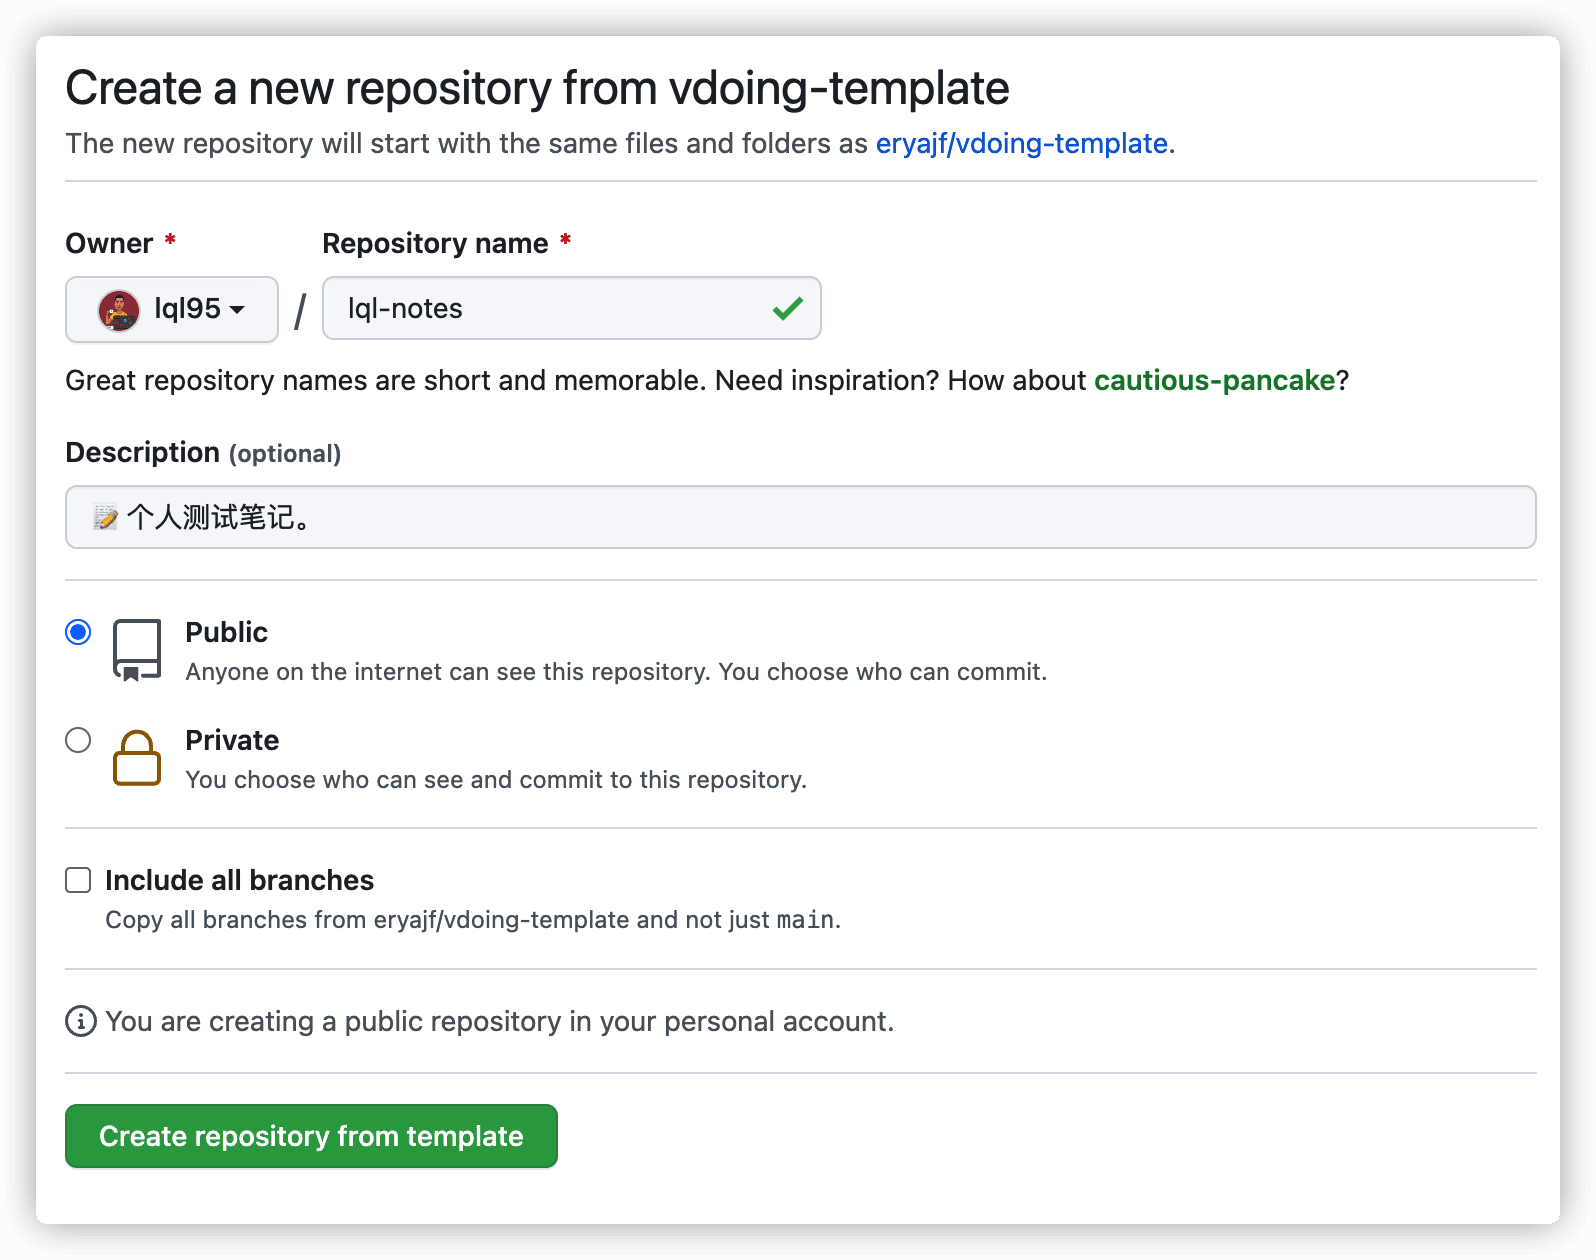
> 这里有一个注意点:仓库的名字将会是 `GitHub Pages` 的访问一级路由。比如上边我仓库名字定义为:`lql-notes`,那么配置成功之后的首页访问路径是: https://lql95.github.io/lql-notes ,如果你想让首页的访问路径是根,那么只需把仓库名字命名为:`lql95.github.io`。
创建完成之后,自己仓库中的项目内容如下:
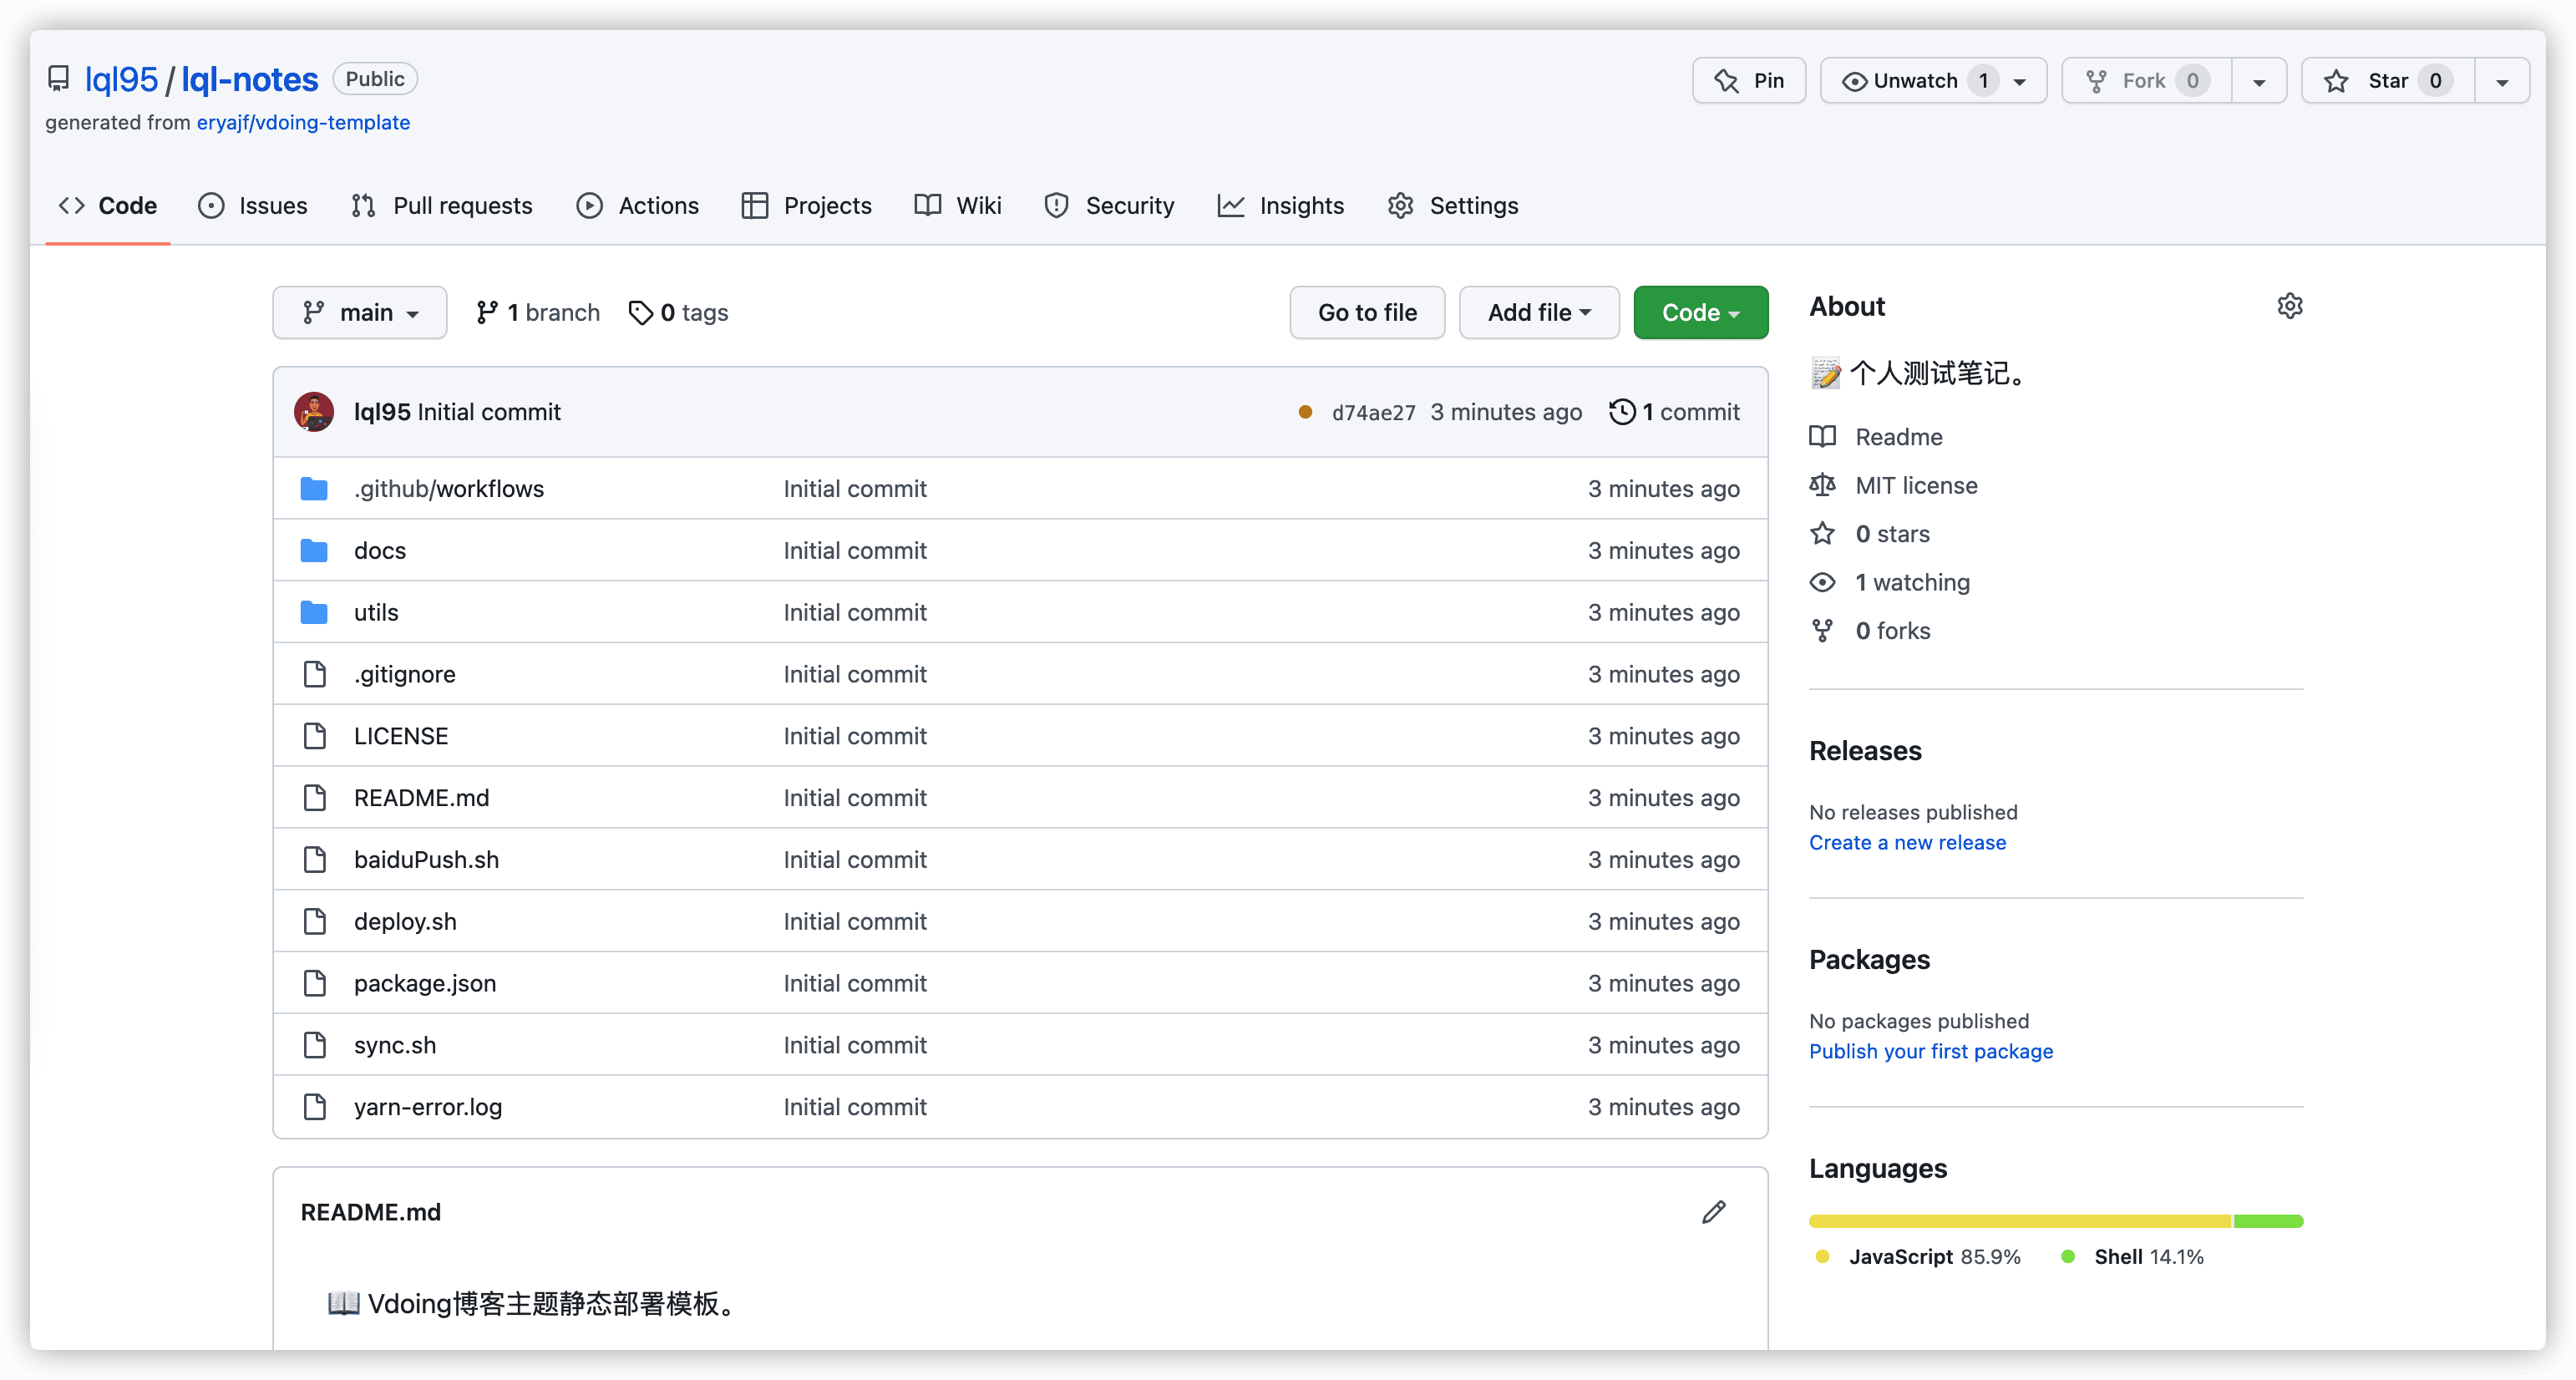
然后将代码克隆到本地,使用编辑器打开:
```sh
$ git clone [email protected]:lql95/lql-notes.git
```
## 调整内容
接下来的操作就是将模板中的内容,替换成自己想要的内容,好在模板我已经精简了很多,不需要繁琐的配置,这里简单说明一下:
### 全局替换关键字
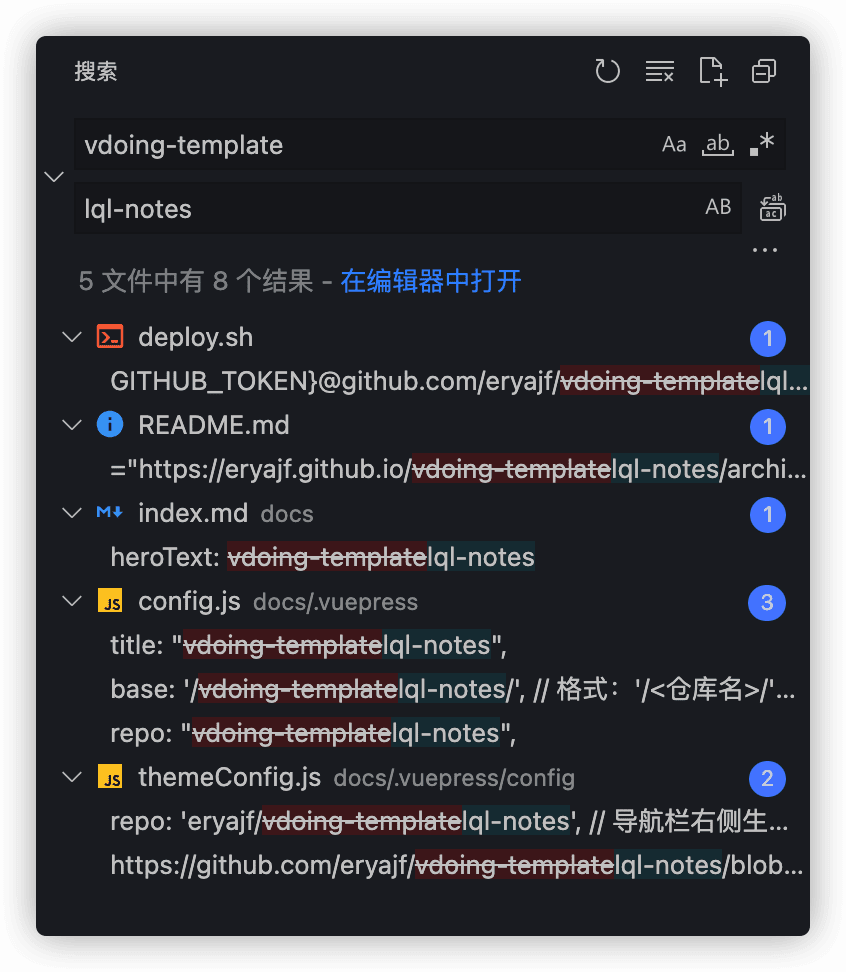
这样基本上就搞定了配置内容的一大步,剩下的就是一些修改美化方面的内容了。
### 配置首页
首页的配置信息在 `docs/index.md` 这个文件当中,我们可以参照官方文档进行按需配置:[点我去看文档](https://doc.xugaoyi.com/pages/f14bdb/)
### 配置评论
模板默认内置了 vssue 的评论组件,也是基于 github 的 issue 作为评论的存储数据。
只需两步即可完成配置:
- 第一步:[参考官方文档](https://vssue.js.org/zh/guide/github.html),创建一个`GitHub OAuth App`。或者不用看官方文档,直接看如下两个步骤。
[点击此处](https://github.com/settings/applications/new),进入创建页面:
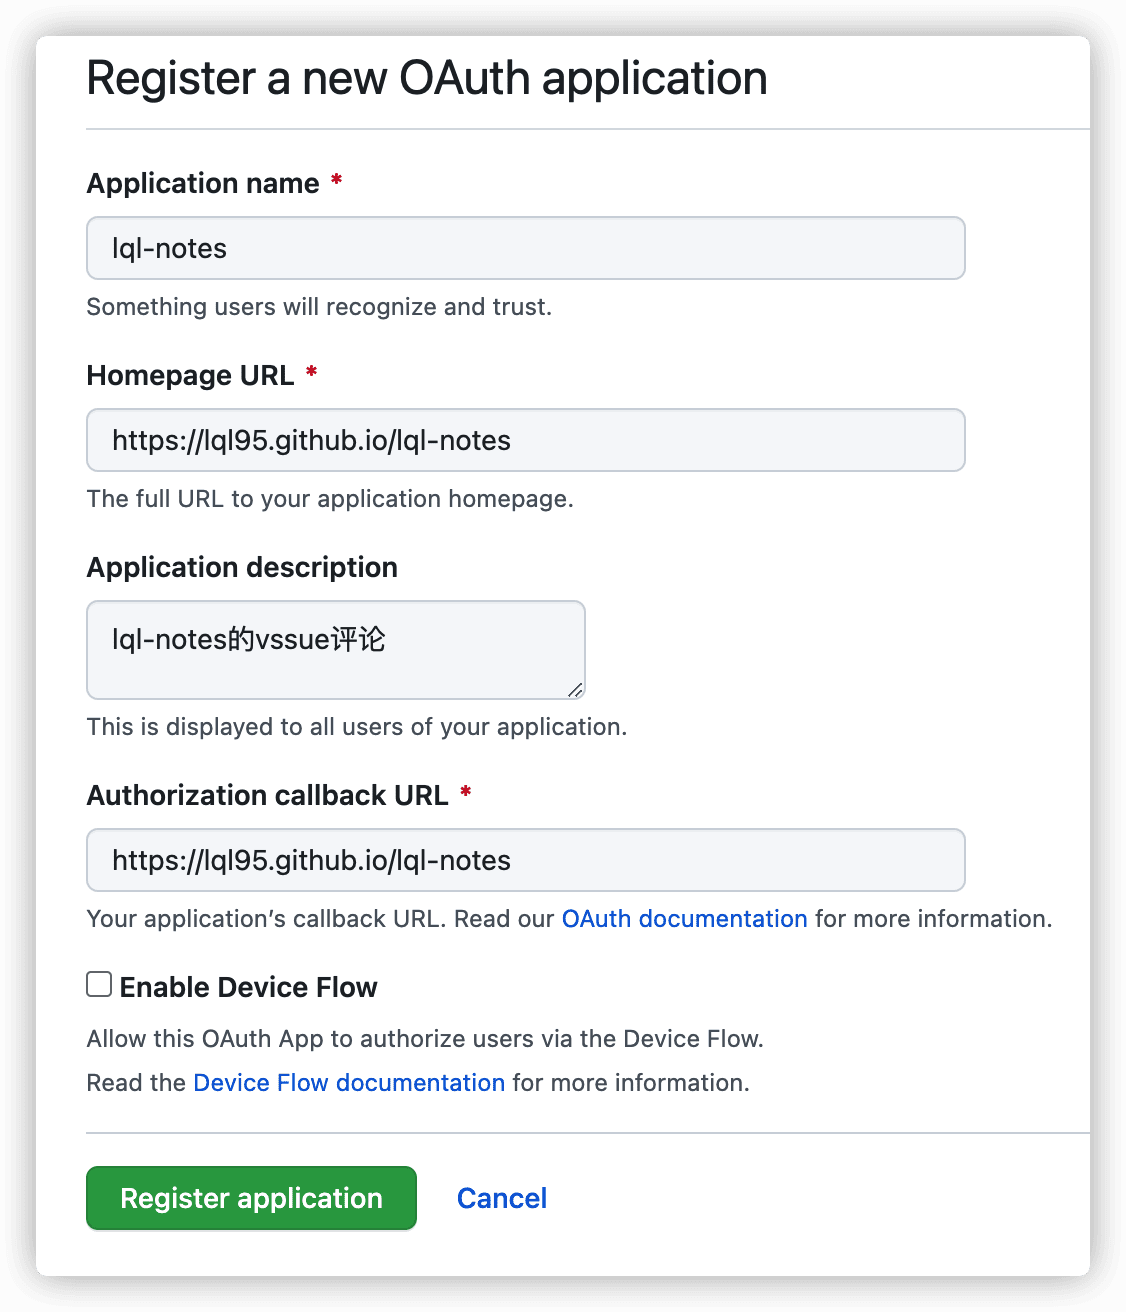
点击注册之后,就进入到了详情页面,可以看到`Client ID`,点击 `Generate a new client secret` 生成一个秘钥:
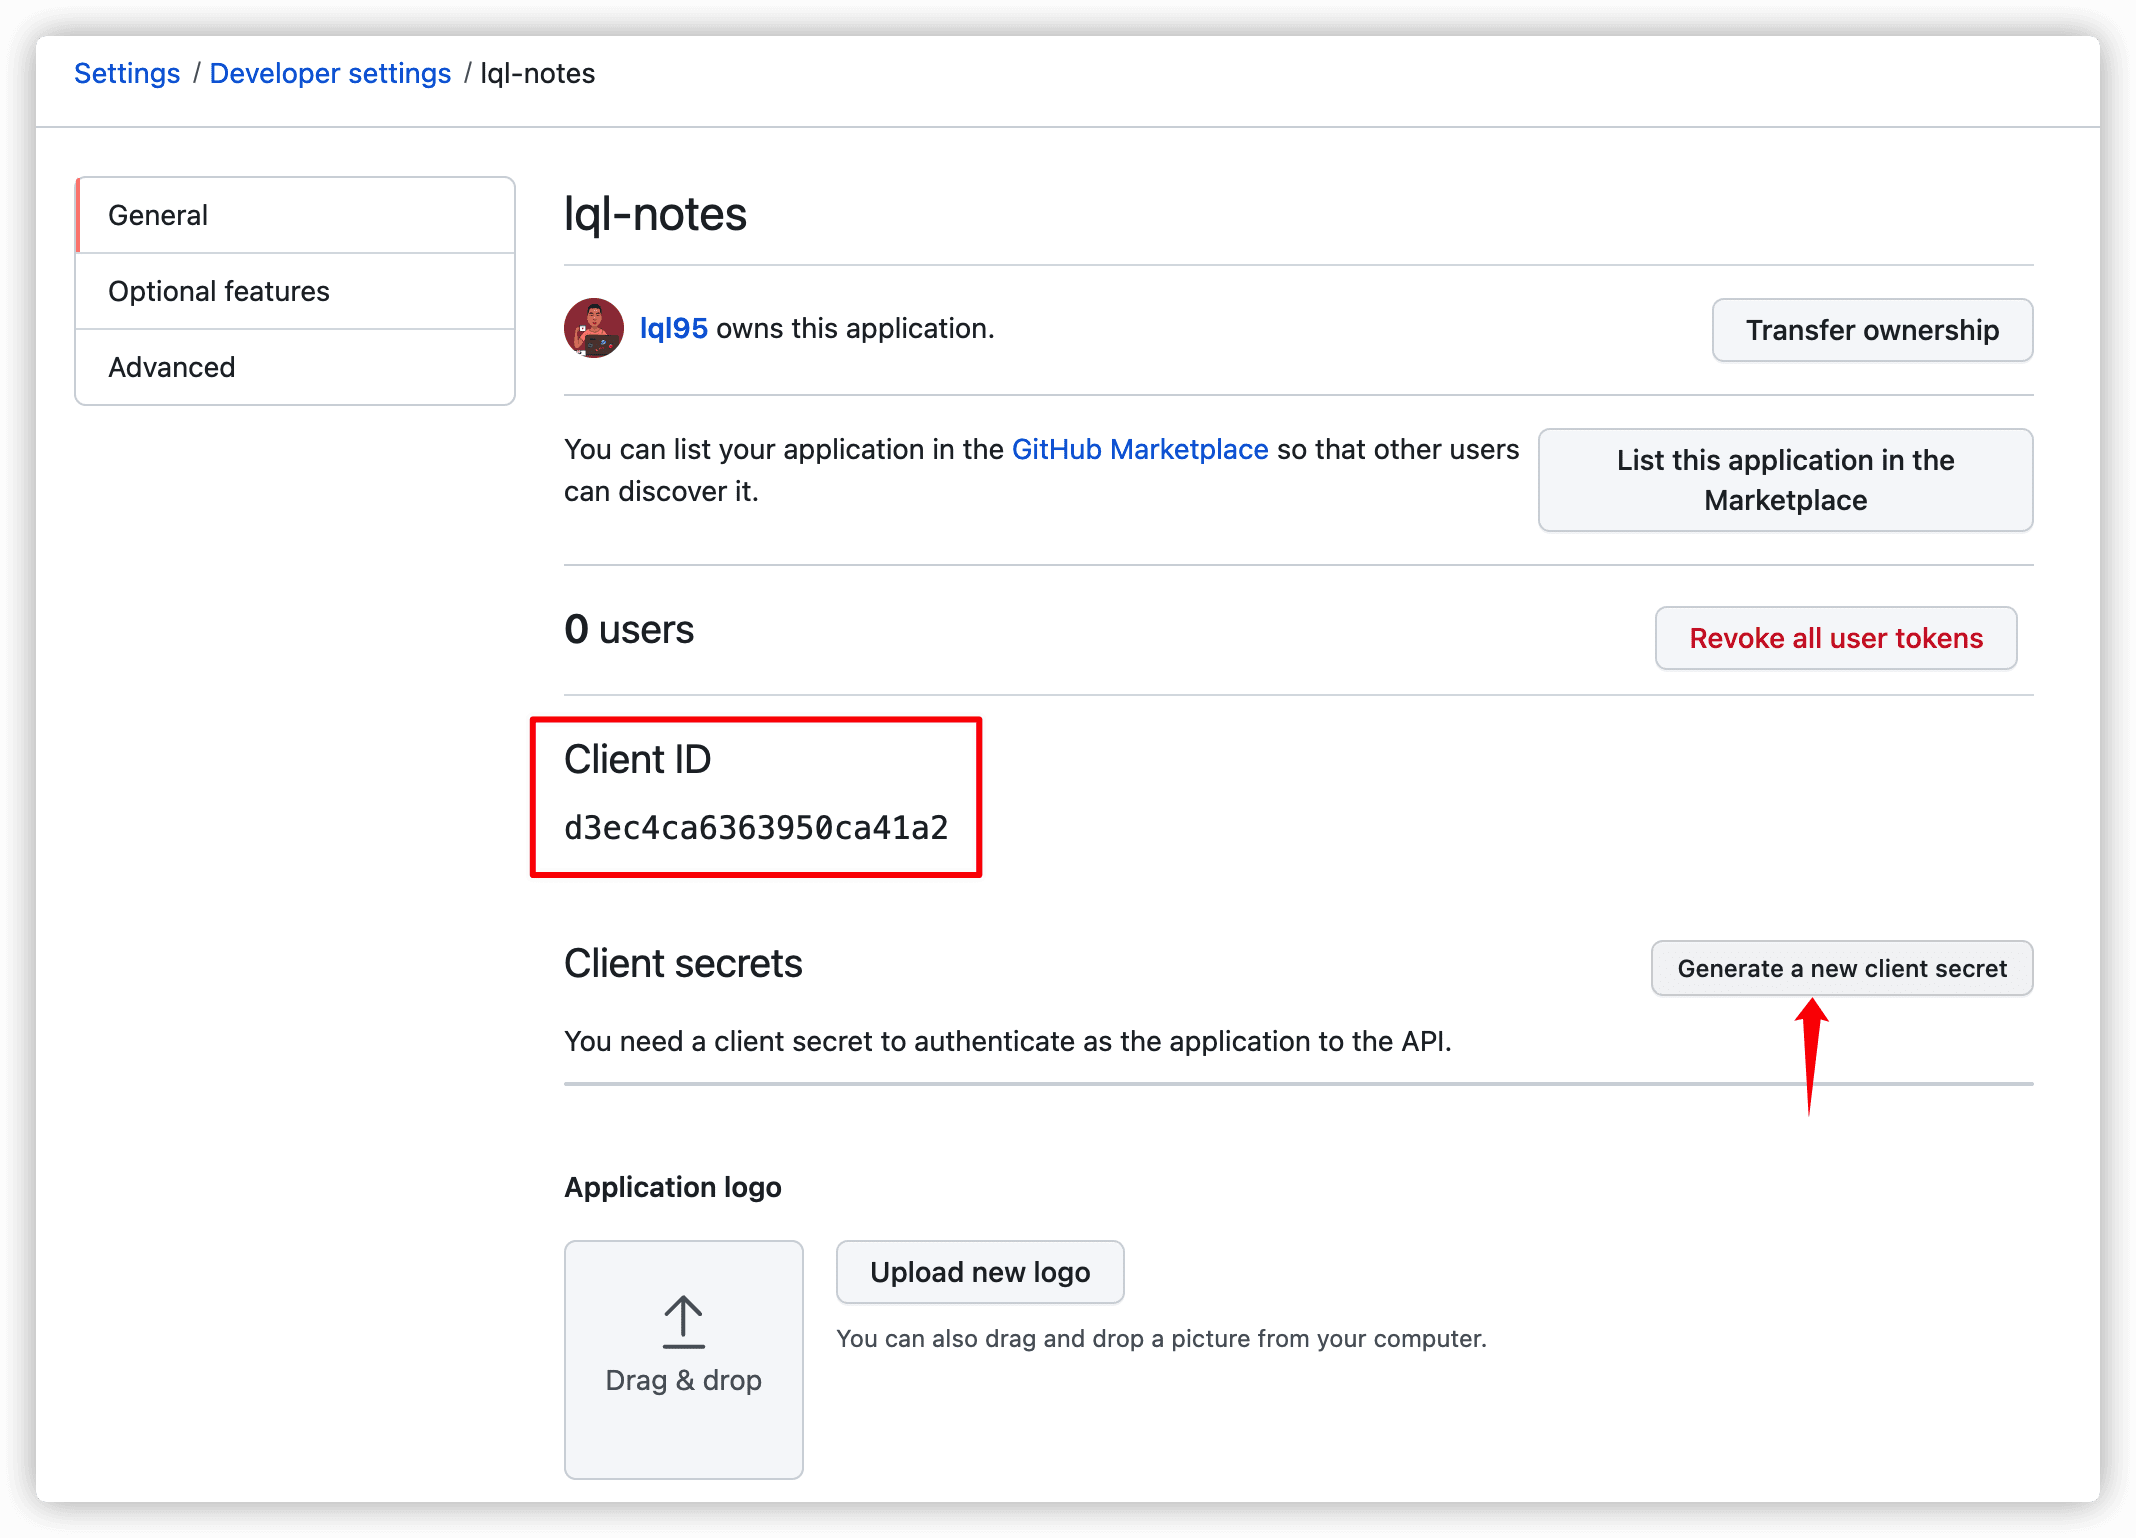
- 第二步:将配置信息填写到 `docs/.vuepress/config.js` 中。
```yaml
// vssue 评论插件
plugins: [
[
"vuepress-plugin-vssue-global",
{
platform: "github",
title: "[Comment]<%- frontmatter.title %>",
needComments: true,
// 其他的 Vssue 配置
autoCreateIssue: true,
clientId: "d3ec4ca6363950ca41a2",
clientSecret: "897465b6393f1d663e6128d2fab6959a0c0333cc",
owner: "lql95",
repo: "lql-notes",
},
],
],
```
现在基本配置项都已经搞定,可以将代码提交上去,然后`GitHub Actions`会自动将代码部署到 `gh-pages` 分支。
## 终极配置
终极配置就是等 GitHub Actions 跑完之后,我们能看到分支当中多了一个 `gh-pages` 分支。
此时点击 `Settings` ---> `Pages`,进行如下配置:
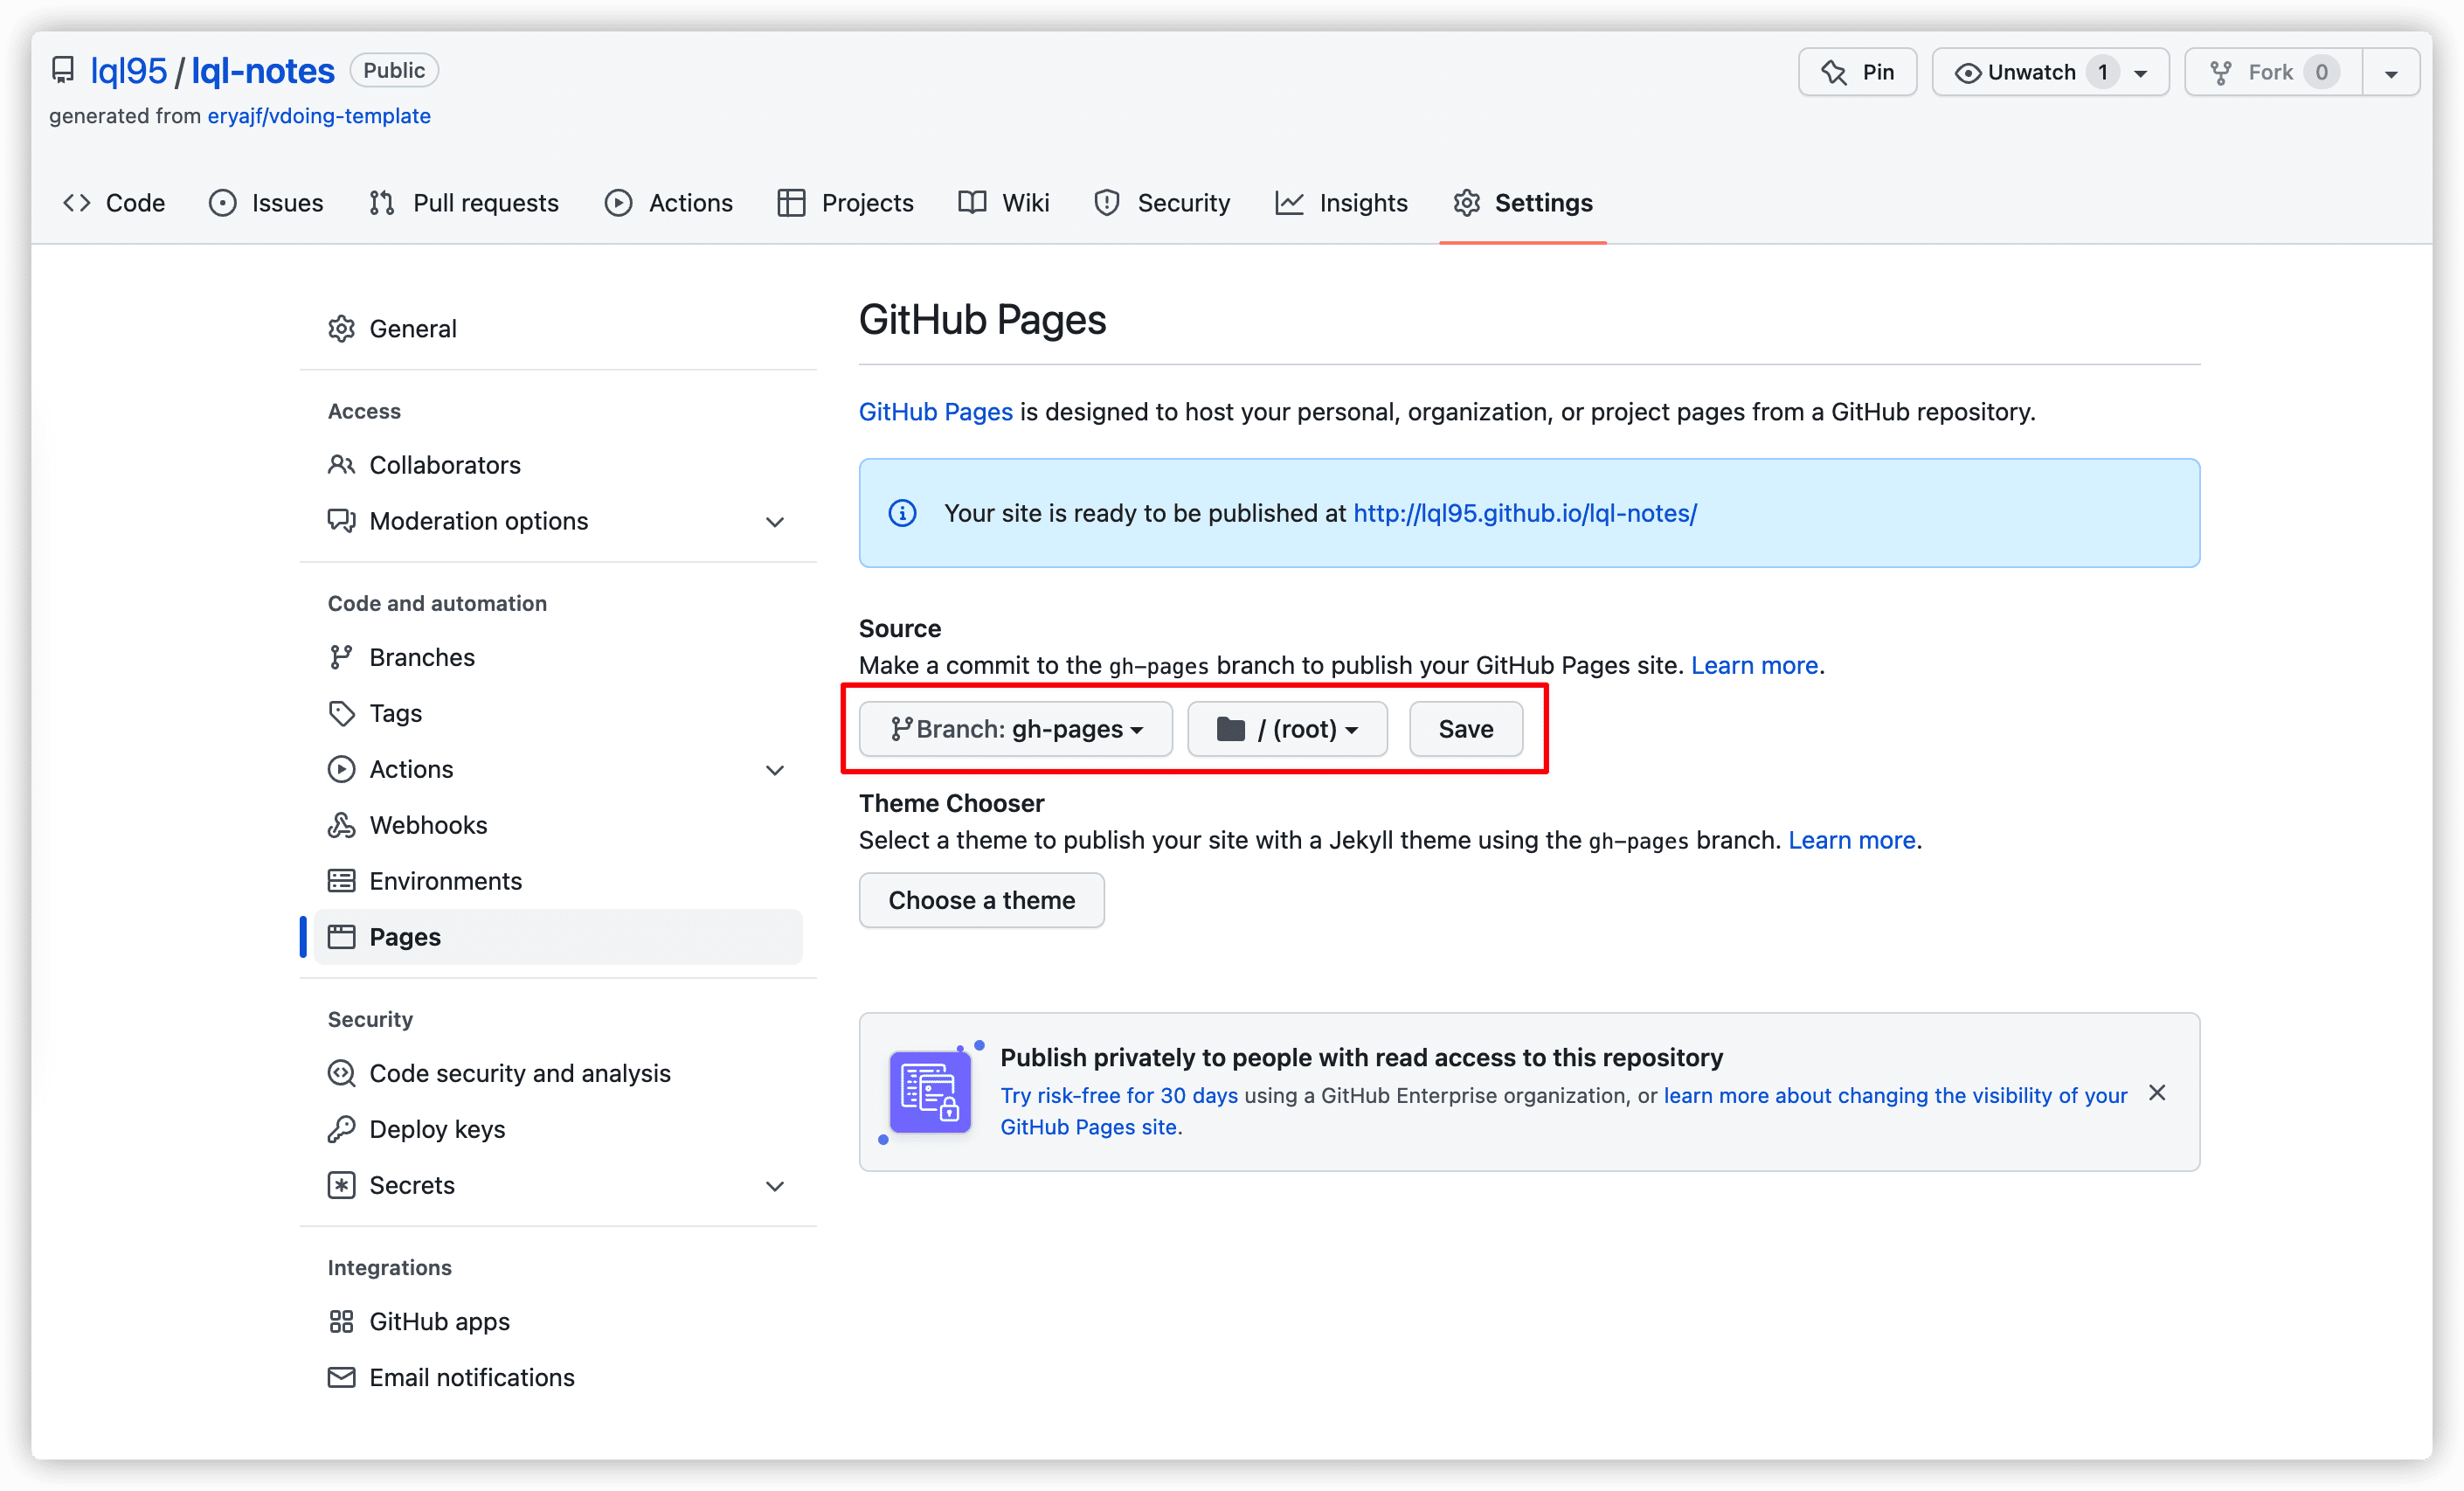
两个配置项,第一个表示选择哪个分支作为静态文件,第二个表示选择前边分支的哪个目录。
点击保存之后,静待一分钟,然后就可以访问上边提供的那个地址了。成果如下:
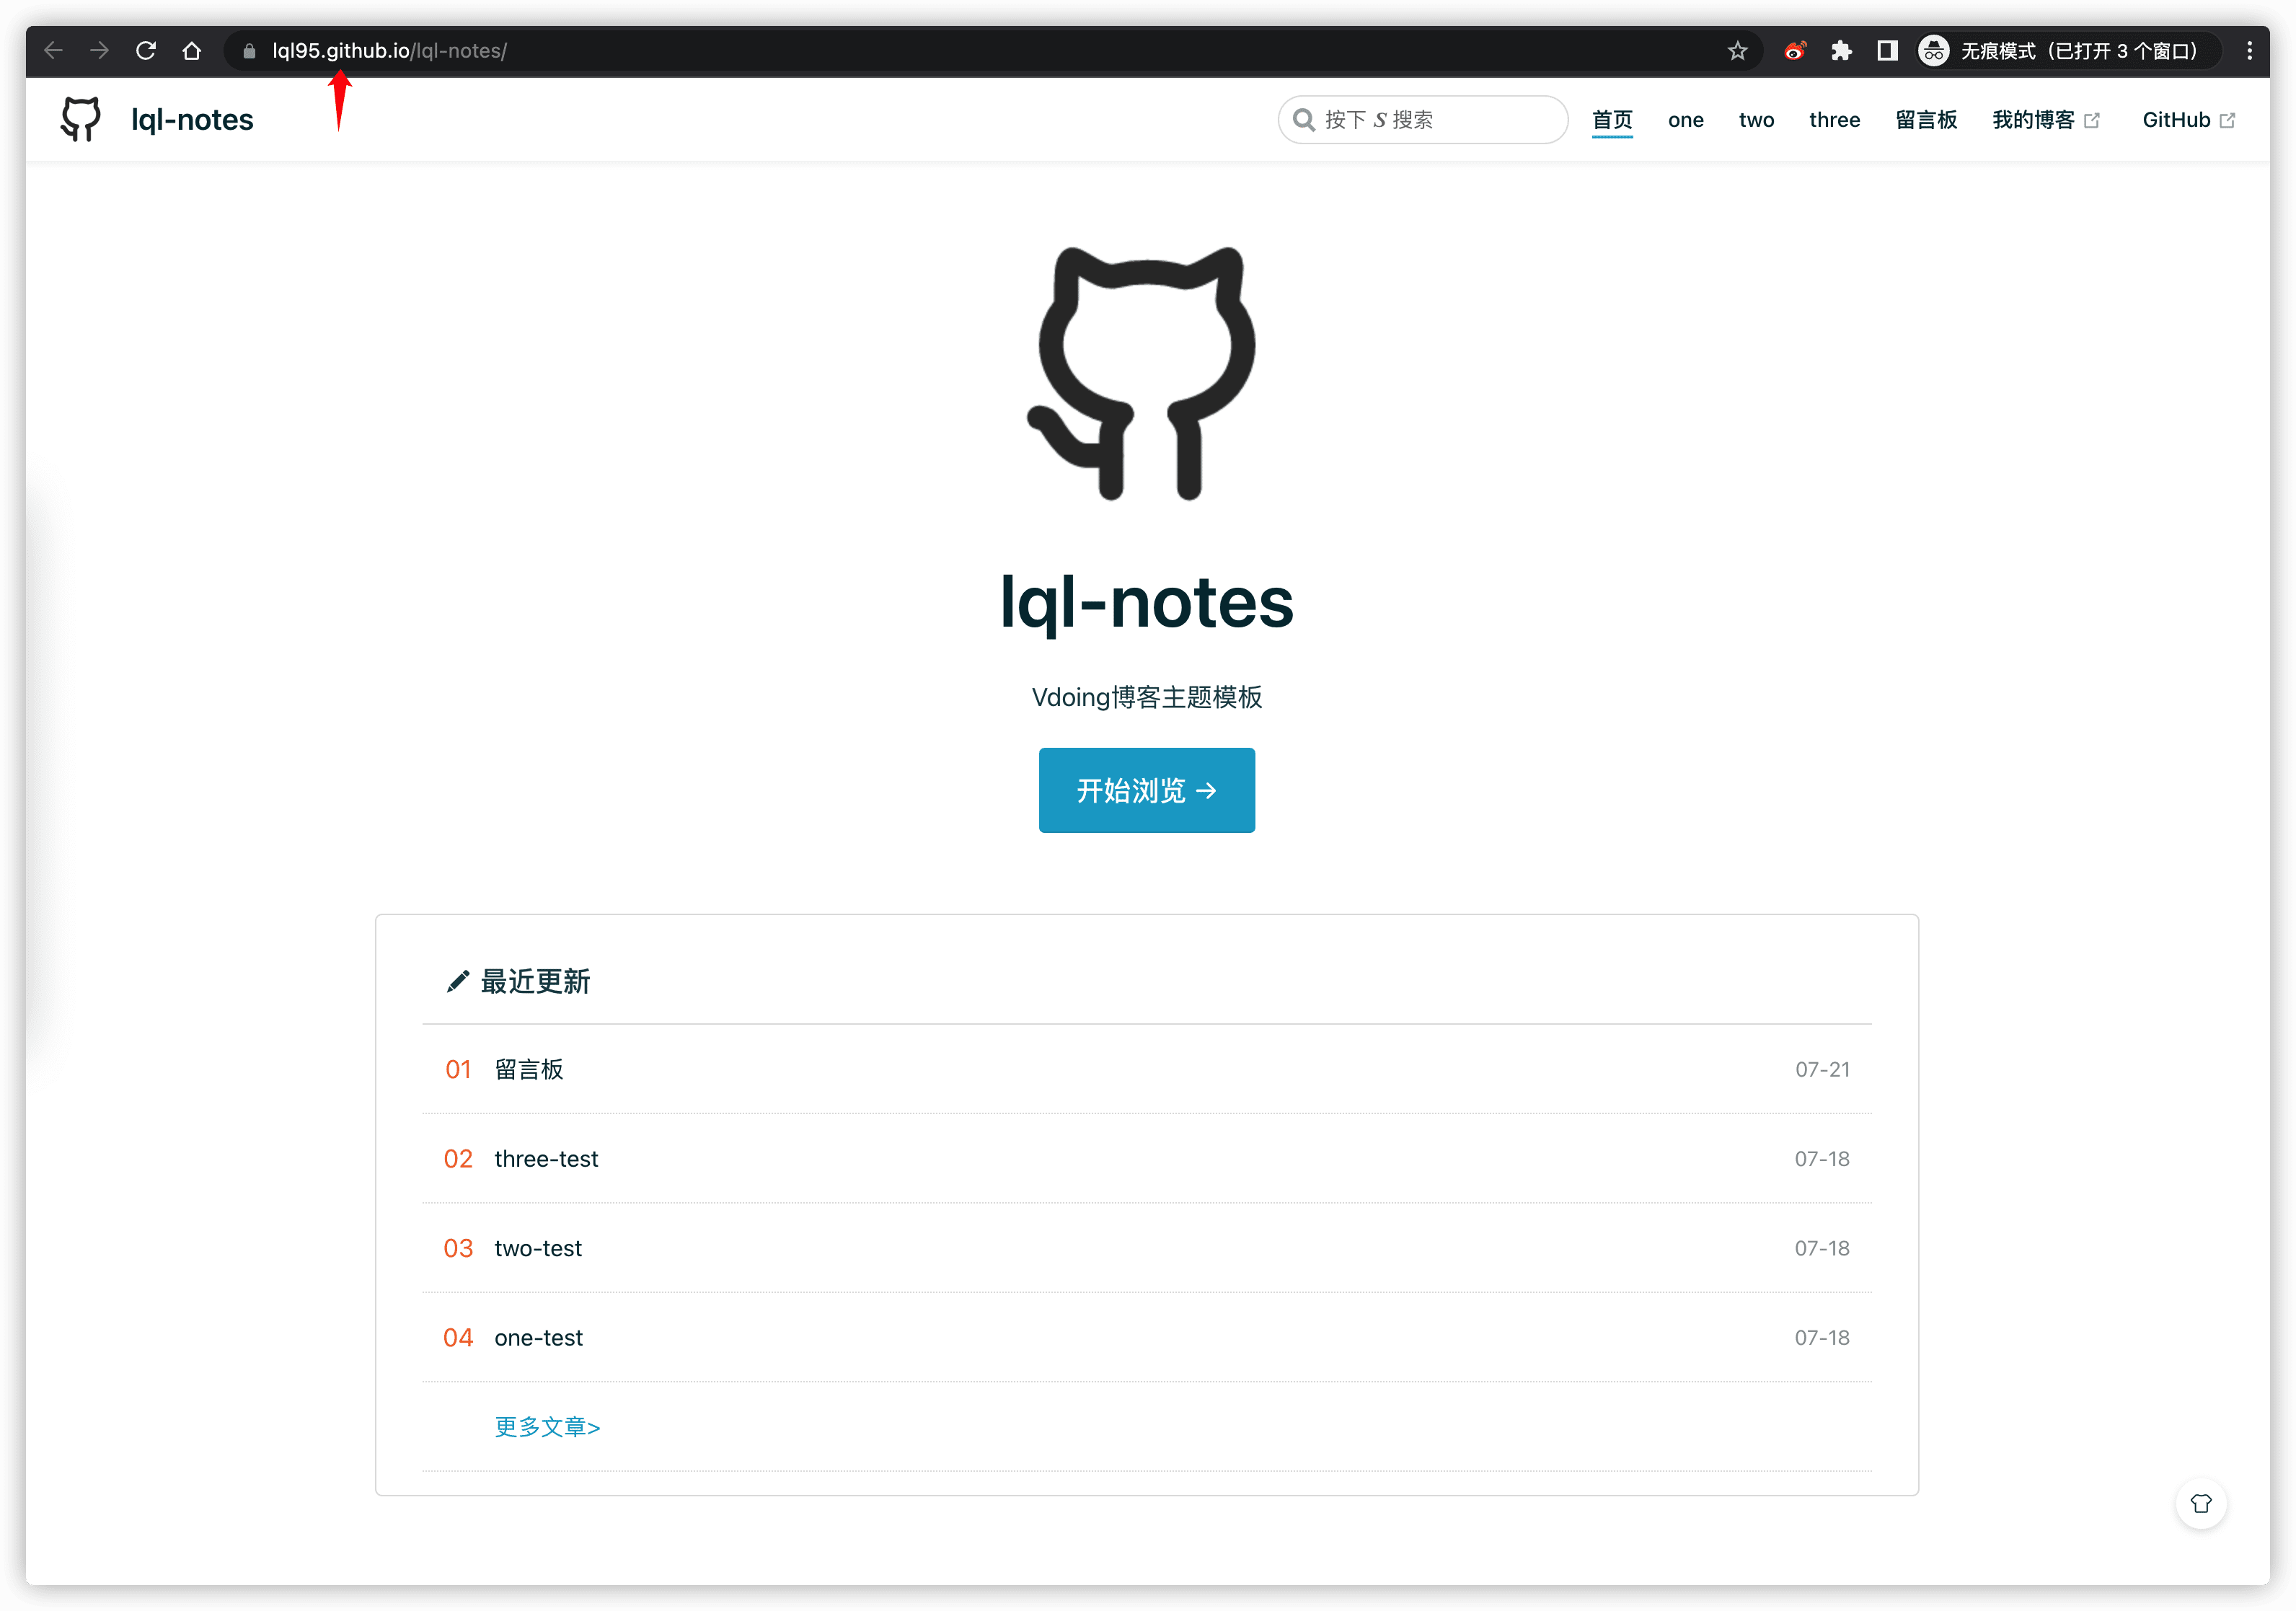
> 如果你想配置个人自定义域名,可参考此文档:[https://eryajf.github.io/HowToStartOpenSource/pages/06d15f/](https://eryajf.github.io/HowToStartOpenSource/pages/06d15f/)
如果一路配置没问题,那么文章也应该会自动加载评论功能:
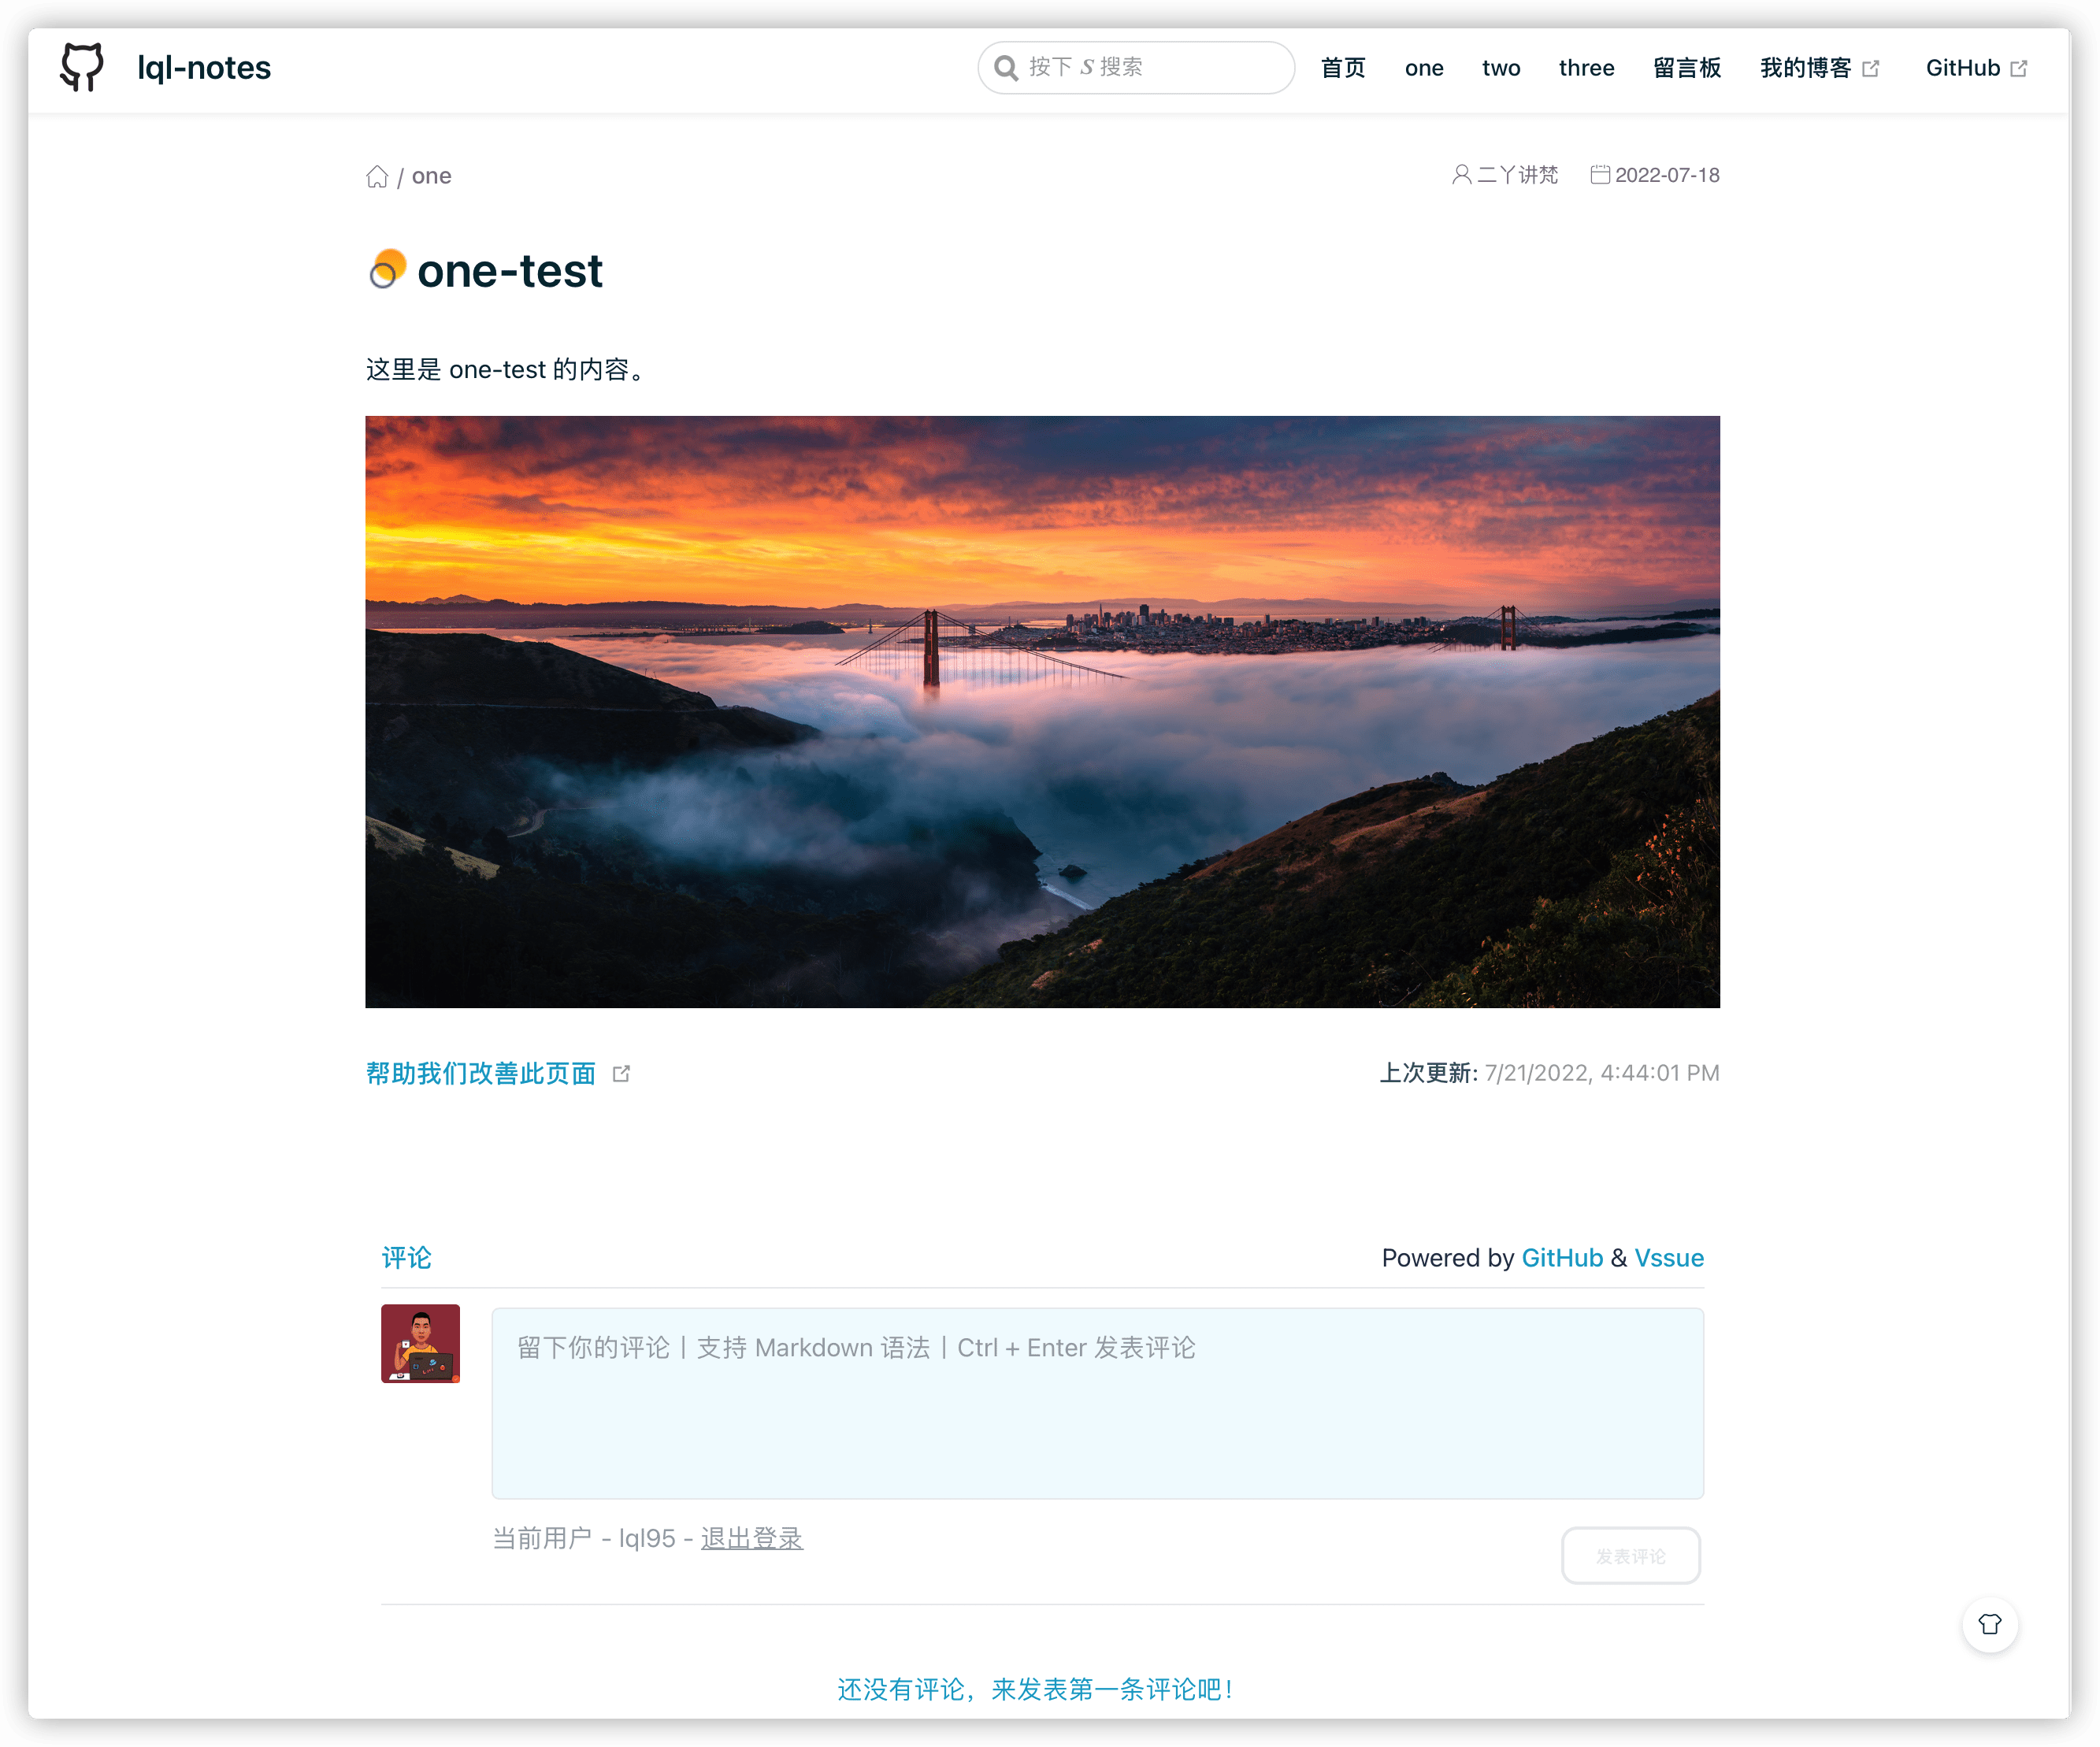
剩下的就是一些细节的优化调整,稍微打磨之后,就可以愉快地撰写你的博客了。