https://github.com/ethanhe42/u-net
U-Net: Convolutional Networks for Biomedical Image Segmentation
https://github.com/ethanhe42/u-net
convolutional-networks convolutional-neural-networks deep-learning deep-neural-networks image-segmentation keras medical-imaging python tensorflow unet
Last synced: over 1 year ago
JSON representation
U-Net: Convolutional Networks for Biomedical Image Segmentation
- Host: GitHub
- URL: https://github.com/ethanhe42/u-net
- Owner: ethanhe42
- License: mit
- Created: 2016-06-29T07:46:30.000Z (about 10 years ago)
- Default Branch: master
- Last Pushed: 2022-02-28T02:28:45.000Z (over 4 years ago)
- Last Synced: 2024-04-13T06:57:08.177Z (about 2 years ago)
- Topics: convolutional-networks, convolutional-neural-networks, deep-learning, deep-neural-networks, image-segmentation, keras, medical-imaging, python, tensorflow, unet
- Language: Python
- Homepage: https://yihui-he.github.io/blog/ultrasound-nerve-segmentation-with-tensorflow
- Size: 10.7 MB
- Stars: 415
- Watchers: 27
- Forks: 161
- Open Issues: 10
-
Metadata Files:
- Readme: README.md
- Funding: .github/FUNDING.yml
- License: LICENSE
Awesome Lists containing this project
README
# Ultrasound Nerve Segmentation with TensorFlow
[GitHub - yihui-he/u-net: U-Net: Convolutional Networks for Biomedical Image Segmentation](https://github.com/yihui-he/u-net)
**Deep Learning Tutorial for Kaggle Ultrasound Nerve Segmentation competition, using Keras**
This tutorial shows how to use [Keras library](http://keras.io/) to build deep neural network for ultrasound image nerve segmentation. More info on this Kaggle competition can be found on [https://www.kaggle.com/c/ultrasound-nerve-segmentation](https://www.kaggle.com/c/ultrasound-nerve-segmentation).
This deep neural network achieves **~0.57 score on the leaderboard** based on test images, and can be a good staring point for further, more serious approaches.
The architecture was inspired by [U-Net: Convolutional Networks for Biomedical Image Segmentation](http://lmb.informatik.uni-freiburg.de/people/ronneber/u-net/).
---
## Overview
### Data
[Provided data](https://www.kaggle.com/c/ultrasound-nerve-segmentation/data) is processed by `data.py` script. This script just loads the images and saves them into NumPy binary format files **.npy** for faster loading later.
### Pre-processing
The images are not pre-processed in any way, except resizing to 64 x 80. Since the images are pretty noisy, I expect that some thoughtful pre-processing could yield better performance of the model.
Output images (masks) are scaled to [0, 1] interval.
### Model
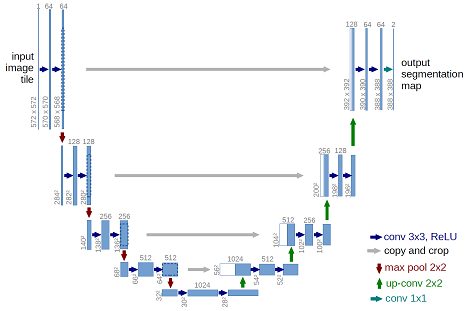
The provided model is basically a convolutional auto-encoder, but with a twist - it has skip connections from encoder layers to decoder layers that are on the same “level”. See picture below (note that image size and numbers of convolutional filters in this tutorial differs from the original U-Net architecture).
This deep neural network is implemented with Keras functional API, which makes it extremely easy to experiment with different interesting architectures.
Output from the network is a 64 x 80 which represents mask that should be learned. Sigmoid activation function makes sure that mask pixels are in [0, 1] range.
### Training
The model is trained for 20 epochs, where each epoch took ~30 seconds on Titan X. Memory footprint of the model is ~800MB.
After 20 epochs, calculated Dice coefficient is ~0.68, which yielded ~0.57 score on leaderboard, so obviously this model overfits (cross-validation pull requests anyone? ;)).
Loss function for the training is basically just a **negative of Dice coefficient** (which is used as [evaluation metric on the competition](https://www.kaggle.com/c/ultrasound-nerve-segmentation/details/evaluation)), and this is implemented as custom loss function using Keras backend - check `dice_coef()` and `dice_coef_loss()` functions in `train.py` for more detail. Also, for making the loss function smooth, a factor `smooth = 1` factor is added.
The weights are updated by Adam optimizer, with a 1e-5 learning rate. During training, model’s weights are saved in HDF5 format.
---
## How to use
### Dependencies
This tutorial depends on the following libraries:
- cv2 (OpenCV)
- Theano and/or Tensorflow
- Keras >= 1.0
Also, this code should be compatible with Python versions 2.7-3.5.
### Prepare the data
In order to extract raw images and save them to *.npy* files, you should first prepare its structure. Make sure that `raw` dir is located in the root of this project. Also, the tree of `raw` dir must be like:
```
-raw
|
---- train
| |
| ---- 1_1.tif
| |
| ---- …
|
---- test
|
---- 1.tif
|
---- …
```
- Now run `python data.py`.
Running this script will create train and test images and save them to **.npy** files.
### Define the model
- Check out `get_unet()` in `train.py` to modify the model, optimizer and loss function.
### Train the model and generate masks for test images
- Run `python train.py` to train the model.
Check out `train_predict()` to modify the number of iterations (epochs), batch size, etc.
After this script finishes, in `imgs_mask_test.npy` masks for corresponding images in `imgs_test.npy` should be generated. I suggest you examine these masks for getting further insight of your model’s performance.
### Generate submission
- Run `python submission.py` to generate the submission file `submission.csv` for the generated masks.
Check out function `submission()` and `run_length_enc()` (thanks woshialex) for details.
## About Keras
Keras is a minimalist, highly modular neural networks library, written in Python and capable of running on top of either TensorFlow or Theano. It was developed with a focus on enabling fast experimentation. Being able to go from idea to result with the least possible delay is key to doing good research.
Use Keras if you need a deep learning library that:
allows for easy and fast prototyping (through total modularity, minimalism, and extensibility). supports both convolutional networks and recurrent networks, as well as combinations of the two. supports arbitrary connectivity schemes (including multi-input and multi-output training). runs seamlessly on CPU and GPU. Read the documentation [Keras.io](http://keras.io/)
Keras is compatible with: Python 2.7-3.5.