https://github.com/explosion/jupyterlab-prodigy
🧬 A JupyterLab extension for annotating data with Prodigy
https://github.com/explosion/jupyterlab-prodigy
active-learning annotation annotation-tool artificial-intelligence computer-vision data-annotation data-science jupyter jupyterlab labeling-tool machine-learning machine-teaching natural-language-processing nlp prodigy spacy
Last synced: over 1 year ago
JSON representation
🧬 A JupyterLab extension for annotating data with Prodigy
- Host: GitHub
- URL: https://github.com/explosion/jupyterlab-prodigy
- Owner: explosion
- License: mit
- Created: 2019-04-08T06:18:49.000Z (over 7 years ago)
- Default Branch: master
- Last Pushed: 2023-05-10T09:04:11.000Z (about 3 years ago)
- Last Synced: 2025-03-31T04:07:47.189Z (over 1 year ago)
- Topics: active-learning, annotation, annotation-tool, artificial-intelligence, computer-vision, data-annotation, data-science, jupyter, jupyterlab, labeling-tool, machine-learning, machine-teaching, natural-language-processing, nlp, prodigy, spacy
- Language: TypeScript
- Homepage: https://prodi.gy
- Size: 251 KB
- Stars: 189
- Watchers: 18
- Forks: 23
- Open Issues: 3
-
Metadata Files:
- Readme: README.md
- License: LICENSE
Awesome Lists containing this project
README
# JupyterLab extension for the Prodigy annotation tool ✨

[](https://www.npmjs.com/package/jupyterlab-prodigy)
This repo contains a [JupyterLab](https://jupyterlab.readthedocs.io/en/stable/) extension for [Prodigy](https://prodi.gy), our scriptable annotation tool for creating training data for machine learning models. It lets you run Prodigy within a JupyterLab tab, and annotate as you develop your models and applications. In order to use this
extension, you'll need a license for Prodigy – [see this page](https://prodi.gy/buy) for more details. For questions, please use the [Prodigy Support Forum](https://support.prodi.gy). If you've found a bug, feel free to submit a [pull request](https://github.com/explosion/jupyterlab-prodigy/pulls).
🙏 **Special thanks** to Jupyter core dev [Grant Nestor](https://www.grantnestor.com/)
for helping us build this extension!

## ⌛️ Installation
To use this extension, you need
[JupyterLab](https://jupyterlab.readthedocs.io/en/stable/) >= 3.0.0 and
[Prodigy](https://prodi.gy).
```bash
pip install jupyterlab>=3.0.0
```
To install the extension, run:
```bash
pip install jupyterlab-prodigy
```
Ensure that the extension is installed and enabled:
```bash
jupyter labextension list
```
### Uninstall
To remove the extension, run:
```bash
pip uninstall jupyterlab-prodigy
```
### Compatibility
This extension is compatible with Jupyterlab 3.0.0 and above. If you're using
Jupyterlab with versions `>=2.0.0` and `<3.0.0`, then you should install the
`3.0.0` version of `jupyterlab-prodigy`
```bash
jupyter labextension install jupyterlab-prodigy@3.0.0
```
## 📋 Usage
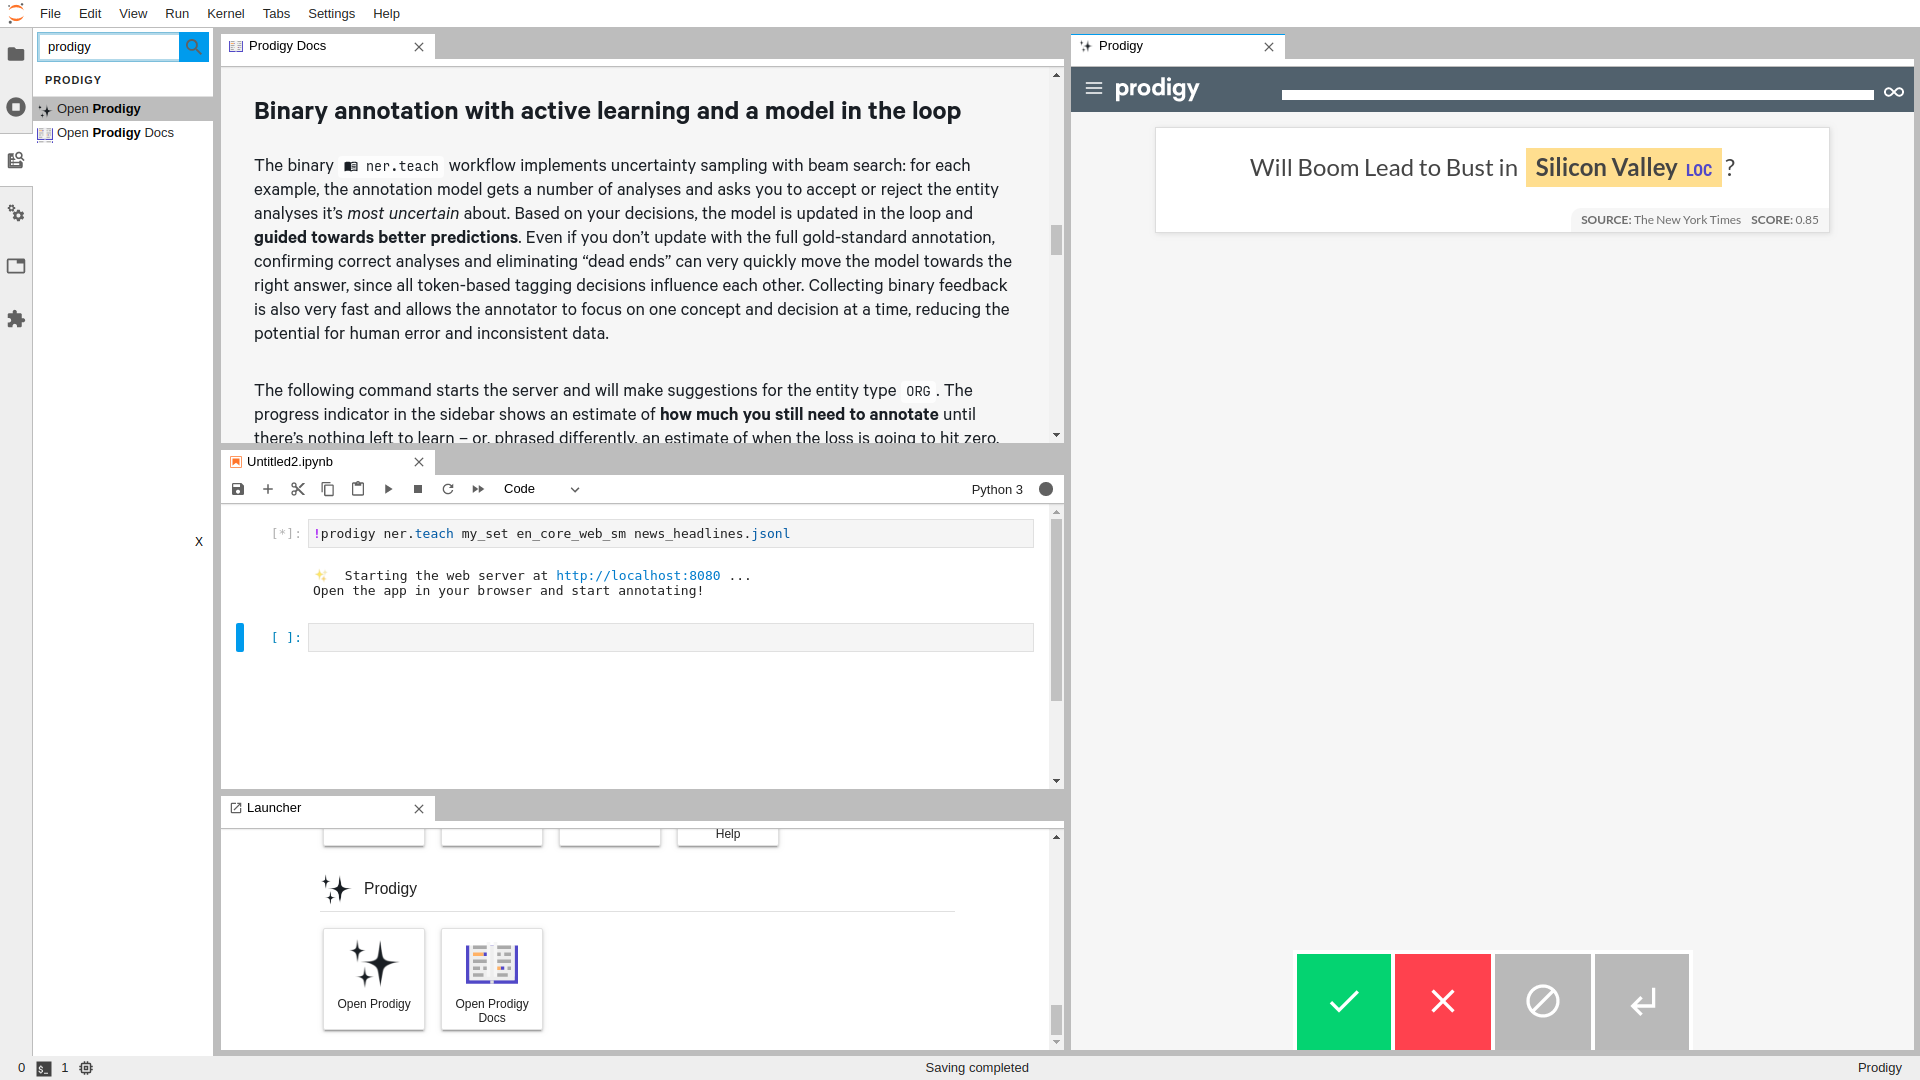
Start a Prodigy session in a terminal, e.g.:
```console
$ prodigy ner.manual my_set blank:en notebooks/news_headlines.jsonl --label PERSON,ORG,PRODUCT
```
In another terminal session, start JupyterLab:
```console
$ jupyter lab
```
Then, inside of JupyterLab, open the `Commands` toolbar via ⌘ CMD/Ctrl + SHIFT + C, and search/type:
Open Prodigy
Execute it, you will have a new Prodigy panel on the side.
## ⚙ Configuration
If your Prodigy is being served at a URL different than the default (e.g. behind a reverse proxy) you can configure the URL to use in the settings.
Open the `Settings` menu, go to `Advanced Settings Editor`, select the settings for `Prodigy Jupyter Extension`, and there you can add your custom URL, e.g.:
```JSON
{
"prodigyConfig": {
"url": "https://prodigy.example.com"
}
}
```
## 👩💻 Develop
Note: You will need NodeJS to build the extension package. It is also
highly-recommended that you work in a [virtual
environment](https://docs.python.org/3/tutorial/venv.html) when developing.
The `jlpm` command is JupyterLab's pinned version of
[yarn](https://yarnpkg.com/) that is installed with JupyterLab. You may use
`yarn` or `npm` in lieu of `jlpm` below.
```bash
# Clone the repo to your local environment
# Change directory to the jupyterlab-prodigy directory
# Install dev requirements
pip install -r requirements-dev.txt
# Install package in development mode
pip install -e .
# Link your development version of the extension with JupyterLab
jupyter labextension develop . --overwrite
# Rebuild extension Typescript source after making changes
jlpm run build
```
You can watch the source directory and run JupyterLab at the same time in
different terminals to watch for changes in the extension's source and
automatically rebuild the extension.
```bash
# Watch the source directory in one terminal, automatically rebuilding when needed
jlpm run watch
# Run JupyterLab in another terminal
jupyter lab
```
With the watch command running, every saved change will immediately be built
locally and available in your running JupyterLab. Refresh JupyterLab to load
the change in your browser (you may need to wait several seconds for the
extension to be rebuilt).
By default, the `jlpm run build` command generates the source maps for this
extension to make it easier to debug using the browser dev tools. To also
generate source maps for the JupyterLab core extensions, you can run the
following command:
```bash
jupyter lab build --minimize=False
```
### Uninstall
```bash
pip uninstall jupyterlab-prodigy
```
### Packaging the extension
See [RELEASE](RELEASE.md)