https://github.com/fairagro/m4.4_sciwin_client_demo
Demo for SciWIn Client Usage
https://github.com/fairagro/m4.4_sciwin_client_demo
sciwin
Last synced: 4 months ago
JSON representation
Demo for SciWIn Client Usage
- Host: GitHub
- URL: https://github.com/fairagro/m4.4_sciwin_client_demo
- Owner: fairagro
- Created: 2025-05-21T08:43:55.000Z (about 1 year ago)
- Default Branch: master
- Last Pushed: 2025-09-23T09:10:04.000Z (8 months ago)
- Last Synced: 2025-09-23T09:26:24.390Z (8 months ago)
- Topics: sciwin
- Language: Python
- Homepage: https://fairagro.github.io/m4.4_sciwin_client/examples/advanced-example/
- Size: 235 KB
- Stars: 0
- Watchers: 2
- Forks: 0
- Open Issues: 2
-
Metadata Files:
- Readme: README.md
Awesome Lists containing this project
README
# SciWIn Client Demo
A basic Workflow using [SciWIn Client (`s4n`)](https://github.com/fairagro/m4.4_sciwin_client) can be created with the commands hereafter. This guide assumes the usage of unix based operating systems, however Windows should work, too. If not please [open an issue](https://github.com/fairagro/m4.4_sciwin_client/issues/new).
## Installation
[](https://github.com/fairagro/m4.4_sciwin_client/releases/latest)
The latest Version of `s4n` can be installed using the following command:
```
curl --proto '=https' --tlsv1.2 -LsSf https://fairagro.github.io/m4.4_sciwin_client/get_s4n.sh | sh
```
Specific Versions can be installed with the following command, by replacing the version tag with a version of choice.
```
curl --proto '=https' --tlsv1.2 -LsSf https://github.com/fairagro/m4.4_sciwin_client/releases/download/v0.6.0/s4n-installer.sh | sh
```
The Installation can be verified using `s4n -V`.
SciWIn Client comes with a lot of commands. In this demo the `init`, `tool`, `workflow` and `execute` commands will be showcased.
```
_____ _ _ _ _____ _____ _ _ _
/ ___| (_)| | | ||_ _| / __ \| |(_) | |
\ `--. ___ _ | | | | | | _ __ | / \/| | _ ___ _ __ | |_
`--. \ / __|| || |/\| | | | | '_ \ | | | || | / _ \| '_ \ | __|
/\__/ /| (__ | |\ /\ / _| |_| | | | | \__/\| || || __/| | | || |_
\____/ \___||_| \/ \/ \___/|_| |_| \____/|_||_| \___||_| |_| \__|
Client tool for Scientific Workflow Infrastructure (SciWIn)
Documentation: https://fairagro.github.io/m4.4_sciwin_client/
Version: 0.8.0
Usage: s4n
Commands:
init Initializes project folder structure and repository
create Creates a new CWL File or Workflow
list Lists either all CWL Files or details to a given file [aliases: ls]
remove Removes a CWL File from the workflows Directory [aliases: rm]
connect Connects a workflow node
disconnect Disconnects a workflow node
visualize Visualizes a workflow
save Saves a workflow
install Installs a workflow as submodule [aliases: i]
uninstall Removes an installed workflow
execute Execution of CWL Files locally or on remote servers [aliases: ex]
annotate Annotate CWL files
completions Generate shell completions
help Print this message or the help of the given subcommand(s)
Options:
-h, --help Print help
-V, --version Print version
```
## Demo Repository
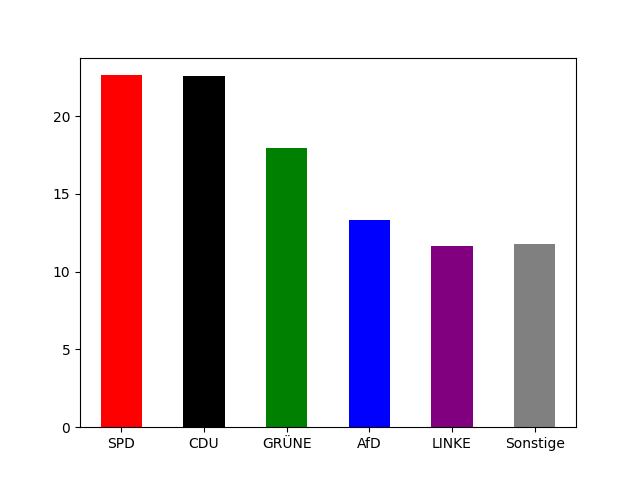
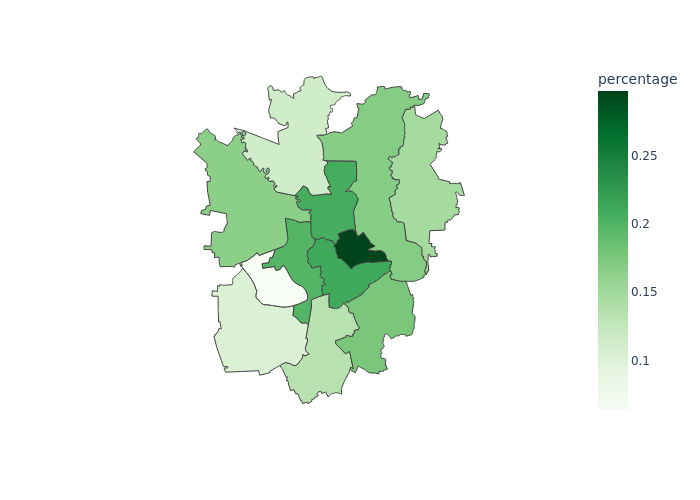
The [Demo Repository](https://github.com/fairagro/sciwin_client_demo) mainly contains two folders `data` and `code`. The result workflow will download election data, print election results as `barplot`, convert input data into a `geojson` file, and maps it onto the `geojson` data resulting in a `choropleth` graph. See the images for the final outputs.
## Creating the CommandLineTools
First of all, we start, by creating a new `s4n` project.
```
s4n init
```
CWL mainly describes processes in CommandLineTools which later can be connected into Workflows. CommandLineTools are essentially wrappers for commands that would usually be executed in the command line. CWL uses a special YAML structure to describe those processes.
```cwl
#!/usr/bin/env cwl-runner
cwlVersion: v1.2
class: CommandLineTool
requirements:
- class: DockerRequirement
dockerPull: osgeo/gdal:ubuntu-full-3.6.3
- class: InlineJavascriptRequirement
inputs:
- id: districts_geojson
type: string
default: districts.geojson
inputBinding:
position: 0
- id: data_braunschweig
type: Directory
default:
class: Directory
location: ../../data/braunschweig
inputBinding:
position: 1
- id: lco
type: string
default: RFC7946=YES
inputBinding:
prefix: -lco
outputs:
- id: districts
type: File
outputBinding:
glob: $(inputs.districts_geojson)
baseCommand: ogr2ogr
```
However it may is tedious to write those files by hand. That is where `s4n` comes to the rescue. A Command that would normally happen on the command line just needs to be prefixed with `s4n tool create`. Examples can be found at the [documentation](https://fairagro.github.io/m4.4_sciwin_client/examples/tool-creation/).
To create Tools based of the Python scripts in the `code` Directory a virtual environment needs to be created using
```bash
python3 -m venv .venv
source .venv/bin/activate
pip install plotly pandas kaleido==0.2.1 matplotlib
```
The next step is to download election data using a series of API calls for which luckily already a script exists. The script downloads the data from `votemanager.kdo.de` and writes the `csv` to stdout.
A tool can be created easily be prefixing the python call. However we also need to escape the `>` using a backslash for it to properly work
```bash
s4n create python code/download_election_data.py --ags 03101000 --election "Bundestagswahl 2025" \> data.csv
```
The written csv file lacks the header information of which party results correspond to which column. Therefore we use the `get_feature_info` script and create a tool as follows:
```bash
s4n create python code/get_feature_info.py --data data.csv
```
With this information the election plot can be outputted. The script `plot_election` does the job and accepts the json file from `get_feature_info` and the aforementioned csv.
```bash
s4n create -c Dockerfile --container-tag pyplot --enable-network python code/plot_election.py --data data.csv --features features.json
```
## Combining the Tools into a workflow
The three CommandLineTools now will be combined into an automated pipeline. A barebones workflow can be generated by using the create command. This command is optional, as the `connect` command also triggers creation of a workflow.
```bash
s4n create --name demo
```
The workflow that is being built looks like the graph represented in the following image

First of all a connection between the donwload script and `get_feature_info` as well as `plot_election` is created by
```bash
s4n connect demo --from download_election_data/data --to get_feature_info/data
s4n connect demo --from download_election_data/data --to plot_election/data
```
To get the correct values for `--from` and `--to` the command `s4n tool ls -a` can be used.
The plot tool also needs the feature information, so the next step is to combine both tools:
```bash
s4n connect demo --from get_feature_info/features --to plot_election/features
```
To use the workflow it needs inputs and outputs. In this demo's tools there are a lot of inputs, but some have default values. That means only neccesary connections have to be made. For the creation of inputs the `--from` value neeeds to start with `@inputs`.
```bash
s4n connect demo --from @inputs/election --to download_election_data/election
s4n connect demo --from @inputs/ags --to download_election_data/ags
```
Adding outputs follows the same logic, however `@outputs` is used in `--to`
```bash
s4n connect demo --from plot_election/election --to @outputs/bar
```
Saving the workflow is neccessary to have a clean git history for further creating CommandLineTools.
```bash
s4n save demo
```
During the creation `s4n workflow status demo` can always be used to view the connection status.
## Adding additional steps
The next tool uses [GDAL](https://de.wikipedia.org/wiki/Geospatial_Data_Abstraction_Library) to convert the shape file in `data/braunschweig` to a `geojson` file. The Command one would typically use would be
```bash
ogr2ogr districts.geojson data/braunschweig -lco RFC7946=YES
# s4n command
s4n create ogr2ogr districts.geojson data/braunschweig -lco RFC7946=YES
```
However we might not have gdal installed on our machine, so we request `s4n` to not run the command. Therefore `s4n` needs to be told what file will be written with `-o` and for later usage a docker image is specified using `-c`.
```bash
s4n create --name shp2geojson --no-run -o districts.geojson -c osgeo/gdal:ubuntu-full-3.6.3 ogr2ogr districts.geojson data/braunschweig -lco RFC7946=YES
```
This correct creation of the tool can be tested using
```bash
s4n execute local workflows/shp2geojson/shp2geojson.cwl
```
The outputted file now needs to be committed to move on
```bash
git add . && git commit -m "Execution of shp2geojson"
```
In the last step the plot tool needs to be created. In this tool `plotly` is used to create a `choropleth` graph based on the outputs of the preceeding steps. The packages installed to the virtual environment are needed here. A Dockerfile to use is already in the repo.
```bash
s4n create -c Dockerfile --container-tag pyplot --enable-network python code/plot_map.py --geojson districts.geojson --csv data.csv --feature F3 --on gebiet-nr:BEZNUM --output_name plot
```
## Adding the new tools to Workflow
The two new tools will now be added to the workflow.

Knowing that the plot tool needs the geojson, a connection from the geojson output to the corresponding input can be created.
```bash
s4n connect demo --from shp2geojson/districts --to plot_map/geojson
```
As the plot step also needs the election data, another connection can be created.
```bash
s4n connect demo --from download_election_data/data --to plot_map/csv
```
Now we need to wire up the inputs. The input connections for `ags`, `election`, `feature`and `shapes` will be created as follows:
```bash
s4n connect demo --from @inputs/feature --to plot_map/feature
s4n connect demo --from @inputs/shapes --to shp2geojson/data_braunschweig
```
The last step is to add the output to the workflow. Only the `png` file is desired.
```bash
s4n connect demo --from plot_map/plot --to @outputs/map
```
The final workflow needs to be saved.
```bash
s4n save demo
```
## Workflow Execution
We want to clean our workspace by deleting the outputs we created by creating the CommandLineTools. For the execution a parameter file will be created using the `s4n execute make-template` command.
```bash
s4n execute make-template workflows/demo/demo.cwl > inputs.yml
```
This needs to be updated using the correct input values:
```yaml
ags: "03101000"
election: Bundestagswahl 2025
shapes:
class: Directory
location: data/braunschweig
feature: F3
```
Execution of the Workflow is done by
```bash
s4n execute local workflows/demo/demo.cwl inputs.yml
```