https://github.com/fareedkhan-dev/saas-payment-guide
A Beginner's Guide to Monetizing Your Python AI Chatbot
https://github.com/fareedkhan-dev/saas-payment-guide
ai-chatbot flask monetization payment-gateway python sass
Last synced: about 2 months ago
JSON representation
A Beginner's Guide to Monetizing Your Python AI Chatbot
- Host: GitHub
- URL: https://github.com/fareedkhan-dev/saas-payment-guide
- Owner: FareedKhan-dev
- License: mit
- Created: 2025-04-22T09:47:02.000Z (about 1 year ago)
- Default Branch: main
- Last Pushed: 2025-04-22T10:28:40.000Z (about 1 year ago)
- Last Synced: 2025-04-23T15:16:46.274Z (about 1 year ago)
- Topics: ai-chatbot, flask, monetization, payment-gateway, python, sass
- Language: Python
- Homepage: https://medium.com/@fareedkhandev/building-a-subscription-plan-payment-system-for-ai-webapp-using-python-end-to-end-implementation-4dc2f6715805
- Size: 36.1 KB
- Stars: 2
- Watchers: 1
- Forks: 0
- Open Issues: 0
-
Metadata Files:
- Readme: README.md
- License: LICENSE
Awesome Lists containing this project
README
# Building a Subscription Plan Payment System for AI Webapp
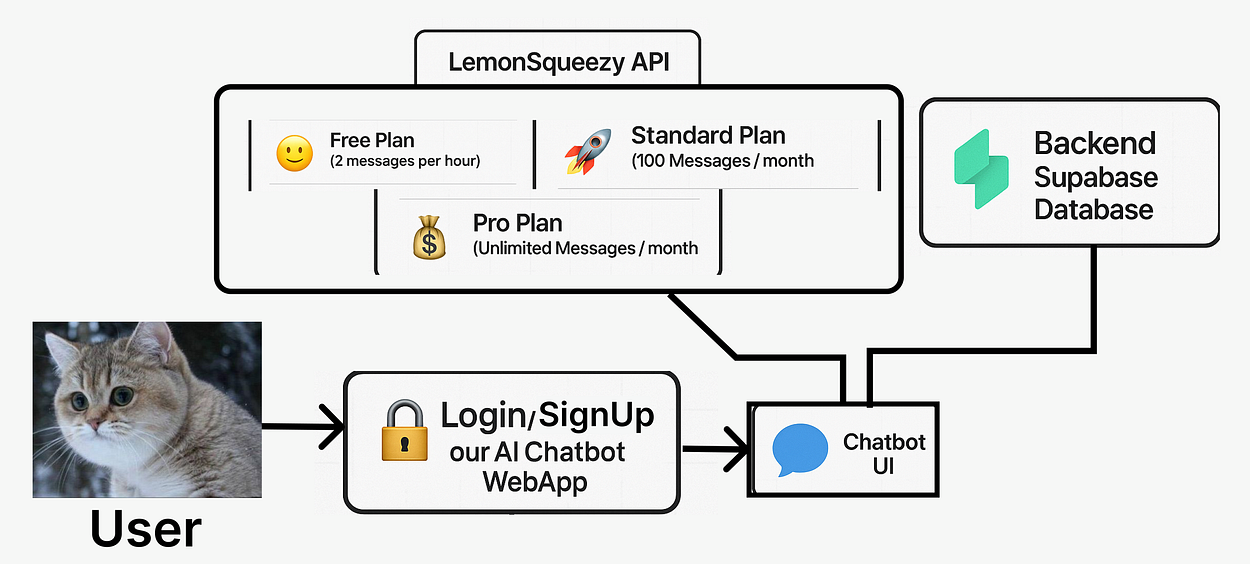
We are going to create a simple AI Chatbot web app from scratch (Frontend + Backend + Payment System) that will include three subscription plans:
* Free Plan (2 messages/hour)
* Standard Plan (100 messages/month = 5 USD)
* Pro Plan (Unlimited messages/month = 20 USD)
Here is the architecture of our web app:
#### Bored? Scroll to the final result: [link](#testing-webapp)
We will be using Supabase as the backend and the LemonSqueezy payment system API to integrate the payment gateway.
LemonSqueezy is a free platform, but they charge (5% + a small fixed fee) for every transaction (amount transferred to your bank account).
You can use the Paddle platform, but they have recently started restricting AI products, so your web app might get rejected.
Here is our complete stack:
* Flask (Python Web Framework)
* OpenAI / Nebius / Ollama for web chat with LLM
* Supabase (Free plan database for backend)
* LemonSqueezy (as the payment gateway for handling our subscription plans)
* ngrok (To test payment system)
## Table of Content
- [Getting Started](#getting-started)
- [SupaBase Database Setup](#supabase-database-setup)
- [Lemon Squeezy Configuration](#lemon-squeezy-configuration)
- [LLM API Configuration](#llm-api-configuration)
- [Setup and Preparation](#setup-and-preparation)
- [Creating a Lemon Squeezy Customer](#creating-a-lemon-squeezy-customer)
- [User Signup Route](#user-signup-route)
- [User Login Route](#user-login-route)
- [User Logout Route](#user-logout-route)
- [Data Fetching \& Monthly Reset](#data-fetching--monthly-reset)
- [Determine Plan Info \& Limits](#determine-plan-info--limits)
- [Processing Allowed Messages](#processing-allowed-messages)
- [Checkout Link \& Rendering](#checkout-link--rendering)
- [Lemon Squeezy Webhook Handler](#lemon-squeezy-webhook-handler)
- [Creating the Frontend Templates](#creating-the-frontend-templates)
- [Creating Webhook Event](#creating-webhook-event)
- [Testing Webapp](#testing-webapp)
- [What’s Next](#whats-next)
## Getting Started
Let’s set up our project structure. Create a main folder (e.g., `simple-chatbot-complete`) and inside it:
```bash
simple-chatbot-complete/
├── templates/
│ ├── home.html
│ ├── login.html
│ └── signup.html
├── .env
├── app.py
└── requirements.txt
```
Now, create the `requirements.txt` file with our dependencies:
```bash
# requirements.txt
Flask
supabase
python-dotenv
openai
werkzeug
requests
```
Once you create the requirements module file, let’s install them first.
```bash
pip install -r requirements.txt
```
Next, we need to create `.env` file which contains all of our keys.
```bash
# .env
# Supabase Credentials
SUPABASE_URL='YOUR_SUPABASE_PROJECT_URL'
SUPABASE_KEY='YOUR_SUPABASE_ANON_PUBLIC_KEY'
# Nebius API Key (or your LLM provider's details)
NEBIUS_API_KEY='YOUR_NEBIUS_API_KEY'
NEBIUS_BASE_URL="https://api.studio.nebius.com/v1/" # Or your provider's base URL
NEBIUS_MODEL="microsoft/Phi-3-mini-4k-instruct" # Or your chosen model
# Lemon Squeezy Credentials
LEMONSQUEEZY_API_KEY="YOUR_LEMONSQUEEZY_API_KEY"
LEMONSQUEEZY_STORE_ID='YOUR_LEMONSQUEEZY_STORE_ID'
LEMONSQUEEZY_STANDARD_VARIANT_ID='YOUR_STANDARD_PLAN_VARIANT_ID'
LEMONSQUEEZY_PRO_VARIANT_ID='YOUR_PRO_PLAN_VARIANT_ID'
LEMONSQUEEZY_WEBHOOK_SECRET='YOUR_LEMONSQUEEZY_WEBHOOK_SIGNING_SECRET'
LEMONSQUEEZY_CHECKOUT_LINK='YOUR_SINGLE_LEMONSQUEEZY_CHECKOUT_LINK'
```
We will go through these environment variables one by one to obtain their values and understand their purpose.
## SupaBase Database Setup
Let’s create the necessary table in Supabase to store user data and track their plan status and usage.
1. Log in to your Supabase dashboard.
2. Select/Create your project.
3. Navigate to the **SQL Editor** in the left sidebar.
4. Paste the following SQL code and click **RUN**.
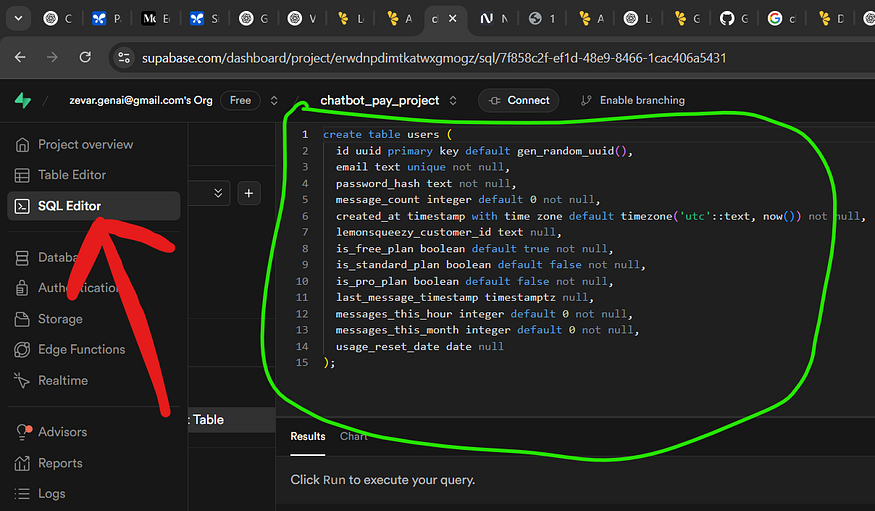
*SupaBase Dashboard*
```sql
-- Create the users table
create table users (
id uuid primary key default gen_random_uuid(), -- Unique user ID (Primary Key)
email text unique not null, -- User's email (must be unique)
password_hash text not null, -- Hashed password
created_at timestamp with time zone default timezone('utc'::text, now()) not null, -- When the user signed up
-- Lemon Squeezy Integration
lemonsqueezy_customer_id text null, -- Stores the corresponding customer ID from Lemon Squeezy
-- Plan Status Flags (Mutually Exclusive)
is_free_plan boolean default true not null,
is_standard_plan boolean default false not null,
is_pro_plan boolean default false not null,
-- Usage Tracking
message_count integer default 0 not null, -- Lifetime message count (optional, good for stats)
messages_this_hour integer default 0 not null, -- Counter for Free plan hourly limit
last_message_timestamp timestamptz null, -- Timestamp of the last message (for Free plan hourly check)
messages_this_month integer default 0 not null, -- Counter for Standard plan monthly limit
usage_reset_date date null -- Date (YYYY-MM-DD) when monthly usage should reset (for Standard/Pro)
);
```
When you run this command, our database table will be created. Let’s take a look at each of the created fields and their purposes.
**Database Table Columns:**
* **id**: uuid, primary key, default gen_random_uuid() - Unique user ID (Primary Key)
* **email**: text, unique, not null - User's email (must be unique)
* **password_hash**: text, not null - Hashed password
* **created_at**: timestamp with time zone, default timezone('utc'::text, now()), not null - When the user signed up
* **lemonsqueezy_customer_id**: text, null - Stores the corresponding customer ID from Lemon Squeezy
* **is_free_plan**: boolean, default true, not null - Flag for Free Plan
* **is_standard_plan**: boolean, default false, not null - Flag for Standard Plan
* **is_pro_plan**: boolean, default false, not null - Flag for Pro Plan
* **message_count**: integer, default 0, not null - Lifetime message count (optional, good for stats)
* **messages_this_hour**: integer, default 0, not null - Counter for Free plan hourly limit
* **last_message_timestamp**: timestamptz, null - Timestamp of the last message (for Free plan hourly check)
* **messages_this_month**: integer, default 0, not null - Counter for Standard plan monthly limit
* **usage_reset_date**: date, null - Date (YYYY-MM-DD) when monthly usage should reset (for Standard/Pro)
Explanation of Columns:
1. Standard user fields: `id`, `email`, `password_hash`, `created_at`.
2. `lemonsqueezy_customer_id`: Links our user to their Lemon Squeezy profile.
3. `is_free_plan`, `is_standard_plan`, `is_pro_plan`: Boolean flags to easily check the user's current active plan. Only one should be true at a time.
4. `message_count`: Total messages sent by the user ever (useful for general stats).
5. `messages_this_hour` / `last_message_timestamp`: Used together to check the Free plan's 2-message-per-hour limit.
6. `messages_this_month`: Counts messages within the current billing cycle for the Standard plan.
7. `usage_reset_date`: Stores the date when `messages_this_month` should be reset to `0`. This is typically set based on the subscription renewal date provided by Lemon Squeezy.
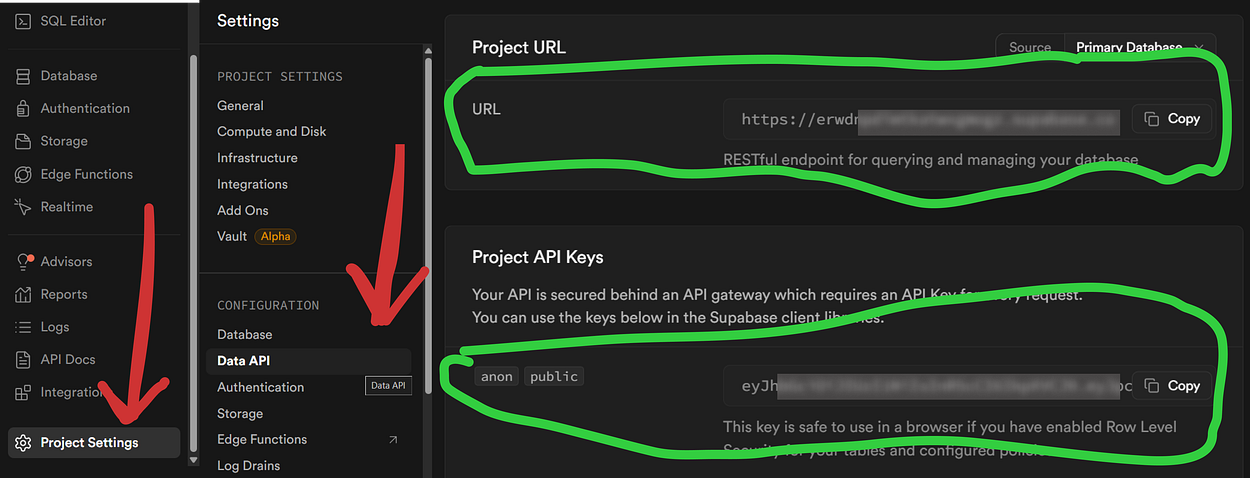
*Finding Supabase API Key*
You can find your Supabase project URL and API key in the project settings. Once you have them, replace the corresponding values in your environment variables.
```bash
# Supabase Credentials
SUPABASE_URL='YOUR_SUPABASE_PROJECT_URL'
SUPABASE_KEY='YOUR_SUPABASE_ANON_PUBLIC_KEY'
```
Now that our backend database has been configured correctly, next let’s configure the LemonSqueezy payment plans.
## Lemon Squeezy Configuration
Before creating the subscription plan using LemonSqueezy, we need to understand how it works. So let’s visualize it first.
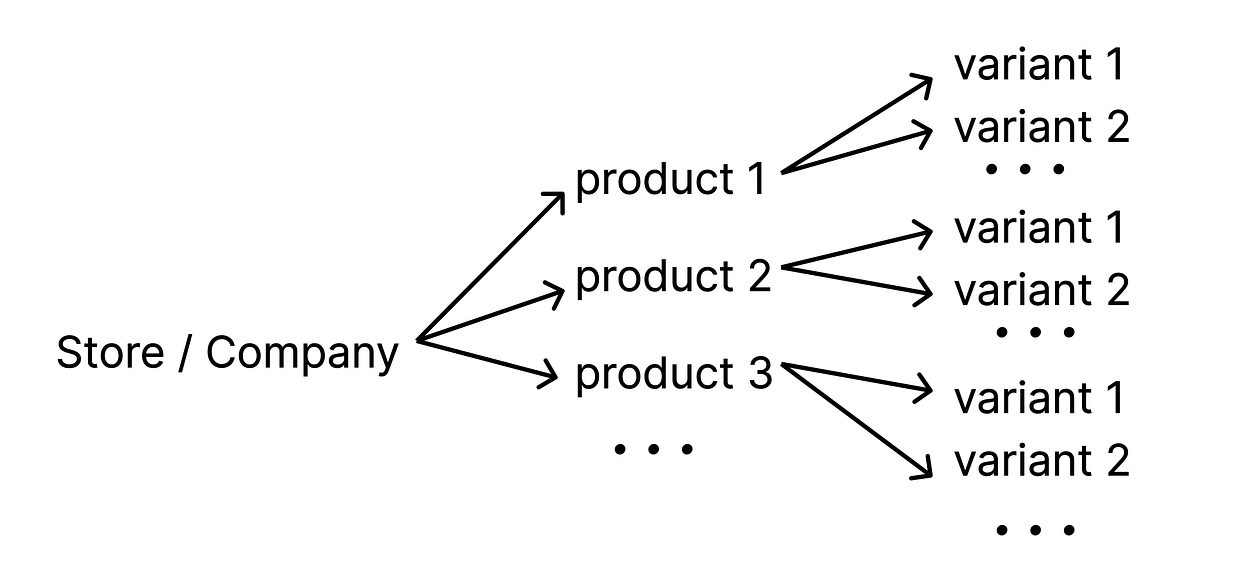
*LemonSqueezy Basic Flow Diagram*
A store represents a company. We can have multiple companies, but each needs to be approved by LemonSqueezy (you can follow the guide to get your store approved on their website).
However, we can use an unapproved store in test mode to integrate the payment system.
Each store can have multiple products. A product can either be a digital product with a set price or a subscription plan. Each product can have multiple variants for example, a subscription product can have:
* Variant 1: Standard Plan
* Variant 2: Pro Plan
Similarly, a digital product can have variants like:
* One variant with a limited set of files.
* Another variant with a different set of files access.
So we are going to create a product (Pricing Plans) and within that we can have multiple variants (Standard Plan, Pro Plan).
1. **Log in** to your Lemon Squeezy dashboard.
2. Go to created store -> Products.
3. Click “+ New Product”.
4. Give it a name (e.g., “Pricing Plan”) and fill rest of the fields.

*Making Pricing Plan*
I added two variants with the pricing currency set to my country (PKR) by default for test mode (you can set it to USD if preferred) and also make sure to set (Subscription — charge on fee) for each variant.
Once you’ve done that, save your changes, and the pricing plans will be displayed in the Products tab.
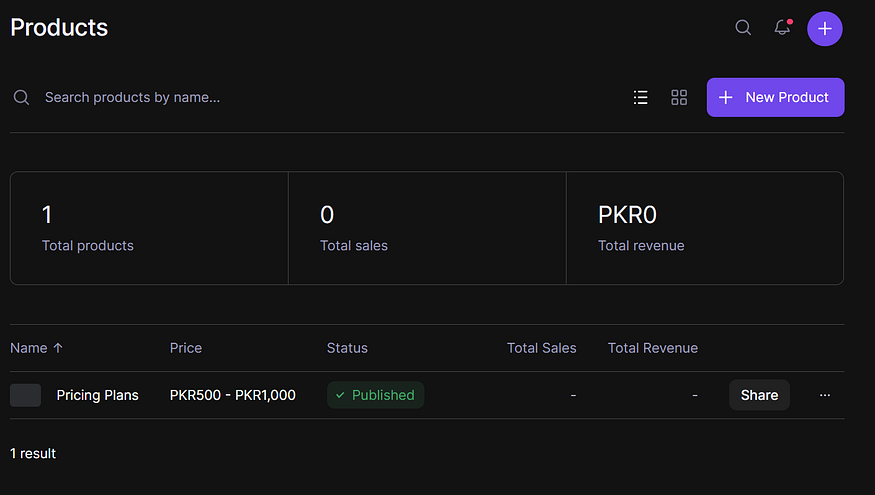
*Products Info*
You can get your Store ID and API Key under the Settings tab. If no API key is present, make sure to create one.

*Getting store ID and API Key*
You also need to get both of your subscription plan variant IDs, which you can obtain by clicking the three dots and copying each variant ID.
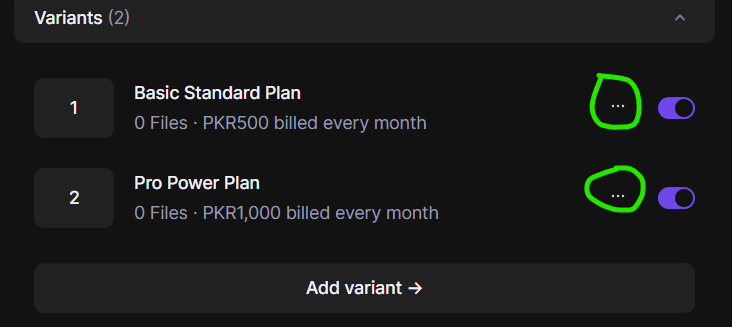
*Variant IDs*
Next, to get a checkout page link for your product, click on the Share button of that product and copy the provided link.
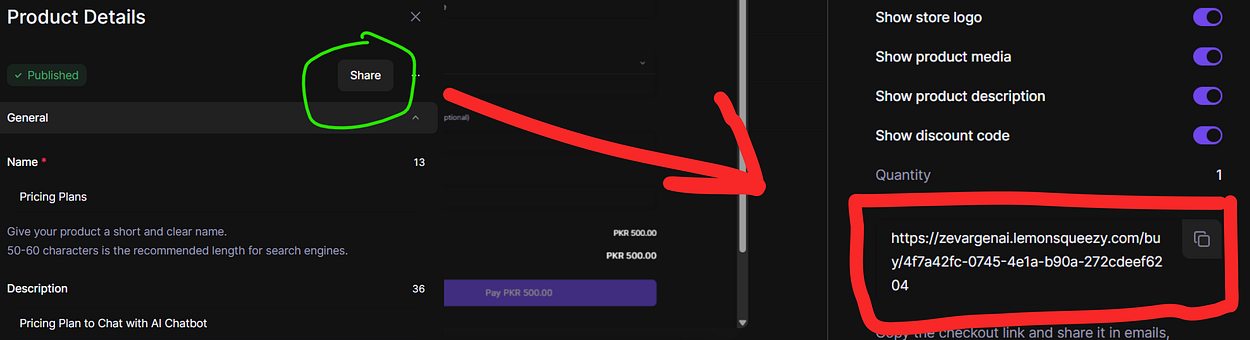
*Get Checkout link*
Once you have them, replace the corresponding values in your environment variables.
```bash
# Lemon Squeezy Credentials
LEMONSQUEEZY_API_KEY="YOUR_LEMONSQUEEZY_API_KEY"
LEMONSQUEEZY_STORE_ID='YOUR_LEMONSQUEEZY_STORE_ID'
LEMONSQUEEZY_STANDARD_VARIANT_ID='YOUR_STANDARD_PLAN_VARIANT_ID'
LEMONSQUEEZY_PRO_VARIANT_ID='YOUR_PRO_PLAN_VARIANT_ID'
LEMONSQUEEZY_CHECKOUT_LINK='YOUR_SINGLE_LEMONSQUEEZY_CHECKOUT_LINK'
# Set it to anything (will be use later)
LEMONSQUEEZY_WEBHOOK_SECRET='YOUR_LEMONSQUEEZY_WEBHOOK_SIGNING_SECRET'
```
You can set **webhook environment variable** of lemonSqueezy (testing transaction) can be set to any value which we will be using later.
## LLM API Configuration
I will be using the Nebius AI platform, which operates under the OpenAI module, similar to how other platforms like Together AI or Ollama function.
There’s not much to configure, you just need to set the base URL and specify the model name you want to integrate into the chatbot.
You can use any LLM provider as long as it supports the OpenAI module. Alternatively, you can use a locally downloaded Hugging Face LLM, but for that, you’ll need to make some adjustments in the code.
```bash
# Nebius API Key (or your LLM provider's details)
NEBIUS_API_KEY='YOUR_NEBIUS_API_KEY'
NEBIUS_BASE_URL="https://api.studio.nebius.com/v1/" # Or your provider's base URL
NEBIUS_MODEL="microsoft/Phi-3-mini-4k-instruct" # Or your chosen model
```
So now that we have configured everything, it’s time to start building our web app.
## Setup and Preparation
First, we need to make the app aware of our environment variables.
Let’s import the necessary libraries and establish the connection between the Flask app and the environment variables:
```python
# app.py
import os
import requests
import json
import hmac
import hashlib
from datetime import datetime, timedelta, timezone, date
from flask import Flask, render_template, request, redirect, url_for, session, flash, abort
from supabase import create_client, Client
from dotenv import load_dotenv
from werkzeug.security import generate_password_hash, check_password_hash
from openai import OpenAI
# Load environment variables from .env file
load_dotenv()
app = Flask(__name__)
# --- Supabase Configuration ---
supabase_url = os.environ.get("SUPABASE_URL")
supabase_key = os.environ.get("SUPABASE_KEY")
supabase: Client = create_client(supabase_url, supabase_key)
# --- Nebius/OpenAI Client Configuration ---
NEBIUS_BASE_URL = os.environ.get("NEBIUS_BASE_URL")
NEBIUS_API_KEY = os.environ.get("NEBIUS_API_KEY")
NEBIUS_MODEL = os.environ.get("NEBIUS_MODEL")
nebius_client = OpenAI(
base_url=NEBIUS_BASE_URL,
api_key=NEBIUS_API_KEY
)
# --- Lemon Squeezy Configuration ---
LEMONSQUEEZY_API_KEY = os.environ.get("LEMONSQUEEZY_API_KEY")
LEMONSQUEEZY_STORE_ID = os.environ.get("LEMONSQUEEZY_STORE_ID")
LEMONSQUEEZY_STANDARD_VARIANT_ID = os.environ.get("LEMONSQUEEZY_STANDARD_VARIANT_ID")
LEMONSQUEEZY_PRO_VARIANT_ID = os.environ.get("LEMONSQUEEZY_PRO_VARIANT_ID")
LEMONSQUEEZY_WEBHOOK_SECRET = os.environ.get("LEMONSQUEEZY_WEBHOOK_SECRET")
LEMONSQUEEZY_API_URL = "https://api.lemonsqueezy.com/v1"
LEMONSQUEEZY_CHECKOUT_LINK_BASE = os.environ.get("LEMONSQUEEZY_CHECKOUT_LINK", "YOUR_SINGLE_CHECKOUT_LINK_HERE") # Load base link
# --- Constants ---
FREE_PLAN_HOURLY_LIMIT = 2
STANDARD_PLAN_MONTHLY_LIMIT = 100
# Pro plan is effectively unlimited, checked by the is_pro_plan flag
```
So …
* We import necessary libraries (`Flask`, `Supabase`, `OpenAI`, `requests`, `datetime`, etc.).
* `load_dotenv()` reads the variables from our `.env` file.
* We initialize the `Supabase` and `Nebius` clients using the environment variables. Error handling is included.
* We load all the `Lemon Squeezy` configuration variables, including the variant IDs and the single checkout link base URL.
* Plan limit constants are defined for clarity.
## Creating a Lemon Squeezy Customer
During signup, we want to create a corresponding customer record in Lemon Squeezy *before* we save the user to our own database.
This ensures we have a link for future subscription events. Let’s create a helper function for this API call.
```python
# app.py (continued)
# --- Helper Function: Create Lemon Squeezy Customer ---
def create_lemon_squeezy_customer(email, name):
"""Creates a customer record in Lemon Squeezy via their API."""
# Construct the API endpoint URL
customer_url = f"{LEMONSQUEEZY_API_URL}/customers"
# Set required headers, including authorization with our API key
headers = {
'Accept': 'application/vnd.api+json',
'Content-Type': 'application/vnd.api+json',
'Authorization': f'Bearer {LEMONSQUEEZY_API_KEY}'
}
# Define the data payload according to Lemon Squeezy API specs
payload = {
"data": {
"type": "customers",
"attributes": {
"name": name, # Name for the customer
"email": email, # Email for the customer
},
"relationships": {
"store": { # Link this customer to our specific store
"data": {
"type": "stores",
"id": str(LEMONSQUEEZY_STORE_ID) # Store ID needs to be a string
}
}
}
}
}
# Make the POST request to Lemon Squeezy API
print(f"Attempting to create LS customer for: {email}")
response = requests.post(customer_url, headers=headers, json=payload)
# Check if the API call was successful (status code 2xx)
if response.status_code == 201: # 201 Created is the expected success code
customer_data = response.json()
customer_id = customer_data.get("data", {}).get("id")
if customer_id:
print(f"Successfully created LS customer ID: {customer_id}")
return customer_id, None # Return the new customer ID and no error
else:
# API succeeded but response format was unexpected
print(f"LS Success Response missing customer ID: {customer_data}")
return None, "Could not extract customer ID from successful API response."
else:
# API call failed (status code 4xx or 5xx)
print(f"Error creating LS customer. Status: {response.status_code}, Response: {response.text}")
```
So …
* This function `create_lemon_squeezy_customer` takes the user's `email` and a `name` (we'll generate this from the `email`).
* It defines the correct API endpoint (`/v1/customers`) and the necessary headers, including our `LEMONSQUEEZY_API_KEY` for authorization.
* It constructs the payload containing the customer's details and links it to our `LEMONSQUEEZY_STORE_ID`.
* Using the `requests` library, it sends a `POST` request to the Lemon Squeezy API.
* It checks the `response.status_code`. A `201 Created` status means success.
* If successful, it extracts the `customer_id` from the JSON response and returns it.
* If there's an error (like a `4xx` or `5xx` status code), it attempts to extract a specific error message.
## User Signup Route
For our web app, we need to create a signup route that allows users to create an account. The user data will be stored in our Supabase database.
```python
# app.py (continued)
# --- Routes ---
@app.route('/signup', methods=['GET', 'POST'])
def signup():
"""Handles user signup."""
# If the request is a POST (user submitted the form)
if request.method == 'POST':
# Get email and password from the submitted form data
email = request.form.get('email')
password = request.form.get('password')
# Simple validation
if not email or not password:
flash('Email and password are required.', 'error')
return redirect(url_for('signup'))
# Query the 'users' table for an entry matching the email
existing_user_check = supabase.table('users').select('id', count='exact').eq('email', email).execute()
# If count > 0, the email is already registered
if existing_user_check.count > 0:
flash('Email address already registered.', 'error')
print(f"Signup failed: {email} already exists.")
return redirect(url_for('signup'))
# --- Create Lemon Squeezy Customer *Before* Supabase User ---
# Generate a simple name from the email for LS
name = email.split('@')[0].replace('.', '').replace('+', '')
ls_customer_id, ls_error = create_lemon_squeezy_customer(email, name)
# --- Create User in Supabase Database ---
# Hash the user's password securely before storing it
password_hash = generate_password_hash(password)
print(f"Creating Supabase user for {email} linked to LS ID {ls_customer_id}")
# Prepare the data for the new user row
user_data = {
'email': email,
'password_hash': password_hash,
'lemonsqueezy_customer_id': ls_customer_id,
'is_free_plan': True, # Default to Free plan
'is_standard_plan': False,
'is_pro_plan': False,
'message_count': 0,
'messages_this_hour': 0,
'last_message_timestamp': None,
'messages_this_month': 0,
'usage_reset_date': None
}
# Insert the new user data into the 'users' table
insert_result = supabase.table('users').insert(user_data).execute()
# If the request is GET (user just visiting the page), render the signup form
return render_template('signup.html')
```
So the Signup Process works like this …
* The route listens on `/signup` for both `GET` (displaying the form) and `POST` (processing signup) requests. On `POST`, it gets the `email` and `password` from the form.
* It checks `Supabase` (`supabase.table('users').select(...)`) to see if a user with that email already exists.
* Crucially, it calls our `create_lemon_squeezy_customer` helper function next. We want to ensure the payment system profile is created before committing to our database.
* If the Lemon Squeezy step succeeds, it securely hashes the password using `generate_password_hash` from `Werkzeug`.
* It prepares a `user_data` dictionary containing all the necessary fields for our `Supabase` users table, defaulting the user to the `is_free_plan`.
* It inserts this data into Supabase using `supabase.table('users').insert(...)`. If the insert is successful, it redirects the user to the login page (`url_for('login')`) with a success message (`flash`).
* If any step fails, it shows an error message (`flash`) and redirects back to the signup page.
* On `GET`, it simply shows the `signup.html` template.
## User Login Route
Now that we have coded the signup route, which also creates a LemonSqueezy user and links it with the ID, next we need to create a login route for that user.
```python
# app.py (continued)
@app.route('/login', methods=['GET', 'POST'])
def login():
"""Handles user login."""
if request.method == 'POST':
email = request.form.get('email')
password = request.form.get('password')
if not email or not password:
flash('Email and password are required.', 'error')
return redirect(url_for('login'))
print(f"Login attempt for: {email}")
# --- Fetch User from Supabase ---
# Select the user matching the email, including their ID and hashed password
user_query = supabase.table('users').select('id, email, password_hash').eq('email', email).execute()
# Check if any user was found (user_query.data will be a list)
if user_query.data:
user = user_query.data[0] # Get the first (and should be only) user found
# --- Verify Password ---
# Compare the provided password with the securely stored hash
if check_password_hash(user['password_hash'], password):
# Password matches! Store user info in the session
session['user_email'] = user['email']
session['user_id'] = user['id'] # Store Supabase user ID
flash('Login successful!', 'success')
# Redirect to the main chatbot homepage
return redirect(url_for('home'))
else:
# Password does not match
flash('Invalid email or password.', 'error')
return redirect(url_for('login'))
else:
# No user found with that email
print(f"Login failed for {email}: User not found")
flash('Invalid email or password.', 'error') # Use generic error for security
return redirect(url_for('login'))
# Render the login page for GET requests
return render_template('login.html')
```
The login process is pretty simple this is how it is working …
* Listens on `/login` for `GET` and `POST`.
* On `POST`, gets `email` and `password`.
* Queries `Supabase` for a user matching the `email`, retrieving their `id` and `password_hash`.
* If a user is found, it uses `check_password_hash` to safely compare the submitted password against the stored hash.
* If the password matches, it stores the `user_email` and `user_id` in the Flask session. The session securely remembers the user is logged in across different page requests.
* Redirects to the main home page (`url_for('home')`) on success.
* Shows error messages for incorrect credentials or if the user isn't found.
* On `GET`, it shows the `login.html` template.
## User Logout Route
We also need a simple logout route that allows the user to log out of our web app.
```python
# app.py (continued)
@app.route('/logout')
def logout():
"""Handles user logout."""
user_email = session.get('user_email', 'Unknown User') # Get email for logging before removal
# Remove user information from the session
session.pop('user_email', None)
session.pop('user_id', None)
print(f"User {user_email} logged out.")
flash('You have been logged out.', 'success')
# Redirect the user back to the login page
return redirect(url_for('login'))
```
* Listens on `/logout`.
* It uses `session.pop()` to remove the `user_email` and `user_id` keys from the session data, effectively logging the user out.
* Flashes a confirmation message.
* Redirects the user to the login page.
## Data Fetching & Monthly Reset
Now we need to code a primary route where users interact with the chatbot after logging in. It handles displaying the interface (`GET` request) and processing messages (`POST` request).
First, we define the route and ensure the user is actually logged in by checking the session.
```python
# app.py (continued)
@app.route('/', methods=['GET', 'POST'])
def home():
"""Displays the main chatbot page and handles message sending."""
# --- 1. Check if user is logged in ---
# If 'user_id' is not found in the session, they aren't logged in
if 'user_id' not in session:
flash('Please login to access the chatbot.', 'error')
return redirect(url_for('login')) # Send them back to login
# Get the logged-in user's ID from the session
user_id = session['user_id']
print(f"Accessing home page for User ID: {user_id}")
# Initialize variables we'll need for the template later
bot_response = None
user_message = None
message_limit_reached = False
plan_name = "Free" # Sensible defaults
current_limit_info = f"{FREE_PLAN_HOURLY_LIMIT}/hour limit"
# --- 2. Fetch Current User Data from Supabase ---
# We need the user's email, plan status, and current usage counts
# Use .single() as we expect exactly one user row for the logged-in ID
user_data_query = supabase.table('users').select(
'email, message_count, is_free_plan, is_standard_plan, is_pro_plan, '
'messages_this_hour, last_message_timestamp, messages_this_month, usage_reset_date'
).eq('id', user_id).single().execute()
# Handle case where user data might be missing (e.g., DB issue)
if not user_data_query.data:
flash('Error fetching your user data. Please login again.', 'error')
print(f"Error: Could not fetch data for User ID: {user_id}")
session.clear() # Log out user if their data is corrupt/missing
return redirect(url_for('login'))
user_data = user_data_query.data
# print(f"User data fetched: {user_data}") # Optional: Log fetched data (be careful with sensitive info)
```
The route checks if the user is logged in via session, redirecting to the login page if not. It then queries the Supabase users table for the logged-in user’s plan and usage limits, handling errors if the query fails.
Next, we assign the fetched data to local variables for easier access and convert data types where needed (like timestamp strings to datetime objects). We also implement the logic to automatically reset monthly message counts for paid plans.
```python
# app.py (continued from Part 1)
# --- 3. Assign local variables & Convert Types ---
# Assign data from the fetched dictionary to Python variables
user_email = user_data['email']
is_free_plan = user_data['is_free_plan']
is_standard_plan = user_data['is_standard_plan']
is_pro_plan = user_data['is_pro_plan']
# These counters might be modified by the reset logic or message sending
message_count = user_data['message_count']
messages_this_hour = user_data['messages_this_hour']
messages_this_month = user_data['messages_this_month']
# Get the string representations from the database
last_message_timestamp_str = user_data['last_message_timestamp']
usage_reset_date_str = user_data['usage_reset_date']
# Convert strings to actual datetime/date objects if they exist
last_message_timestamp = datetime.fromisoformat(last_message_timestamp_str) if last_message_timestamp_str else None
usage_reset_date = date.fromisoformat(usage_reset_date_str) if usage_reset_date_str else None
print(f"User Plan Status: Free={is_free_plan}, Std={is_standard_plan}, Pro={is_pro_plan}")
print(f"Usage Counts: Hour={messages_this_hour}, Month={messages_this_month}, ResetDate={usage_reset_date}")
# --- 4. Check and Perform Monthly Usage Reset ---
today = date.today() # Get today's date
# Check only if user is on Standard or Pro AND a reset date is set AND today is on or after that date
if (is_standard_plan or is_pro_plan) and usage_reset_date and today >= usage_reset_date:
print(f"--- Resetting monthly usage for User ID: {user_id} ---")
print(f"Today ({today}) >= Reset Date ({usage_reset_date})")
# Reset the counter in our local variable FIRST
messages_this_month = 0
# Prepare the database update
reset_update_payload = {'messages_this_month': 0}
# Update the database in the background
print(f"Updating DB: Resetting messages_this_month to 0")
update_reset = supabase.table('users').update(reset_update_payload).eq('id', user_id).execute()
```
The `user_data` dictionary is unpacked, converting the `last_message_timestamp` and `usage_reset_date` into Python `datetime` and `date` objects for accurate comparisons.
If the user is on a paid plan, the reset date has passed, and conditions are met, the message counter is reset, with the next reset date set by the Lemon Squeezy webhook.
## Determine Plan Info & Limits
Now we determine user-friendly strings for the plan and limits based on the flags, and then we start handling the case where the user actually submitted a message (a POST request).
```python
# app.py (continued from Part 2)
# --- 5. Determine Current Plan Info for Display ---
# Set user-friendly strings based on the plan flags
if is_pro_plan:
plan_name = "Pro"
current_limit_info = "Unlimited messages"
elif is_standard_plan:
plan_name = "Standard"
# Use the 'messages_this_month' value (which might have just been reset)
current_limit_info = f"{messages_this_month}/{STANDARD_PLAN_MONTHLY_LIMIT} messages this month"
else: # Free plan (default if not Pro or Standard)
plan_name = "Free"
current_limit_info = f"{FREE_PLAN_HOURLY_LIMIT}/hour message limit"
print(f"User ID {user_id} is on {plan_name} plan. UI Limit info: {current_limit_info}")
# --- 6. Handle Message Submission (POST Request) ---
if request.method == 'POST':
# User submitted the chat form
user_message = request.form.get('user_input') # Get the text from the textarea
print(f"User {user_id} ({plan_name}) submitted message: '{user_message[:50]}...'")
# Proceed only if the message isn't empty and the AI client is ready
if user_message and nebius_client:
allow_message = True # Start by assuming the message is allowed
now_dt = datetime.now(timezone.utc) # Get the current time in UTC for comparisons
usage_update_payload = {} # Prepare an empty dictionary to hold DB updates needed for *this* message
# --- Check Plan Limits --- (This part will be detailed next)
```
Based on the user’s plan flag (`is_pro_plan`, `is_standard_plan`, `is_free_plan`), the `plan_name` and `current_limit_info` are set and displayed on the chat page, with the Standard plan showing the updated `messages_this_month`.
If the request method is `POST`, it processes the user's chat message, checking for a non-empty message and successful AI client initialization, then prepares for potential database updates.
Inside the POST handler, this is where we enforce the rules for each subscription plan.
```python
# app.py (continued inside the `if request.method == 'POST'` block)
# --- Check Plan Limits ---
if is_pro_plan:
# Pro plan users have no message limits
print(f"User {user_id} (Pro): No limit check needed.")
pass # allow_message remains True
elif is_standard_plan:
# Check against the monthly limit
print(f"User {user_id} (Standard): Checking monthly limit ({messages_this_month}/{STANDARD_PLAN_MONTHLY_LIMIT}).")
if messages_this_month >= STANDARD_PLAN_MONTHLY_LIMIT:
allow_message = False # Block the message
message_limit_reached = True # Set flag for the template
flash(f'Standard plan limit ({STANDARD_PLAN_MONTHLY_LIMIT}/month) reached.', 'warning')
print(f"User {user_id} (Standard): Limit REACHED.")
elif is_free_plan:
# Check the hourly limit
print(f"User {user_id} (Free): Checking hourly limit.")
# Check if there *was* a last message and if it was less than 1 hour ago
if last_message_timestamp and (now_dt - last_message_timestamp < timedelta(hours=1)):
print(f" Within 1 hour. Messages this hour: {messages_this_hour}")
# Check if they've already sent the max allowed in this hour window
if messages_this_hour >= FREE_PLAN_HOURLY_LIMIT:
allow_message = False # Block the message
message_limit_reached = True
flash(f'Free plan limit ({FREE_PLAN_HOURLY_LIMIT}/hour) reached.', 'warning')
print(f"User {user_id} (Free): Limit REACHED this hour.")
else:
# Allow message, increment the counter *for this specific hour*
messages_this_hour += 1
print(f" Incrementing hourly count to: {messages_this_hour}")
else:
# It's either the very first message, or the last message was > 1 hour ago
# Start a new hourly count
print(f" New hour window or first message. Setting hourly count to 1.")
messages_this_hour = 1
# If the message is allowed, update the last message timestamp *locally*
# It will only be saved to DB if the AI call succeeds later
if allow_message:
last_message_timestamp = now_dt
# --- Process Message if Allowed --- (This part will be detailed next)
```
Inside the if `user_message` and `nebius_client` block, the logic checks the user's plan:
* **Pro Plan**: No changes, `allow_message` remains True.
* **Standard Plan**: Compares `messages_this_month` with the plan's limit and disables the message if the limit is reached.
* **Free Plan**: If the user has sent a message before and the last message was within the last hour, it checks if the hourly limit is reached; if so, blocks the message. Otherwise, it updates the message count and the timestamp.
## Processing Allowed Messages
If the limit checks determine `allow_message` is still `True`, we proceed to call the AI and update the database.
```python
# app.py (continued inside the `if request.method == 'POST'` block)
# --- Process Message if Allowed by Limits ---
if allow_message:
print(f"User {user_id}: Message allowed. Preparing usage update and calling AI.")
# --- Prepare DB Update Payload ---
# Increment lifetime counter (always)
message_count += 1
usage_update_payload['message_count'] = message_count
# Increment plan-specific counters and add to payload
if is_standard_plan:
messages_this_month += 1 # Use the incremented local value
usage_update_payload['messages_this_month'] = messages_this_month
print(f" Incrementing monthly count to {messages_this_month}")
elif is_free_plan:
# Add the updated hourly count and timestamp to the payload
usage_update_payload['messages_this_hour'] = messages_this_hour
usage_update_payload['last_message_timestamp'] = last_message_timestamp.isoformat() # Store as ISO string
print(f" Updating hourly count to {messages_this_hour} and timestamp.")
# --- Call the AI Model ---
# Use a try-except block specifically for the external API call
try:
print(f" Calling Nebius API for user {user_id}...")
response = nebius_client.chat.completions.create(
model=NEBIUS_MODEL,
messages=[{"role": "user", "content": user_message}]
)
# Extract the text response from the AI
bot_response = response.choices[0].message.content.strip()
print(f" Nebius API Success. Response: '{bot_response[:50]}...'")
# --- Update Usage Counts in Supabase (Only if AI call succeeded) ---
# Use another try-except for the database update
try:
print(f" Updating Supabase usage for user {user_id} with payload: {usage_update_payload}")
update_usage = supabase.table('users').update(usage_update_payload).eq('id', user_id).execute()
# Check if the update query itself failed
if not update_usage.data:
print(f" Warning: Supabase update query failed for user {user_id} after AI call. Response: {update_usage}")
flash('Could not save message usage stats.', 'warning')
else:
print(f" Successfully updated usage stats in Supabase.")
# Immediately update the display string if Standard plan count changed
if is_standard_plan:
current_limit_info = f"{messages_this_month}/{STANDARD_PLAN_MONTHLY_LIMIT} messages this month"
except Exception as e:
# Handle errors during the database update
print(f" ERROR updating Supabase usage for user {user_id} after AI call: {e}")
flash('Error saving message usage progress.', 'error')
# Note: Message was SENT to user, but DB counts might be inconsistent now.
except Exception as e:
# Handle errors during the AI API call itself
print(f" ERROR calling Nebius API or processing response: {e}")
bot_response = "Sorry, there was an error communicating with the AI."
# IMPORTANT: If AI call fails, we DO NOT proceed to update Supabase counts.
# The usage_update_payload was prepared but never sent to DB.
else: # Message was blocked by limits
print(f"User {user_id}: Message blocked due to plan limits. No AI call or DB update.")
# --- Handle cases where message was empty or AI client wasn't ready ---
elif not user_message:
flash("Please enter a message.", "info")
print(f"User {user_id} submitted empty message.")
else: # nebius_client is None
bot_response = "Chatbot service is temporarily unavailable."
print("Attempted to send message but AI client is not configured.")
# --- Prepare Checkout Link --- (This part will be detailed next)
# --- Render the Page --- (This part will be detailed next)
```
If `allow_message` is True, the code increments local counters (message_count, messages_this_month, messages_this_hour) and adds the updated values to `usage_update_payload`.
It then sends the user's message to the AI using `nebius_client.chat.completions.create` within a try...except block to handle errors.
* If the AI call succeeds, it attempts to update the user's record in Supabase with the payload, also wrapped in a try...except block.
* If the AI call fails, it sets an error message and skips the database update; if the database update fails after the AI call, it logs a warning.
## Checkout Link & Rendering
Finally, still within the main `/` route function, we prepare the checkout link with the prefilled `email` and render the `home.html` template, passing all the necessary data.
```python
# app.py (continued from Part 5, now outside the `if request.method == 'POST'` block)
# --- 7. Prepare THE SINGLE Checkout Link with Prefill ---
# Default to '#' if the base link isn't configured properly in .env
upgrade_checkout_link = "#"
# Check if the base link is set and not the placeholder value
if LEMONSQUEEZY_CHECKOUT_LINK_BASE and LEMONSQUEEZY_CHECKOUT_LINK_BASE != "YOUR_SINGLE_CHECKOUT_LINK_HERE":
# URL-encode the user's email to handle special characters safely in the URL
encoded_email = quote(user_email)
# Append the email as a query parameter for Lemon Squeezy prefill
upgrade_checkout_link = f"{LEMONSQUEEZY_CHECKOUT_LINK_BASE}?checkout[email]={encoded_email}"
print(f"Generated checkout link: {upgrade_checkout_link}")
else:
print("Warning: Lemon Squeezy checkout link not configured in .env. Upgrade buttons will not work correctly.")
# --- 8. Render the Page ---
# Pass all computed and fetched data to the Jinja template
print(f"Rendering home template for user {user_id}. Plan: {plan_name}. Limit info: '{current_limit_info}'")
return render_template('home.html',
user_email=user_email,
plan_name=plan_name,
current_limit_info=current_limit_info, # The user-friendly limit string
is_free_plan=is_free_plan, # Pass boolean flags for template logic
is_standard_plan=is_standard_plan,
is_pro_plan=is_pro_plan,
user_message=user_message, # The user's most recent message (if POST)
bot_response=bot_response, # The AI's response (if POST and successful)
message_limit_reached=message_limit_reached, # Boolean to disable Send button
upgrade_checkout_link=upgrade_checkout_link, # The single prefilled checkout link
STANDARD_PLAN_MONTHLY_LIMIT=STANDARD_PLAN_MONTHLY_LIMIT # Pass constant for display
)
```
The code first prepares a checkout link by encoding the user’s email using `urllib.parse.quote` and appending it to the base checkout URL (`LEMONSQUEEZY_CHECKOUT_LINK_BASE`).
If the link isn't properly configured, a warning is printed. Finally, it calls Flask's `render_template` function, passing `home.html` as the template and all necessary variables as keyword arguments, allowing Flask's Jinja engine to generate the HTML dynamically for the user's browser.
This completes the main application route (`/`).
## Lemon Squeezy Webhook Handler
This route doesn’t interact directly with the user’s browser. Instead, it acts as a listener, waiting for notifications (webhooks) sent directly from the Lemon Squeezy platform whenever important events related to subscriptions occur in our store (like a new subscription starting, a payment succeeding, or a subscription being cancelled).
The *most critical* part of handling webhooks is ensuring they actually came from Lemon Squeezy and not from a malicious actor trying to fake an upgrade. This is done using a **signing secret**.
```python
# app.py (continued)
# --- Lemon Squeezy Webhook Handler ---
@app.route('/webhook/lemonsqueezy', methods=['POST'])
def lemonsqueezy_webhook():
"""Handles incoming webhooks from Lemon Squeezy."""
# --- 1. Verify Webhook Signature (Security Check!) ---
print("--- Received Incoming Request on /webhook/lemonsqueezy ---")
# Get the secret key we stored in our .env file
secret = LEMONSQUEEZY_WEBHOOK_SECRET
# Lemon Squeezy sends the signature in the 'X-Signature' header
signature = request.headers.get('X-Signature')
if not signature:
print("Webhook Error: X-Signature header missing from request.")
# Abort with 400 Bad Request as the request is malformed
abort(400)
# We need the raw request body (as bytes) to calculate the signature correctly
payload = request.get_data()
# Calculate the expected signature using HMAC-SHA256 algorithm
# The secret key and the raw payload are used
computed_hash = hmac.new(secret.encode('utf-8'), payload, hashlib.sha256)
digest = computed_hash.hexdigest() # The resulting signature as a hex string
# If we reach here, the signature is valid!
print("Webhook signature verified successfully.")
# --- 2. Process the Verified Payload --- (Detailed next)
# ... rest of the webhook logic ...
```
The route listens for POST requests at `/webhook/lemonsqueezy` and retrieves the `LEMONSQUEEZY_WEBHOOK_SECRET` from environment variables.
If the secret is missing, it returns a 500 error. It checks for the `X-Signature` header; if absent, it returns a 400 error.
The raw request body is retrieved as bytes, and using Python’s `hmac` and `hashlib`, it calculates the expected HMAC-SHA256 signature with the secret key, ensuring the request is valid.
Once the signature is verified, we need to understand the content of the notification. We parse the JSON data and identify what kind of event occurred.
```python
# app.py (continued inside the lemonsqueezy_webhook function, after signature verification)
# --- 2. Process the Verified Payload ---
# Decode the raw payload (bytes) into a Python dictionary
event_data = json.loads(payload.decode('utf-8'))
print(f"Webhook Payload successfully parsed as JSON.")
# Get event details from headers and payload metadata for logging/logic
event_name = request.headers.get('X-Event-Name', 'unknown_event')
webhook_id = event_data.get('meta', {}).get('webhook_id', 'N/A') # Useful for tracing
# Get the main 'data' object which contains event-specific details
data_obj = event_data.get('data')
# Get the 'attributes' dictionary within 'data'
attributes = data_obj.get('attributes', {})
# Get the Lemon Squeezy customer ID (needed to find our user)
ls_customer_id = attributes.get('customer_id')
ls_customer_id_str = str(ls_customer_id) # Ensure it's a string
# --- 3. Handle Specific Subscription Events --- (Detailed next)
# ... logic based on event_name ...
```
The raw payload is parsed into a dictionary. The event name and `webhook_id` are extracted for processing or debugging. The `customer_id` is extracted, converted to a string, and used to find the corresponding user in Supabase.
Then comes the core logic for when a user buys a plan or their subscription renews. We need to update their plan status in our database and reset their monthly usage.
```python
# app.py (continued inside the lemonsqueezy_webhook function)
# --- 3. Handle Specific Subscription Events ---
try: # Add a try block for the event processing logic
# --- Event: Subscription Created or Updated (Became Active) ---
# Check if the event is one that signifies an active subscription starting or continuing
if event_name in ['subscription_created', 'subscription_updated']:
# Extract details specific to subscription events
variant_id = attributes.get('variant_id')
renews_at_str = attributes.get('renews_at') # Timestamp for the *next* renewal
status = attributes.get('status') # Current status of the subscription
print(f"Processing {event_name} for LS Customer {ls_customer_id_str}. Status: {status}")
# We only want to grant access/reset limits if the subscription is currently 'active'
if status == 'active':
if not variant_id:
print(f"Webhook Warning ({webhook_id}): 'variant_id' missing for active sub.")
return 'Warning: Missing variant ID', 202
variant_id_str = str(variant_id) # Ensure string comparison
# --- Calculate Next Usage Reset Date ---
next_reset_date = None
if renews_at_str:
# Parse the ISO timestamp string from Lemon Squeezy (usually UTC, ending in 'Z')
# Convert to a timezone-aware datetime object, then get just the date part
next_reset_date = datetime.fromisoformat(renews_at_str.replace('Z', '+00:00')).astimezone(timezone.utc).date()
print(f" Calculated next reset date: {next_reset_date}")
else:
# If 'renews_at' is missing (should be rare for active subs), create a fallback
next_reset_date = date.today() + timedelta(days=30) # Approx. 1 month
print(f" Warning: 'renews_at' missing. Using fallback reset date: {next_reset_date}")
# --- Prepare Supabase Update Payload ---
# This dictionary holds the changes we want to make to the user's record
update_payload = {
'is_free_plan': False, # They are on a paid plan
'messages_this_month': 0, # RESET the monthly counter
'messages_this_hour': 0, # Reset hourly counter (not used, but good practice)
'last_message_timestamp': None, # Clear hourly timestamp
'usage_reset_date': next_reset_date.isoformat() if next_reset_date else None # Store YYYY-MM-DD
}
# --- Set Correct Plan Flag Based on Variant ID ---
# Compare the variant ID from the webhook with the IDs stored in our .env
if variant_id_str == str(LEMONSQUEEZY_STANDARD_VARIANT_ID):
print(f" Setting plan to Standard (Variant ID: {variant_id_str})")
update_payload['is_standard_plan'] = True
update_payload['is_pro_plan'] = False
elif variant_id_str == str(LEMONSQUEEZY_PRO_VARIANT_ID):
print(f" Setting plan to Pro (Variant ID: {variant_id_str})")
update_payload['is_standard_plan'] = False
update_payload['is_pro_plan'] = True
else:
# If the variant ID doesn't match our known plans
print(f" Ignoring unknown active variant ID: {variant_id_str}")
return 'Event for unknown variant ignored', 200 # Acknowledge, but take no action
# --- Apply Update to Supabase ---
# Find the user by their lemonsqueezy_customer_id and apply the updates
print(f" Attempting Supabase update for LS Customer {ls_customer_id_str}")
update_result = supabase.table('users').update(update_payload).eq('lemonsqueezy_customer_id', ls_customer_id_str).execute()
except Exception as e: # Catch errors during the event processing logic
print(f"Webhook Error ({webhook_id}): Unhandled exception processing event {event_name}: {e}")
import traceback
traceback.print_exc() # Log the full error stack trace for debugging
abort(500) # Signal internal server error
```
The event handling is wrapped in a try…except block to catch errors. It checks if the event is `subscription_created` or `subscription_updated` and extracts relevant details, including `variant_id`, `renews_at`, and status.
Only active subscriptions trigger access grants or limit resets. The `next_reset_date` is calculated from `renews_at`. The `update_payload` is prepared to reset usage data and set the correct plan based on `variant_id`.
The database is updated with this payload, and the result is checked to return appropriate status codes (200 for success, 202 for user not found, 500 for errors).
Finally, add the standard code to run the Flask development server when you execute the script.
```python
# app.py (continued)
# --- Run the Flask App ---
if __name__ == '__main__':
# host='0.0.0.0' makes the server accessible on your local network
# debug=True enables auto-reload and provides detailed error pages (disable in production!)
print("--- Starting Flask Development Server ---")
print("Access at: http://127.0.0.1:5000 (or your local IP)")
app.run(debug=True, host='0.0.0.0', port=5000)
```
So now that we have implemented all the backend logic, it’s time to start building the frontend of our web app.
## Creating the Frontend Templates
let’s create a simple signup page first.
```html
Sign Up
Sign Up
{% with messages = get_flashed_messages(with_categories=true) %}
{% if messages %}
{% for category, message in messages %}
{{ message }}
{% endfor %}
{% endif %}
{% endwith %}
Email:
Password:
Sign Up
Already have an account? Login
```
It works in a very simple way: the user signs up and the account is created. After that, the user is redirected to the login page with a flash message saying “Account created successfully.”
The login page is also simple, but for login, we need to check if the user exists in the database. This requires a bit of logic to validate the user credentials before granting access.
```html
Login
Login
{% with messages = get_flashed_messages(with_categories=true) %}
{% if messages %}
{% for category, message in messages %}
{{ message }}
{% endfor %}
{% endif %}
{% endwith %}
Email:
Password:
Login
Don't have an account? Sign Up
```
Yup, it’s also very simple a flash message appear when we no user was found in our database.
Now finally, we need to code the HTML template for our chat app user interface. This will include the layout for the chat window, input field, send button, and any other elements needed for the chatbot interaction.
```html
Chatbot Home
{% with messages = get_flashed_messages(with_categories=true) %}
{% if messages %}
{% for category, message in messages %}
{{ message }}
{% endfor %}
{% endif %}
{% endwith %}
{% if is_free_plan or is_standard_plan %}
{% if is_free_plan %}
Upgrade your plan for more messages!
Please ensure you use the email '{{ user_email }}' during checkout.
{% elif is_standard_plan %}
Upgrade to Pro for unlimited messages!
Please ensure you use the email '{{ user_email }}' during checkout.
{% endif %}
{% endif %}
Simple Chatbot
{{ user_message or '' }}
{# Disable button if message limit reached #}
Send
{# Display previous user message if sent in this request #}
{% if user_message and not message_limit_reached %}
You: {{ user_message | escape }}
{% endif %}
{# Display bot response if generated #}
{% if bot_response %}
Bot: {{ bot_response | escape }}
{% endif %}
{# Initial state message or limit reached message #}
{% if not user_message and not bot_response and not message_limit_reached %}
Ask the chatbot a question above.
{% elif message_limit_reached %}
Your message limit has been reached for the current plan/period.
{% endif %}
```
So, our home page template will display the current active plan for the user, along with the message count for that user and some other basic information. This will give the user an overview of their subscription and usage.
We are very close to testing our app! The final step is to host our app using ngrok and create a webhook event link that will help make the transaction successful.
## Creating Webhook Event
Lemon Squeezy webhooks need a publicly accessible URL to send notifications to your Flask app.
While developing locally, your app is usually only available at `http://127.0.0.1:5000`, which Lemon Squeezy can't reach. Ngrok creates a secure tunnel to expose your local server to the internet, allowing you to test webhooks and other integrations with external services.
Go to [ngrok.com/download](https://www.google.com/url?sa=E&q=https%3A%2F%2Fngrok.com%2Fdownload) and download the version for your operating system. Unzip it and make it available via environment variables too, you can follow this [youtube video](https://www.youtube.com/watch?v=ZKnpP7QGjX8), in case you get stuck.
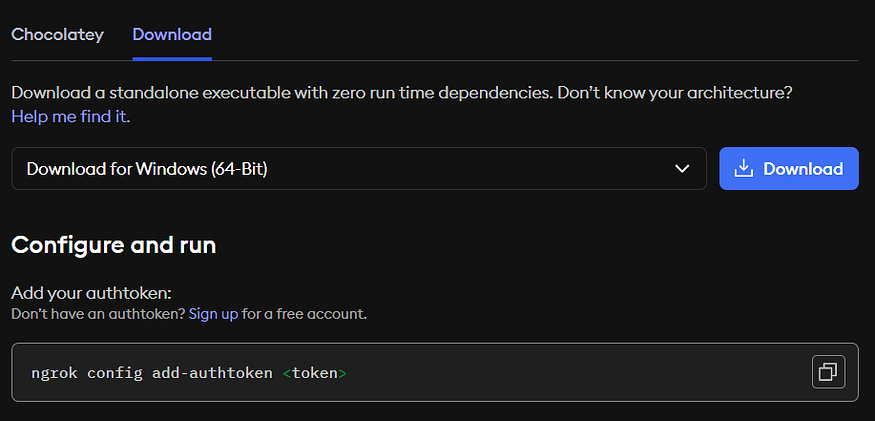
*Ngrok download step*
Once you configure ngrok, start your Flask app using:
```bash
python app.py
```
This will run your app locally, open a *new separate terminal window* (keep your Flask app terminal running). Navigate to where you downloaded ngrok (or ensure it’s in your system’s PATH) and run:
```bash
ngrok http 5000
```
*(Replace 5000 if your Flask app runs on a different port).*
This will generate a public URL (e.g., `https://abcd1234.ngrok.io`) that you can use for webhooks and other external integrations.
```bash
Session Status online
Account Your Name (Plan: Free)
Version x.x.x
...
Forwarding https://xxxxxxxx.ngrok.io -> http://localhost:5000
```
Go back to your Lemon Squeezy dashboard -> Settings -> Webhooks. Add a new webhook.
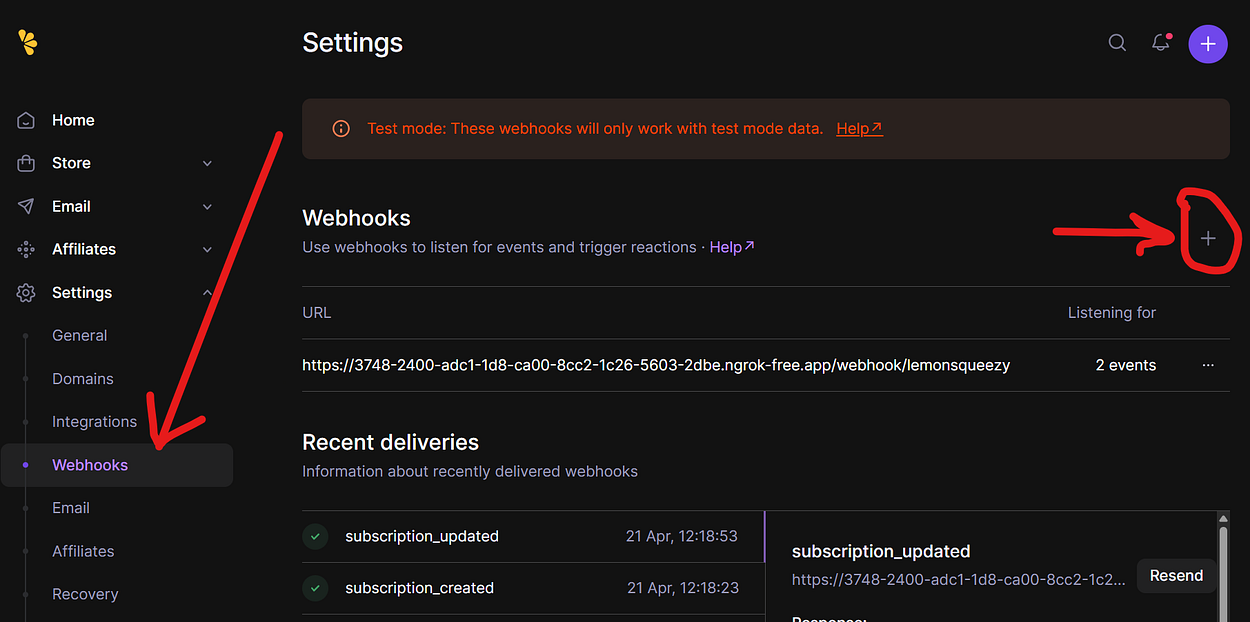
*Creating a webhook*
Now paste that ngrok URL into the webhook environment variable you created, and make sure to enable the `subscription_created` and `subscription_updated` events, these are the two features we’ve implemented.
You’ll see there’s a lot more we can do with additional webhook events and automation later on.

*Webhook customization*
Save that webhook, and one important point to remember is that if you run the app (Flask + ngrok) again the next day, you’ll need to update the ngrok URL, as it will be different with each new session.
## Testing Webapp
Now that we have coded everything its time to test our app. Let’s try to login first it must throws error because haven’t created the account yet right.
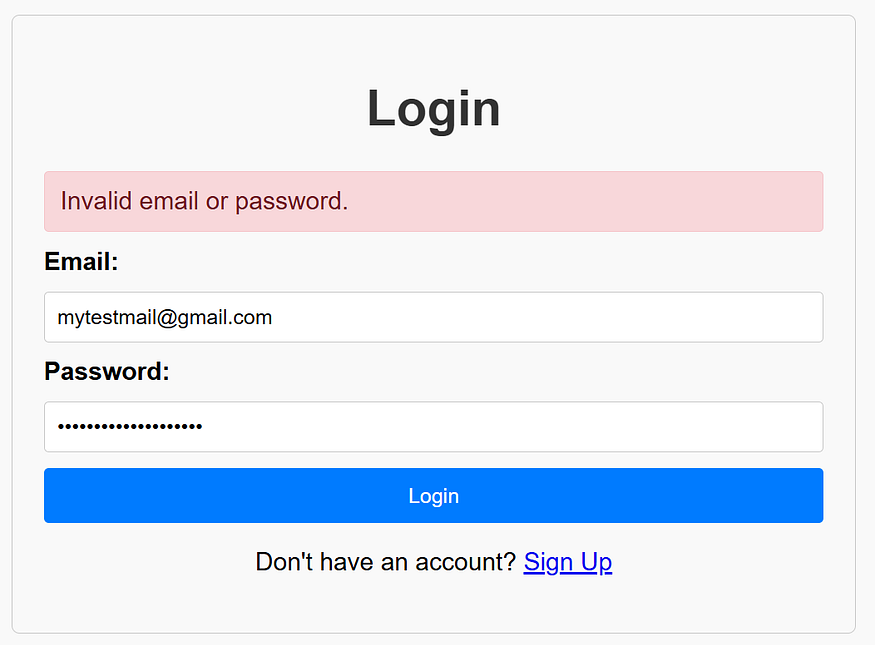
*login error*
so the login error works as expected let’s create an account and then login to see the user interface and test our free plan.
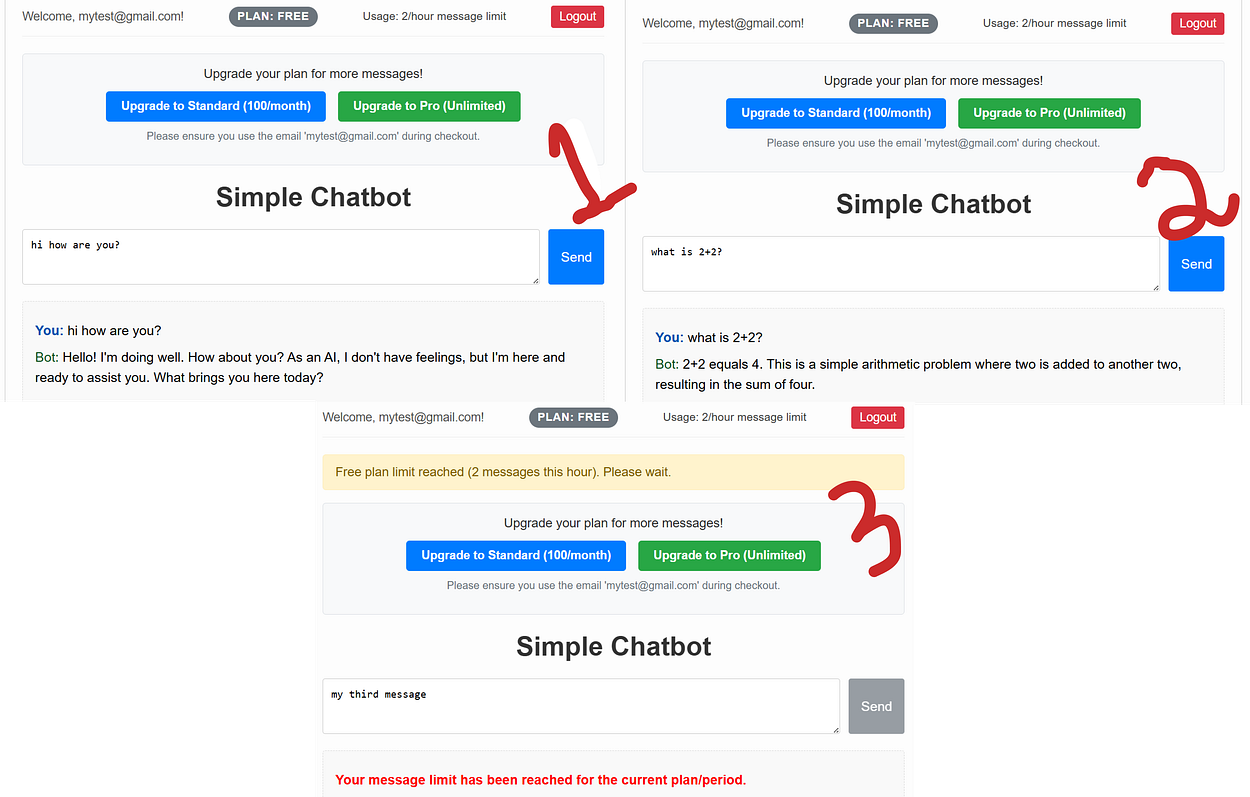
*Free plan usage*
Our user interface is very minimal, and you can see that every new user login is assigned the default Free plan, which is working as expected (2 messages per hour).
Now, let’s buy the Standard plan and see how it updates our user interface accordingly.
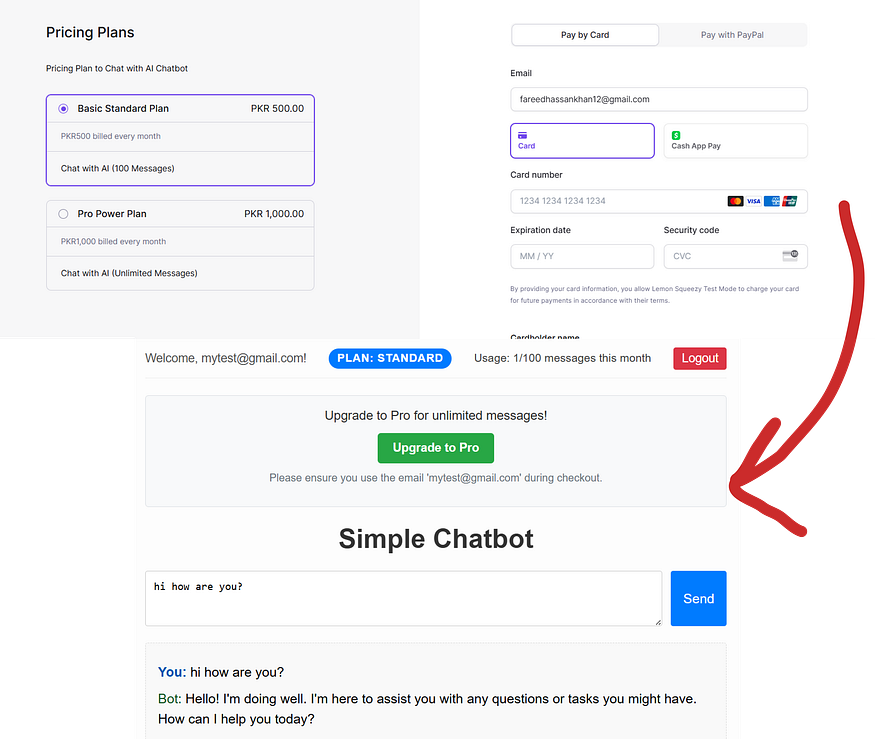
*Buying standard plan*
You can see that when I purchase the Standard plan, the user interface updates to show my current plan, the number of remaining messages, and other relevant information.
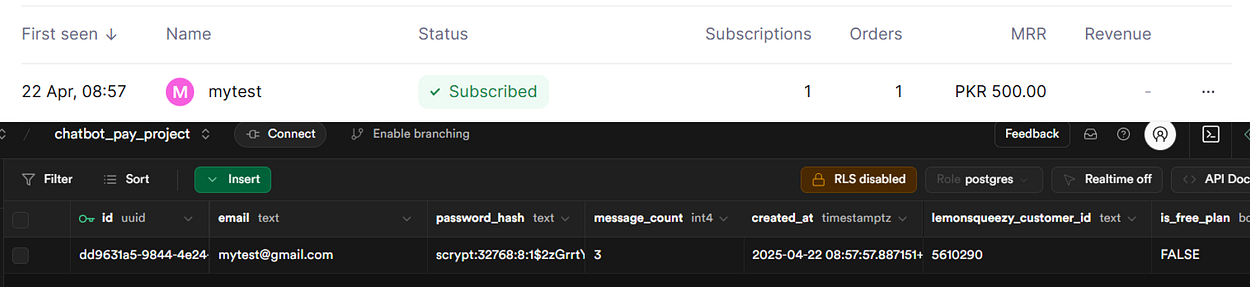
*Supabase + LemonSqueezy database table*
You can see that our database table, along with the payment data table, is updated with the user’s current subscription and related details.
## What’s Next
LemonSqueezy offers a wide range of features to help you build a complete, secure, end-to-end application. You can test transactions using dummy cards listed in their [documentation](https://docs.lemonsqueezy.com/).
LemonSqueezy only charges fees when your business generates revenue, making it ideal for startups and developers.
Make sure to thoroughly explore their documentation to understand and test each feature properly, and to ensure your app is secure and production-ready.
Hope this blog gives you a strong starting point.
> **Happy Reading!**