https://github.com/fifolio/signcast
Technical Assignment
https://github.com/fifolio/signcast
assessment-project
Last synced: 11 months ago
JSON representation
Technical Assignment
- Host: GitHub
- URL: https://github.com/fifolio/signcast
- Owner: fifolio
- Created: 2024-12-04T14:38:58.000Z (over 1 year ago)
- Default Branch: main
- Last Pushed: 2024-12-11T19:38:43.000Z (over 1 year ago)
- Last Synced: 2024-12-11T20:36:14.089Z (over 1 year ago)
- Topics: assessment-project
- Language: TypeScript
- Homepage: https://signcast.netlify.app
- Size: 6.79 MB
- Stars: 1
- Watchers: 1
- Forks: 0
- Open Issues: 0
-
Metadata Files:
- Readme: README.md
Awesome Lists containing this project
README
# SignCast Front-End Project 📊
Welcome to the **SignCast** repository! This project aims to create a **PDF drawing tool** that helps installation teams design the installation of LED screens. The tool provides a user-friendly interface for configuring and downloading the installation diagram in PDF format.
🔴 View Live: Signcast.netlify.app
## 📋 Project Overview
SignCast is a React-based application designed to simplify the installation process of LED screens by offering a digital tool that allows users to:
- Select equipment from a pre-defined database (CSV).
- Toggle between configurations (e.g., screen orientation, installation type).
- Generate and download installation diagrams in PDF format.
## 🚀 Getting Started
To get started with the development and run the project locally, follow these steps:
## 🛠️ Prerequisites
1. **Node.js & npm**: Ensure you have Node.js and npm installed.
- Install from [Node.js official website](https://nodejs.org/).
2. **Vite**: This project uses **Vite** as the build tool for fast and efficient development.
- Vite is already included as a development dependency and doesn't require global installation.
3. **Dependencies**: This project uses various libraries and frameworks:
- **React** for building the UI.
- **Tailwind CSS** for styling.
- **Fabric.js** for drawing and generating PDF diagrams.
- **Papaparse** for handling Excel (.xlsx) data.
- **zustand** for state management.
### 📝 Installation
1. Clone this repository:
```bash
git clone https://github.com/fifolio/signcast.git
```
2. Navigate into the project folder:
```bash
cd signcast
```
3. Install the dependencies:
```bash
npm install
```
4. Run the development server:
```bash
npm run dev
```
The application will be available at `http://localhost:3000`.
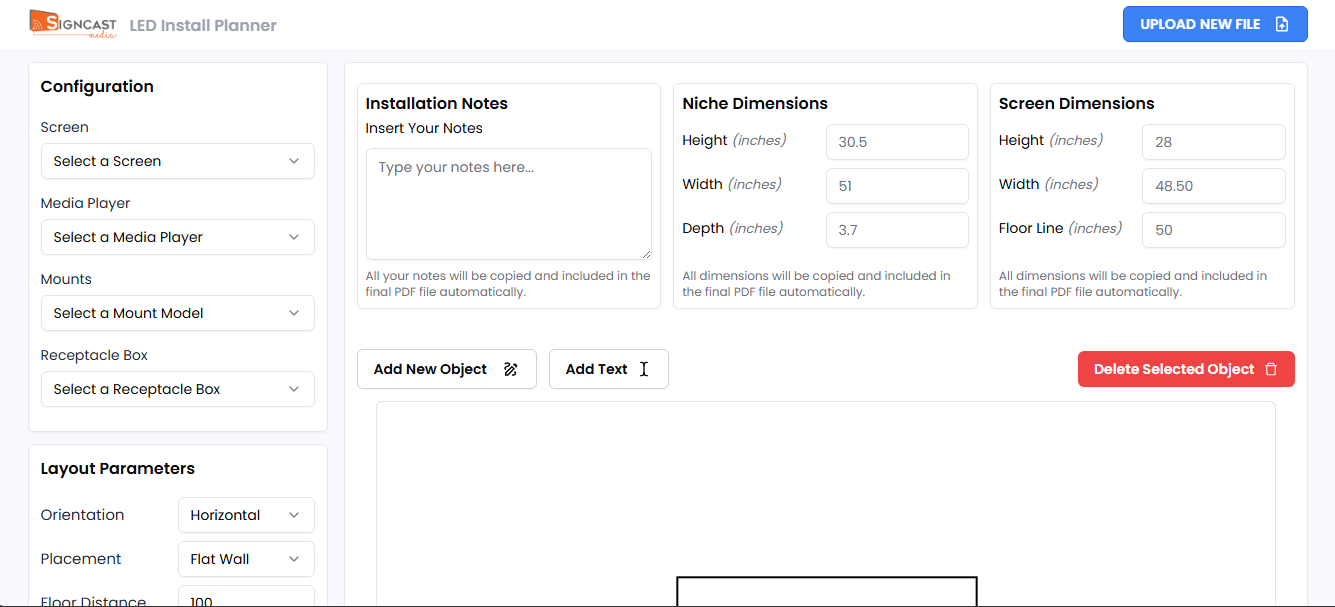
## 📸 Screenshot of the Control Panel
Below is a screenshot of the Control Panel interface, where users can manage settings, view data processing status, and access the uploaded Excel file for processing.
## 🖥️ Application Structure
The application is divided into the following main folders:
- **components/**: Contains reusable UI components.
- **common/**: General components like the Navbar.
- **controllers/**: Handles major functional components like Configuration, Description, etc.
- **details/**: Displays the project information and equipment selection.
- **fabric/**: Includes the Fabric.tsx component for handling the diagram creation logic.
- **ui/**: Contains additional UI elements for the design.
- **upload/**: Handles file uploads, including Excel (.xlsx) file reading.
- **helpers/**: Utility functions like file handling.
- **stores/**: Zustand-based state management for user selections and configurations.
- **public/**: Static assets like images or files.
- **src/**: The main source directory for the React application.
- **types/**: TypeScript types for defining application state and props.
## 🔑 Features
- **Equipment Selection**: Users can select from dropdowns (e.g., LED Screen, Mount Type, Media Player).
- **Dynamic Drawing**: Updates in real-time based on the selections, including screen orientation and installation type.
- **PDF Export**: The application generates a downloadable PDF with the installation diagram.
- **Configuration Options**: Users can adjust parameters like niche depth, screen size, and the distance from the floor to the screen center.
## 📂 Folder Overview
- **src/components/fabric/Fabric.tsx**: The main component responsible for drawing the diagram using Fabric.js.
- **src/components/details/Notes.tsx**: Displays user notes and project information.
- **src/components/controllers/Configuration.tsx**: Manages user configuration inputs for the screen and installation type.
## ⚙️ Key Functionality
### 1. Equipment Selection 🖥️
Users can choose different equipment such as LED screens, media players, and mount types from a pre-loaded Excel (.xlsx) file. This data is used to populate dropdown menus in the UI.
- **CSV Parsing**: Uses the `Papaparse` library to read Excel (.xlsx) data.
- **Dropdowns**: Built using Radix UI components like `@radix-ui/react-select`.
### 2. Drawing Display ✏️
The **Fabric.tsx** component is the core of the drawing functionality. It leverages **Fabric.js** to render the LED screen diagram dynamically. Users can:
- Toggle screen orientation (horizontal or vertical).
- Adjust niche depth.
- View the power outlet location and other measurements.
### 3. PDF Export 📥
Once the diagram is drawn and the user is satisfied with the configuration, they can download the drawing as a PDF.
- Uses `@react-pdf/renderer` to generate and download the PDF.
## 📝 Configuration Options
The application allows the following configurations:
- **Orientation**: Toggle between horizontal and vertical screens.
- **Installation Type**: Choose between recessed (Niche) or flat wall installation.
- **Distance from Floor**: Input the distance from the floor to the center of the screen.
- **Niche Depth**: Automatically calculated or adjusted by the user.
## 🔄 Data Flow
1. **Excel (.xlsx) Data Loading**: The equipment data is loaded from a Excel (.xlsx) file and parsed using **Papaparse**.
2. **User Selection**: User interactions (e.g., dropdown selections) update the **zustand** store, which triggers a re-render of the UI and the Fabric.js canvas.
3. **Drawing Update**: The **Fabric.tsx** component listens for state changes and updates the drawing in real-time.
4. **PDF Generation**: Once the drawing is complete, users can generate a PDF using the configured settings.
## 📊 Excel File Format
For proper and successful loading of the Excel (.xlsx) file, make sure it includes the following header sections in each relevant sheet:
1. **Screen MFR sheet**:
- **Screen MFR**
- **Make**
- **Screen Size**
- **Height**
- **Width**
- **Depth**
2. **Media Player MFR sheet**:
- **MFG. PART**
- **Make**
- **Height**
- **Width**
- **Depth**
3. **Mounts sheet**:
- **MFG. PART**
- **Brand**
- **Maximum Load (lbs)**
4. **Receptacle Box sheet**:
- **MFG. PART**
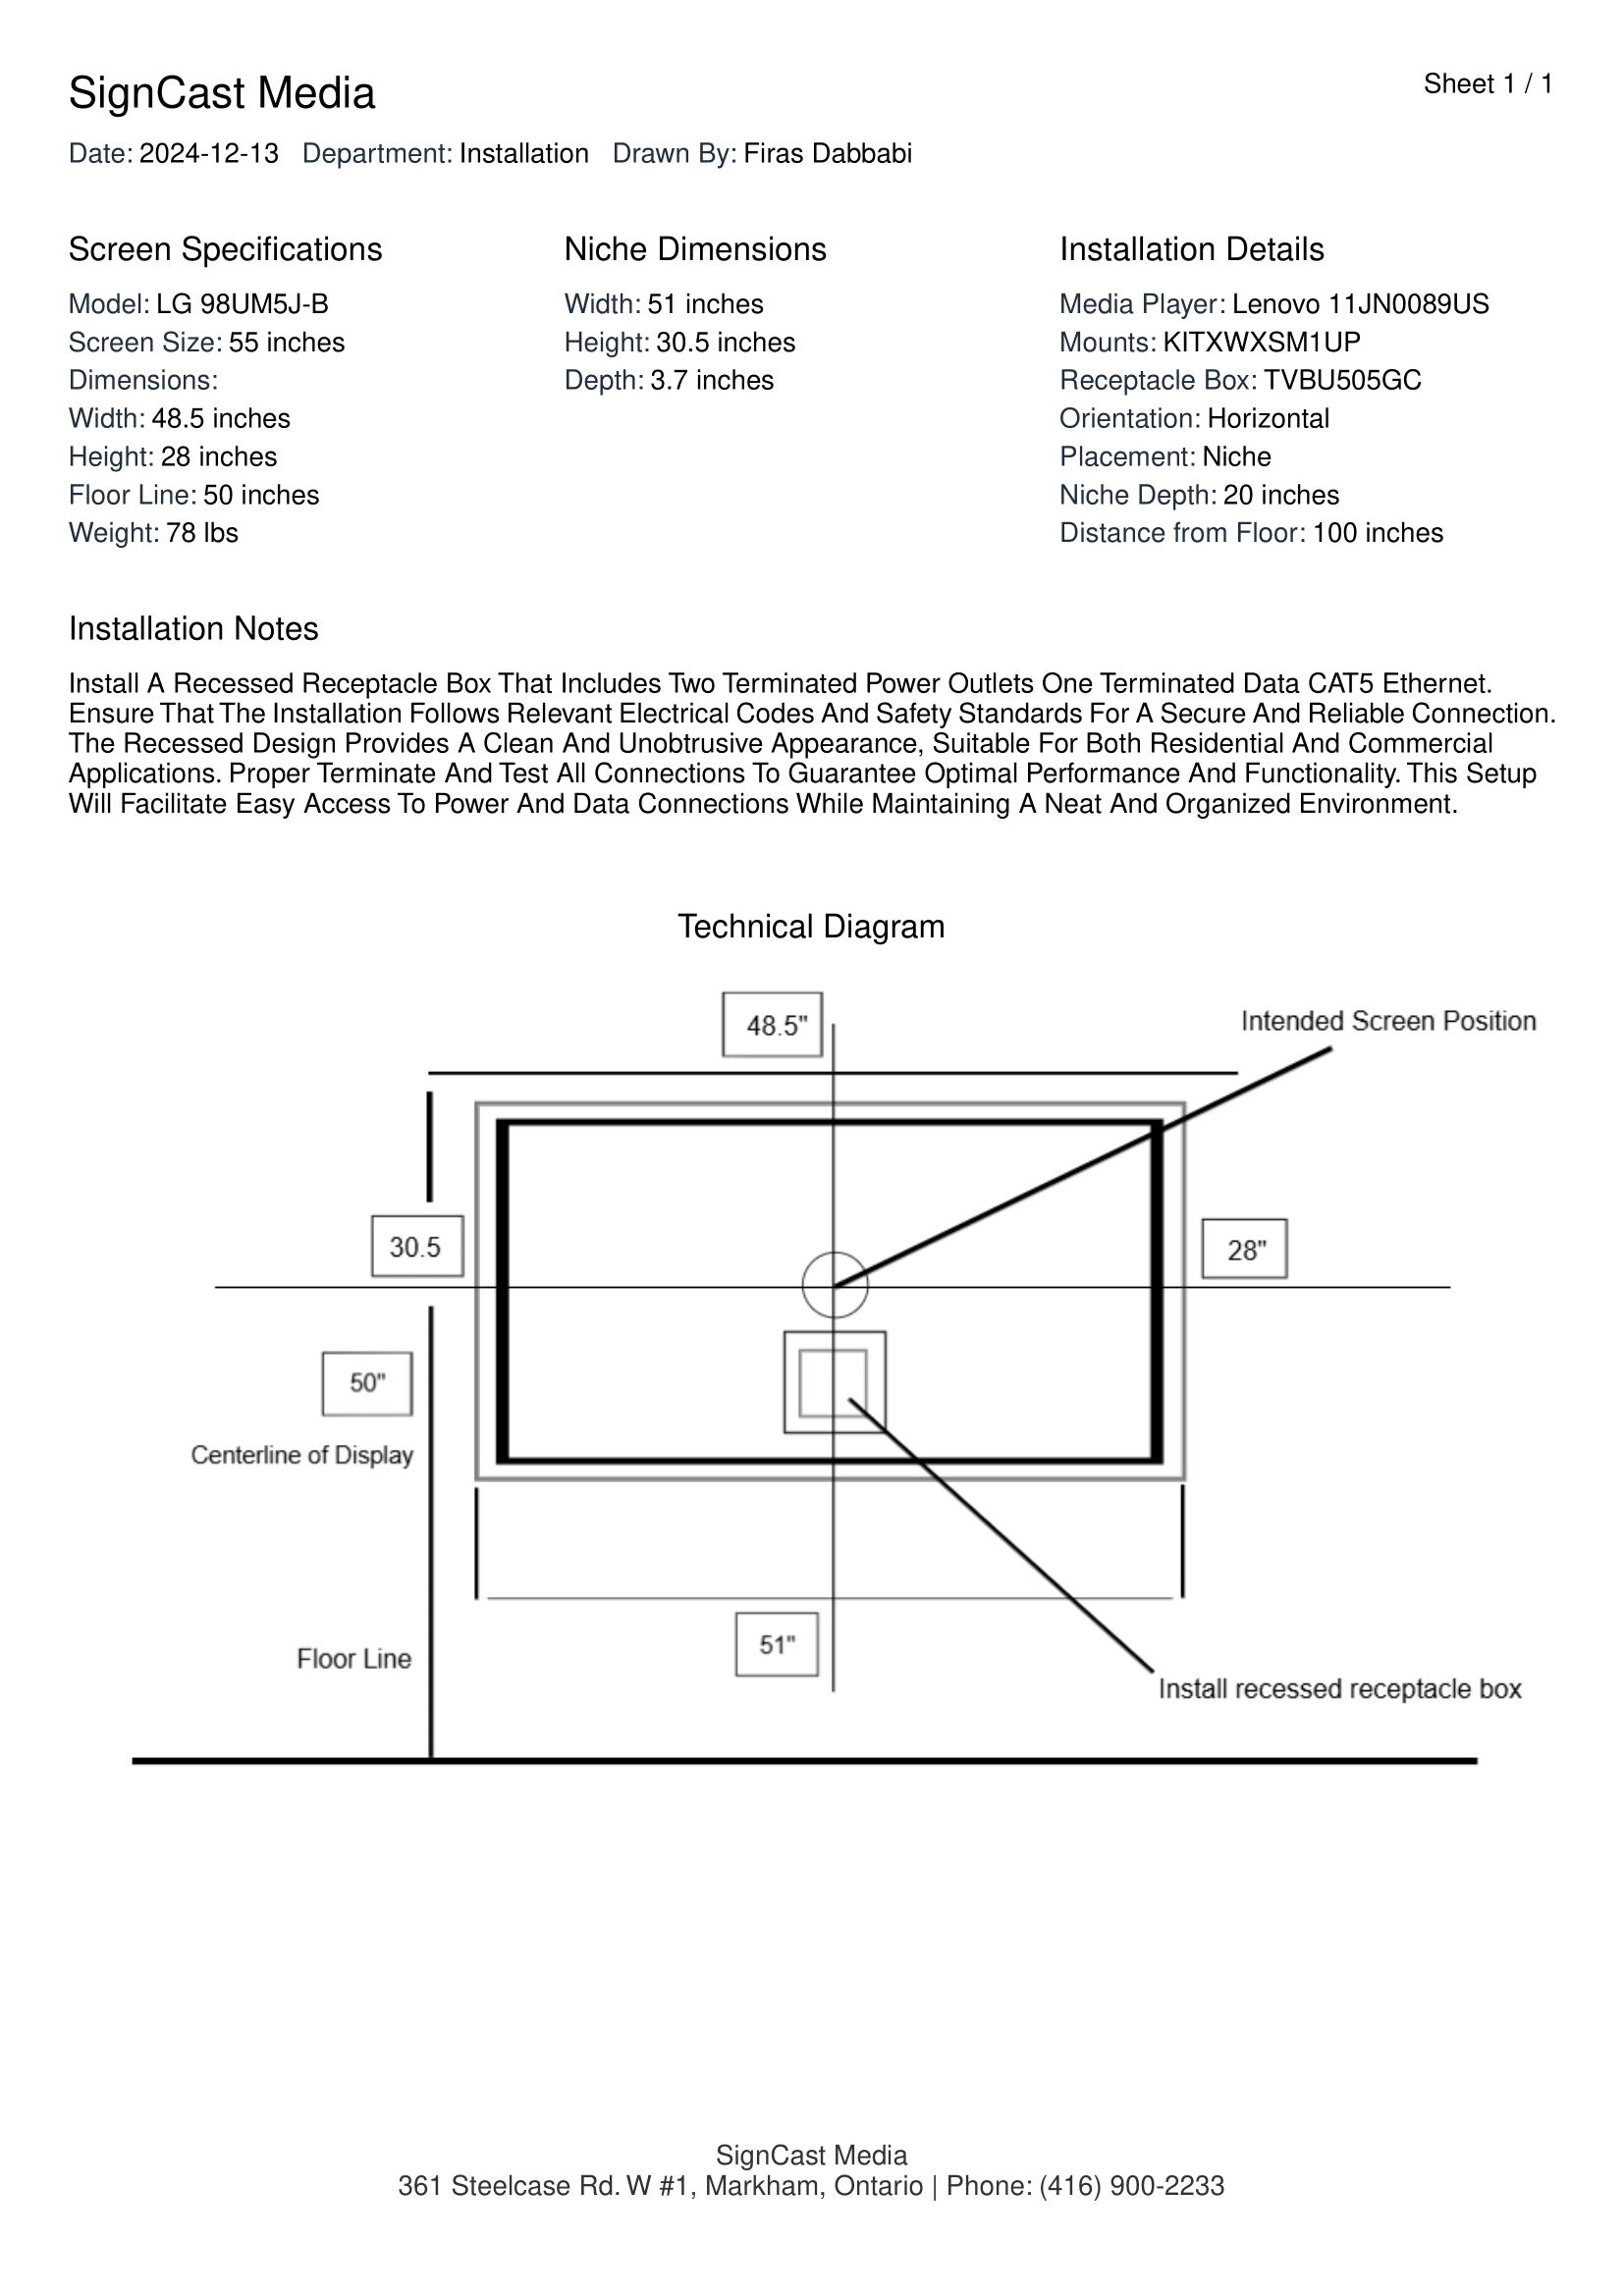
## 🖼️ Example Output PDF Document
The following is an example of the output PDF document generated by the system. This PDF contains all the necessary data processed from the Excel file and is formatted for easy review.
## 🚀 Potential Enhancements
The current system is designed to handle core functionalities effectively. However, several enhancements could be implemented to improve its usability, reliability, and user experience. Below are some suggested features:
1. **Handle Errors Gracefully**
- **Why?** Error handling ensures the system can identify and respond to unexpected issues (e.g., invalid Excel formats, missing data, or failed file uploads) without crashing. This reduces frustration and improves overall reliability.
- **How?** Implement detailed error messages and validation checks during file upload and data processing. For example, when a user uploads an Excel file missing a required header, the system can display a clear message, such as _"Missing Header: Screen MFR on Screen MFR sheet."_ This can be complemented with a guided troubleshooting wizard.
2. **Add Event Notifications for Better UI/UX**
- **Why?** Although I have included few notifications to track few actions, but adding more will keep users informed about the status of their actions (e.g., file upload progress, data processing success, or errors encountered). This improves the user experience by providing real-time feedback.
- **How?** Introduce a notification system (e.g., toast messages, progress bars, or pop-ups) to update users on actions like _"File Uploaded Successfully,"_ _"PDF Generation Completed,"_ or _"Error Detected in Receptacle Box sheet."_ These notifications can also include actionable options (e.g., retrying uploads or downloading logs).
3. **Add a Log-in Page for the Team**
- **Why?** A log-in page adds an extra layer of security and allows team members to access the system with unique credentials. This also opens up possibilities for personalized dashboards, activity tracking, and user-specific settings.
- **How?** Implement a user authentication system using modern frameworks (e.g., OAuth or JWT). Provide admin privileges for supervisors to manage team members and control access to features like uploading files or downloading PDFs.
## 🧑🤝🧑 Collaboration
We use **Git** for version control and encourage everyone to contribute:
1. **Fork the repository** to your own GitHub account.
2. **Clone** the forked repository.
3. Create a **branch** for your feature/bugfix.
4. Make your changes and **commit** them.
5. **Push** your changes and open a **Pull Request**.
## 💬 Questions and Issues
If you have any questions or face issues, feel free to open an issue or ask for help in the repository discussions.
## 📝 License
This project is licensed under the MIT License.
## 💡 Inspiration
This tool was designed with **installation teams** in mind. It's focused on delivering a real-world solution that helps teams quickly configure and install LED screens.