https://github.com/fkkarakurt/reconic
A Powerful Network Reconnaissance Tool for Security Professionals
https://github.com/fkkarakurt/reconic
bug-bounty cybersecurity network penetration-testing pentesting python recon reconnaissance security-tools
Last synced: about 1 month ago
JSON representation
A Powerful Network Reconnaissance Tool for Security Professionals
- Host: GitHub
- URL: https://github.com/fkkarakurt/reconic
- Owner: fkkarakurt
- License: mit
- Created: 2024-02-18T18:47:04.000Z (over 2 years ago)
- Default Branch: main
- Last Pushed: 2024-12-29T19:42:21.000Z (over 1 year ago)
- Last Synced: 2026-02-18T17:38:15.505Z (5 months ago)
- Topics: bug-bounty, cybersecurity, network, penetration-testing, pentesting, python, recon, reconnaissance, security-tools
- Language: Python
- Homepage:
- Size: 727 KB
- Stars: 106
- Watchers: 1
- Forks: 5
- Open Issues: 1
-
Metadata Files:
- Readme: README.md
- Contributing: .github/CONTRIBUTING.md
- License: LICENSE
- Code of conduct: .github/CODE_OF_CONDUCT.md
- Security: .github/SECURITY.md
Awesome Lists containing this project
README

# Reconic | All-in-One Reconnaissance Tool
Reconic is a network scanning and discovery tool designed to empower cybersecurity professionals and bug hunters in mapping, analyzing and securing digital infrastructures.
## Features
- **WHOIS Lookup**: Automates the retrieval of domain registration details, providing insights into the ownership and administrative contacts of a target domain.
- **DNS Resolution**: Executes scans to resolve DNS records, uncovering associated domains, subdomains, and critical DNS configurations.
- **SSL/TLS Certificate Inspection**: Inspects SSL/TLS certificates for validity, expiration, and configuration details. This includes detailed information about the issuer, subject, and validity period of the certificates.
- **HTTP Header Analysis**: Captures and analyzes HTTP headers, providing insights into security configurations and potential misconfigurations.
- **Port Scanning**: Scans for open ports, identifying exposed services and potential entry points for unauthorized access. This feature helps in understanding the attack surface of the target system.
- **Subdomain Discovery**: Identifies and lists subdomains that do not return 404 errors, using DNS zone methods to uncover the full scope of a domain's presence on the internet.
- **Directory Traversal**: Searches for accessible directories, identifying potentially sensitive information or misconfigured access controls. This can reveal hidden administrative interfaces or unsecured directories.
- **JavaScript File Enumeration**: Identifies and lists JavaScript files for further analysis. This focuses on client-side code that may reveal vulnerabilities or sensitive information, providing a pathway to identify potential security issues in web applications.
- **Technology Scanner**: Analyzes the target webpage to identify the technologies used, including frameworks, libraries, and platforms. This feature provides a detailed understanding of the technological stack of the target, which is crucial for planning security assessments.
- **CVE Links for Identified Technologies**: Provides links to the Common Vulnerabilities and Exposures (CVE) database for each identified technology. This helps in quickly identifying known vulnerabilities associated with the technologies in use, facilitating proactive security measures.
---
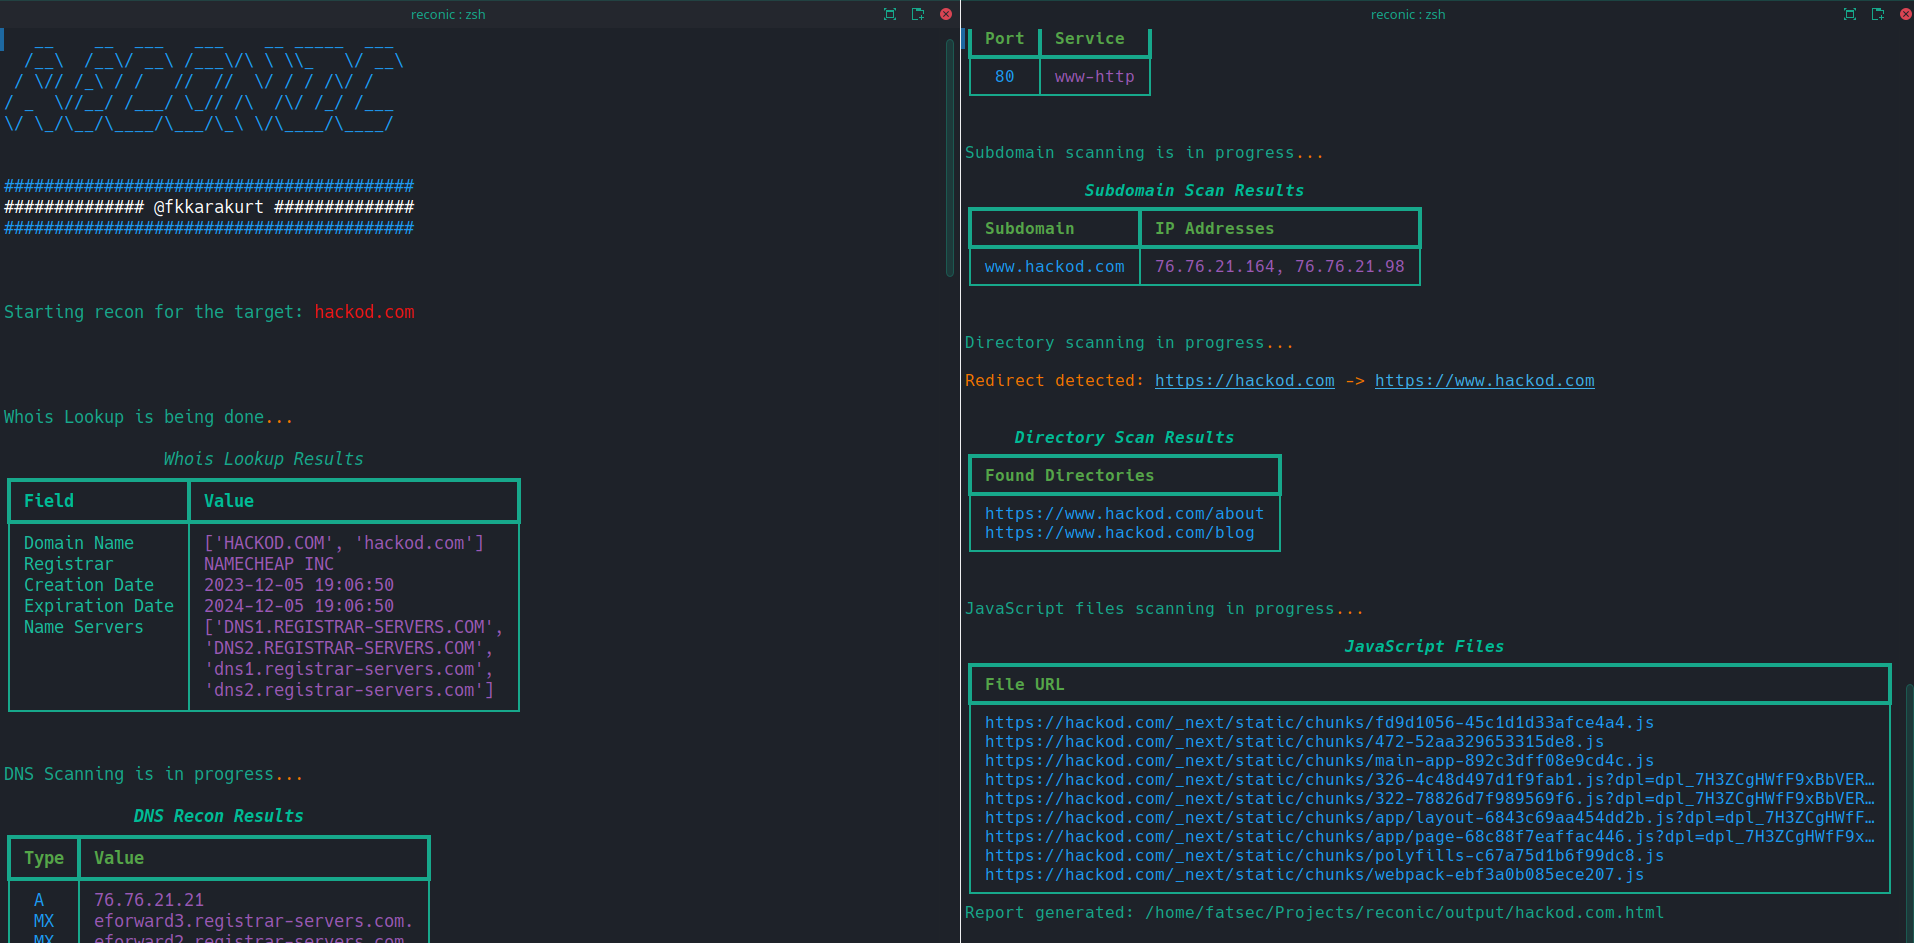
## Screenshots


## Installation
To ensure a smooth and effective setup of Reconic, follow the step-by-step instructions below. These steps will guide you through installing the necessary dependencies using `pip` and a `requirements.txt` file, preparing your environment for Reconic's operation.
### Prerequisites
Before proceeding with the installation, ensure you have the following prerequisites met:
- Python 3.6 or newer installed on your system. Reconic is developed with compatibility for Python 3.6 and above.
- `pip`, Python's package installer, is up-to-date. You can update `pip` using the command: `python -m pip install --upgrade pip`.
### Installation Steps
1. **Clone the Repository**
Begin by cloning the Reconic repository to your local machine. Open a terminal and run the following command:
```sh
git clone https://github.com/fkkarakurt/reconic
```
2. **Navigate to the Project Directory**
Change into the cloned project's directory:
```sh
cd reconic
```
3. **Create a Virtual Environment (Optional)**
It's recommended to create a virtual environment to isolate project dependencies. Run the following command to create a virtual environment named `venv`:
```sh
python3 -m venv venv
```
Activate the virtual environment:
- On Windows: `.\venv\Scripts\activate`
- On Unix or MacOS: `source venv/bin/activate`
4. **Install Dependencies**
Reconic's dependencies are listed in the `requirements.txt` file. Install them using `pip`:
```sh
pip install -r requirements.txt
```
This command will automatically download and install all the necessary packages defined in the `requirements.txt` file.
5. **Verify Installation**
Once the installation process is complete, you can verify that Reconic has been installed correctly by running a simple `help` command.
```sh
python3 reconic.py --help
```
### Updating Reconic
To update Reconic to the latest version, pull the latest changes from the repository and reinstall the dependencies:
```sh
git pull origin main
pip install -r requirements.txt
```
Ensure you're in the Reconic project directory and your virtual environment is activated when performing the update.
## Usage/Examples
To start using Reconic, you will need to specify a target URL using the `-u` or `--url` flag, along with a choice between using HTTP or HTTPS for web technology detection.
1. If you want to perform the scan using HTTPS, you can use the following command:
```sh
python3 reconic.py -u --https
```
2. Alternatively, to force the scan over HTTP, use:
```sh
python3 reconic.py -u --http
```
3. You will see the results neatly in tables on your command line. Also, after the scan is finished, an HTML file will be created in the `output` directory of the main folder. You can also review the same results in your web browser.
```sh
./output/.html
```
---
> IMPORTANT!
> Reconic was developed to assist with bug bounty and penetration testing. Do not use this for malicious purposes. For any target URL you will crawl with Reconic, make sure you have the necessary permissions. This is a crime wherever you are.
## License
[](https://choosealicense.com/licenses/mit/)