https://github.com/gagneurlab/absplice
https://github.com/gagneurlab/absplice
Last synced: about 1 month ago
JSON representation
- Host: GitHub
- URL: https://github.com/gagneurlab/absplice
- Owner: gagneurlab
- Created: 2022-04-02T21:49:39.000Z (about 3 years ago)
- Default Branch: master
- Last Pushed: 2024-09-11T14:19:03.000Z (8 months ago)
- Last Synced: 2025-03-25T14:38:56.531Z (about 2 months ago)
- Language: Python
- Size: 56.2 MB
- Stars: 38
- Watchers: 6
- Forks: 4
- Open Issues: 3
-
Metadata Files:
- Readme: README.md
- Changelog: HISTORY.rst
- License: license/CC_BY_NC_4.0.txt
Awesome Lists containing this project
README
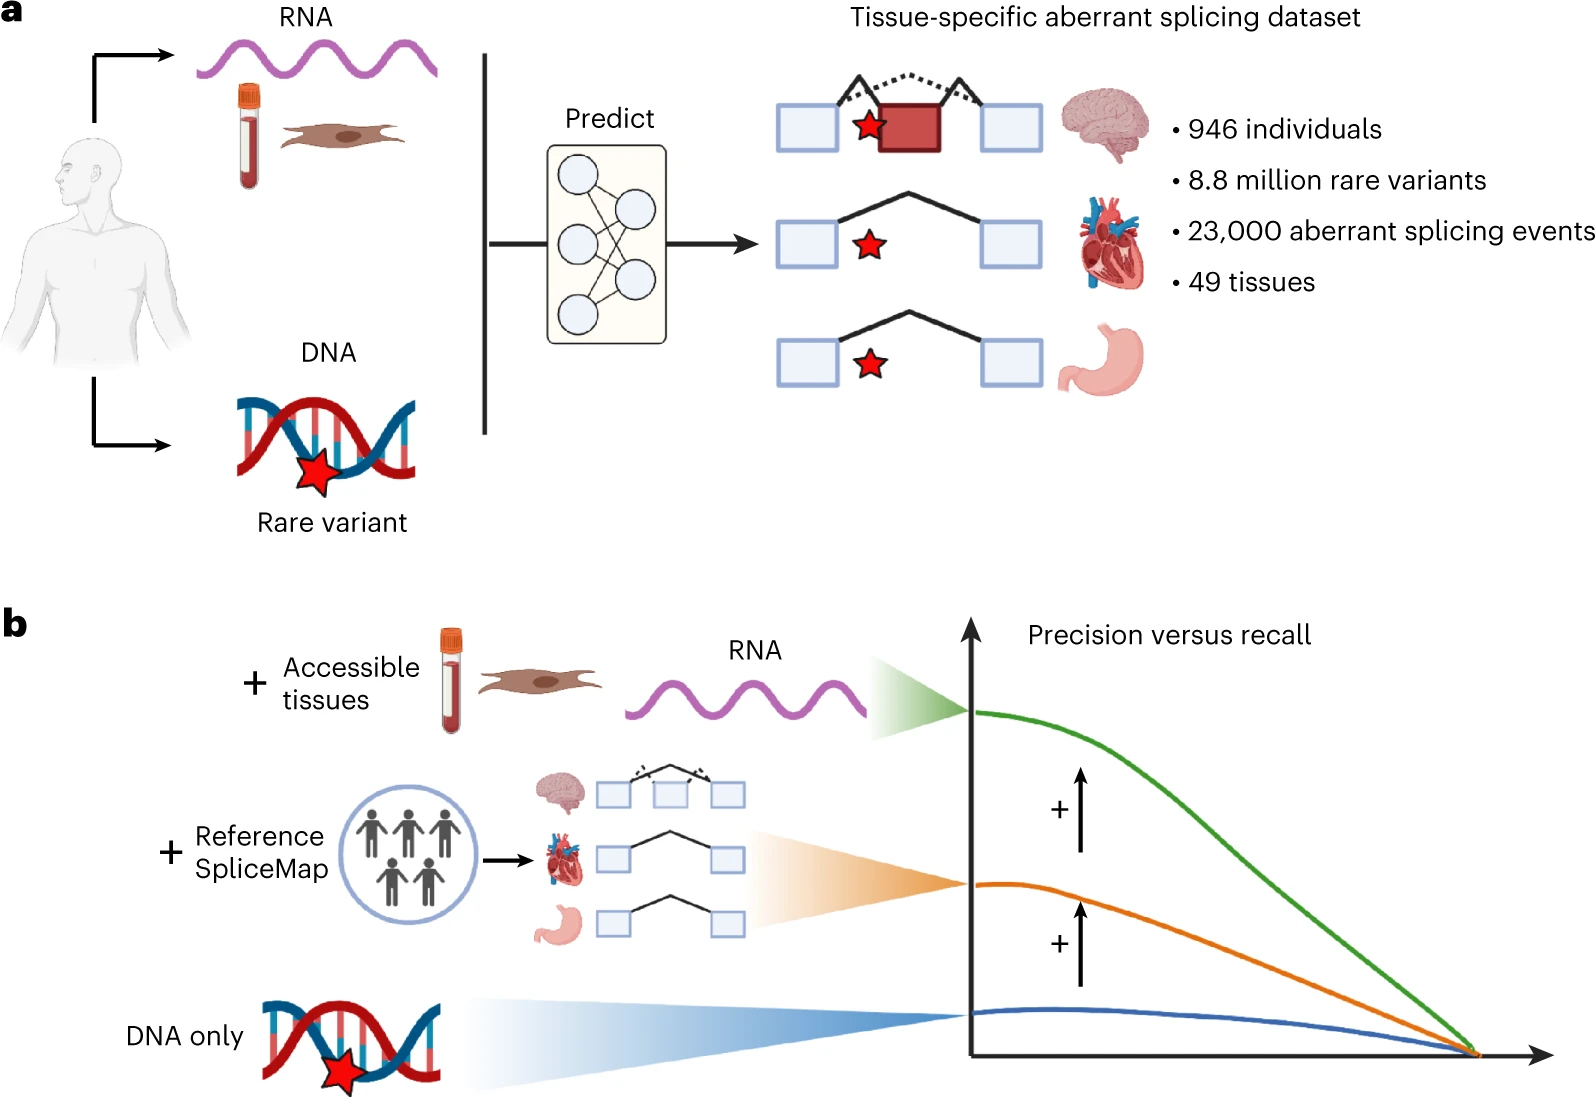
AbSplice: aberrant splicing prediction across human tissues
--------------------------------
AbSplice is a method that predicts aberrant splicing across human tissues, as described in [Wagner, Çelik et al., Nature Genetics 2023](https://www.nature.com/articles/s41588-023-01373-3).
Precomputed AbSplice-DNA scores for all possible single-nucleotide variants genome-wide are available [here](https://doi.org/10.5281/zenodo.6408331) (hg38) and [here](https://zenodo.org/doi/10.5281/zenodo.10776852) (hg19) for download.
AbSplice predictions are computed from VCF files and are based on enhanced tissue-specific splice site annotations ([SpliceMaps](https://github.com/gagneurlab/splicemap)). The scores represent the probability that a given variant causes aberrant splicing in a given tissue.
AbSplice-DNA: if only DNA is available, different DNA-based splicing predictions, as well as information from tissue-specific SpliceMaps, are combined into the integrative model AbSplice-DNA (see [example](https://github.com/gagneurlab/absplice/tree/master/example) use case).
AbSplice-RNA: if RNA-seq from clinically accessible tissues (e.g. blood or skin) is available, these direct splicing measurements can be used to predict aberrant splicing in another tissue from the same individual with the model AbSplice-RNA.
## License
The source code to create and use SpliceMaps is under [MIT license](https://github.com/gagneurlab/absplice/tree/master/license/MIT.txt). Pre-computed SpliceMaps are under [MIT license](https://github.com/gagneurlab/absplice/tree/master/license/MIT.txt). The source code of AbSplice is under [MIT license](https://github.com/gagneurlab/absplice/tree/master/license/MIT.txt). The pre-trained AbSplice models as well as the pre-computed AbSplice scores are under the [CC BY NC 4.0 license](https://github.com/gagneurlab/absplice/tree/master/license/CC_BY_NC_4.0.txt) for academic and non-commercial use. This is because the implementation of running AbSplice predictions makes use of trained SpliceAI models which are currently under the CC BY NC 4.0 by Illumina (as of 21st December 2023).
## How to use AbSplice
### UCSC browser track
Precomputed AbSplice scores for all SNVs in protein-coding genes are available as a [UCSC browser track](https://genome.ucsc.edu/cgi-bin/hgTrackUi?hgsid=2338955748_SgIatoRKz41Udd423gAW0fOgEDA8&g=abSplice&hgTracksConfigPage=configure). The displayed scores are colored with respect to three cutoffs:
* High (red) - An AbSplice score over 0.2 (high likelihood of aberrant splicing in at least one tissue).
* Medium (orange) - A score between 0.05 and 0.2 (medium likelihood).
* Low (blue) - A score between 0.01 and 0.05 (low likelihood).
* Scores below the lowest cutoff (<0.01) are not displayed.
Mouseover on items shows the gene name, maximum score, and tissues that had this score. Clicking on any item brings up a table with scores for all 49 GTEX tissues.
### Web interface
You can easily run AbSplice-DNA on arbitrary variants using our web interface at [https://absplice.cmm.cit.tum.de](https://absplice.cmm.cit.tum.de). The web interface uses AbSplice precomputed scores to retrieve SNVs (takes less than a second per variant) and runs AbSplice for indels (can take up to several seconds per variant).
On the input page, you should provide the variants you want to run AbSplice on and choose the genome version (hg19 or hg38). The output will be shown as a web page and can be exported as a CSV file. On the output page you will find the result table containing seven columns:
* Variant
* Gene ID (Ensembl gene ID)
* Gene name (all gene names the gene has or used to have)
* Tissue
* AbSplice score (the column's coloring represents 3 AbSplice cutoffs; red: score is above the high cutoff (>0.2), orange: below the high cutoff (0.2) and above the medium (0.05), yellow: below the medium (0.05) and above the low (0.01), green: below the low cutoff (<0.01))
* Delta PSI
* Delta score
> _For the explicit description of the AbSplice output columns see [Output](#output) section._
You can sort values in the columns and filter the output table for a specific variant, gene ID, tissue or AbSplice score cutoff.
Additionally, in the "Advanced settings" section, you can choose options to:
* Add extra information from the SpliceMap to the output: on the web page you will see additional columns "Splice site is expressed", "Junction", "Splice site", "Reference PSI", in the attached output CSV you will find the complete AbSplice output (Note that this option increases the running time for SNVs as it forces AbSplice to compute scores instead of retrieving them from the database)
* Display only the maximum score across tissues per variant (can be used for faster prioritization of the input variants; in the attached output CSV file you will find scores for all tissues)
* Run AbSplice only on a subset of tissues
### Installation with container
Instead of Docker you can also use Podman (you just need to replace `docker` with `podman` in all the commands).
Download the image [archive](https://zenodo.org/record/8095625) (file size is 5GB):
```
wget https://zenodo.org/record/8095625/files/absplice.oci
```
Load the image from archive:
```
docker load -i absplice.oci
```
Run the image with command line interface:
```
docker run -it --name absplice_container localhost/absplice:latest /bin/bash
```
Now you are working inside the container. The conda environment is already installed here, you just need to activate it:
```
conda activate absplice_dock
```
Clone the AbSplice repository to the container:
```
git clone https://github.com/gagneurlab/absplice.git
cd absplice
```
Install the AbSplice package:
```
pip install -e .
```
### Installation with creating a conda environment
Clone git repo:
```
git clone https://github.com/gagneurlab/absplice.git
```
cd into repo directory:
```
cd absplice
```
Install conda environment:
```
# Recommended if you have mamba installed
mamba env create -f environment.yaml
# otherwise
conda env create -f environment.yaml
```
Activate conda environment:
```
conda activate absplice
```
Install modules from absplice:
```
pip install -e .
```
## Output
Note: if you run AbSplice on large datasets, you might experience memory issues with the full output. We suggest setting the [config](https://github.com/gagneurlab/absplice/blob/0f0de504f46de949152f0be99fdbc3b302d538cf/example/workflow/config.yaml#L8C1-L8C21) fields `extra_info_dna` and `extra_info_rna` to `False` in such cases and if you do not need additional information from SpliceAI and SpliceMaps (`True` by default). This will crop the output, leaving only the columns with AbSplice features and unique row identifiers.
The full [output](https://github.com/gagneurlab/absplice/blob/master/example/data/results/hg19/_example_hg19.vcf.gz_AbSplice_DNA.csv) of AbSplice is tabular data with `variant`, `gene_id`, `tissue` being the unique row identifier. It contains the following columns:
| ID | Column | Description |
| -------- | ----- | ----------- |
| `variant` | Variant | Variant as chrom:pos:ref>alt. |
| `gene_id` | GeneID | Ensembl GeneID of the gene which the variant belongs to. |
| `tissue` | Tissue | Name of the tissue that was used from SpliceMap. |
| `AbSplice_DNA` | AbSplice-DNA | The AbSplice score is a probability estimate of how likely aberrant splicing of some sort takes place in a given tissue and reports the splice site with the strongest effect. The model was trained using scores from MMSplice and SpliceAI models as well as annotation features from tissue-specific SpliceMaps. To ease downstream applications we suggest three cutoffs (high: 0.2, medium: 0.05, low: 0.01), which approximately have the same recalls as the high, medium and low cutoffs of SpliceAI. |
| `delta_score` | SpliceAI DeltaScore | Input feature to AbSplice. The main score predicted by SpliceAI, computed as a maximum of acceptor gain, acceptor loss, donor gain, and donor loss delta scores. The score represents probability of the variant being splice-altering. |
| `delta_logit_psi` | MMSplice + SpliceMap score | Input feature to AbSplice. The score is computed by using SpliceMap as an annotation for MMSplice. The score shows the effect of the variant on the inclusion level (PSI – percent spliced in) of the junction. The score is on a logit scale. If the score is positive, it shows that variant leads higher inclusion rate for the junction. If the score is negative, it shows that variant leads higher exclusion rate for the junction. |
| `delta_psi` | MMSplice + SpliceMap + Ψ_ref score | Input feature to AbSplice. The `delta_psi` (∆Ψ) score is computed by converting `delta_logit_psi` (∆𝑙𝑜𝑔𝑖𝑡(Ψ)) to natural scale with the splicing scaling law and `ref_psi` (Ψ𝑟𝑒𝑓):
∆Ψ = σ(∆𝑙𝑜𝑔𝑖𝑡(Ψ) + 𝑙𝑜𝑔𝑖𝑡(Ψ𝑟𝑒𝑓)) − Ψ𝑟𝑒𝑓|
| `splice_site_is_expressed` | Splice site expressed | Input feature to AbSplice. Binary feature indicating if the splice site is expressed in the target tissue using a cutoff of 10 split reads (`median_n` from SpliceMap). |
| `junction` | Intron | Coordinates of the respective intron from SpliceMap. |
| `event_type` | Type of splicing event | The `event_type` takes values either psi3 or psi5 for alternative donor or alternative acceptor site usage (from SpliceMap). |
| `splice_site` | Splice site location | Coordinates of the splice site. |
| `ref_psi` | Ψ reference score | Reference level of site usage from SpliceMap. |
| `median_n` | Median coverage Splice site | The median number of split reads sharing the splice site (from SpliceMap). |
| `acceptor_gain` | SpliceAI Delta score (acceptor gain) | Probability computed by SpliceAI that the variant will lead to an acceptor gain at `acceptor_gain_position` . |
| `acceptor_loss` | SpliceAI Delta score (acceptor loss) | Probability computed by SpliceAI that the variant will lead to an acceptor loss at `acceptor_loss_position`. |
| `donor_gain` | SpliceAI Delta score (donor gain) | Probability computed by SpliceAI that the variant will lead to a donor gain at `donor_gain_position`. |
| `donor_loss` | SpliceAI Delta score (donor loss) | Probability computed by SpliceAI that the variant will lead to a donor loss at `donor_loss_position`. |
| `acceptor_gain_position` | SpliceAI Delta postion (acceptor gain) | Delta position represents the location of respective splicing change relative to the variant position: positive values are downstream of the variant, negative values are upstream. |
| `acceptor_loss_position` | SpliceAI Delta position (acceptor loss) | See description of `acceptor_gain_position`. |
| `donor_gain_position` | SpliceAI Delta postion (donor gain) | See description of `acceptor_gain_position`. |
| `donor_loss_position` | SpliceAI Delta position (donor loss) | See description of `acceptor_gain_position`. |
## Example use case
The [example](https://github.com/gagneurlab/absplice/tree/master/example) folder contains a snakemake workflow to generate AbSplice predictions, given a vcf file and a fasta file (either for hg19 or hg38, will be downloaded automatically). \
The snakemake workflow will download precomputed SpliceMaps from Zenodo and run AbSplice based on these annotations.
To generate predictions run:
```
cd example/workflow
python -m snakemake -j 1 --use-conda
```
### AbSplice-DNA:
To run the workflow on your own data do the following:
- Store all (or provide a symlink to) vcf files for analysis in [`data/resources/analysis_files/vcf_files/`](https://github.com/gagneurlab/absplice/tree/master/example/data/resources/analysis_files/vcf_files).
- Specify the genome version that you are going to use (hg19 or hg38) in the field `genome` of the [config](https://github.com/gagneurlab/absplice/blob/master/example/workflow/config.yaml#L4) file.
- In the field `splicemap_tissues` of the [config](https://github.com/gagneurlab/absplice/blob/master/example/workflow/config.yaml#L21) file you can uncomment the tissues that AbSplice will use to generate predictions.
Optionally:
- If you want to run the example on large datasets, you can enable a fast lookup interface [spliceai_rocksdb](https://github.com/gagneurlab/spliceai_rocksdb) that uses precomputed SpliceAI scores.
The first time you use it, the precomputed database will be downloaded (it will take significant time – about 1 hour and use approximately 180GB of storage).
To enable fast lookup for SpliceAI simply change the field `use_rocksdb` in the [config](https://github.com/gagneurlab/absplice/blob/master/example/workflow/config.yaml#L19) file to `True`.
***For users who work with the container:***
To run AbSplice on your own vcf-files, you need to copy them from your disk to the container. If you are inside the container, run:
```
exit
```
To copy a vcf-file from your disk to the container run:
```
docker cp path/on/your/disk absplice_container:/app/absplice/example/data/resources/analysis_files/vcf_files/
```
To execute the container run:
```
docker start absplice_container
docker exec -it absplice_container /bin/bash
```
To edit the config file inside the container use pre-installed editor `nano` as follows (or optionally install any other editor):
```
nano config.yaml
```
To close the editor press Ctrl+X, choose whether to save the changes: Y or N, and press Enter.
### AbSplice-RNA:
AbSplice-RNA combines DNA and RNA information.
For each individual, DNA-based predictions of variants will be combined with RNA-based predictions/ measurements for junctions in the vicinity of the variants. The input are vcf files (either single or multisample) from DNA and the results from running FRASER on RNA-seq samples using [DROP](https://github.com/gagneurlab/drop).
The DNA IDs in the vcf file have to match the DNA IDs in the `DNA_ID` column of the sample annotation file from DROP.
[Example output for AbSplice-RNA](https://github.com/gagneurlab/absplice/blob/master/example/data/results/hg19/_example_hg19.vcf.gz_tissue_cat=Cells_Cultured_fibroblasts_AbSplice_all_info.csv).
To run AbSplice-RNA on your own data you need to:
- Set the field `AbSplice_RNA` of the [config](https://github.com/gagneurlab/absplice/blob/master/example/workflow/config.yaml#L75) file to `True`.
- Run the aberrant splicing module of [DROP](https://github.com/gagneurlab/drop) and copy the root directory of DROP into [this folder](https://github.com/gagneurlab/absplice/tree/master/example/data//resources/analysis_files/absplice_rna_related_files/).
- Specifiy the names of the DROP groups in the field `DROP_group` of the [config](https://github.com/gagneurlab/absplice/blob/master/example/workflow/config.yaml#L80) file.
- Speficy the gene annotation that was used to run DROP in the field `geneAnnotation` of the [config](https://github.com/gagneurlab/absplice/blob/master/example/workflow/config.yaml#L78) file.