https://github.com/github/oauth-ruby-quickstart
Starter code and quickstart guide for a GitHub OAuth App in Ruby
https://github.com/github/oauth-ruby-quickstart
Last synced: 10 months ago
JSON representation
Starter code and quickstart guide for a GitHub OAuth App in Ruby
- Host: GitHub
- URL: https://github.com/github/oauth-ruby-quickstart
- Owner: github
- Archived: true
- Created: 2018-05-25T15:32:55.000Z (about 8 years ago)
- Default Branch: master
- Last Pushed: 2019-01-11T11:43:51.000Z (over 7 years ago)
- Last Synced: 2024-09-30T00:22:26.276Z (almost 2 years ago)
- Language: HTML
- Homepage: https://developer.github.com
- Size: 19.5 KB
- Stars: 18
- Watchers: 5
- Forks: 9
- Open Issues: 1
-
Metadata Files:
- Readme: README.md
Awesome Lists containing this project
README
## About this Quickstart Guide
This is a quickstart guide to GitHub OAuth authentication using:
- Ruby
- The [Sinatra](http://sinatrarb.com) web framework
- [Octokit](https://github.com/octokit/octokit.rb) - a Ruby client for the GitHub [REST API](https://github.com.) (makes interacting with GitHub data easier)
To demonstrate the OAuth process, we're going to:
1) Set up a basic web server with Sinatra
2) Register a new OAuth Application on GitHub.com
3) Authenticate a user into our Sinatra app using GitHub's OAuth API
4) Use Octokit to retrieve this user's information from GitHub
## 1) Sinatra Webserver Setup
First, go ahead and clone the starter code from the [OAuth Ruby Quickstart Guide](https://github.com/github/OAuth-Ruby-Quickstart) repository.
This repository contains 3 files that we'll be working with:
`server.rb` - Our Sinatra webserver
`views/index.erb` - The webpage users will see before 'Signing in with GitHub'
`views/profile.erb` - The webpage users will see _after_ authenticating with GitHub OAuth. This page will display their profile photo, along with other user information
_P.S._([erb](https://ruby-doc.org/stdlib-2.5.1/libdoc/erb/rdoc/ERB.html) is a Ruby templating language which allows us to build HTML pages and pass in application data to be displayed on the page)
To fire up our webapp, open a terminal and run the following command from the project directory.
```
$ ruby server.rb
```
You should see a message that **'Sinatra has taken the stage'**

We can now visit [http://localhost:4567](http://localhost:4567) to see our webpage.
You should see something like this:
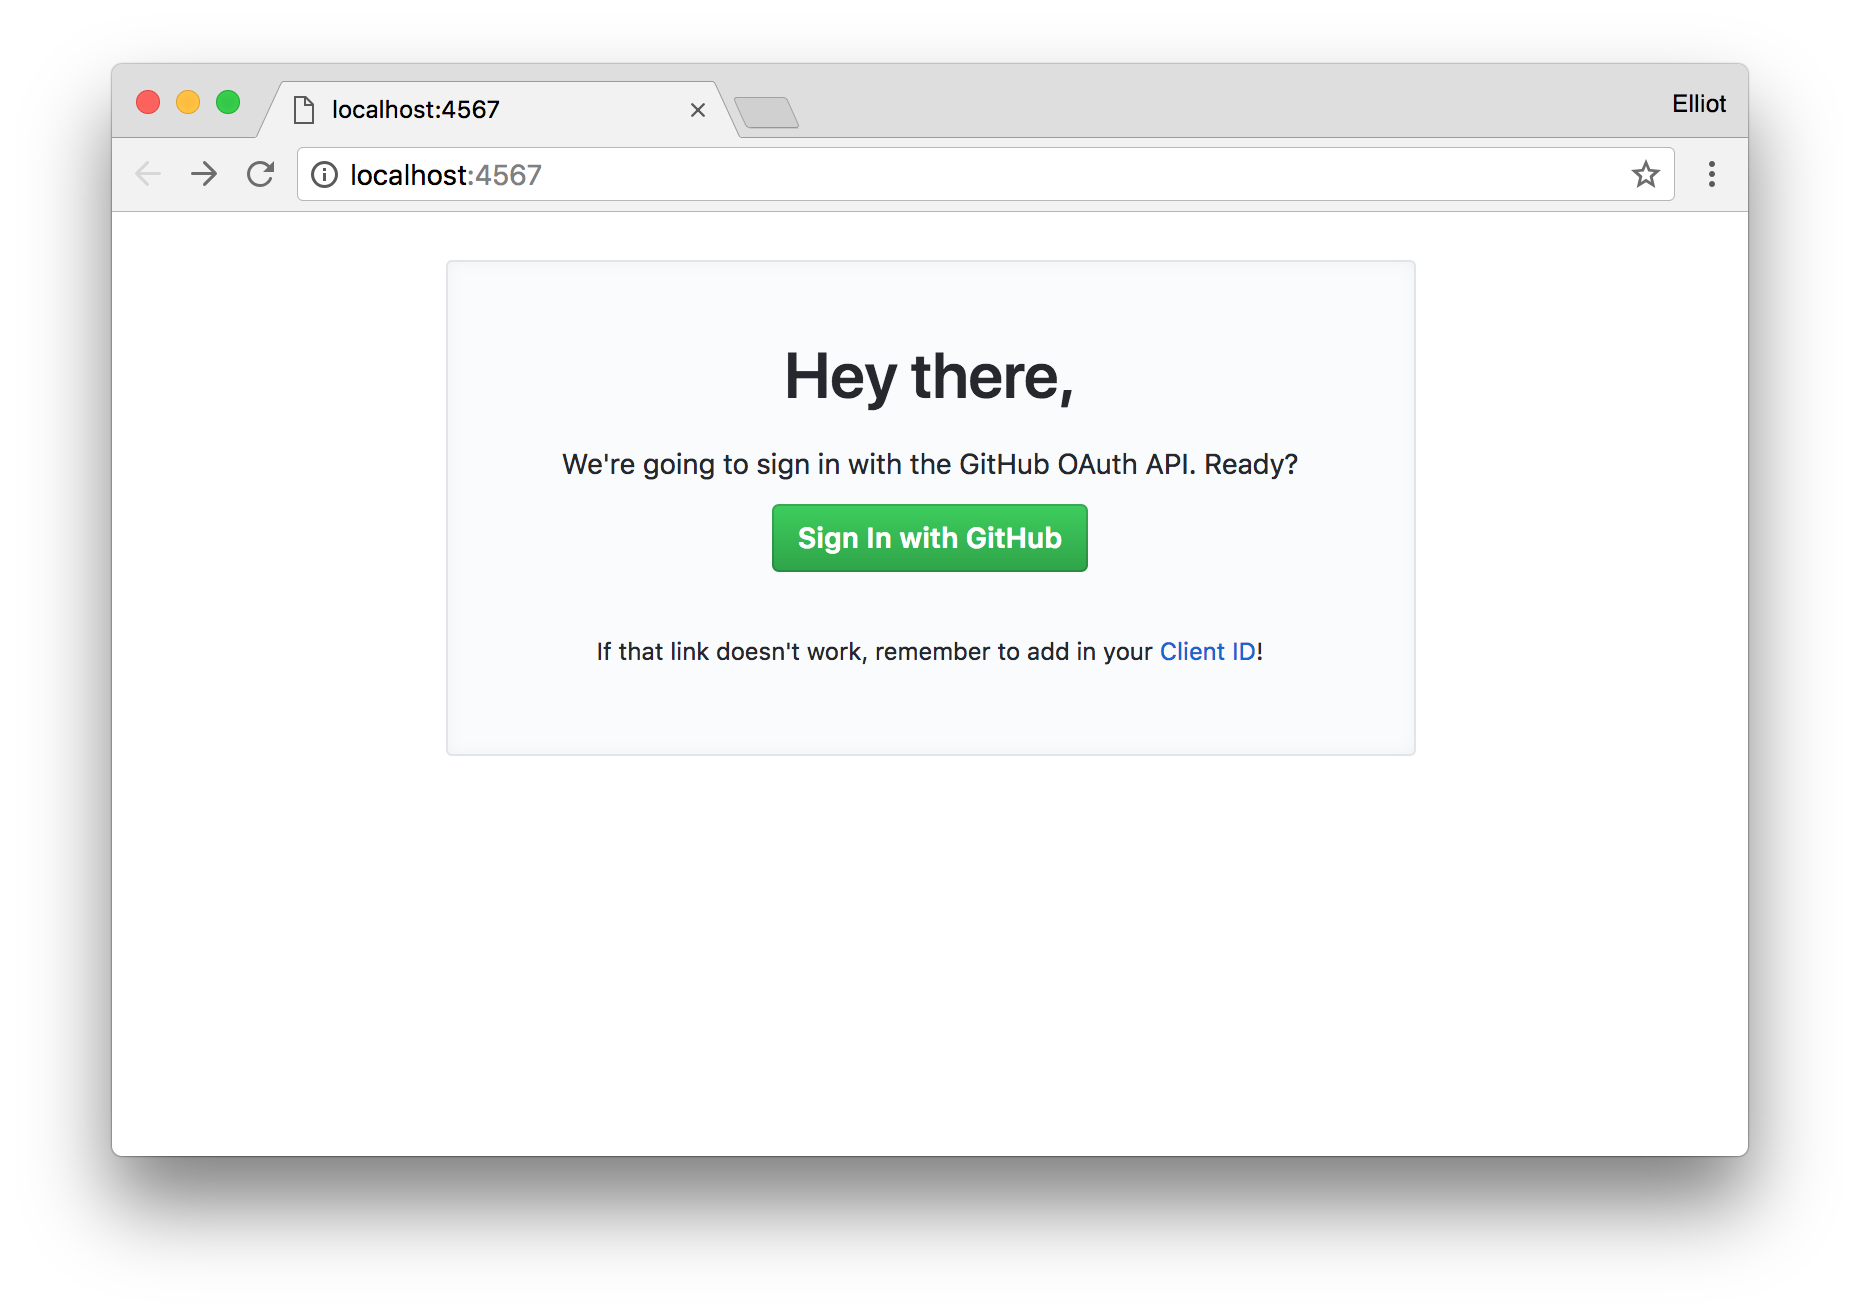
Our Sinatra app is up and running, but clicking that green **Sign In** button won't work yet. First, we need to register a new GitHub OAuth Application.
## 2) Register a new GitHub OAuth Application
Head on over to your [Developer Settings](https://github.com/settings/developers) and register a new OAuth Application.

You'll find the following fields:
**Application name** - This must be unique among all GitHub OAuth Applications.
**Homepage URL** - If you don't have a homepage for your application yet, just use your GitHub profile: `https://github.com/` (don't forget the `https://`).
**Application description** - Explain to future users what this OAuth Application is used for.
**Authorization callback URL** - GitHub needs to know where to redirect users after a successful OAuth authorization. For this app, the user should be redirected to the `/profile` view in our `server.rb` file. Since we're still working locally, we can actually use the localhost url from step #1: `http://localhost:4567/profile`.
## 3) Authenticate a User with GitHub’s OAuth API
Now for the fun stuff.
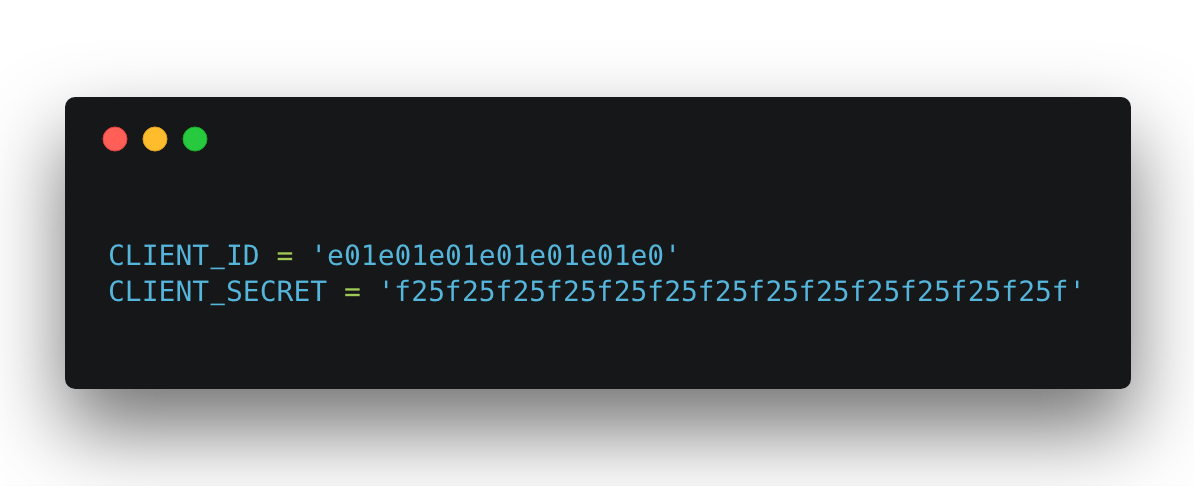
After registering your OAuth Application, you should see your Client ID and Client Secret. They'll look something like this:

Copy the Client ID and Client Secret into their respective places in the `server.rb` file.
Given the example above, the code would look like this:
With that set up, we're ready to authenticate a user with GitHub's OAuth API.
With the Sinatra app running, go ahead and visit [localhost:4567](http://localhost:4567) again. This time, clicking the **Sign In with GitHub** button should take you to an authorization page:
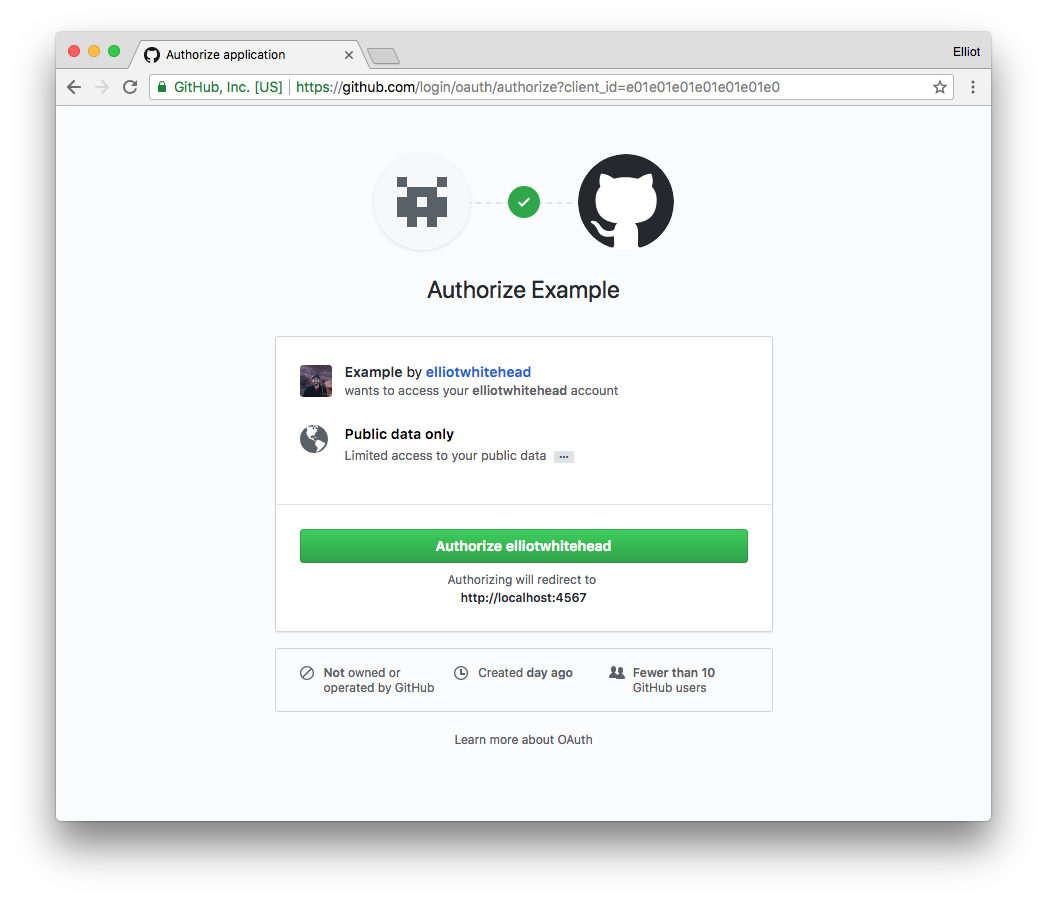
This is where users grant your OAuth Application permission to access their data. As you can see, we're only requesting public data right now.
##### What happened here?
If you look at the URL in the address bar, you'll see your Client ID. On the previous page, the **Sign In with GitHub** button was in fact a link to an OAuth Authorization page, with your Client ID as a parameter. Sinatra built this link for us when we passed the `CLIENT_ID` into the index.erb template on line 24 of `server.rb`. Sinatra then interpolated our Client ID into the OAuth API link on line 15 of `index.erb`.
Go ahead and Authorize the Application access to your GitHub account data, and you should be redirected to your callback page: `/profile`.

After a successful Application authorization, GitHub provides us with a temporary *authorization grant code* (see it in the URL up there?). We need to `POST` this code to the's `/login/oauth/access_token` endpoint to recieve an *access_token* The access token is what grants us access to the account data that we want to display.
To simplify the process of `POST`ing the authorization grant code back to GitHub, we'll use the [rest-client](https://github.com/rest-client/rest-client) Ruby gem.
First, let's update our `/profile` view to retrieve the temporary authorization grant code. We'll use Sinatra's built in webserver interface, [Rack](https://rack.github.io/) to grab the code from the session data.
``` ruby
get '/profile' do
# Retrieve temporary authorization grant code
session_code = request.env['rack.request.query_hash']['code']
erb :profile
end
```
Now that we have the authorization grant code, let's use `rest-client` to `POST` it back to GitHub along with our `CLIENT_ID` and `CLIENT_SECRET` in exchange for our `access_token`.
The `https://github.com/login/oauth/access_token` endpoint expects the following parameters:
Name | Type | Description
-- | -- | --
`client_id` | `string` | __Required.__ Your GitHub OAuth Application Client ID
`client_secret` | `string` | __Required.__ Your GitHub OAuth Application Client Secret
`code` | `string` | __Required.__ The authorization grant code returned after Application authorization
Let's also use the request header `:accept` to let the API know that we'd like a `JSON` formatted response.
``` ruby
get '/profile' do
# Retrieve temporary authorization grant code
session_code = request.env['rack.request.query_hash']['code']
# POST Auth Grant Code + CLIENT_ID/SECRECT in exchange for our access_token
response = RestClient.post('https://github.com/login/oauth/access_token',
# POST payload
{:client_id => CLIENT_ID
:client_secret => CLIENT_SECRET
:code => session_code},
# Request header for JSON response
:accept => :json)
erb :profile
end
```
The API's response to our `POST` request will include the access token in a field called `access_token` in the `response` variable. Now we just need to parse out the access token.
``` ruby
#Parse access_token from JSON response
access_token = JSON.parse(response)['access_token']
```
## 4) Use Octokit to Access User Data
Now that we finally have our access token, we can start acessing user data via the GitHub API. Instead of manually calling / handling our own REST request / responses to the API, we can save some time and effort by using GitHub's official Ruby library, [Octokit](http://octokit.github.io/octokit.rb/).
First, we need initialize the Octokit client by passing it our access token `Octokit::Client.new(:access_token => access_token)`. After that, the user data associated with our `access_token` is available as `client.user`. We can now access any of the [user data properties](https://developer.github.com/v3/users/#get-the-authenticated-user) available from the v3 REST API.
Here is the entire function, with the call to Octokit:
``` ruby
get '/profile' do
# Retrieve temporary authorization grant code
session_code = request.env['rack.request.query_hash']['code']
# POST Auth Grant Code + CLIENT_ID/SECRECT in exchange for our access_token
response = RestClient.post('https://github.com/login/oauth/access_token',
# POST payload
{:client_id => CLIENT_ID,
:client_secret => CLIENT_SECRET,
:code => session_code},
# Request header for JSON response
:accept => :json)
# Parse access_token from JSON response
access_token = JSON.parse(response)['access_token']
# Initialize Octokit client with user access_token
client = Octokit::Client.new(:access_token => access_token)
# Create user object for less typing
user = client.user
# Access user data
profile_data = {:user_photo_url => user.avatar_url,
:user_login => user.login,
:user_name => user.name,
:user_id => user.id }
# Render profile page, passing in user profile data to be displayed
erb :profile, :locals => profile_data
end
```
All of the template [locals](http://sinatrarb.com/intro.html) we'd like to use are packaged up in `profile_data` and will be availble on the `profile.erb` page.
Now we just need to add in the erb partials in `profile.erb` to display the data.
``` html

Hey, @<%= user_login %>!
You are GitHub user #<%= user_id %>
Click here to see all of
your public profile data
```
The final result should look something like this:
