https://github.com/github0013/nextjs-auth0-google
https://github.com/github0013/nextjs-auth0-google
Last synced: 12 months ago
JSON representation
- Host: GitHub
- URL: https://github.com/github0013/nextjs-auth0-google
- Owner: github0013
- Created: 2020-04-22T06:32:55.000Z (about 6 years ago)
- Default Branch: master
- Last Pushed: 2023-01-24T02:14:32.000Z (over 3 years ago)
- Last Synced: 2025-03-16T18:22:59.281Z (over 1 year ago)
- Language: TypeScript
- Size: 1.18 MB
- Stars: 1
- Watchers: 0
- Forks: 0
- Open Issues: 12
-
Metadata Files:
- Readme: README.md
Awesome Lists containing this project
README
# nextjs + auth0 + google (reload でもログインキープ)サンプル
https://github.com/Swizec/useAuth
auth0 はこのパッケージでだいぶ楽だが、google などの ID プロバイダーなどでのログインとなるとやっかいで、ログイン後にリロードするとログアウト状態になる。
これはセキュリティの観点上重要な情報はメモリ内にあるだけなので、リロードすると消えてしまう。
このパッケージにもあるように、Google でリロード後もログイン状態を保つには以下の通りにする。
Set Up Social Connections
https://auth0.com/docs/dashboard/guides/connections/set-up-connections-social
参考:
React Tutorial: Building and Securing Your First App
(Keeping Users Signed In after a Refresh から読む)
https://auth0.com/blog/react-tutorial-building-and-securing-your-first-app/
これを読んでいってもちょっと分かりにくかったので、このサンプル環境と手順で簡単に試せます。
## 事前準備
1. gmail のアカウントがある(あとで google API console にログインする必要がある)
1. ngrok にアカウントがある(すぐ作れる - 外から繋がる https が必要)
1. ngrok の authtoken がある(ログイン後、通常表示される)
1. auth0 にアカウントがある
1. auth0 に app がある
1. auth0 に Google の connection がある
1. docker-compose.yml の`YOUR_NGROK_AUTH`に ngrok の authtoken を入れる
1. ./frontend に .env を作る(.env.EXAMPLE 参考)
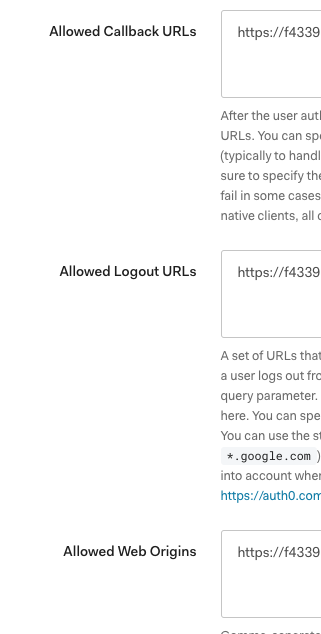
1. auth0 を開いて app の`Allowed Callback URLs`、`Allowed Logout URLs`、`Allowed Web Origins`を設定
1. `docker-compose up` (down すると ngrok のアドレスが変わり、auth0 の設定をやり直さないといけないので注意)
1. http://YOUR_LOCAL_IP:4040/ を開いて ngrok の https アドレスをクリック表示
1. frontend が表示される
1. url をコピー
### .env の設定
| AUTH0_DOMAIN | AUTH0_CLIENT_ID |
| ---------------------- | ------------------------- |
| auth0 の app の Domain | auth0 の app の Client ID |
## auth0 の設定
| Allowed Callback URLs | Allowed Logout URLs | Allowed Web Origins |
| ---------------------------------- | ------------------- | ------------------- |
| https://...ngrok.io/auth0/callback | https://...ngrok.io | https://...ngrok.io |
## メールアドレス登録でのログイン
1. frontend の login ボタンで auth0 のダイアログが表示されれば一旦は OK
1. sign up でとりあえずメールアドレス登録でログインしてみる
1. /users が開けば OK
1. リロードしてみる
1. 引き続きログインが出来ていれば OK
## Google の設定
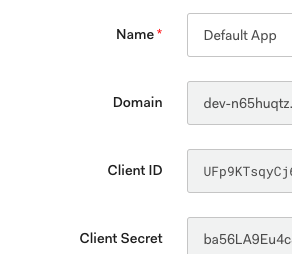
ここがややこしい。Google でガチャガチャ設定して Google の`Client ID`、`Client Secret`を作り、`Admin SDK`を有効にしておいて、auth0 の Google connection に Google の`Client ID`、`Client Secret`を設定する流れ。
1. auth0 へログインする
1. https://auth0.com/docs/connections/social/google を開く
1. 手順が書いてあるが、一応説明
1. https://console.developers.google.com/ にログインする
1. プロジェクトがないならまず作る
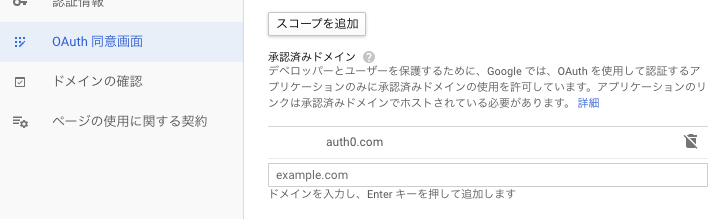
1. OAuth 同意画面へ行く
1. 承認済みドメインへ`auth0.com`を入れて保存
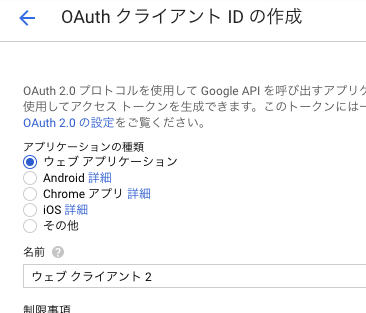
1. 認証情報で OAuth クライアント ID 新規作成
1. ウェブ アプリケーションを選択
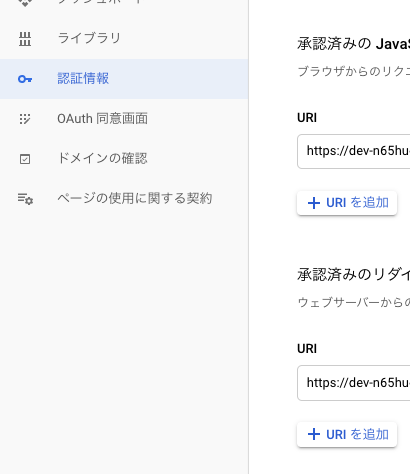
1. 承認済みの JavaScript 生成元、承認済みのリダイレクト URI を https://auth0.com/docs/connections/social/google に表示されているとおりに入力
1. ID とシークレットが表示されるのでコピー
1. 念のために作成されたクライアント ID をクリックして内容確認(意外と承認済みの JavaScript 生成元 | 承認済みのリダイレクト URI どっちかが無かったりする)
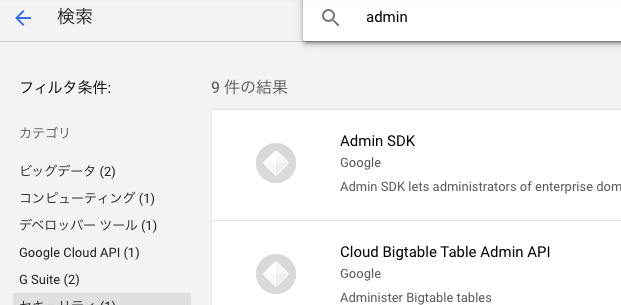
1. ライブラリに行って、`admin`と検索して`Admin SDK`を有効にする
1. auth0 に行く
1. connections で google をクリックして表示
1. `Client ID`、`Client Secret`が入力出来るので OAuth クライアント ID 作成時に出来たものを入れる
1. TRY ボタンで試してみて、google のログインが出たら OK
1. frontend に行って、google アカウント(誰のでも)でログインしてみる
1. ログイン後、リロードしてもログイン状態なら成功
### https://auth0.com/docs/connections/social/google
| 承認済みの JavaScript 生成元 | 承認済みのリダイレクト URI |
| ----------------------------- | -------------------------- |
| Authorized JavaScript origins | Authorized redirect URIs |
### OAuth 同意画面(autho0.com 追加)
### ウェブアプリケーションで ID の作成
### 出来たクライアント ID を開いた所
### Admin SDK の検索