https://github.com/glopez-dev/trelltech
A project management mobile app in React Native
https://github.com/glopez-dev/trelltech
epitech mobile-app react-native
Last synced: about 2 months ago
JSON representation
A project management mobile app in React Native
- Host: GitHub
- URL: https://github.com/glopez-dev/trelltech
- Owner: glopez-dev
- Created: 2025-01-24T19:15:35.000Z (over 1 year ago)
- Default Branch: main
- Last Pushed: 2025-01-24T19:18:04.000Z (over 1 year ago)
- Last Synced: 2025-06-01T05:17:11.859Z (about 1 year ago)
- Topics: epitech, mobile-app, react-native
- Language: TypeScript
- Homepage:
- Size: 92.1 MB
- Stars: 0
- Watchers: 1
- Forks: 0
- Open Issues: 0
-
Metadata Files:
- Readme: README.md
Awesome Lists containing this project
README
# Epitech 6th semester - Mobile dev module - Trelltech
Module: `T-DEV-600`
## Technical Stack
- React Native
- TypeScript
- Jest
- Expo
- Gluestack UI
- React Navigation [https://reactnavigation.org/docs/hello-react-navigation]()
## Architecture
Model View ViewModel (MVVM)
**Resources** :
- https://tech.groww.in/apply-mvvm-in-react-native-app-ad77fa0f851b
### How to Use MVVM with React Native?
When you are developing a complex project with React Native, you may not be able to maintain the code and structure with ease. MVVM architecture makes the code manageable and ensures that it is scalable.
You won't need to make any additions to the architecture while adding more views or models to the project Redux and MobX. Before choosing the apt method, you will need to develop a few apps.
Before we begin coding, we will take a look at MVVM in-depth. We just touched upon how it is valid and the pros and cons. Here we will look at the individual aspects and learn how to code each one for React Native applications.
The four main blocks for any MVVM include:
- View
- ViewController
- ViewModel
- Model
Let’s understand each block in detail.
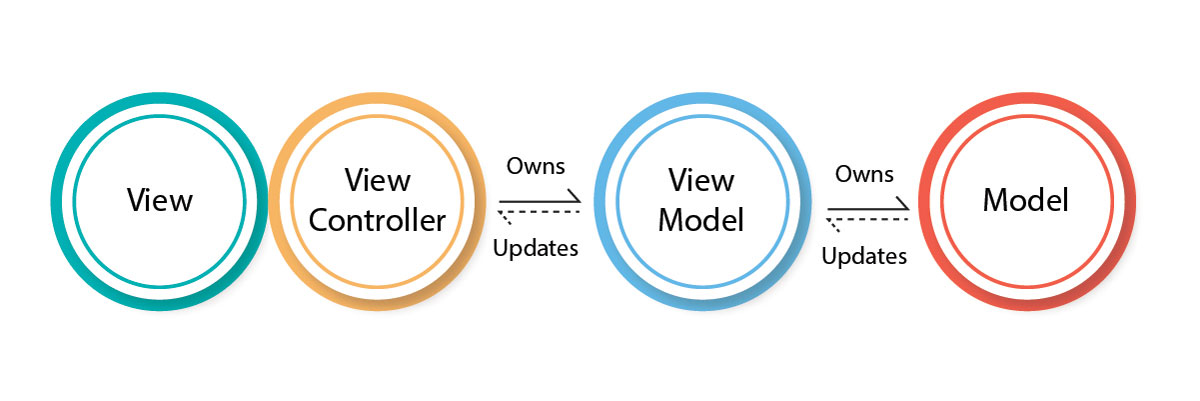
### View
The view is your Interface, which you build with React Native framework. This is the point where the user will interact with your application.
Either they will input a command, use mouse movements or press a key to trigger the ViewController from the interface.
The interface doesn’t do much except take in and give out the display data. For instance, if you use the tax calculator, your input will be salary and other details, while the output will be the tax liability.
The view will only display the numbers and trigger events based on the input in both cases.
```js
import React from "react";
import PokemonList from "./UI/PokemonList";
import PokemonForm from "./UI/PokemonForm";
class PokemonView extends React.Component {
render() {
const {
pokemons,
pokemonImage,
pokemonName,
randomizePokemon,
setPokemonName,
addPokemon,
removePokemon,
shouldDisableSubmit,
} = this.props;
return (
);
}
}
```
### ViewController
The ViewController will take up the command and pass it on to the ViewModel.
It is important to note that one ViewController can pass commands to several ViewModels.
You won't need to ramp up the controllers in this case. The command will be cleaned, interpreted, and passed to the ViewModel, thus enabling easy access.
```js
import React from "react";
import PokemonView from "./PokemonView";
class PokemonController extends React.Component {
state = {
pokemonImage: "1.gif",
pokemonName: "",
};
setRandomPokemonImage = () => {
const rand = Math.ceil(Math.random() * 10);
this.setState({ pokemonImage: `${rand}.gif` });
};
setPokemonName = (e) => {
this.setState({ pokemonName: e.target.value });
};
clearPokemonName() {
this.setState({ pokemonName: "" });
}
savePokemon = () => {
this.props.viewModel.addPokemon({
image: this.state.pokemonImage,
name: this.state.pokemonName,
});
};
addPokemon = () => {
this.savePokemon();
this.clearPokemonName();
};
removePokemon = (pokemon) => {
this.props.viewModel.removePokemon(pokemon);
};
render() {
const { viewModel } = this.props;
return (
);
}
}
export default PokemonController;
```
### ViewModel
This is the third and most important block of the MVVM architecture.
At this point, the block is not communicating with the interface directly.
So, it will not know whether the interface was built using React, Vue, or any other framework.
It is a JS class that you can reuse to make any application.
```js
class PokemonViewModel {
constructor(pokemonStore) {
this.store = pokemonStore;
}
getPokemons() {
return this.store.getPokemons();
}
addPokemon(pokemon) {
this.store.addPokemon(pokemon);
}
removePokemon(pokemon) {
this.store.removePokemon(pokemon);
}
}
export default PokemonViewModel;
```
### Model
This is your source for accessing the data; from here, the `ViewModel` and `ViewController` will gain the necessary output and send it to `View`.
This part of the architecture will find databases, network layers, and services. Your logic should be restricted to helping the model send the necessary updates to the View.
This is your MVVM architecture. However, there is an extra component that you will use to bind these elements together, and it is known as a provider. The provider is not part of the MVVM architecture but will be used when creating the app solution.
### Provider
When working with `ViewModel`, you will need to inject dependencies that can help quickly collect the data and send it to the `View`.
That’s where the provider will help. The instances in the `ViewModel ` are passed to the `ViewController` through this block after injecting the necessary dependencies.
This block doesn’t carry any logic. It is designed to connect the different blocks properly.
```js
import React from "react";
import { inject } from "mobx-react";
import PokemonController from "./PokemonController";
import PokemonViewModel from "./PokemonViewModel";
import RootStore from "../../models/RootStore";
@inject(RootStore.type.POKEMON_MODEL)
class PokemonProvider extends React.Component {
constructor(props) {
super(props);
const pokemonModel = props[RootStore.type.POKEMON_MODEL];
this.viewModel = new PokemonViewModel(pokemonModel);
}
render() {
return ;
}
}
export default PokemonProvider;
```