https://github.com/goldstack/goldstack
Templates and boilerplates for fullstack projects customised to your needs.
https://github.com/goldstack/goldstack
berry eslint javascript template templates typescript yarn
Last synced: 3 months ago
JSON representation
Templates and boilerplates for fullstack projects customised to your needs.
- Host: GitHub
- URL: https://github.com/goldstack/goldstack
- Owner: goldstack
- Created: 2020-09-24T21:04:37.000Z (almost 6 years ago)
- Default Branch: master
- Last Pushed: 2026-03-26T05:32:44.000Z (3 months ago)
- Last Synced: 2026-03-27T01:35:15.848Z (3 months ago)
- Topics: berry, eslint, javascript, template, templates, typescript, yarn
- Language: HTML
- Homepage: https://goldstack.party
- Size: 3.71 GB
- Stars: 135
- Watchers: 3
- Forks: 21
- Open Issues: 14
-
Metadata Files:
- Readme: README.md
- Contributing: CONTRIBUTING.md
- Agents: AGENTS.md
Awesome Lists containing this project
README
 [](https://www.codacy.com/gh/goldstack/goldstack/dashboard?utm_source=github.com\&utm_medium=referral\&utm_content=goldstack/goldstack\&utm_campaign=Badge_Grade)
Getting started on a new project is fun ... until it isn't. Goldstack provides customizable starter templates that help you lift your project off the ground and immediately start working on the features that matter to you.
# Getting Started
Explore the templates Goldstack provides:


Find all templates on [Goldstack](https://goldstack.party/).
# How Does It Work
Generating new starter projects with Goldstack is simple and quick.
### Step 1: Select the templates you need
Rather than providing a library of projects, Goldstack provides a *library of module templates* that can be used to compose projects. This ensures that you can start with a project that includes exactly the features you need.
You can select as many modules as you want. All modules are configured to be easily used alongside each other. For instance, if you choose all modules from the list above, you can link the Lambda Express module to the Next JS application and the S3 module with the Express application. All modules are deployed into a project configured using Yarn workspaces.
### Step 2: Provide your Email (if you like)
You can specify your email address so we can send you a link to your template for safekeeping and further configuration. But if you do not want to share your email with us, you don't need to provide it.
### Step 3: Download
Goldstack will package your project into one zip file that you can download. This zip file will contain everything to get started developing business logic for your project. If you have provided your email, we will also send you an email with a link you can use to re-download your project or create more Goldstack templates. The email also includes a list of getting started guides for your project.
### Step 4: Configure the project for AWS deployment (Optional)
It can often be overwhelming to get started with customizing a new starter project to your needs, especially if the starter project consists of many different modules. We therefore provide a web-based interface for creating a baseline configuration for your project for deployment to AWS. This baseline configuration will enable you to start developing and deploying your project immediately.
All configuration is written into source files. So you will be able to change and extend the configuration later in accordance with your requirements.
For instance, if any module is selected that requires deployment to a website, the configuration tool will help you configure the domain to be used for deploying the website. If you later want to change the domain or deploy your project to multiple domains (e.g. staging and production), you can modify the configuration files in your source code.
### Step 5: Follow getting started guides
We recommend that you follow the getting started guides we provide with the download link. The first step will usually be to simply run `yarn` at the root of your project, open VSCode and to run `yarn infra up [dev|prod]` to bring up your infrastructure.
# Roadmap
It should be a surprise to no one that setting up a dynamic monorepo for JavaScript/TypeScript projects is challenging. While the projects built with Goldstack have loads of config and best practices embedded, there is still a way to go to make this a complete turnkey solution. The following table gives an overview of what works well in the generated project and where some work may still be needed.
| Status | Feature | Comments |
| ------ | ---------------------- | -------------------------------------------------------------------------------------------------------------------------------------------------------------------------------------------------------- |
| 👌 | Install and Build | Yarn Workspaces using Yarn v2 (Berry) overall works very well and allows for very fast install and build speeds. |
| 👌 | TypeScript | Well-supported, only workaround required is to run `yarn fix-project-references` when new inter-project dependencies are added. |
| 👌 | Linting and Formatting | Biome are configured to work effectively across all packages. |
| 👌 | Testing | Running tests with Jest works across all packages |
| 👌 | IDE Integration | VSCode including Intellisense works across the monorepo |
| 🤷 | AWS | Deployment into AWS using Terraform overall works very well. Just initial configuration and the way credentials are provided can be improved. See [#3](https://github.com/goldstack/goldstack/issues/3). |
# About
Getting started with a new project often takes so much longer than it should. Rather than writing code for the problem we want to solve, we fiddle around with the tooling. This problem is often substantial especially in JavaScript ecosystems, where getting common tools such as ESLint, TypeScript, Jest and React work together takes a lot of time and can be frustrating.
Goldstack provides high quality starter projects that are configured based on best practices and sensible defaults. Using a Goldstack starter project rather than a hand-rolled one, will save you dozens of development hours. Moreover, at Goldstack we obsess with every detail of our starter projects and have the freedom to spend the time on optimizing things; something often lost in the race to get goals delivered in many development projects.
## Design Principles
Goldstack templates are based on the following design principles:
### Only the best tech
We aim to provide starter templates for the best frameworks currently on the market. All templates on Goldstack are based on frameworks and solutions with proven track records for productivity and stability.
### Professional
Goldstack templates allow your project to lift off at rocket speed while being sufficiently robust and configurable to fit the requirements of a professional environment. We enable this by:
* All infrastructure is defined in Terraform and can be modified to fit into your environments
* Everything can be deployed in AWS
* We provide instructions for security hardening for every template
### Serverless
Goldstack templates use Serverless technologies unlocking the benefits of rapid development cycles, security, observability and low ongoing costs. Following some examples of ways Serverless technologies are employed for the templates:
* Any frontends are deployed using AWS S3 and CloudFront
* Our Express server template is wrapped in a Lambda
* Our email template utilizes AWS Simple Email Service for email sending
### Unlimited customizability
We all know that there is usually a trade off in platforms that help us get something done quickly such as when using Firebase. It is very easy to develop and deploy a simple application. However, it is often difficult to adapt the initial simple project to our specific needs. Goldstack is based on the premise that there should not a be a limit to what you can do with your project. Some of the elements that enable this are:
* Infrastructure can be adapted to your needs utilizing the full power of Terraform
* Core functionality is defined as easy to change source code in the project
* Any dependencies we add to your project are available as open source and open for you to modify as required
### Modularity first
Modularity is one of the most important principles in software design. Unfortunately it is often difficult in the JavaScript ecosystem to develop truly modular applications. Many projects have started to adopt Lerna for this purpose, but Lerna comes with its own problems, especially for larger projects.
* Utilizing Yarn 2 for efficient workspace management
* Providing TypeScript APIs for connecting packages; for instance a backend package can simply import an S3 package and use TypeScript methods to establish a connection to the bucket
### Built to be Tested
Automated testing is a key driver for software quality but, while modern frameworks make it easy to write unit tests for individual components, it is often difficult to establish end-to-end tests that cover the entire stack of an application. Goldstack templates are optimized to allow writing tests that cover all packages of an application. For instance, it is possible to write a Jest test that uses React Testing Library to walk through the user interface while interacting with an in-memory API server (rather than having to mock calls to the backend).
# Configuration
It can often be overwhelming to start working with a new starter project. If you provide us with some details about your project, we can generate a baseline configuration for deployment to AWS.
The following properties are required for general project configuration:
* **Project Name**: A name for this project.
* **Deployment**: Choose if you want to use the configuration tool to configure production or development infrastructure. At this point, the configuration tool only supports definition of either production or development infrastructure. However, after you download your project, you can configure unlimited additional deployment configurations (for example if you choose to define development infrastructure now, you can define production infrastructure later).
* **AWS Region**: The [AWS region](https://aws.amazon.com/about-aws/global-infrastructure/regions_az/#:~:text=AWS%20maintains%20multiple%20geographic%20Regions,Africa%2C%20and%20the%20Middle%20East.) infrastructure that your project should be deployed to.
## AWS Configuration
In order to set up infrastructure on AWS and for running deployed services, Goldstack needs access to AWS credentials. These can be provided in a number of ways:
### Using the default local AWS user
If you have the [AWS CLI](https://aws.amazon.com/cli/) installed and have [credentials configured locally](https://docs.aws.amazon.com/cli/latest/userguide/cli-configure-files.html), Goldstack will use the default AWS user if no other configuration options are provided.
You can check if the default AWS user is configured by running [`aws configure list`](https://docs.aws.amazon.com/cli/latest/reference/configure/list.html).
aws configure list
### Using a specific local AWS user
The AWS CLI uses a standardised location to store AWS credentials and configuration. Goldstack will attempt to read from this configuration if no other configuration was provided.
Please see the AWS documentation to learn more about where these files are stored and how to create them: [AWS CLI / Configuration and credential file settings](https://docs.aws.amazon.com/cli/latest/userguide/cli-configure-files.html).
Note that Goldstack will require both the `credentials` as well as the `config` file, and in the `config` file specifically the `region` needs to be specified.
Goldstack will use the `default` profile if no profile is specified. If you want to use more than one profile (e.g. for different deployment stages) you can use the Goldstack AWS configuration file. This file is stored in the repository in the following location:
```bash
config/infra/aws/config.json
```
You can define a number of different users as follows:
```json
{
"users": [
{
"name": "dev",
"type": "profile",
"config": {
"profile": "default",
"awsDefaultRegion": "us-west-2"
}
},
{
"name": "prod",
"type": "profile",
"config": {
"profile": "prod",
"awsDefaultRegion": "us-west-2"
}
}
]
}
```
Note that Goldstack also supports overriding the path of the default AWS configuration and credentials files:
```json
{
"users": [
{
"name": "prod",
"type": "profile",
"config": {
"profile": "prod",
"awsDefaultRegion": "us-west-2",
"awsConfigFileName": "/path/to/config/file",
"awsCredentialsFileName": "/path/to/credentials/file"
}
}
]
}
```
### Using process credentials
There are a number of issues when trying to work with multiple profiles and SSO credentials, see [aws/aws-cli#4982 (comment)](https://github.com/aws/aws-cli/issues/4982#issuecomment-939348934) and [goldstack/goldstack#17](https://github.com/goldstack/goldstack/issues/17).
An excellent way to deal with situations where we do not want to provide the user credentials directly is to use [process credentials](https://docs.aws.amazon.com/cli/latest/userguide/cli-configure-sourcing-external.html).
Goldstack supports defining process credentials in the `config/infra/aws/config.json` file.
```json
"users": [
{
"name": "dev-user",
"type": "profile",
"config": {
"profile": "with-process",
"awsDefaultRegion": "us-west-2",
"credentialsSource": "process"
}
}
]
```
This will require a `~/.aws/config` file as follows:
[with-process]
credential_process=[your command]
Useful commands to use in the `credential_process` field are: [aws-sso-creds-helper](https://github.com/ryansonshine/aws-sso-creds-helper), [aws-sso-util](https://github.com/benkehoe/aws-sso-util#adding-aws-sso-support-to-aws-sdks), [aws-vault](https://github.com/99designs/aws-vault/blob/0615e7c8cddc5d5046e29b87acfc0fe73c1aa998/USAGE.md#using-credential_process) and [aws2-wrap](https://github.com/linaro-its/aws2-wrap#use-the-credentials-via-awsconfig).
Note that it is also possible to place the credentials file in a different location.
```json
{
"users": [
{
"name": "prod",
"type": "profile",
"config": {
"profile": "prod",
"awsDefaultRegion": "us-west-2",
"awsConfigFileName": "/path/to/config/file",
"credentialsSource": "process"
}
}
]
}
```
### Using credentials in Goldstack configuration file
AWS credentials they can be configured directly in the Goldstack configuration file. Note we do not recommend this option. If you can, use the user credentials or environment variables.
This file can be found under the following paths:
```bash
config/infra/aws/config.json
```
The configuration file can have contents as follows:
```json
{
"users": [
{
"name": "dev-user",
"type": "apiKey",
"config": {
"awsAccessKeyId": "[Your Access Key ID]",
"awsSecretAccessKey": "[Your Secret Access Key]",
"awsDefaultRegion": "[Region for user]"
}
},
{
"name": "prod-user",
"type": "apiKey",
"config": {
"awsAccessKeyId": "[Your Access Key ID]",
"awsSecretAccessKey": "[Your Secret Access Key]",
"awsDefaultRegion": "[Region for user]"
}
}
]
}
```
Make sure that the `"name"` property matches the `"awsUser"` of module deployments for which the user should be used. There is no limit to how many users you can define.
Note that this file should *not* checked into source control if AWS credentials are provided.
If you want to supply AWS user credentials in your CI/CD systems, these can be supplied using environment variables and for local development you can use the files provided by the AWS CLI (see above).
### Credentials in Environment Variables
Goldstack can read AWS *Access Key ID* and *Secret Access Key* from environment variables. The easiest way is to set the following environment variables:
```bash
AWS_USER_NAME: [Your user name]
AWS_ACCESS_KEY_ID: [Your access key id]
AWS_SECRET_ACCESS_KEY: [Your secret access key]
AWS_DEFAULT_REGION: [User region]
```
The `AWS_USER_NAME` variable is optional but can be useful for explicitly referencing the correct Goldstack user in deployments. The above setup is particularly useful for CI/CD environments. For instance, when using [GitHub Actions](https://github.com/actions), environment variables could be configured as follows:
```yaml
- name: Deploy UI
run: |
yarn workspace my-ui deploy dev
env:
AWS_USER_NAME: dev-user
AWS_ACCESS_KEY_ID: ${{secrets.AWS_ACCESS_KEY_ID}}
AWS_SECRET_ACCESS_KEY: ${{secrets.AWS_SECRET_ACCESS_KEY}}
AWS_DEFAULT_REGION: us-west-2
```
The values of the environment variables are defined in [GitHub Secrets](https://docs.github.com/en/free-pro-team@latest/actions/reference/encrypted-secrets).
## How to get AWS Credentials
\[Video: Step-by-step Video Guide]\(https://www.youtube.com/embed/-lWrkpzEgfs)
The easiest way to configure the AWS user for Goldstack is to do it during project setup by providing an *AWS Access Key Id* and *AWS Secret Access Key*. To obtain these, please do the following:
* Create an AWS account if you do not already have one. See [instructions on this from AWS here](https://aws.amazon.com/premiumsupport/knowledge-center/create-and-activate-aws-account/).
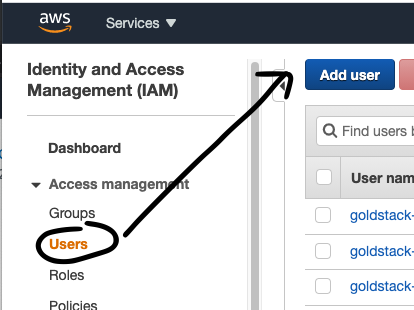
* Open the AWS console IAM management and sign in if required:
* Click on *Users* in the menu on the right
* Provide a username of your choice, for instance 'goldstack-dev'
* Select the Access Type *Programmatic Access*
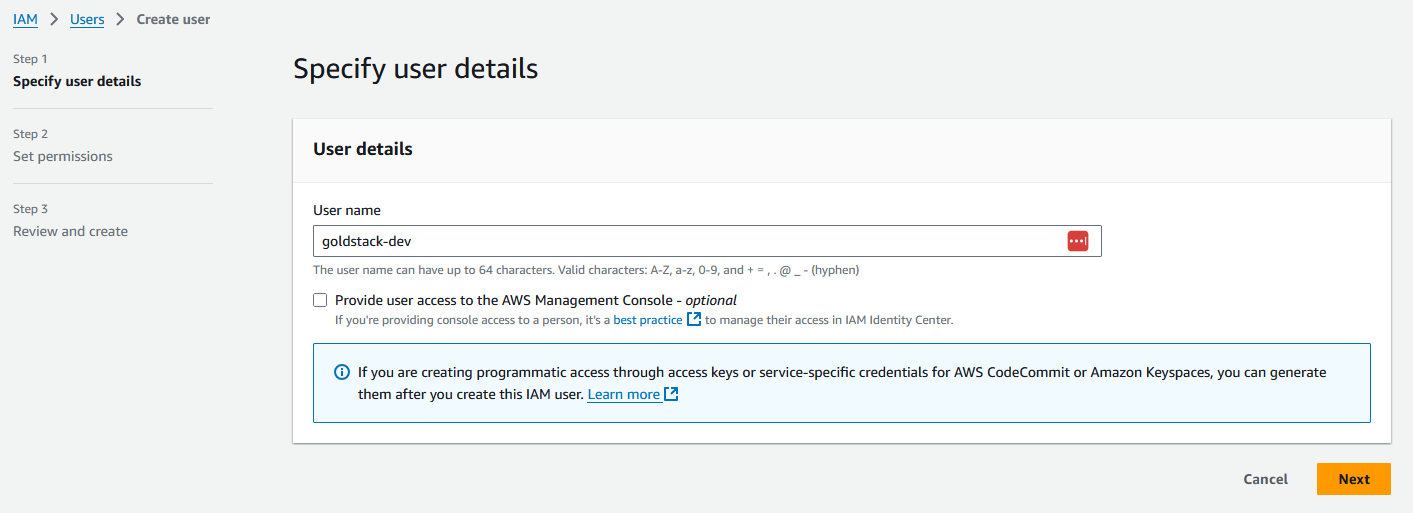
* Click on the button *Next: Permissions*
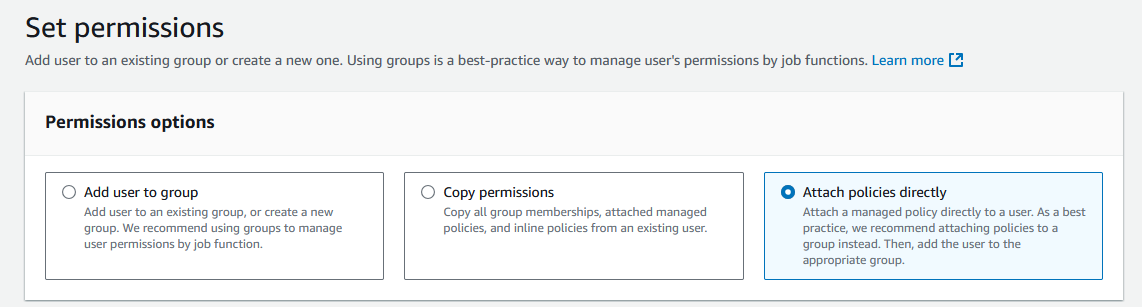
* Select *Attach existing policies directly*
* Select the Policy *AdministratorAccess*
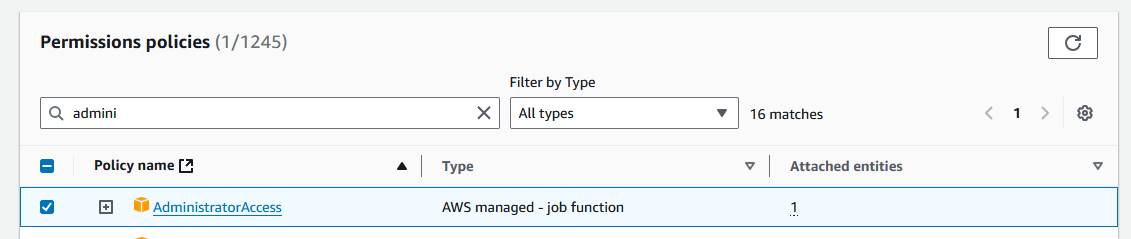
* Click on the button *Next*
* On the review page click *Create user*
* Click on the name of the user you have just created
* Then click on the tab *Security credentials*

* Scroll down to *Access Keys* and click *Create Access Key*
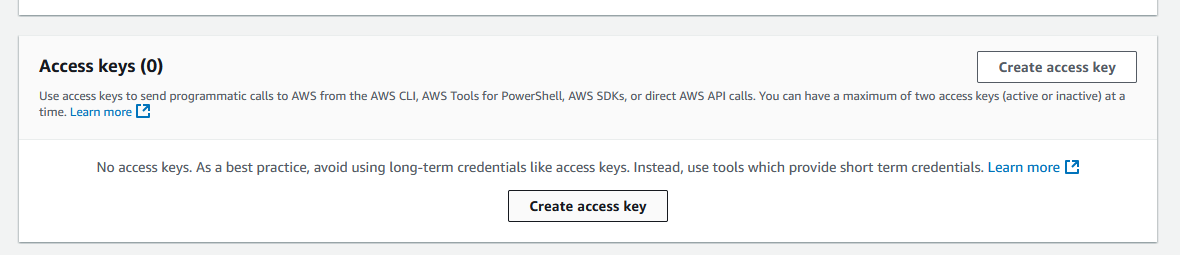
* Select *Local code* and check the box under *Confirmation*, and click *Next*
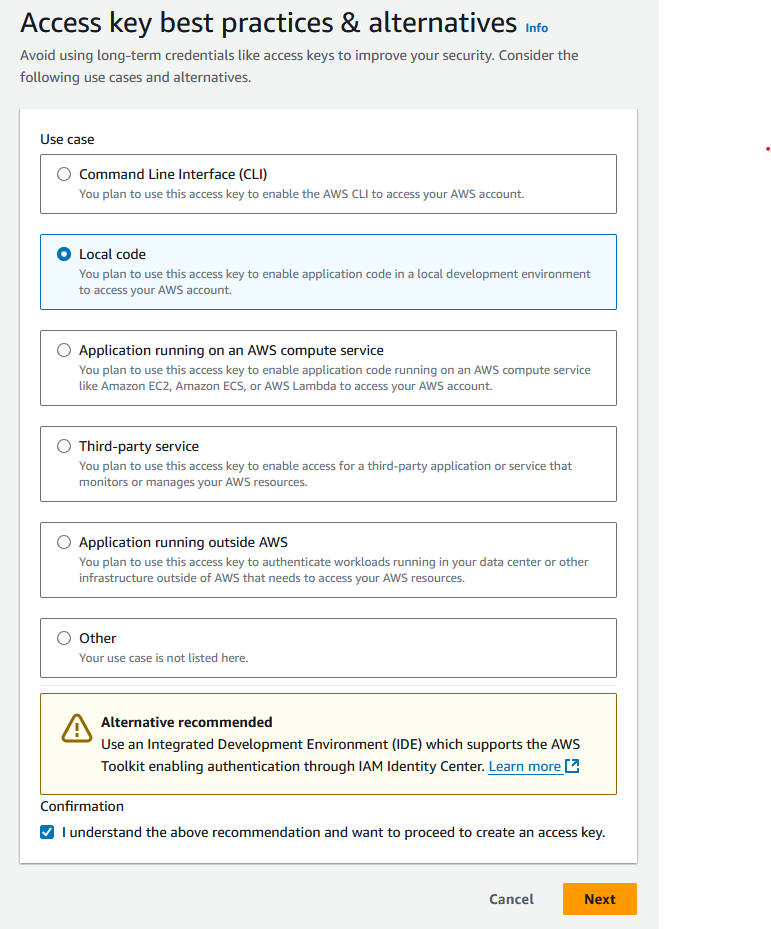
* You do not need to provide a description tag value. Click *Create access key*.
Now you can copy the *Access Key ID* and add it to the Goldstack configuration form or add it into your local configuration file. Do the same with the *Secret Access Key* (It can be shown by clicking on Show).
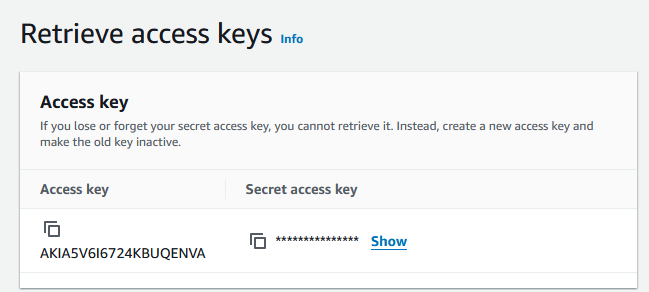
Note that it is recommended to only provide this key and secret for development systems (and prototype/hobby production systems). For all other systems, it is recommended to provide this key and secret only through environment variables (see below).
## Hosted Zone Configuration
\[Video: Video Guide]\(https://www.youtube.com/embed/9rug-hhkxSc)
Many templates need to deploy resources to a domain, for instance for a [static website](./../modules/static-website-aws) or for an [API server](./../modules/lambda-express). Goldstack templates can provide the DNS configuration required but you need to specify the [Route 53 hosted zone](https://docs.aws.amazon.com/Route53/latest/DeveloperGuide/AboutHZWorkingWith.html) that the DNS entries should be added to. You can either use an already existing hosted zone or create a new one.
### Creating a new hosted zone
The following steps describe how to create a new hosted zone in AWS Route 53.
* (Optional) If you haven't registered a domain, you can [register a domain through Route 53](https://docs.aws.amazon.com/Route53/latest/DeveloperGuide/domain-register.html).
* Go to the [Route 53 AWS console](https://console.aws.amazon.com/route53/v2/hostedzones#)
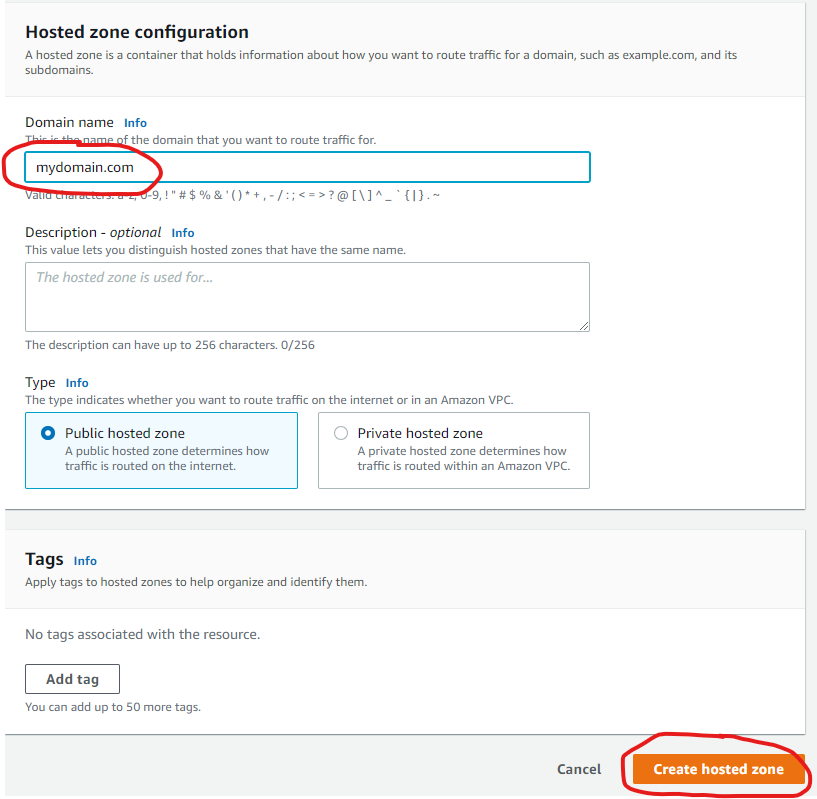
* Click on *Create Hosted Zone*
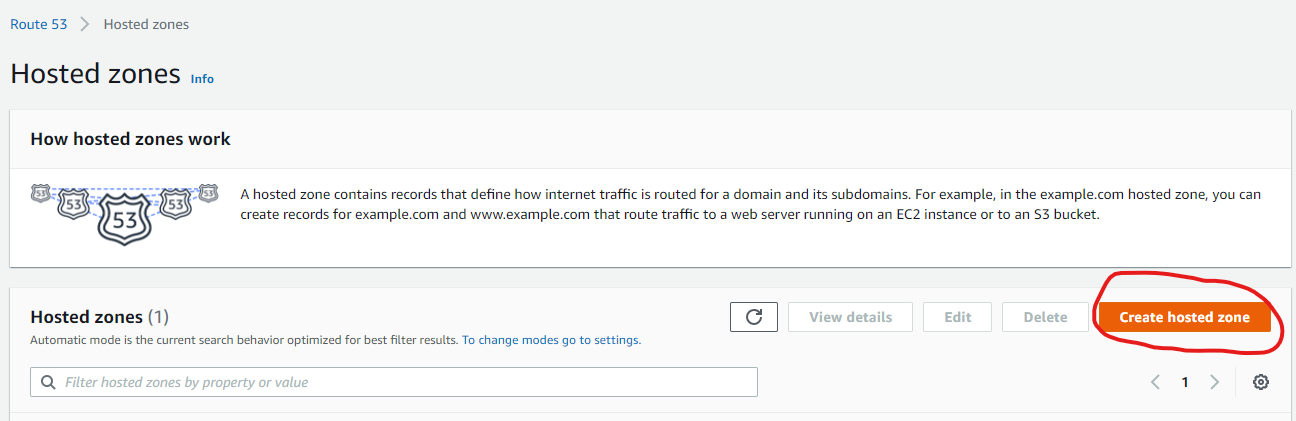
* Provide the name of a domain you own (or a subdomain of a domain you own) and click *Create hosted zone*.
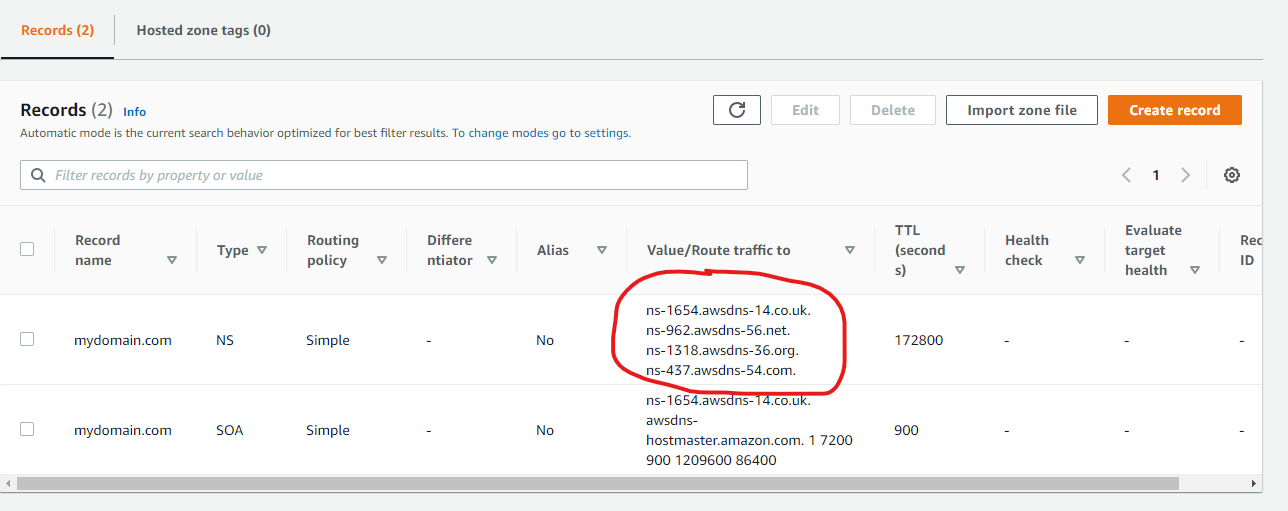
* If you haven't registered your domain through Route 53, configure your domain with your domain registrar to use the nameservers Route 53 lists for your domain.
Now you can copy the domain name of your hosted zone and provide this in your template configuration

Note that for the actual domain your package uses, you can specify the domain name of the hosted zone directly, or one of it's subdomains. For instance, if your hosted zone domain is `yourdomain.com` you can configure a website template to be deployed to `yourdomain.com` or `website.yourdomain.com`.
You can use the same hosted zone for multiple modules. Just make sure to use subdomains to avoid conflicts between packages. For instance, if you configure a website to be deployed to `mydomain.com` then deploy your API to `api.mydomain.com`.
### Using an existing hosted zone
If you already have a hosted zone configured for the domain you would like to use for your template, you simply need to provide the domain of the hosted zone.
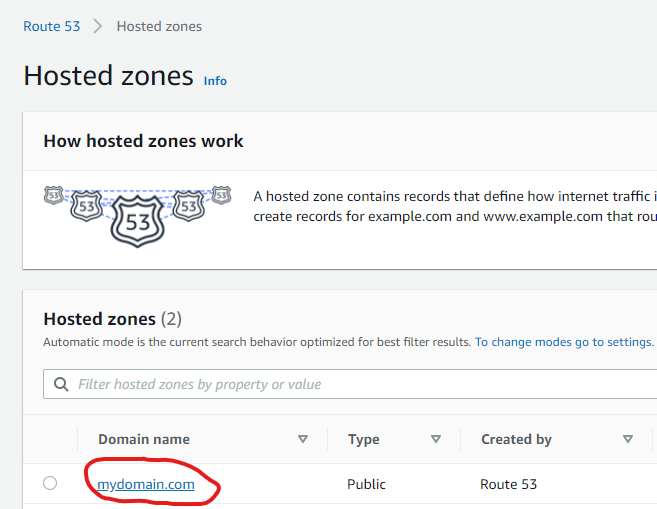
* You can find all hosted zones you have configured in the [Route 53 Console](https://console.aws.amazon.com/route53/v2/hostedzones#)
* Copy the value provided under *Domain name* and provide this in your template configuration
## Terraform
All Goldstack templates contain Terraform Infrastructure as Code definitions. Goldstack provides easy tooling to stand up this infrastructure. Terraform will use the *AWS credentials* configured as per the instructions above.
All state will be stored in [Terraform S3 remote state using DynamoDB locking](https://www.terraform.io/docs/language/settings/backends/s3.html). Goldstack will automatically create a bucket for storing the state in the same AWS account that the infrastructure is deployed to (thus being able to use the same AWS credentials).
During standing up the infrastructure for the first package of a project, Goldstack will create the `config/infra/aws/terraform.json` file that contains the S3 bucket and DynamoDB table for all packages deployed to a respective AWS account. Below an example `terraform.json` file.
```json
{
"remoteState": [
{
"user": "dev",
"terraformStateBucket": "goldstack-tfstate-67a73e60720c25855a39baeb1218b55229578671",
"terraformStateDynamoDBTable": "goldstack-tfstate-a82076777995c7254fbcae1f9e8013fee75833f2-lock"
},
{
"user": "prod",
"terraformStateBucket": "goldstack-tfstate-0cb1a35a83c9c952321ee4addbe76d096b031d47",
"terraformStateDynamoDBTable": "goldstack-tfstate-0cb1a35a83c9c957772ee4addbe76d096b031d47-lock"
}
]
}
```
To prevent Goldstack from auto-generating the bucket and table names, provide a `terraform.json` file before standing up the infrastructure for your first package. Goldstack will create bucket and table using the names you specify then. Also, if you have special requirements for your bucket and table, you can create these before standing up the infrastructure with Goldstack. You only need to ensure that the bucket and table fulfil the requirements of Terraform for storing its remote state.
All packages included in a project will use the same bucket and DynamoDB table. The name of the state file will be defined in the `goldstack.json` file within each package.
```json
{
"$schema": "./schemas/package.schema.json",
"name": "mypackage",
"deployments": [
{
"name": "dev",
"tfStateKey": "mypackage-dev-f53056a8788c8eb7a1ac.tfstate"
}
]
}
```
If the `tfStateKey` property is defined before running `yarn infra init [deployment]`, Goldstack will use the name specified as key for the state in bucket and DynamoDB table. If the `tfStateKey` property is not defined, a name will be generated and `goldstack.json` updated.
Ensure that after standing up infrastructure for the first time to commit and push changes to your project, since Goldstack will update `goldstack.json` config and the `config/infra/aws/terraform.json` config. This is only required for initialising the infrastructure for each package and target AWS account (and if you do not provide the names for bucket, table and state files manually). For subsequent updates to the infrastructure it is not necessary to update the source files.
### Upgrading Terraform Version
Terraform frequently releases new versions of their tooling. Goldstack provides tooling to support different versions of Terraform for different modules and for upgrading Terraform.
⚠️ Note that upgrading Terraform is often a difficult process and although Goldstack provides some tools to make this process easier, expect that a number of manual steps and fixes will be required.
First note that Goldstack allows defining the version of Terraform that is to be used for executing infrastructure commands in two ways:
1. Centrally for a package using a file `infra/tfConfig.json` such as the following:
```json
{
"tfVersion": "1.10"
}
```
2. If a project has multiple different deployments that require different Terraform versions, or for first upgrading Terraform for test environments, it is also possible to specify the Terraform version per deployment. For this, add the `"tfVersion"` property to a `"configuration"` for a deployment in `goldstack.json`, for instance:
```json
{
"$schema": "./schemas/package.schema.json",
"name": "lambda-api-template",
"template": "lambda-api",
"templateVersion": "0.1.0",
"configuration": {},
"deployments": [
{
"name": "prod",
"awsRegion": "us-west-2",
"awsUser": "goldstack-dev",
"configuration": {
"tfVersion": "1.10"
}
}
]
}
```
Changing the Terraform version will result in Goldstack using the specified version of the Docker image `hashicorp/terraform:[version]`. Please avoid specifying minor versions: use `0.12` not `0.12.1`.
Note that Terraform often provides upgrade scripts for Terraform. These can either be applied by installing the matching Terraform version locally or using the following Goldstack command:
yarn infra upgrade [deployment] [targetVersion]
Note that this command is only supported for a limited number of versions. Also versions need to be upgraded one jump at a time, e.g. going from `0.12` to `0.13` is supported but not going from `0.12` to `0.14` or higher versions. For a reference of available versions, see [Terraform Versions](https://releases.hashicorp.com/terraform/).
It is recommend to run `yarn infra init [deployment]`, `yarn infra up [deployment]` and `yarn deploy [deployment]` after every `upgrade` command.
Note that you may have to upgrade various versions in `infra/aws/terraform/providers.tf` as well as making various other changes upgrading Terraform may involve, also see [Terraform Upgrade Guides](https://www.terraform.io/language/upgrade-guides).
### Releasing State Locks
Goldstack automatically creates Terraform state files on S3 and maintains a state lock using DynamoDB. Sometimes Terraform state can become locked if an operation fails unexpectedly. When performing further Terraform operations, an error as the following will be reported:
```
│ Error: Error acquiring the state lock
│
│ Error message: ConditionalCheckFailedException: The conditional request
│ failed
│ Lock Info:
│ ID: 37ce96a7-3689-8630-f346-9f1e745c038b
│ Path: goldstack-tfstate-f865b5cbbebb107ee7639f77a95b6f46c814fff9/env:/prod/server-side-rendering-prod-9241dfab78652931e675.tfstate
│ Operation: OperationTypeApply
│ Who: root@f3f77f0e8b44
│ Version: 1.1.3
│ Created: 2022-10-07 22:05:04.2574526 +0000 UTC
│ Info:
```
To resolve this error, take note of the `ID` above and the `deployment` for which the state file has been locked and run the command:
yarn infra terraform [deployment] force-unlock -force [ID]
### Destroying State
Goldstack provides commands to clean up Terraform state. These commands are useful when you want to completely remove a deployment or reset your infrastructure configuration.
⚠️ **Important**: All packages in a project share the same S3 bucket and DynamoDB table for storing state. The state for each deployment is stored in a separate file identified by the `tfStateKey` in `goldstack.json`.
#### Destroy Deployment State
To delete only the state file for a specific deployment:
yarn infra destroy-state [deployment]
This command:
* Deletes the `.tfstate` file for the specific deployment from S3
* Removes the lock entry for that deployment from DynamoDB
* **Does not affect other deployments** or the shared infrastructure
This is the **recommended** way to clean up state for a single deployment.
#### Destroy State Bucket
⚠️ **DANGER**: This command affects **ALL deployments** in your project.
To delete the entire S3 bucket and DynamoDB table used for Terraform state:
yarn infra destroy-state-bucket [deployment]
This command:
* Deletes **ALL** state files from the S3 bucket
* Deletes the DynamoDB table used for state locking
* Affects **every deployment** that uses the same AWS account
**When to use this command:**
* When you want to completely remove all Terraform state infrastructure
* During project cleanup when you're sure no deployments need their state
* When migrating to a different state management solution
**Confirmation required**: You must type `destroy-bucket` when prompted to confirm this destructive operation.
**Note**: After running `destroy-state-bucket`, you will need to run `yarn infra up [deployment]` again for any deployment, which will recreate the bucket and table.
### Providing Terraform Variables
Terraform variables can be defined in multiple ways. Variables are discovered from the `variables.tf` file in your `infra/aws` folder, and their values can be provided through:
1. `goldstack.json` configuration files (recommended for most values)
2. Environment variables (`process.env`)
3. `.env` files (useful for sensitive values)
**Important**: Variables defined in `variables.tf` do not need to be present in `goldstack.json`. If a variable is not defined in `goldstack.json`, Goldstack will automatically attempt to resolve its value from environment variables or `.env` files. This is particularly useful for sensitive values that should not be committed to source control.
#### Using goldstack.json
Define variables in the `configuration` property of your `goldstack.json`. There is one global `configuration` property that applies for all deployments, and each deployment can have its own `configuration` property:
```json
{
"configuration": {
"myVar": "global-value"
},
"deployments": [
{
"name": "prod",
"configuration": {
"myVar": "prod-specific-value"
}
}
]
}
```
#### Using Environment Variables
You can provide Terraform variable values directly through environment variables. For a variable named `my_var` in `variables.tf`, set the environment variable `MY_VAR`:
```bash
MY_VAR=value yarn infra up prod
```
This works well in CI/CD pipelines with secrets:
```yaml
- name: Deploy
run: yarn workspace my-package infra up prod
env:
MY_VAR: ${{ secrets.MY_SECRET }}
```
#### Using .env Files
Goldstack loads `.env` files from both the monorepo root and the package directory in the following order (later files override earlier ones):
1. `root/.env` - Shared across all deployments
2. `root/.env.[deployment]` - Deployment-specific (e.g., `.env.prod`, `.env.dev`)
3. `package/.env` - Package-specific shared values
4. `package/.env.[deployment]` - Package and deployment-specific (highest priority)
For example, if you have a Terraform variable `my_var` defined in `variables.tf`, you can provide its value via a `.env` file:
# .env.prod
MY_VAR=my-value
The environment variable name should be uppercase with underscores matching the Terraform variable name (e.g., `my_var` → `MY_VAR`).
#### Variable Resolution Priority
When resolving Terraform variable values, Goldstack uses the following priority (from highest to lowest):
1. Values defined in `goldstack.json` configurations
2. Environment variables (`process.env`)
3. Values from `.env` files
If a variable defined in `variables.tf` is not found in any of these sources, a warning will be logged and the variable will not be passed to Terraform.
# First Steps
This page describes what you can do once you have downloaded your starter project. You will be able to download your project after selecting modules and having configured them on the Goldstack website. Please see [How Does It Work](./how-does-it-work) for more details.
## 1. Install dependencies
A few dependencies need to be available in your development system. Please verify they are present or install them.
* Node v20+
* Yarn v1.22.5+
* Docker v20+
* Terraform CLI
* AWS CLI v2
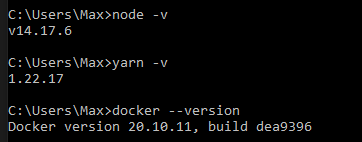
Open a terminal and run the following commands:
```bash
node -v
yarn -v
docker --version
```
This should produce the following output:
If you need to install or update any of the dependencies, please see the following guides:
* [Downloading and installing Node.js and npm](https://docs.npmjs.com/downloading-and-installing-node-js-and-npm)
* [Yarn Installation](https://yarnpkg.com/getting-started/install)
* [Install Docker for Windows](https://docs.docker.com/docker-for-windows/install/) / [Install Docker for Mac](https://docs.docker.com/docker-for-mac/install/)
* [Install Terraform](https://developer.hashicorp.com/terraform/tutorials/aws-get-started/install-cli)
* [Install AWS CLI](https://docs.aws.amazon.com/cli/latest/userguide/getting-started-install.html)
## 2. Extract and install
Extract the contents of the zip file into a folder of your choice.
Run `yarn` in your project directory to install and download all dependencies.
The installation process should take around 3-10 minutes depending on the dependencies that need to be downloaded.
You can confirm everything was installed correctly by running `yarn -v`. This should show a yarn version of `3.0.0+`.

## 3. Build modules
Make sure that the project compiles correctly by running `yarn build` your project directory:
Note that this command also ensures that all TypeScript project references are configured correctly.
## 4. Configure VSCode
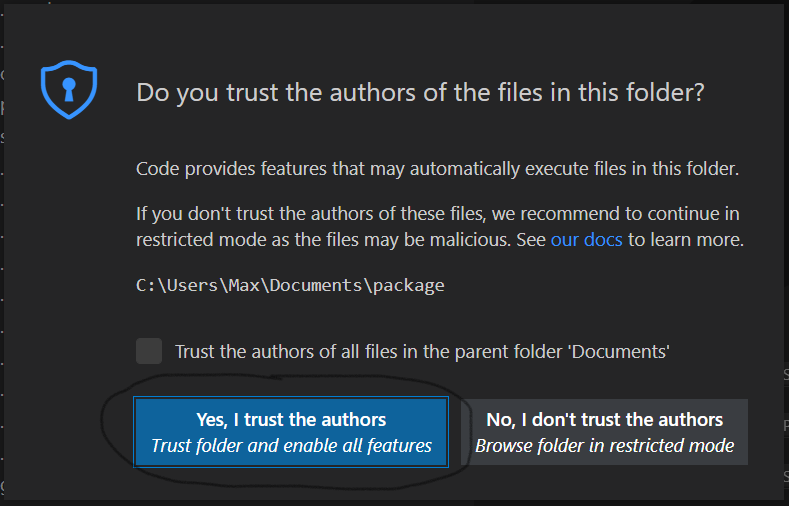
In order to setup VSCode, open the project in VSCode.
VSCode may prompt you to ask if you trust the authors of the workspace. Respond with Yes.
You may also be asked if you want to install recommended extensions for this workspace. We recommend to do so since the template will be optimised to work with the suggested extensions.
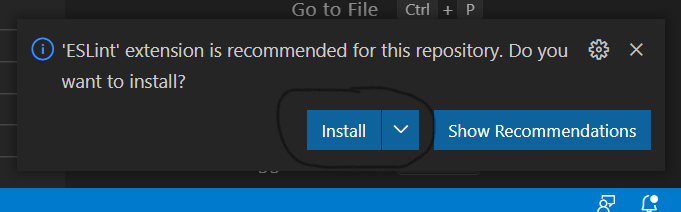
If you want to install the necessary extensions manually, here are links to the extensions required:
* [ESLint](https://marketplace.visualstudio.com/items?itemName=dbaeumer.vscode-eslint)
* [Prettier](https://marketplace.visualstudio.com/items?itemName=esbenp.prettier-vscode)
* [ZipFS](https://marketplace.visualstudio.com/items?itemName=arcanis.vscode-zipfs) (optional)
## 5. Initialise TypeScript
Locate a `.ts` or `.tsx` file in the workspace and open it. When asked whether to use the workspace TypeScript version, click *Allow*.
In the status bar on the bottom right-hand corner of the VSCode editor you should now see *TypeScript*.
## 6. Deploy modules (Optional)
If you have [configured your project for AWS deployment](./configuration) on Goldstack before downloading the project, all modules should be ready to be deployed to AWS. We recommend going through each of your modules individually to ensure the infrastructure for them can be deployed successfully. Please see the getting started guides for the templates you have chosen for instructions. You should have received an email that contains links to the relevant getting started guides.
## 7. Develop
Each module you have selected comes with its own instructions about how to get started with development. However, there are some handy commands in the project root that can be useful for development:
* `yarn build`: Will build all modules in the project.
* `yarn compile`: Will compile all TypeScript code.
* `yarn fix-project-references`: Will ensure all [TypeScript project references](https://www.typescriptlang.org/docs/handbook/project-references.html) between the packages in the project are correct. Always run this after adding a new package or changing the dependencies between packages in the project.
* `yarn test-watch`: Will run tests when modules have changed.
* `yarn format-check` and `yarn format`: Will check or fix source code formatting using Prettier
* `yarn lint` and `yarn lint-fix`: Will check or auto-fix linting issues using ESLint.
* `yarn check` and `yarn check-fix`: Will check and auto-fix import order, linting and formatting issues
Note that you can run all of these commands in the context of individual modules as well. If you only modify code within one module, this is sufficient. However, if you develop multiple modules at the same time, it is important to run these commands at the project root.
# Security Hardening
Goldstack templates provide a balance between usability and security. If you have heightened security requirements, you can easily configure the templates for more security. Simply follow the documentation below or the documentation provided with your templates.
### AWS
The biggest trade-off made in all AWS templates is that there are no restrictive policies and permissions configured. Instead, many resources are simply given admin rights to all components of the system. This is similar to how resources would work in vanilla Kubernetes and works well for small applications and for initial greenfield development. We also recommend that within larger organisations, Goldstack projects should be deployed to dedicated AWS accounts (for further reading see [AWS Organisations](https://aws.amazon.com/organizations/)) whenever possible.
However, for workloads that are more security sensitive we recommend setting more restrictive policies. This must be done on a per-package basis. Please see the template documentation provided for the templates you have selected for specific instructions (links to relevant template documentation should have been sent to you via email).
# Template Documentation
Find documentation for the individual projects on the [Goldstack Documentation](https://docs.goldstack.party/docs)
# Contribute
See [CONTRIBUTING.md](./CONTRIBUTING.md)
## Analysis Tools
* [Codacy](https://app.codacy.com/gh/goldstack/goldstack/dashboard)
* [Code Climate](https://codeclimate.com/github/goldstack/goldstack)
* [Mozilla Observatory](https://observatory.mozilla.org/analyze/goldstack.party)