https://github.com/grafana/k6-chaos
Repository of helpers to run chaos experiments with k6
https://github.com/grafana/k6-chaos
chaos chaos-engineering k6 kubernetes
Last synced: 9 months ago
JSON representation
Repository of helpers to run chaos experiments with k6
- Host: GitHub
- URL: https://github.com/grafana/k6-chaos
- Owner: grafana
- Archived: true
- Created: 2022-04-07T16:07:11.000Z (about 4 years ago)
- Default Branch: main
- Last Pushed: 2022-11-02T08:22:21.000Z (over 3 years ago)
- Last Synced: 2024-10-28T03:14:49.249Z (over 1 year ago)
- Topics: chaos, chaos-engineering, k6, kubernetes
- Language: JavaScript
- Homepage:
- Size: 55.7 KB
- Stars: 12
- Watchers: 130
- Forks: 3
- Open Issues: 6
-
Metadata Files:
- Readme: README.md
Awesome Lists containing this project
README
# k6-chaos
This repo contains a [collection of JavaScript helpers](./src/chaos.js) to run chaos experiments *effortlessly* on top of [k6](https://k6.io).
> ## Deprecation notice
> ⚠️ k6-chaos has been deprecated in favor or [xk6-disruptor](https://github.com/grafana/xk6-disruptor) a k6 extension providing fault injection capabilities.
# Getting started
The first thing you need is a custom k6 binary with the extensions required to use this library: [xk6-kubernetes](https://github.com/grafana/xk6-kubernetes).
You can also download the required k6 binary from the [releases page](https://github.com/grafana/k6-jslib-chaos/releases).
## Exposing your application
In order to access your application from the test script, it must be assigned an external IP. This can be accomplished in different ways depending on the platform you used for deploying the application.
### As a LoadBalancer service
A service of type [`LoadBalancer`](https://kubernetes.io/docs/tasks/access-application-cluster/create-external-load-balancer/) receives an external IP from an external load balancer provider. The load balancer is configured in different ways depending on the platform your cluster is deployed in and the configuration of the cluster. In the following sections we provide guidelines for exposing your application when running in common development environments. If your cluster is deployed in a public cloud, check your cloud provider's documentation.
#### Configuring a LoadBalancer in Kind
[Kind](https://kind.sigs.k8s.io/) is a tool for running local Kubernetes clusters using Docker container to emulate “nodes”. It may be used for local development or CI. Services deployed in a kind cluster can be exposed to be accessed from the host machine [using metallb as a load balancer](https://kind.sigs.k8s.io/docs/user/loadbalancer).
#### LoadBalancer in Minikube
[Minikube](https://github.com/kubernetes/minikube) implements a local Kubernetes cluster supporting different technologies for virtualizing the cluster's infrastructure, such as containers, VMs or running in bare metal.
Minikube's tunnel command runs as a process, creating a network route on the host to the service CIDR of the cluster using the cluster’s IP address as a gateway. The tunnel command exposes the external IP directly to any program running on the host operating system.
```console
$ minikube tunnel
```
# APIs
## Helpers
The `helpers.js` module offers helper functions and clases to facilitate the setup of test scenariors
### DeploymentHelper
The `DeploymentHelper` class facilitates deploying applications and exposing them as services.
Methods
`constructor` creates a helper for deploying an application
Parameters:
client: k8s client from xk6-kubernetes
name: name of the application
namespace: target namespace
image: image of the application
replicas: number of replicas
options:
- app: value of the 'app' label used as pod selector. Defaults to the name
- port: port to expose in the application's container. Defaults to '80'
`deploy` deploys the application and waits for the replicas to be ready
`expose` exposes the application as a service
Parameters
options: additional parameters for configuring the service
- port: port to expose the service. Defaults to '80'
- name: servie name. Defaults to the application's name
`getPods` returns a list with the names of the deployment pods
### ServiceHelper
The `ServiceHelper` class facilitates accessing services.
Methods
`constructor` creates a helper for accessing services
Parameters:
client: k8s client from xk6-kubernetes
name: name of the service
namespace: target namespace
`getIp` returns the external IP of the service. Throwns an error if none is set.
## KubernetesDisruptor
The `KubernetesDisruptor` class offers methods for introducing faults in kubernetes resources such as namespaces, secrets, config-maps, CRDs, etcetera. It can be used for
example for testing the resilience of operators to those failures.
Methods
`constructor`: creates an instance of KubernetesChaos
Parameters
client: k8s client from xk6-kubernetes
namespace: namespace to inject chaos into
`killNamespace`: kill the namespace
## Node disruptor
The `NodeDisruptor` disrupts nodes
Methods:
`constructor`: creates a node distuptor
Parameters:
client: k8s client from xk6-kubernetes
options: options
- name: name of the attack (used as stress job name prefix)
- namespace: namespace where stress jobs will be started
- selector: labels for selecting target node(s). An empty selector matches all nodes
- picker: strategy used for picking node(s) to disrupt from potential targets.
- auto_clean: automatically delete stress jobs when attacks ends (defaults to true)
`stress`: stressing a list of nodes by exhausting resources
Parameters:
nodes: list of nodes to stress
options: controls the stress attack
- cores: sets the number of CPU concurrent stress processes to start
- cpu_Load: sets the CPU load per stress process
- duration: sets the duration of the stress attack. E.g. '5m'
`clean`: clean jobs started by the disruptor (if auto_cleanup was set to false)
## Pod Disruption
The `PodDisruptor` class allows disruption of Pods
Methods:
`constructor`: creates a pod disruptor
Parameters:
client: k8s client from xk6-kubernetes
options:
- namespace: namespace for selecting target pod(s)
- selector: labels for selecting target pod(s). An empty selector matches all pods
- picker: strategy used for picking pod(s) to disrupt from potential targets.
Presenlty the only suppored value is 'ramdom' (one random pod)
- wait: timeout (as a duration) for the disruptor to be initilized (defaults to '10s')
`kill`: kill pod
`slowdownNetwork`: delays network traffic for the pod
Parameters:
options: controls the delay attack
- delay: average delay in network packages (in milliseconds)
- variation: variation in the delay (in milliseconds)
- duration: duration of the disruption
`disruptHttp`: disrupts http requests to the pod.
Parameters:
options: controls the attack
- delay: average delay in requests (in milliseconds. Default is 0ms)
- variation: variation in the delay (in milliseconds. default is 0ms)
- error_rate: rate of requests that will return an error (float in the range 0.0 to 1.0. Default is 0.0)
- error_code: error code to return
- duration: duration of the disruption (default is 30s)
- target: port on which the requests will be intercepted (defaults is 80)
- port: port the transparent proxy will use to listen for requests (default is 8080)
- interface: interface on which the traffic will be intercepted (default is eth0)
- exclude: list of urls to be excluded from disruption (e.g. /health)
## Service Disruption
The `ServiceDisruptor` class allows disruption of Services
Methods:
`constructor`: creates a service disruptor
Parameters:
client: k8s client from xk6-kubernetes
name: name of the target service
options:
- namespace: namespace for selecting target pod(s)
- wait: timeout (as a duration) for the disruptor to be initilized (defaults to '10s')
`kill`: kill pod
`disruptHttp`: disrupts http requests to the service.
Parameters:
options: controls the attack
- delay: average delay in requests (in milliseconds. Default is 0ms)
- variation: variation in the delay (in milliseconds. default is 0ms)
- error_rate: rate of requests that will return an error (float in the range 0.0 to 1.0. Default is 0.0)
- error_code: error code to return
- duration: duration of the disruption (default is 30s)
- target: port on which the requests will be intercepted (defaults is 80)
- port: port the transparent proxy will use to listen for requests (default is 8080)
- interface: interface on which the traffic will be intercepted (default is eth0)
- exclude: list of urls to be excluded from disruption (e.g. /health)
## Examples
The [./exaples](./examples) folder contains examples of using `k6-chaos`.
### Running examples
Notice `k6-chaos` needs the image `grafana/k6-agent`. This image can build using the command
```bash
make container
```
If you are using a local cluster (e.g Kind or Minikube, ) the `grafana/k6-chaos` available in the cluster where the test application will run.
If using `kind` the following command make the image in the cluster
```
kind load docker-image grafana/k6-chaos`
```
If using `minikube` the following command makes the image available in the cluster:
```bash
minikube image load grafana/k6-chaos
```
## Kill pod in a deployment
The [kill-deployment-pod.js example](examples/kill-deployment-pod.js) shows how `PodDisruptor` can be used for testing the effect of killing an instance of a deloyment. When executed, we can see how the requests are momentarely affected until the pod is restarted:
```bash
WARN[0024] Request Failed error="Get \"http://172.18.255.200\": dial tcp 172.18.255.200:80: connect: connection refused"
WARN[0024] Request Failed error="Get \"http://172.18.255.200\": dial tcp 172.18.255.200:80: connect: connection refused"
WARN[0025] Request Failed error="Get \"http://172.18.255.200\": dial tcp 172.18.255.200:80: connect: connection refused"
WARN[0026] Insufficient VUs, reached 100 active VUs and cannot initialize more executor=constant-arrival-rate scenario=load
WARN[0026] Request Failed error="Get \"http://172.18.255.200\": dial tcp 172.18.255.200:80: connect: connection refused"
WARN[0030] Request Failed error="Get \"http://172.18.255.200\": dial tcp 172.18.255.200:80: connect: no route to host"
WARN[0030] Request Failed error="Get \"http://172.18.255.200\": dial tcp 172.18.255.200:80: connect: no route to host"
running (01m34.0s), 000/101 VUs, 8831 complete and 0 interrupted iterations
load ✓ [======================================] 000/100 VUs 1m30s 100.00 iters/s
delay ✓ [======================================] 1 VUs 00m10.0s/10m0s 1/1 shared iters
✗ successful request
↳ 99% — ✓ 8824 / ✗ 6
```
## Introduce disruptions in http connections to pod
The [disrupt-http.js example](examples/disrupt-http.js) shows how `PodDisruptor` can be used for testing the effect of disruptions in the http requests served by an instance of a deloyment. The example uses a deployment of the `httpbin`. The initial setup makes each request to take `100ms`. When executed without any disruption the statistics looks like this.
```
http_req_duration..............: avg=101.66ms min=100.59ms med=101.69ms max=107.24ms p(90)=102.22ms p(95)=102.36ms
```
When the disruption of an additional `100ms` delay and an error rate of 10% of requests is introduced for a period of `30s`, we can see how the statistics are affected (in particular, `p(90)` and `p(95)`):
```bash
http_req_duration..............: avg=148.96ms min=100.39ms med=104.44ms max=324.18ms p(90)=205.17ms p(95)=205.58ms
```
Also the statistics show a number of failed requests:
```
http_req_failed................: 5.01% ✓ 300 ✗ 5686
```
> Notice we requested an error rate of 0.1 (10%) but we are only applying if for 30s, therefore with respect of the total number of request, only 5% fail.
## Introduce delay in network
The [delay-pod.js example](examples/delay-pod.js) shows how `PodDisruptor` can be used for testing the effect of delays in the traffic from an instance of a deloyment. The example uses a deployment of the `httpbin`. The initial setup makes each request to take `100ms`. When executed without any disruption the statistics looks like this.
```
http_req_duration..............: avg=101.66ms min=100.59ms med=101.69ms max=107.24ms p(90)=102.22ms p(95)=102.36ms
```
When the disruption of an additional `200ms` delay is introduced for a period of `30s`, we can see how the stastics are affected (in particular, `p(90)` and `p(95)`):
```bash
http_req_duration..............: avg=126.21ms min=100.52ms med=101.7ms max=952.95ms p(90)=301.28ms p(95)=301.8ms
s
```
## Http disruptions in a microservices application
The [disrupt-shop.js example](examples/disrupt-shop.js) shows a script that tests the effect of http failures or delays in a microservice of the [Sock Shop application](https://github.com/microservices-demo/microservices-demo). This application is a polyglot microservices-based application that implements a fully functional e-Commerce site.
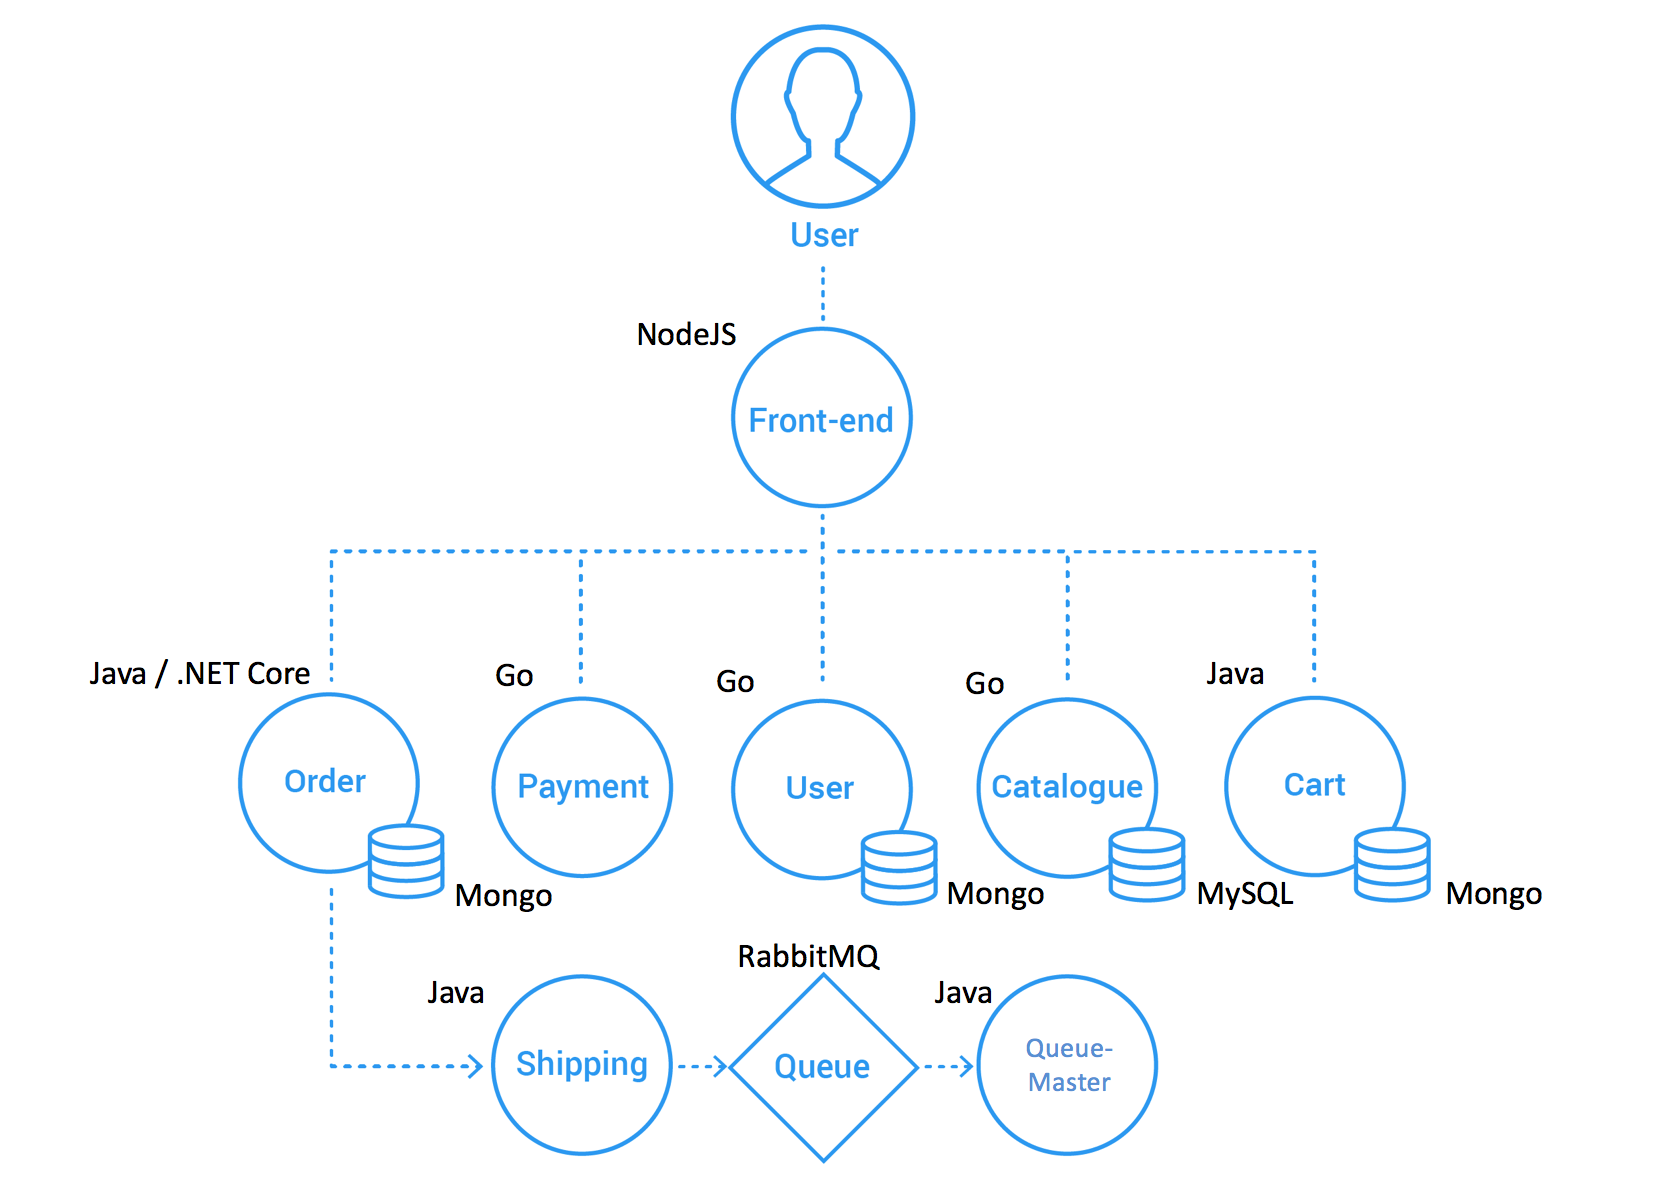Source: [Microservices Demo Design](https://github.com/microservices-demo/microservices-demo/blob/master/internal-docs/design.md)
It offers a web interface that allows users to register, browse the catalog, and buy items.

Each microservice has its own API that can be accessed directly by means of their corresponding Kubernetes services. The front-end service also [exposes all these apis](https://github.com/microservices-demo/front-end/tree/master/api). Therefore all APIS can be accessed by means of the front-end's Kubernetes service.
### Deployment
The Socks Shop application can be [deployed in Kubernetes](https://github.com/microservices-demo/microservices-demo/tree/master/deploy/kubernetes#installing-sock-shop-on-kubernetes).
> The application is deployed in the `sock-shop` namespace. The following examples assume you have set the default namespace accordingly with the command `kubectl config set-context --current --namespace sock-shop`
The default deployment exposes all microservices as `ClusterIP` services and therefore are not accessible from outside the cluster.
```console
$ kubectl get svc
NAME TYPE CLUSTER-IP EXTERNAL-IP PORT(S) AGE
carts ClusterIP 10.96.116.20 80/TCP 1h
carts-db ClusterIP 10.96.205.210 27017/TCP 1h
catalogue ClusterIP 10.96.242.206 80:31924/TCP 1h
catalogue-db ClusterIP 10.96.49.27 3306/TCP 1h
front-end ClusterIP 10.96.95.228 80:30001/TCP 1h
orders ClusterIP 10.96.4.4 80/TCP 1h
orders-db ClusterIP 10.96.44.214 27017/TCP 1h
payment ClusterIP 10.96.23.109 80/TCP 1h
queue-master ClusterIP 10.96.167.37 80/TCP 1h
rabbitmq ClusterIP 10.96.252.218 5672/TCP,9090/TCP 1h
session-db ClusterIP 10.96.131.80 6379/TCP 1h
shipping ClusterIP 10.96.189.187 80/TCP 1h
user ClusterIP 10.96.113.92 80/TCP 1h
user-db ClusterIP 10.96.0.236 27017/TCP 1h
```
### Accessing the application from test scripts
### As a LoadBalancer service
If your cluster has a [load balancer configured](#as-a-loadbalancer-service) you can expose the front-end service my changing its type to 'LoadBalancer':
```bash
> kubectl patch svc front-end -p '{"spec": {"type": "LoadBalancer"}}'
service/front-end patched
> kubectl get svc front-end
NAME TYPE CLUSTER-IP EXTERNAL-IP PORT(S) AGE
front-end LoadBalancer 10.96.95.228 172.18.255.200 80:30001/TCP 2h
```
Notice now the service has an external IP assigned. This can be used for accessing it from the host machine:
```
> curl -v 172.18.255.200/catalogue/3395a43e-2d88-40de-b95f-e00e1502085b | jq .
> GET /catalogue/3395a43e-2d88-40de-b95f-e00e1502085b HTTP/1.1
> Host: 172.18.255.200
> User-Agent: curl/7.81.0
> Accept: */*
>
* Mark bundle as not supporting multiuse
< HTTP/1.1 200 OK
< X-Powered-By: Express
< set-cookie: md.sid=s%3AAv4bhwm5U-Ed2hesf6GF7ljO6J71Z86A.fqnJ8CIVShpevJXLbsf9JPfBQAYu12ZP93KePiyMcBs; Path=/; HttpOnly
< Date: Wed, 17 Aug 2022 16:37:16 GMT
< Connection: keep-alive
< Transfer-Encoding: chunked
<
{ [293 bytes data]
100 286 0 286 0 0 29375 0 --:--:-- --:--:-- --:--:-- 31777
* Connection #0 to host 172.18.255.200 left intact
{
"id": "3395a43e-2d88-40de-b95f-e00e1502085b",
"name": "Colourful",
"description": "proident occaecat irure et excepteur labore minim nisi amet irure",
"imageUrl": [
"/catalogue/images/colourful_socks.jpg",
"/catalogue/images/colourful_socks.jpg"
],
"price": 18,
"count": 438,
"tag": [
"brown",
"blue"
]
}
```