Ecosyste.ms: Awesome
An open API service indexing awesome lists of open source software.
https://github.com/gssi/gssi-infomobility-otp
Open Trip Planner
https://github.com/gssi/gssi-infomobility-otp
Last synced: 9 days ago
JSON representation
Open Trip Planner
- Host: GitHub
- URL: https://github.com/gssi/gssi-infomobility-otp
- Owner: gssi
- License: other
- Created: 2021-03-08T09:58:04.000Z (almost 4 years ago)
- Default Branch: dev-1.x
- Last Pushed: 2024-09-13T22:34:34.000Z (5 months ago)
- Last Synced: 2024-11-30T13:13:15.696Z (2 months ago)
- Language: Java
- Size: 162 MB
- Stars: 0
- Watchers: 1
- Forks: 0
- Open Issues: 0
-
Metadata Files:
- Readme: README.md
- License: LICENSE
- Codeowners: .github/CODEOWNERS
- Security: docs/Security.md
- Governance: docs/Governance.md
Awesome Lists containing this project
README
# OpenTripPlanner - Infomobility L'Aquila
OpenTripPlanner (OTP) is an open source multi-modal trip planner. It depends on open data in open standard file formats (GTFS and OpenStreetMap), and includes a REST API for journey planning as well as a map-based Javascript client.
[OpenTripPlanner](http://opentripplanner.org) - [OTP Documentation](http://docs.opentripplanner.org/en/dev-1.x/)
The main Java **server code** is in `src/main/`. OTP also includes a Javascript **client** based on the Leaflet mapping library in `src/client/`. The Maven **build** produces a JAR file at `target/otp-VERSION.jar` containing all necessary code and dependencies to run OpenTripPlanner.
Additional information and instructions are available in the main documentation, including a quick introduction.
### Requirements
As a Java program, OTP must be run within a Java virtual machine (JVM), which is provided as part of the Java runtime (JRE) or Java development kit (JDK). Run `java -version` to check that you have version `1.8` or newer of the JVM installed. If you do not you will need to install a recent OpenJDK or Oracle Java package for your operating system.
# Documentation
1. [Pre Build JAR](#pre-build-jar)
2. [Development](#development)
3. [Building from Source](#building-from-source)
4. [Required Mobility Data](#required-mobility-data)
5. [Run OTP as JAR application](#run-otp-as-jar-application)
6. [Command Line Parameters](#command-line-parameters)
6. [Deployment](#deployment)
6. [Real Time](#real-time)
# Pre Built JAR
- jar shaded file
Learn how to use it in [Run OTP as application](#run-otp-as-jar-application) section below.
# Development
http://docs.opentripplanner.org/en/latest/Developers-Guide/
## Quick Setup
A Quick guide to setting up the OpenTripPlanner project. *Check next section below for a better approach.*
You need Git, Maven and Java(JDK) and an IDE installed on your computer, or JDK and Maven embedded in your IDE.
- Clone OpenTripPlanner from GitHub.
```
git clone https://github.com/giuseppebianchi/gssi-infomobility-otp.git
```
- Checkout the desired branch
```
git checkout dev-1.x
```
- Build the project, download all dependencies and run test (to skip Tests use `-DskipTest`)
```
mvn clean package -DskipTests
```
- Open the project in your IDE.
If problems occur caused by unavailable maven packages, [here](#) you can find the required set of maven dependencies, ready to be copied in Home directory.
## Working on OTP in an IDE
*Suggested Approach*
- Clone the OTP GitHub repository manually (on the command line or using some other Git interface tool);
- Then import the resulting local OTP repository into your IDE as a *Maven* project.
The IDE should then take care of fetching all the libraries OTP depends on, based on the Maven project description (POM file) in the base of the OTP repository. This step can take a long time because it involves downloading a lot of JAR files. *If problems occur because of packages' unavailabilty or bad references, check previous note in the section above as expedient*.
When running your local copy of the OTP source within an IDE, all command line switches and configuration options will be identical to the ones used when running the OTP JAR from the command line, but you will need to create a ```run configuration``` instance.
### Run Configuration
Both IntelliJ and Eclipse have ``run`` menus, from which you can select an option to edit the run configurations. You want to create a configuration for a Java Application, specifying the main class `org.opentripplanner.standalone.OTPMain`.
Unlike on the command line, the arguments to the JVM and to the main class you are running are specified separately.
In the field for the **VM options** you'll want to put your maximum memory parameter (`-Xmx2G`, or whatever limit you want to place on JVM memory usage).
The rest of the parameters to OTP itself will go in a different field with a name like **program arguments**.
Check [Command Line Parameters](#command-line-parameters) section below to learn more obout them.
### Create an artifact configuration for the JAR
[IntelliJ Documentation](https://www.jetbrains.com/help/idea/compiling-applications.html#run_packaged_jar)
1. From the main menu, select **File | Project Structure** `⌘;` and click **Artifacts**.
2. Click **+**, point to **JAR**, and select **From modules with dependencies**.
3. To the right of the **Main Class** field, click the **Browse button** and select the main class in the dialog that opens (**org.opentripplanner.standalone.OTPMain**) ).
4. IntelliJ IDEA creates the artifact configuration and shows its settings in the right-hand part of the **Project Structure** dialog.

Apply the changes and close the dialog.
#### Build Artifact
1. From the main menu, select **Build | Build Artifacts**.
2. Point to the created **.jar (otp:jar)** and select **Build**.
If you now look at the **out/artifacts** folder, you'll find your **.jar** file there.
### Prevent Maven to build/run project while using other configurations
1. From the main menu select **File | Settings/Preferences | Build, Execution, Deployment |Build Tools | Maven**.
2. Click **Maven** and from the list, select **Runner**.
3. On the Runner page, disable **Delegate IDE build/run actions to maven**.
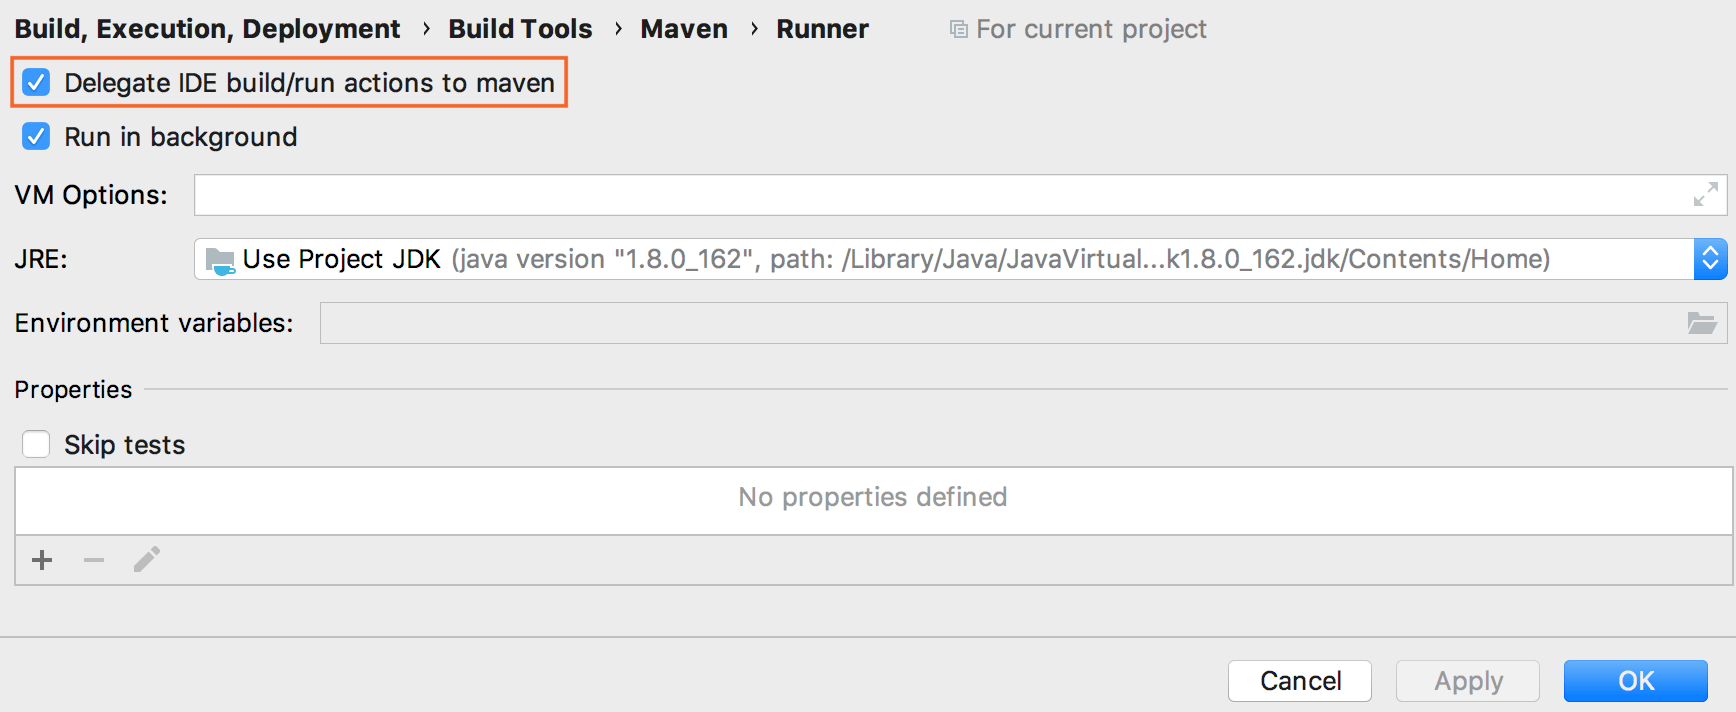
https://github.com/giuseppebianchi/gssi-infomobility-otp/blob/dev-1.x/resources/disable_maven_when_running_different_configurations.png
## Infomobility Configurations
Configurations that have been used for *Infomobility* system are stored as *project files* in ``.idea/runConfiguration``.

*Example of Run Configuration for Java Application*
### Data folder
Before run OpenTripPlanner we need to provide some transit information in `data` directory inside project's root:
- GTFS file, which contains the public transport agency data
- PBF file, the OpenStreetMap data to build a road network for walking, cycling, and driving.
If these resources are not available, please check next section "Required Mobility Data".
In this folder the Transit Graph will be created as well, which can be used and read by OTP without rebuilding the transport network at every run.
### Build Graph
- VM Options: `-Xmx4G`
- CLI arguments: `--build ./data`
#### Java Configuration inMemory
- VM Options: `-Xmx4G`
- CLI arguments: `--build ./data --inMemory`
#### Java Configuration
- VM Options: `-Xmx2G`
- CLI arguments: `--autoReload --server --basePath ./data --autoScan --graphs ./data`
### otp Maven

This builds executable file `otp-x.y.z.-shaded.jar` in `target` directory.
- Command Line: `clean package -DskipTests`
- Profiles: `-test`
If all goes well you should see a success message like the following:
```shell
[INFO] ------------------------------------------------------------------------
[INFO] BUILD SUCCESS
[INFO] ------------------------------------------------------------------------
[INFO] Total time: 42.164s
[INFO] Finished at: Tue Feb 18 19:35:48 CET 2014
[INFO] Final Memory: 88M/695M
[INFO] ------------------------------------------------------------------------
```
This build process should produce a JAR file called **otp-x.y.z-shaded.jar** in the **target/** directory which contains all the compiled OTP classes and their dependencies (the external libraries they use).
# Building from Source
You can follow the same indication explained in the official documentation.
http://docs.opentripplanner.org/en/latest/Getting-OTP/
You may also choose to build OTP from its source code. If you will be modifying OTP you will need to know how to rebuild it (though your IDE may take care of this build cycle for you).
> remember to use `-DskipTests` in *maven* command to avoid tests execution
# Required Mobility Data
### GTFS for Transit Schedules and Stops
ransport agencies throughout the world provide GTFS schedules to the public. Transitland has a registry of feeds and TransitFeeds also provides an extensive catalog. The best option is often to simply fetch the data directly from a transit operator or agency.
The GTFS file's name must end in .zip for OTP to detect it. We often use the convention of ending GTFS file names with .gtfs.zip since technically a GTFS feed is just a ZIP file containing a specific set of files.
### OSM for Streets
You'll also need OpenStreetMap data to build a road network for walking, cycling, and driving.
Download OSM PBF data for the same geographic region as your GTFS feed, and place this PBF file in the same directory you created for the OSM data.
#### Trimmed Map
1. **OpenStreetMap Export** (Suggested)
https://www.openstreetmap.org/export#map=11/42.3418/13.4359
Zomm on the map to get the desired bounded zone to export.
2. **Geofabrik + Osmosis**
Geofabrik provides extracts for larger areas like countries or states, from which you can prepare your own smaller bounding-box extracts using Osmosis or osmconvert.
This [tool](https://boundingbox.klokantech.com/) is useful for determining the geographic coordinates of bounding boxes. The CSV option in that tool produces exactly the format expected by the `osmconvert -b` switch. The `--complete-ways` switch is important to handle roads that cross outside your bounding box.
```shell
$ wget http://download.geofabrik.de/north-america/us/oregon-latest.osm.pbf
$ osmconvert center-italy-latest.osm.pbf -b=-123.043,45.246,-122.276,45.652 --complete-ways -o=laquila.pbf
$ mv laquila.pbf otp
```
If you have extracted a smaller PBF file from a larger region, be sure to put only your extract (not the original larger file) in the directory with your GTFS data. Otherwise OTP will try to load both the original file and the extract in a later step.
# Run OTP as JAR Application
```shell
$ java -Xmx2G -jar otp-shaded.jar --build /home/username/otp --inMemory
```
where /home/username/otp should be the directory where you put your input files.
GTFS and OSM data sets are often very large, and OTP is relatively memory-hungry. You will need at least 1GB of memory when working with the Portland TriMet data set, and several gigabytes for larger inputs. A typical command to start OTP looks like java -Xmx1G -jar otp-0.19.0-shaded.jar . The -Xmx parameter sets the limit on how much memory OTP is allowed to consume. If you have sufficient memory in your computer, set this to a couple of gigabytes (e.g. -Xmx2G); when OTP doesn't have enough memory "breathing room" it can grind to a halt.
It's possible to analyze the GTFS, OSM and any other input data and save the resulting representation of the transit network (what we call a 'graph') to disk. Then when the OTP server is restarted it can reload this pre-built graph, which is significantly faster than building it from scratch. For simplicity, in this introductory tutorial we'll skip saving the graph file. After the graph is built we'll immediately pass it to an OTP server in memory. The command to do so is:
The graph build operation should take about one minute to complete, and then you'll see a Grizzly server running message. At this point you have an OpenTripPlanner server running locally and can open http://localhost:8080/ in a web browser. You should be presented with a web client that will interact with your local OpenTripPlanner instance.
This map-based user interface is in fact sending HTTP GET requests to the OTP server running on your local machine. It can be informative to watch the HTTP requests and responses being generated using the developer tools in your web browser.
OTP's built-in web server will run by default on ports 8080 and 8081. If by any chance some other software is already using those port numbers, you can specify different port numbers with switches like --port 8801 --securePort 8802.
# Command Line Parameters
Here below are listed only the most relevant parameters. Check the whole list of available terms on:
http://dev.opentripplanner.org/javadoc/1.4.0/org/opentripplanner/standalone/CommandLineParameters.html
https://github.com/purushothamgk/OpenTripPlanner/blob/master/src/main/java/org/opentripplanner/standalone/CommandLineParameters.java
| Command | Desc | Default |
|:---| :--- | :---: |
|--autoReload| Auto-scan for graphs to register in graph directory. | false
|--autoScan| Auto-scan for graphs to register in graph directory. | false
|--basePath| Set the path under which graphs, caches, etc. are stored by default. | /var/otp
|--bindAddress| Specify which network interface to bind to by address. 0.0.0.0 means all interfaces. | 0.0.0.0
|--build| Build graphs at specified paths.
|--cacheDirectory,
--cache| The directory under which to cache OSM and NED tiles. | BASE_PATH/cache
|--clientDirectory,
--clientFiles| Path to directory containing local client files to serve. | null
|--disableFileCache | Disable http server static file cache. Handy for development. | false
|--files| Files for graph build. | [ ]
|--graphDirectory,
--graphs| Path to directory containing graphs. | BASE_PATH/graphs
|--help| Print this help message and exit
|--inMemory| Pass the graph to the server in-memory after building it, without saving to disk.
|--port| Server port for plain HTTP. | 8080
|--preFlight| Pass the graph to the server in-memory after building it, and saving to disk.
|--scriptFile,
--script| run the specified OTP script (groovy, python) | null
|--securePort| Server port for HTTPS. | 8088
|--server| Run an OTP API server.| false
|--verbose| Verbose output for debugging |
|--visualize | Open a graph visualizer window for debugging |
# Geocoders
Geocoding is the process of transforming a street address or other description of a location into a (latitude, longitude) coordinate. Reverse geocoding is the process of transforming a (latitude, longitude) coordinate into a (partial) address. The amount of detail in a reverse geocoded location description may vary, for example one might contain the full street address of the closest building, while another might contain only a city name and postal code.
So Geocoding helps you convert your addresses and place-names into coordinates and display them on a map.
Nel sistema di Infomobilità è stato impiegato il servizio gratuito di geocoding Nominatim.
## Geocoding Setup
### config.js
> path: [src/client/js/otp/config.js](https://github.com/giuseppebianchi/gssi-infomobility-otp/blob/dev-1.x/src/client/js/otp/config.js)
First, in `config.js`, we need to specify the list geocoding services for use in address resolution.
Express as an array of objects, where each object has the following fields:
- **name**: the name of the service to be displayed to the user
- **className**: the name of the class that implements this service
- **url**: the location of the service's API endpoint
- **addressParam**: the name of the API parameter used to pass in the user-specifed address string
#### Nominatim Service
```js
{
name: 'Nominatim',
className: 'otp.core.GeocoderInfomobility',
url: "https://nominatim.openstreetmap.org/search/",
addressParam: "q"
}
```
### Create Geocoder File
Next, create a new file in `/src/client/js/otp/core/`, using the existing file `Geocoder.js` as starter template, and rename it with the same *value* you specified in the step before in `config.js`, in **classname** property (*GeocoderInfomobility*).
Then check the parameters you need to provide for API, and the success function, that you are going to use to read and parse received data.
> `otp.core.GeocoderInfomobility`
> path: [src/client/js/otp/core/GeocoderInfomobility.js](https://github.com/giuseppebianchi/gssi-infomobility-otp/blob/dev-1.x/src/client/js/otp/core/GeocoderInfomobility.js)
However `otp.core.GeocoderInfomobility` should be renamed, giving the same name of the corresponding service, such as `GeocoderNominatim`, so that *Infomobility* OTP can easily handle more files related to geocoding services (see [Pelias.io](https://pelias.io/))
# BaseLayer
Base layers are maps that contain rich and complex cartography and serve to set the geographical context for the other data you add to the map.
Configurations used to change the baselayer source used in the map.
#### CartoDB.Positron Provider
[Preview](http://leaflet-extras.github.io/leaflet-providers/preview/index.html)
```js
{
name: 'Light',
tileUrl: 'http://{s}.basemaps.cartocdn.com/light_all/{z}/{x}/{y}.png',
attribution : 'Map tiles by Carto/MapZen. Map data by OpenStreetMap, under ODbL.'
}
```
[Free Tiles Providers](http://leaflet-extras.github.io/leaflet-providers/preview/index.html)
# Real Time
- data flow
- files involved to build real time features
- how the code works
- variables and configurations settings
Only BUS mode is enabled to work with real time data
Real-time data can be provided using either a pull or push system. In a pull configuration, the GTFS-RT consumer polls the real-time provider over HTTP. That is to say, OTP fetches a file from a web server every few minutes. In the push configuration, the consumer opens a persistent connection to the GTFS-RT provider, which then sends incremental updates immediately as they become available. OTP can use both approaches. The OneBusAway GTFS-realtime exporter project provides this kind of streaming, incremental updates over a websocket rather than a single large file.
# Deployment
---
# Open Trip Planner Server
`routerId` parameter in URL is 'default'.
## API Resources
http://dev.opentripplanner.org/apidoc/1.0.0/index.html
### Index API
http://dev.opentripplanner.org/apidoc/1.0.0/resource_IndexAPI.html
```http
/routers/{routerId}/index/clusters
/routers/{routerId}/index/feeds
/routers/{routerId}/index/graphql
/routers/{routerId}/index/patterns
/routers/{routerId}/index/routes
/routers/{routerId}/index/services
/routers/{routerId}/index/stops
/routers/{routerId}/index/agencies/{feedId}
/routers/{routerId}/index/clusters/{clusterId}
/routers/{routerId}/index/patterns/{patternId}
/routers/{routerId}/index/routes/{routeId}
/routers/{routerId}/index/services/{serviceId}
/routers/{routerId}/index/stops/{stopId}
/routers/{routerId}/index/trips/{tripId}
/routers/{routerId}/index/agencies/{feedId}/{agencyId}
/routers/{routerId}/index/patterns/{patternId}/geometry
/routers/{routerId}/index/patterns/{patternId}/semanticHash
/routers/{routerId}/index/patterns/{patternId}/stops
/routers/{routerId}/index/patterns/{patternId}/trips
/routers/{routerId}/index/routes/{routeId}/patterns
/routers/{routerId}/index/routes/{routeId}/stops
/routers/{routerId}/index/routes/{routeId}/trips
/routers/{routerId}/index/stops/{stopId}/patterns
/routers/{routerId}/index/stops/{stopId}/routes
/routers/{routerId}/index/stops/{stopId}/stoptimes
/routers/{routerId}/index/stops/{stopId}/transfers
/routers/{routerId}/index/trips/{tripId}/geometry
/routers/{routerId}/index/trips/{tripId}/semanticHash
/routers/{routerId}/index/trips/{tripId}/stops
/routers/{routerId}/index/trips/{tripId}/stoptimes
/routers/{routerId}/index/agencies/{feedId}/{agencyId}/routes
/routers/{routerId}/index/stops/{stopId}/stoptimes/{date}
```
### Planner Resource
This is the primary entry point for the trip planning web service. All parameters are passed in the query string. These parameters are defined as fields in the abstract RoutingResource superclass, which also has methods for building routing requests from query parameters. This allows multiple web services to have the same set of query parameters. In order for inheritance to work, the REST resources are request-scoped (constructed at each request) rather than singleton-scoped (a single instance existing for the lifetime of the OTP server).
```http
POST /routers/{routerId}/plan
```
| Parameter | Description | Type
| :--- | :--- | :--- |
| `arriveBy` | Whether the trip should depart or arrive at the specified date and time.
| `bannedRoutes` | The comma-separated list of banned routes. The format is agency_[routename][_routeid], so TriMet_100 (100 is route short name) or Trimet__42 (two underscores, 42 is the route internal ID).
| `bannedStops` | A comma-separated list of banned stops. A stop is banned by ignoring its pre-board and pre-alight edges. This means the stop will be reachable via the street network. Also, it is still possible to travel through the stop. Just boarding and alighting is prohibited. The format is agencyId_stopId, so: TriMet_2107
| `bannedTrips` | The comma-separated list of banned trips. The format is agency_trip[:stop*], so: TriMet_24601 or TriMet_24601:0:1:2:17:18:19
| `fromPlace` | The start location -- either latitude, longitude pair in degrees or a Vertex label. For example, 40.714476,-74.005966 or mtanyctsubway_A27_S.
| `intermediatePlaces` | An ordered list of intermediate locations to be visited (see the fromPlace for format). Parameter can be specified multiple times.
| `maxWalkDistance` | The maximum distance (in meters) the user is willing to walk. Defaults to unlimited.
| `mode` | The set of modes that a user is willing to use, with qualifiers stating whether vehicles should be parked, rented, etc.
# API Response Changes
API has been changed to retrieve information about *tripShortName* and all kind of *trips* for a pattern.
...(trips, trip_route, tripShortName)
# iCityAQ Data Integration
The client application privides functions to fetching data from IcityAq system, such as PoI, Events and more.
The REST API used are:
```{hostname_icityaq}/wp-json/wp/v2/job_listing?per_page=100&meta_value={listing_type}```
where:
- `hostname_icityaq`: is the base URL where iCityAQ is accessible,
- `listing_type`: *event* | *place* | *itinerario*
# GTFS Status Alert
An alert will be shown if GTFS is not updated.
# Custom CSS
Via the query param '**style**' you can specify what CSS must be loaded into the OTP client.
### No Layout
```js
style=ama
```
has been used to show OTP *without header and footer*.
# Reloading Graph and GTFS
1. Remove .zip and .pbf files from folder where OTP is executed;
2. Lunch OTP with this configuration:
```shell
java otp.jar --Xmx4G --build . --inMemory --insecure
```
OTP should warn you that no graph was found.
3. Make a zip file containing a GTFS file and an .pbf map file, providing a different name for each request. I suggest to use the command:
```
zip -r bundle.zip ./ama.pbf ./gtfs.zip
```
4. When the bundle zip file is ready, make a POST request to OTP server as below, adding at the end of the path the name of the agency:
```
POST /routers/{routerId}
```
Build a graph from data in the ZIP file posted over the wire, associating it with the given router ID. This method will be selected when the Content-Type is application/zip.
Request Parameters
| name | type | default | constraints | description |
| ---- | ---- | ------- | ----------- | ----------- |
| routerId | path |
| preEvict | query | true | boolean | before reloading each graph, evict the existing graph. This will prevent memory usage from increasing during the reload, but routing will be unavailable on this routerId for the duration of the operation |
Request Body
| media type | data type |
| ---------- | --------- |
| application/zip |
#### Node Native
```node
var http = require('follow-redirects').http;
var fs = require('fs');
var options = {
'method': 'POST',
'hostname': 'localhost',
'port': 8080,
'path': '/otp/routers/',
'headers': {
'Content-Type': 'application/zip'
},
'maxRedirects': 20
};
var req = http.request(options, function (res) {
var chunks = [];
res.on("data", function (chunk) {
chunks.push(chunk);
});
res.on("end", function (chunk) {
var body = Buffer.concat(chunks);
console.log(body.toString());
});
res.on("error", function (error) {
console.error(error);
});
});
var postData = "";
req.write(postData);
req.end();
```
#### Node Axios
```node
var axios = require('axios');
var data = '';
var config = {
method: 'post',
url: 'http://localhost:8080/otp/routers/ama',
headers: {
'Content-Type': 'application/zip'
},
data : data
};
axios(config)
.then(function (response) {
console.log(JSON.stringify(response.data));
})
.catch(function (error) {
console.log(error);
});
```