Ecosyste.ms: Awesome
An open API service indexing awesome lists of open source software.
https://github.com/hashicorp/terraform-elasticache-example
Example Terraform config for creating an Elasticache cluster
https://github.com/hashicorp/terraform-elasticache-example
elasticache redis terraform
Last synced: 4 months ago
JSON representation
Example Terraform config for creating an Elasticache cluster
- Host: GitHub
- URL: https://github.com/hashicorp/terraform-elasticache-example
- Owner: hashicorp
- License: mpl-2.0
- Created: 2017-05-06T13:58:20.000Z (over 7 years ago)
- Default Branch: master
- Last Pushed: 2023-02-01T17:06:25.000Z (almost 2 years ago)
- Last Synced: 2024-09-27T12:41:56.498Z (4 months ago)
- Topics: elasticache, redis, terraform
- Language: HCL
- Size: 26.4 KB
- Stars: 88
- Watchers: 10
- Forks: 51
- Open Issues: 6
-
Metadata Files:
- Readme: README.md
- License: LICENSE
Awesome Lists containing this project
README
# Managing Elasticache with Terraform
Developers continue to pick Redis as their favorite NoSQL data store [Stack Overflow Developer Survey 2017](https://insights.stackoverflow.com/survey/2017#technology-most-loved-dreaded-and-wanted-databases) and Amazon ElastiCache provides an easy, fast, and highly available Redis on AWS. ElastiCache Redis can be deployed via the AWS Console, AWS SDK, Amazon ElastiCache API, AWS CloudFormation and through deployment tools like HashiCorp Terraform. In this blog post, we show how to easily deploy Amazon ElastiCache Redis with HashiCorp Terraform.
This repository examines how to manage AWS ElastiCache with HashiCorp Terraform. Amazon ElastiCache is a web service that allows for deploying, operating, and scaling an in-memory data store or cache and is often used to improve application performance by reading from a fast in-memory data store instead of a slower disk-based database. Currently, Elasticache supports two different engines:
* Redis
* Memcached
## Creating a Cluster
We are going to create the following instances:
* 6x ElastiCache nodes (cache.m4.large)
* 1x SSH host (t2.nano)
We need to create an SSH host because the cluster is not accessible from the public internet, this will be attached to the same VPC so that we can test the cluster, this instance is fulfilling the role of your application server.
To create the cluster clone of the repository at [https://github.com/hashicorp/terraform-elasticache-example](https://github.com/hashicorp/terraform-elasticache-example) to get the example Terraform project.
```bash
$ git clone https://github.com/hashicorp/terraform-elasticache-example.git
$ cd terraform-elasticache-example
```
Before running `terraform plan` and `terraform apply`,set a few environment variables with your AWS account details, for more information on using Terraform with AWS please take a look at this post [Terraform: Beyond the Basics with AWS | AWS Partner Network (APN) Blog](https://aws.amazon.com/blogs/apn/terraform-beyond-the-basics-with-aws/)
```bash
export AWS_ACCESS_KEY_ID=[AWS ACCESS KEY ID]
export AWS_SECRET_ACCESS_KEY=[AWS SECRET ACCESS KEY]
export AWS_REGION=[AWS REGION, e.g. eu-west-1]
```
Run `terraform plan` and `terraform apply` in your terminal.
```bash
$ terraform plan
# ...
Plan: 10 to add, 0 to change, 0 to destroy.
```
You should see output similar to the following in your terminal output:
```bash
$ terraform apply
# ...
Apply complete! Resources: 10 added, 0 changed, 0 destroyed.
The state of your infrastructure has been saved to the path
below. This state is required to modify and destroy your
infrastructure, so keep it safe. To inspect the complete state
use the `terraform show` command.
State path:
Outputs:
configuration_endpoint_address = tfrediscluster.ua5mrp.clustercfg.euw1.cache.amazonaws.com
ssh_host = 52.30.43.172
```
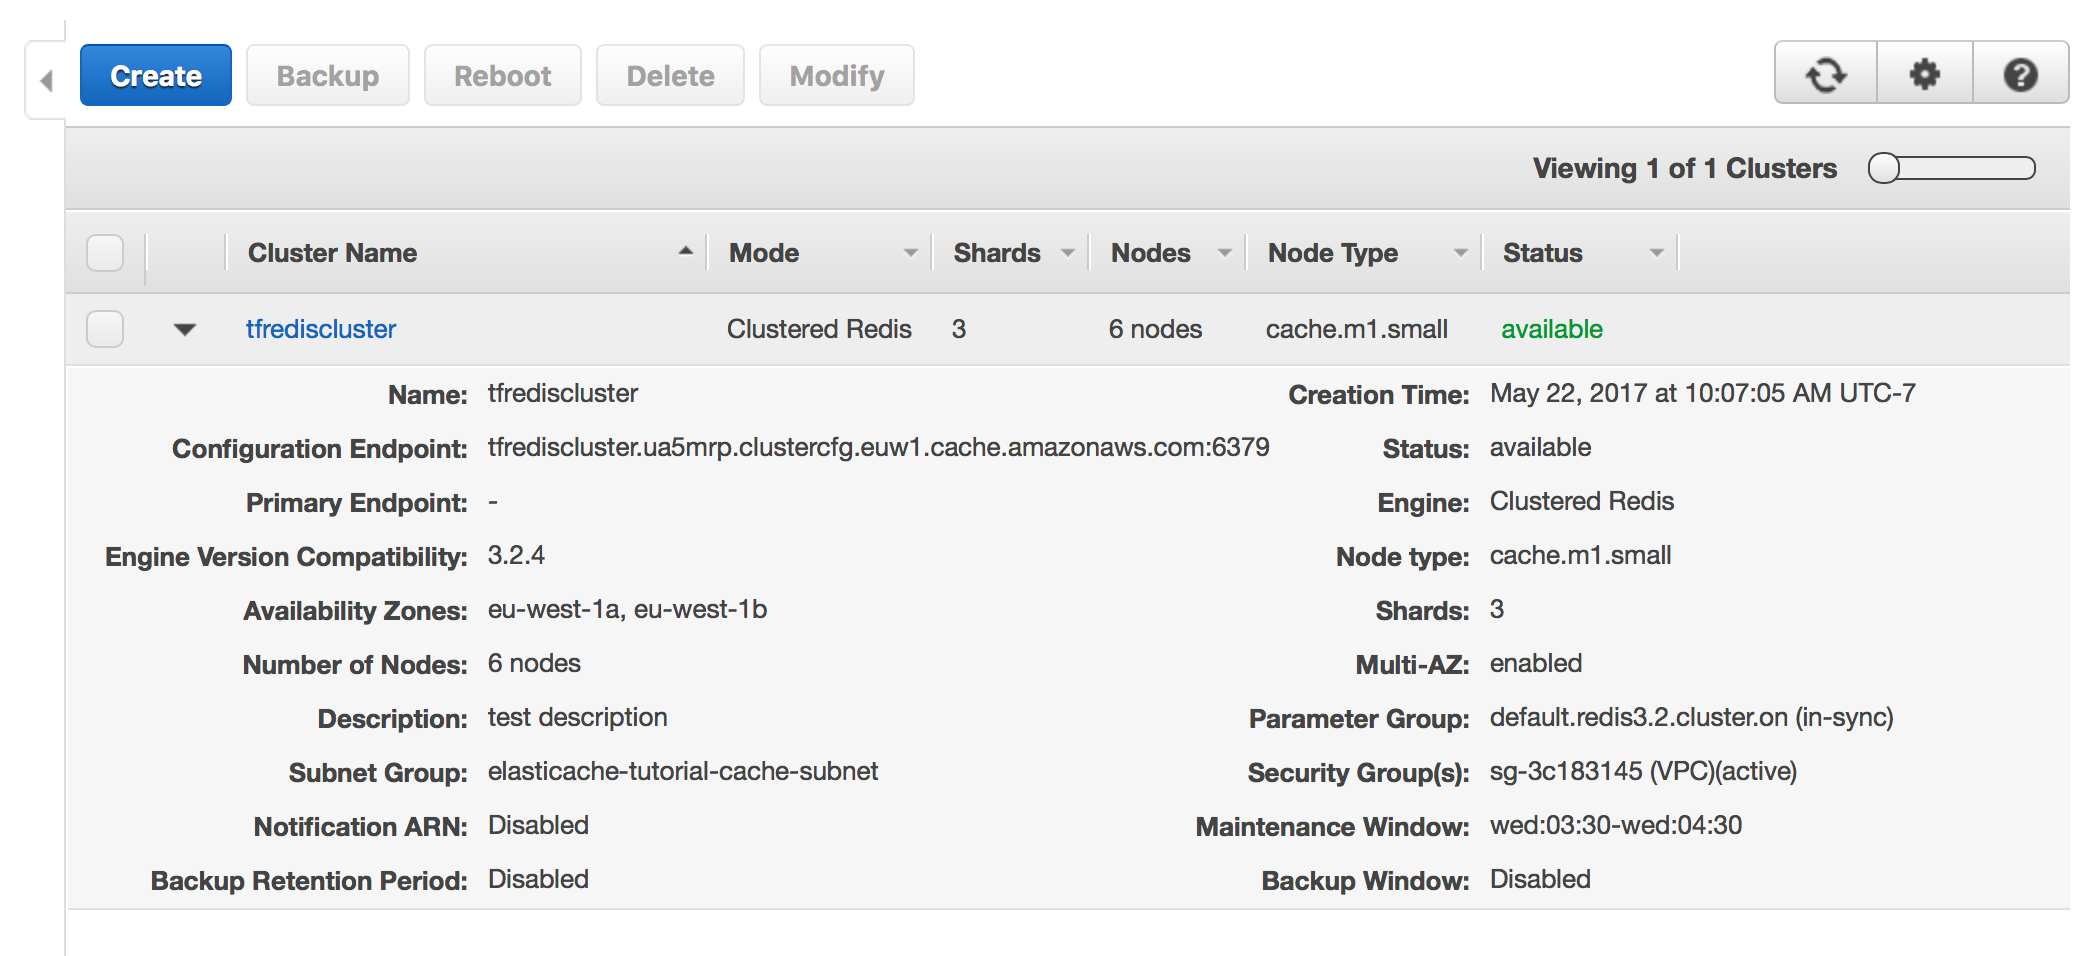
If we also look at the AWS console, we can see that the nodes have been created and are ready for use.
To test the cluster, ssh into the instance listed in the Terraform output with the username "ubuntu":
```bash
ssh [email protected]
```
To connect to an ElastiCache cluster, use the configuration endpoint provided by AWS in the Terraform output. This will will return a list of active nodes. We can use these nodes to interact with the cluster. To see this in operation run the following command in your ssh session, replacing the parameter value for `-h` with your cluster's configuration endpoint. Then execute the `CLUSTER NODES` command to show the cluster details. A full list of commands are available in the [Redis Documentation](https://redis.io/commands)
```bash
$ redis-cli -h tfrediscluster.ua5mrp.clustercfg.euw1.cache.amazonaws.com -p 6379
$ tfrediscluster.ua5mrp.clustercfg.euw1.cache.amazonaws.com:6379> CLUSTER NODES
```
You should see output similar to the following:
```bash
2d5db9ee5ac9dc34c1798ee1122b48e9094a71ea 10.1.1.132:6379 master - 0 1495477718562 1 connected 0-5461
e8da4bf07ed69d44fe5a2c648148e049705838a1 10.1.2.147:6379 master - 0 1495477719570 0 connected 5462-10922
cabaa3e60d7ac0b4ab861d25d721bb579c58005c 10.1.1.53:6379 master - 0 1495477716549 2 connected 10923-16383
95a5796c4bb46a2fc8c9203d42dcbd0abc15dc2f 10.1.1.105:6379 myself,slave e8da4bf07ed69d44fe5a2c648148e049705838a1 0 0 1 connected
8d7b98815198e3eb861abf4538a1c367edcc012d 10.1.2.103:6379 slave cabaa3e60d7ac0b4ab861d25d721bb579c58005c 0 1495477717556 2 connected
9f4fc8c777be63df257423267fad86894b5e9e2d 10.1.2.166:6379 slave 2d5db9ee5ac9dc34c1798ee1122b48e9094a71ea 0 1495477715542 1 connected
```
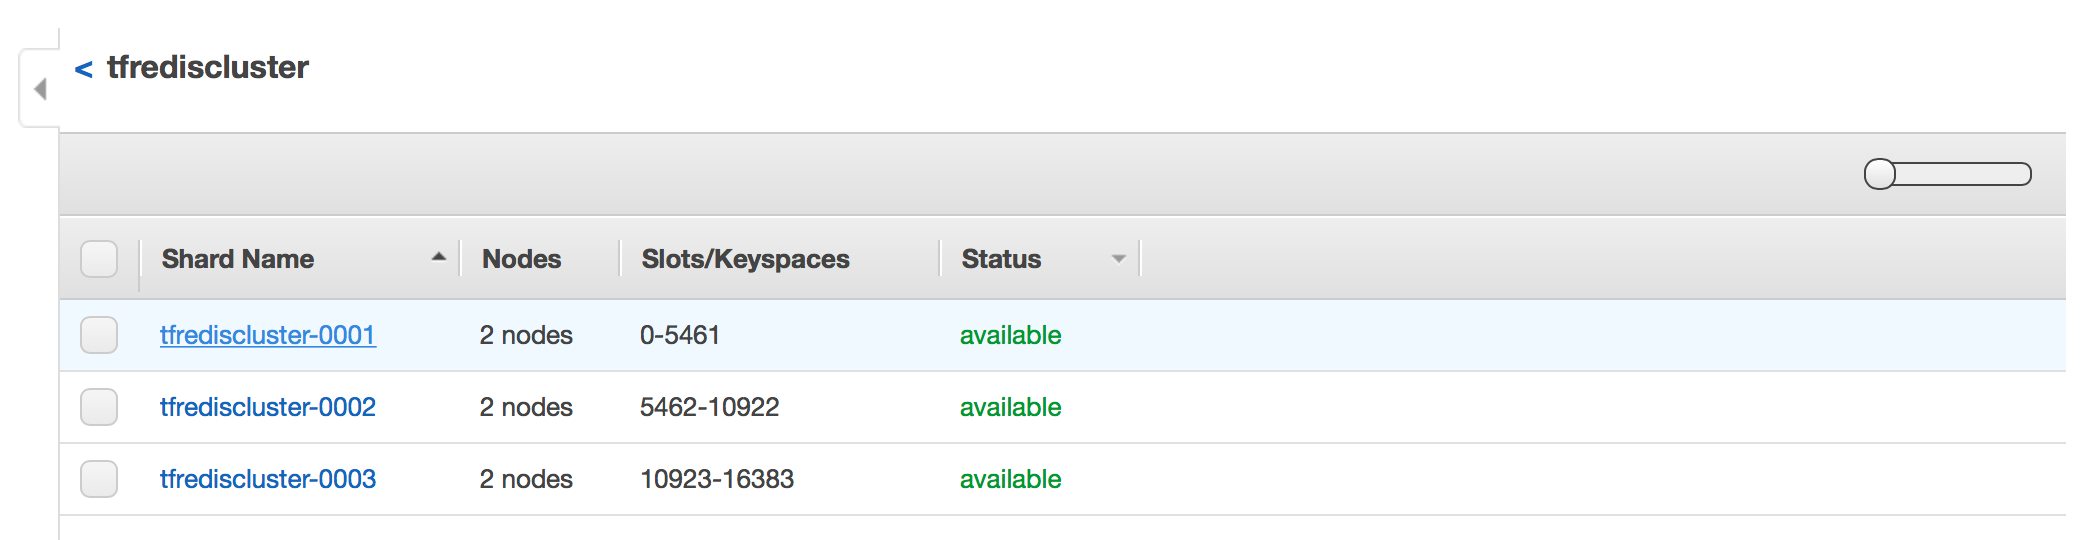
AWS launches the nodes into multiple availability zones ensuring that the masters and the slaves are always in a different zone. This way if a zone is lost then the cluster can failover, promoting the slaves in the different zone to master nodes.
We can now connect to one of the nodes and execute commands, most of the client libraries will take a list of addresses and automatically manage load balancing. For the purpose of this demonstration we can just select the first master node in the list.
```bash
ubuntu@ip-10-1-1-93:~$ redis-cli -c -h 10.1.1.132 -p 6379
10.1.1.132:6379> set foo bar
-> Redirected to slot [12182] located at 10.1.1.53:6379
OK
10.1.1.53:6379> get bar
-> Redirected to slot [5061] located at 10.1.1.132:6379
(nil)
10.1.1.132:6379> get foo
-> Redirected to slot [12182] located at 10.1.1.53:6379
"bar"
```
Looking at the output you will see that when we write the value to the key `foo` we are redirected to a different server. The Redis cluster shards the keys across the nodes and when you connect to a server and read or write a key if the key the node will forward the request to the correct node if it does not contain the requested key.
Now that the cluster is up and running, let's take a look at the Terraform configuration that created it.
## Terraform Configuration
We use the`aws_elasticache_subnet_group` resource stanza to create the cluster subnet group. This resource is different to the `aws_subnet` stanza, which needs to be created separately or used with an existing subnet.
```hcl
resource "aws_elasticache_subnet_group" "default" {
name = "${var.namespace}-cache-subnet"
subnet_ids = ["${aws_subnet.default.*.id}"]
}
```
The `name` attribute is the name of the subnet group. Using the namespace variable helps to ensure this value is unique. The `subnet_ids` is a list of VPC subnet ids for the cache subnet group.
[https://www.terraform.io/docs/providers/aws/r/elasticache_subnet_group.html](https://www.terraform.io/docs/providers/aws/r/elasticache_subnet_group.html)
We then create the `aws_elasticache_cluster` resource stanza which creates our cluster.
```hcl
resource "aws_elasticache_replication_group" "default" {
replication_group_id = "${var.cluster_id}"
replication_group_description = "Redis cluster for Hashicorp ElastiCache example"
node_type = "cache.m4.large"
port = 6379
parameter_group_name = "default.redis3.2.cluster.on"
snapshot_retention_limit = 5
snapshot_window = "00:00-05:00"
subnet_group_name = "${aws_elasticache_subnet_group.default.name}"
automatic_failover_enabled = true
cluster_mode {
replicas_per_node_group = 1
num_node_groups = "${var.node_groups}"
}
}
```
* `replication_group_id` is a required attribute and is the unique identifier for the cluster
* `replication_group_description` is a required attribute and is a user-created description for the group
* `node_type` is the type of node to create in the node group, for information on available node types please see the AWS documentation [Redis Cache Node Sizes](http://docs.aws.amazon.com/AmazonElastiCache/latest/UserGuide/CacheNodes.SelectSize.html#CacheNodes.SelectSize.Redis)
* `port` is the port number which each node will accept connections, we are using the default Redis port 6379
* `parameter_group_name` this is the name of the parameter group which defines the runtime properties of your nodes and clusters. The details of the default parameter groups can be found in the AWS documentation [ElastiCache Parameter Groups](http://docs.aws.amazon.com/AmazonElastiCache/latest/UserGuide/ParameterGroups.html) . You can also configure a custom parameter group using the `aws_elasticache_parameter_group` stanza [https://www.terraform.io/docs/providers/aws/r/elasticache_parameter_group.html](https://www.terraform.io/docs/providers/aws/r/elasticache_parameter_group.html)
* `snapshot_retention_limit` this allows us to configure a daily backup of the cluster state, we are setting the retention period to 5 days for this backup. To disable backups we can either omit this attribute from the config or set the value to 0
* `snapshot_window` the time range in UTC during which ElastiCache will begin taking a daily snapshot of your cluster
* `aws_elasticache_subnet_group` this is the name of the subnet group, we are referencing the output from the `aws_elasticache_subnet_group` resource we created earlier
* `automatic_failover_enabled` this parameter defines if a the slave nodes will automatically be promoted to master when the existing master fails.
* `replicas_per_node_group` the number of replica nodes in each node group. Replica nodes will be distributed across the availability zones for redundancy
* `num_node_groups` the number of shards for the Redis replication group., changing this variable will force a re-creation of the cluster.
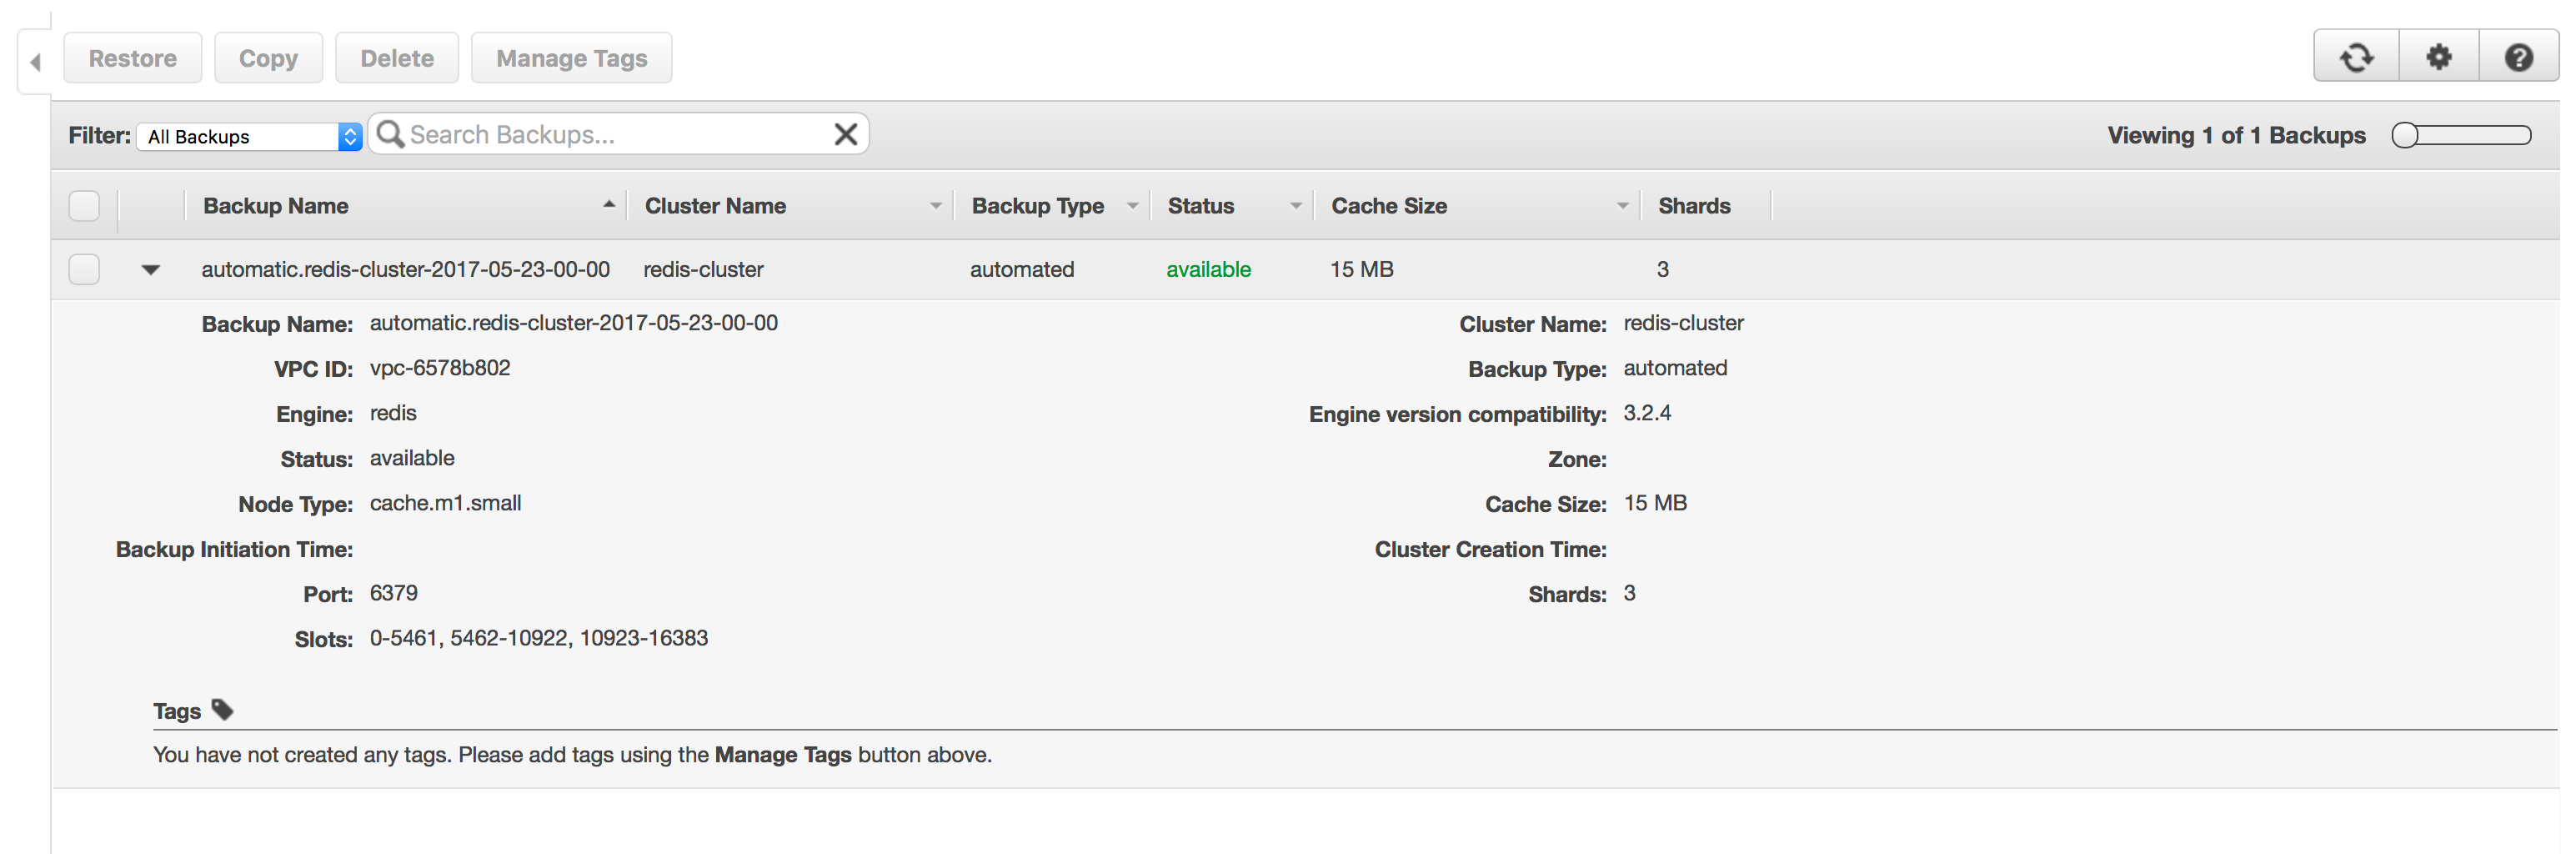
In this example snapshots have been enabled with a 5 day retention period, the AWS ElastiCache consul shows a list of these backups.
## Destroying the Cluster
You would almost never need to destroy your cluster in production, however a running cluster incurs costs, and if you are testing out this configuration and not creating a production cluster do not forget to destroy it! Destroy the cluster by running `terraform destroy` in the terminal.
```
$ terraform destroy
# ...
Destroy complete! Resources: 13 destroyed.
```
For more information on all of the features, please see the [Terraform ElastiCache documentation](https://www.terraform.io/docs/providers/aws/r/elasticache_cluster.html#).