https://github.com/hawkeye64/classify
Node-based CLI for Neural Network Image Classification via Coco model
https://github.com/hawkeye64/classify
Last synced: 5 months ago
JSON representation
Node-based CLI for Neural Network Image Classification via Coco model
- Host: GitHub
- URL: https://github.com/hawkeye64/classify
- Owner: hawkeye64
- License: mit
- Created: 2018-08-24T13:38:41.000Z (over 7 years ago)
- Default Branch: master
- Last Pushed: 2018-08-31T16:23:18.000Z (over 7 years ago)
- Last Synced: 2025-04-11T00:42:34.895Z (9 months ago)
- Language: JavaScript
- Homepage:
- Size: 1.81 MB
- Stars: 20
- Watchers: 5
- Forks: 6
- Open Issues: 1
-
Metadata Files:
- Readme: README.md
- License: LICENSE
Awesome Lists containing this project
README
# classify
CLI for Neural Network image classification using Coco model.
This package is written to be used as a Node command-line interface (CLI).
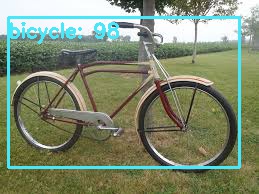
## Example Classification

## Pre-Installation
This package uses [opencv4nodejs](https://github.com/justadudewhohacks/opencv4nodejs/tree/master/examples) which downloads and compiles opencv into Node.
Make sure you have **cmake** installed and available on your path or the build will fail.
To verify **cmake**, run:
```command -v cmake```
If available, you should see something like this:
```
$ command -v cmake
/usr/bin/cmake
```
If it is not available, then it will be like this:
```
$ command -v cmake
$
```
## Installation
Apparently, this project is too big for `npm` and it crashes with javascript `out of heap` error when trying to upload it to the registry.
So, instead of:
```npm i -g classify```
You need to download the project from Github (this may be lengthy because of the size). Then run:
```npm install```
Then run:
```npm i -g . classify```
To install the package globally.
This installs it globally into your Node ecosystem and makes it available on your path.
Now you can run it like so:
```classify --image --confidence 50```
## Back Story
This is my first foray into **Classification** with **Neural Networks**. Another programmer at work did something similar in Python. I wanted to know if it was at all possible to do the same thing with Node. I found **tensorflow.js** and then **tfjs-node** (tensorflow for node), but had issues getting models converted to a web-friendly format for it to work. Then I found **opencv4nodejs** and this article [Node.js meets OpenCV's Deep Neural Networks -- Fun with Tensorflow and Caffe](https://medium.com/@muehler.v/node-js-meets-opencvs-deep-neural-networks-fun-with-tensorflow-and-caffe-ff8d52a0f072). After that things fell into place. This cli project is the results of that endeavor. Feel free to add PRs if you would like it updated.
I am by no means an expert in this area. I am still learning (and there is a **LOT** to learn!). If asked, it's unlikely I'll be able to answer specific questions about Neural Networks or OpenCV.
## Issues (large files)
Aside from the programming of the CLI, the biggest issue I found was uploading the models to Github. In order to have large file support, you must install [git-lfs](https://git-lfs.github.com/). I still ran into problems pushing the large files (being asked for username/password, which would fail), until I found that you also have to do this:
```
git remote set-url origin git@github.com:username/repo.git
```
It still took a (very!) long time to upload the project.
## CLI Options
Running **classify** from the command-line will output the following:
**classify**
Classifies an image using machine learning from passed in image path.
**Options**
**--image** _imagePath_ [required] The image path.
**--confidence** _value_ [optional; default 50] The minimum confidence level to use for classification. (ex: 50 for 50%).
**--filter** _filterFile_ [optional] A filter file used to filter out classification not wanted.
**--quick** [optional; default slow] Use quick classification, but may be more inaccurate.
**--version** Application version.
**--help** Print this usage guide.
## Image
**--image** or **-i** followed by the path to the image to classify.
## Confidence
**--confidence** or **-c** followed by the confidence value as a percentage (whole number). For instance, to filter out any levels less than 50%, use **--confidence _50_**.
## Filter
**--filter** or **-f** followed by a path to the filter file.
A filter file contains only the interested items from the model that you want classified. It contains one item per line. There should be no empty lines or comments.
**Example**
```
bear
bicycle
bird
bus
car
cat
cow
dog
horse
motorcycle
person
sheep
train
truck
```
## Quick
**--quick** or **-q** specifies to use the 300x300 Coco SSD instead of the 512x512 Coco SSD. The 300x300 is faster, but may come at the cost of less accuracy in classified items.
## Version
**--version** or **-v** outputs the curent version.
## Help
**--help** or **-h** displays the help output.
## Output
The classified image will be output in the current directory. It is renamed in the following format:
`_classified__.`
So, `bicycle.jpg` becomes `bicycle_classified_coco300_30.jpg`, with the latter containing rects and classification (if any exist).
## Examples
`classify --image ./images/test/bicycle.jpg --quick`
`classify --image ./images/test/train.jpg --confidence 50`
`classify --image ./images/test/royals.jpg --filter ./filter.txt`
`classify --image ./images/test/snapshot_001.jpg --filter ./filter.txt --confidence 50`
## More Examples


## Too Many Classifications
If you have an image with a lot of "action", consider filtering using the **--filter** parameter or at least the **--confidence** parameter.
This is what a classification looks like without either:

And, what it looks like after filtering:
