https://github.com/hngprojects/hng_boilerplate_java_web
https://github.com/hngprojects/hng_boilerplate_java_web
Last synced: about 1 year ago
JSON representation
- Host: GitHub
- URL: https://github.com/hngprojects/hng_boilerplate_java_web
- Owner: hngprojects
- License: apache-2.0
- Created: 2024-07-12T14:43:12.000Z (almost 2 years ago)
- Default Branch: dev
- Last Pushed: 2025-03-02T22:33:34.000Z (over 1 year ago)
- Last Synced: 2025-03-28T21:01:29.859Z (about 1 year ago)
- Language: Java
- Size: 3.63 MB
- Stars: 152
- Watchers: 3
- Forks: 56
- Open Issues: 14
-
Metadata Files:
- Readme: README.md
- License: LICENSE
Awesome Lists containing this project
README
# [App Name] Integration Guide
## Overview of this project
[Description]
## Folder Structure
```
|--- .mvn
|--- src
| |--- main
| |--- java
| |---hng_java_boilerplate
| |---
| |---Program.java
| |---utils
| |--- resources
| |--- static
| |--- templates
| |--- application.properties
| |--- test
| |--- java
| |---hng_java_boilerplate
| |---
|--- .gitignore
|--- mvnw
|--- mvnw.cmd
|--- README.md
```
## Getting started
Ensure you have your computer setup correctly for development by installing the following
- Java 17 or higher
- Install Java SDK/JDK
- Use your favourite IDE or Text editor
## Contribution Guide
#### If you don't have git on your machine, [install it](https://docs.github.com/en/get-started/quickstart/set-up-git).
## Fork this repository
Fork this repository by clicking on the fork button on the top of this page.
This will create a copy of this repository in your account.
## Clone the repository
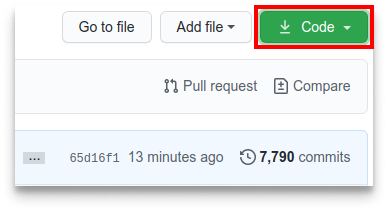
Now clone the forked repository to your machine. Go to your GitHub account, open the forked repository, click on the code button and then click the _copy to clipboard_ icon.
Open a terminal and run the following git command:
```bash
git clone "url you just copied"
```
where "url you just copied" (without the quotation marks) is the url to this repository (your fork of this project). See the previous steps to obtain the url.

For example:
```bash
git clone git@github.com:this-is-you/hng_project.git
```
where `this-is-you` is your GitHub username. Here you're copying the contents of the first-contributions repository on GitHub to your computer.
## Create a branch
Change to the repository directory on your computer (if you are not already there):
```bash
cd hng_project
```
Now create a branch using the `git switch` command:
```bash
git switch -c your-new-branch-name
```
For example:
```bash
git switch -c add-alonzo-church
```
### Make Changes
Make your changes to the codebase. Ensure your code follows the project's coding standards and guidelines.
### Run Tests
Run the existing tests to ensure your changes do not break anything. If you added new functionality, write corresponding tests and run them.
## commit those changes
Now open `Contributors.md` file in a text editor, add your name to it. Don't add it at the beginning or end of the file. Put it anywhere in between. Now, save the file.
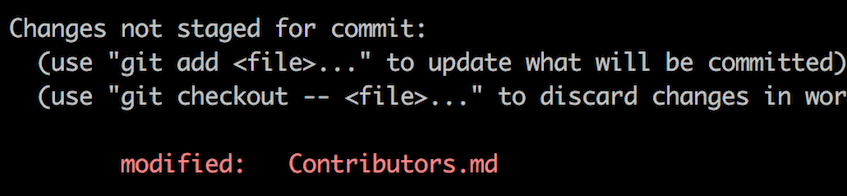
If you go to the project directory and execute the command `git status`, you'll see there are changes.
Add those changes to the branch you just created using the `git add` command:
## Push changes to GitHub
Push your changes using the command `git push`:
```bash
git push -u origin your-branch-name
```
replacing `your-branch-name` with the name of the branch you created earlier.
If you get any errors while pushing, click here:
- ### Authentication Error
remote: Support for password authentication was removed on August 13, 2021. Please use a personal access token instead.
remote: Please see https://github.blog/2020-12-15-token-authentication-requirements-for-git-operations/ for more information.
fatal: Authentication failed for 'https://github.com//first-contributions.git/'
Go to [GitHub's tutorial](https://docs.github.com/en/authentication/connecting-to-github-with-ssh/adding-a-new-ssh-key-to-your-github-account) on generating and configuring an SSH key to your account.
## Submit your changes for review into Staging
If you go to your repository on GitHub, you'll see a `Compare & pull request` button. Click on that button.
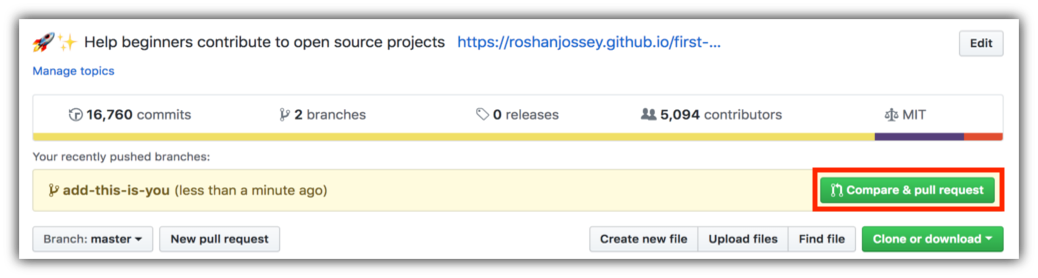
Now submit the pull request.

Soon your changes will be merged into the staging branch of this project. You will get a notification email once the changes have been merged.
## Setup Instructions
### 1. Clone the Repository
First, clone the repository to your local machine using Git.
```sh
git clone https://github.com/your-username/[app-name].git
cd [app-name]
```
### 2. Install Dependencies
Opening the project in your dev environment should automatically restore all your dependencies.
You can also install dependencies by running the following `mavin` command in your root folder.
```sh
mvn dependency:resolve
```
### 3. set up database
- Ensure PostgreSQL is installed and running
- Create a new database in the database
`CREATE DATABASE {database_name}`
- Flyway Migrations
- migration files should be placed in the `src/main/resources/db/migration` directory
- Each migration file should follow the naming convention `V__.sql.` e.g
- `V1__init_database.sql`
- `V2__create_users_table.sql`
- sample migration file
```sql
-- V1__create_users_table.sql
CREATE TABLE users (
id VARCHAR(255) PRIMARY KEY,
name VARCHAR(255) NOT NULL,
email VARCHAR(255) NOT NULL UNIQUE
);
-- V2__create_profiles_table.sql
CREATE TABLE profiles (
id VARCHAR(255) PRIMARY KEY,
first_name VARCHAR(255),
last_name VARCHAR(255),
phone VARCHAR(255),
avatar_url VARCHAR(255)
);
-- V3__create_products_table.sql
CREATE TABLE products (
id VARCHAR(255) PRIMARY KEY,
name VARCHAR(255) NOT NULL,
description TEXT,
user_id VARCHAR(255) NOT NULL,
FOREIGN KEY (user_id) REFERENCES users(id)
);
-- V4__create_organisations_table.sql
CREATE TABLE organisations (
id VARCHAR(255) PRIMARY KEY,
name VARCHAR(255) NOT NULL,
description TEXT
);
-- Many-to-Many Relationship Table
CREATE TABLE user_organisation (
user_id VARCHAR(255) NOT NULL,
organisation_id VARCHAR(255) NOT NULL,
PRIMARY KEY (user_id, organisation_id),
FOREIGN KEY (user_id) REFERENCES users(id),
FOREIGN KEY (organisation_id) REFERENCES organisations(id)
);
```
- update the `application.properties` file with your database credentials and configure flyway
```html
spring.datasource.url=jdbc:{connection_string}
spring.datasource.username=your_username
spring.datasource.password=your_password
spring.flyway.enabled=true
spring.flyway.locations=classpath:db/migration
spring.flyway.user={database_username}
spring.flyway.password={database_password}
```
- Apply migrations
`./mvnw flyway:migrate`
### 4. Run the Development Server
Press `F5` on your keyboard to run the application in debug mode for your Vscode or use whatever your IDE requires (You may need to open a .java file to trigger this).
### 5. Verify the Setup
Depending on the IDE/code editor, you should be greeted with a Hello world text when you navigate to `localhost:8080`.
#### test endpoint using curl or postman
- using curl (user_one_id: id of the user created in the database)
`curl -X GET http://localhost:8080/api/v1/users/user_one_id`
- Using Postman
- Open Postman
- Create a new GET request to curl -X GET http://localhost:8080/api/v1/users/user_one_id
- send the request and verify the response
- Expected Response
```json
{
"name": "John Doe",
"id": "some-user-id",
"email": "johndoe@example.com",
"profile": {
"first_name": "John",
"last_name": "Doe",
"phone": "1234567890",
"avatar_url": "http://example.com/avatar.jpg"
},
"organisations": [
{
"org_id": "some-org-id-1",
"name": "Some Org",
"description": "Some Org Description"
},
{
"org_id": "some-other-org-id-2",
"name": "Some Other Org",
"description": "Some Other Org Description"
}
],
"products": [
{
"product_id": "some-product-id",
"name": "Some Product",
"description": "Some Product Description"
},
{
"product_id": "some-other-product-id",
"name": "Some Other Product",
"description": "Some Other Product Description"
}
]
}
```