https://github.com/hngprojects/hng_boilerplate_php_laravel_web
https://github.com/hngprojects/hng_boilerplate_php_laravel_web
Last synced: 5 months ago
JSON representation
- Host: GitHub
- URL: https://github.com/hngprojects/hng_boilerplate_php_laravel_web
- Owner: hngprojects
- License: apache-2.0
- Created: 2024-05-29T19:13:54.000Z (about 2 years ago)
- Default Branch: dev
- Last Pushed: 2025-03-03T03:33:34.000Z (over 1 year ago)
- Last Synced: 2025-03-12T14:17:53.017Z (over 1 year ago)
- Language: Blade
- Size: 2.79 MB
- Stars: 144
- Watchers: 5
- Forks: 63
- Open Issues: 46
-
Metadata Files:
- Readme: README.md
- License: LICENSE
- Code of conduct: CODE_OF_CONDUCT.md
Awesome Lists containing this project
README
# [hng_boilerplate_php_web] Integration Documentation
## Overview
[Description]
## Dependencies (Dev)
- PHP
- Laravel
## Getting Started
Before you begin, ensure you have the following installed on your machine:
- [PHP](https://www.php.net/)
- [Git](https://www.php.net/)
## Contribution Guide
## Getting Started
#### If you don't have git on your machine, [install it](https://docs.github.com/en/get-started/quickstart/set-up-git).
## Fork this repository
Fork this repository by clicking on the fork button on the top of this page.
This will create a copy of this repository in your account.
## Clone the repository
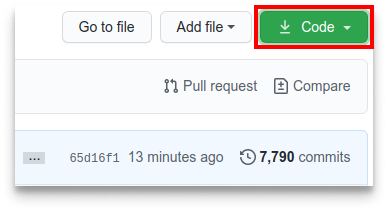
Now clone the forked repository to your machine. Go to your GitHub account, open the forked repository, click on the code button and then click the _copy to clipboard_ icon.
Open a terminal and run the following git command:
```bash
git clone https://github.com/hngprojects/hng_boilerplate_php_web.git
```
## Create a branch
Change to the repository directory on your computer (if you are not already there):
```bash
cd first-contributions
```
Now create a branch using the `git switch` command:
```bash
git switch -c your-new-branch-name
```
For example:
```bash
git switch -c add-alonzo-church
```
### Make Changes
Make your changes to the codebase. Ensure your code follows the project's coding standards and guidelines.
### Run Tests
Run the existing tests to ensure your changes do not break anything. If you added new functionality, write corresponding tests.
```sh
php artisan test
```
## commit those changes
Now open `Contributors.md` file in a text editor, add your name to it. Don't add it at the beginning or end of the file. Put it anywhere in between. Now, save the file.
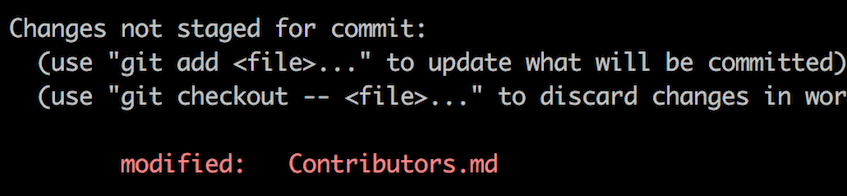
If you go to the project directory and execute the command `git status`, you'll see there are changes.
Add those changes to the branch you just created using the `git add` command:
## Push changes to GitHub
Push your changes using the command `git push`:
```bash
git push -u origin your-branch-name
```
replacing `your-branch-name` with the name of the branch you created earlier.
If you get any errors while pushing, click here:
- ### Authentication Error
remote: Support for password authentication was removed on August 13, 2021. Please use a personal access token instead.
remote: Please see https://github.blog/2020-12-15-token-authentication-requirements-for-git-operations/ for more information.
fatal: Authentication failed for 'https://github.com//first-contributions.git/'
Go to [GitHub's tutorial](https://docs.github.com/en/authentication/connecting-to-github-with-ssh/adding-a-new-ssh-key-to-your-github-account) on generating and configuring an SSH key to your account.
## Submit your changes for review into Staging
If you go to your repository on GitHub, you'll see a `Compare & pull request` button. Click on that button.
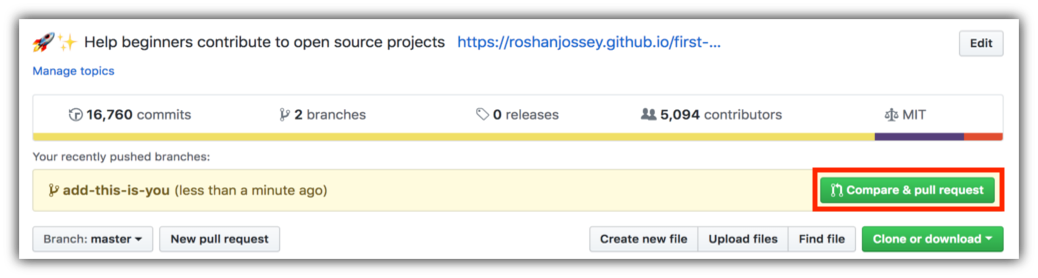
Now submit the pull request.

Soon your changes will be merged into the staging branch of this project. You will get a notification email once the changes have been merged.
## Setting Up the Environment
This guide provides step-by-step instructions to help any developer, regardless of their familiarity with Laravel, run the app and test the feature implemented in the PR.
- You should have WSL installed on your windows PC or use a linux distribution(Recommended but not compulsory).
- Have Git installed
- Have PHP 8.1 or higher, PostgreSQL 15 or higher and Composer installed(Mandatory)
- Have Docker installed(Recommended but not compulsory).
- If not using docker, install WAMP, XAMPP or Laragon
## Cloning the repository
```
git clone https://github.com/hngprojects/hng_boilerplate_php_laravel_web.git
cd hng_boilerplate_php_laravel_web
git checkout scaffold
```
## Setting up using docker
### Set Up Environment Variables
Copy the example environment file to create your own `.env` file in the project folder:
```
cp .env.example .env
```
Open the `.env` file in a text editor and update the following variables:
- `DB_CONNECTION` (e.g., `pgsql`)
- `DB_HOST` (e.g., `127.0.0.1`)
- `DB_PORT` (e.g., `5432`)
- `DB_DATABASE` (your database name)
- `DB_USERNAME` (your database username)
- `DB_PASSWORD` (your database password)
### Generate Application Key
Run the following command to generate a new application key:
`sail artisan key:generate` or `php artisan key:generate`
Run the following command to generate a new JWT secret key:
`sail artisan jwt:secret` or `php artisan jwt:secret `
### Start the Development Server
- Run `composer install`
- Run `sail artisan migrate --seed` to migrate the tables and seed them, in another terminal.
-
Run the following command to start the Laravel development server:
`sail artisan up`
The application will be available at http://127.0.0.1/ or http://localhost/.
## Setting up without docker
Move your project folder into the www folder in WAMP, XAMPP or Laragon
### Set Up Environment Variables
Copy the example environment file to create your own `.env` file in the project folder:
`
cp .env.example .env
`
Run the following command to generate a new JWT secret key:
`php artisan jwt:secret `
Open the `.env` file in a text editor and update the following variables:
- `DB_CONNECTION` (e.g., `pgsql`)
- `DB_HOST` (e.g., `pgsgl`)
- `DB_PORT` (e.g., `5432`)
- `DB_DATABASE` (your database name)
- `DB_USERNAME` (your database username)
- `DB_PASSWORD` (your database password)
### Generate Application Key
Run the following command to generate a new application key:
`php artisan key:generate`
### Start the Development Server
- Run `composer install`
- Run `php artisan migrate --seed` to migrate the tables and seed them
-
Run the following command to start the Laravel development server:
`php artisan serve`
The application will be available at http://127.0.0.1:8000/ or http://localhost/.
### 6. Verify the Setup
Open your browser and navigate to `http://localhost:8000/api/v1/` to verify that the application is running correctly.
## Additional Resources
- [PHP](https://www.php.net/docs.php)
- [Laravel](https://laravel.com/docs/11.x)
By following these steps, you should have your Laravel application up and running. If you encounter any issues, please refer to the documentation of the respective tools or seek help from the community.
## API Endpoints
All API endpoints can be referenced in the [API Reference](API_REFERENCE.md) document.
## Versioning
This project is versioned to ensure backward compatibility and easy maintenance. The current version is [version].