https://github.com/hyperlinksspace/hyperlinksspaceprogram
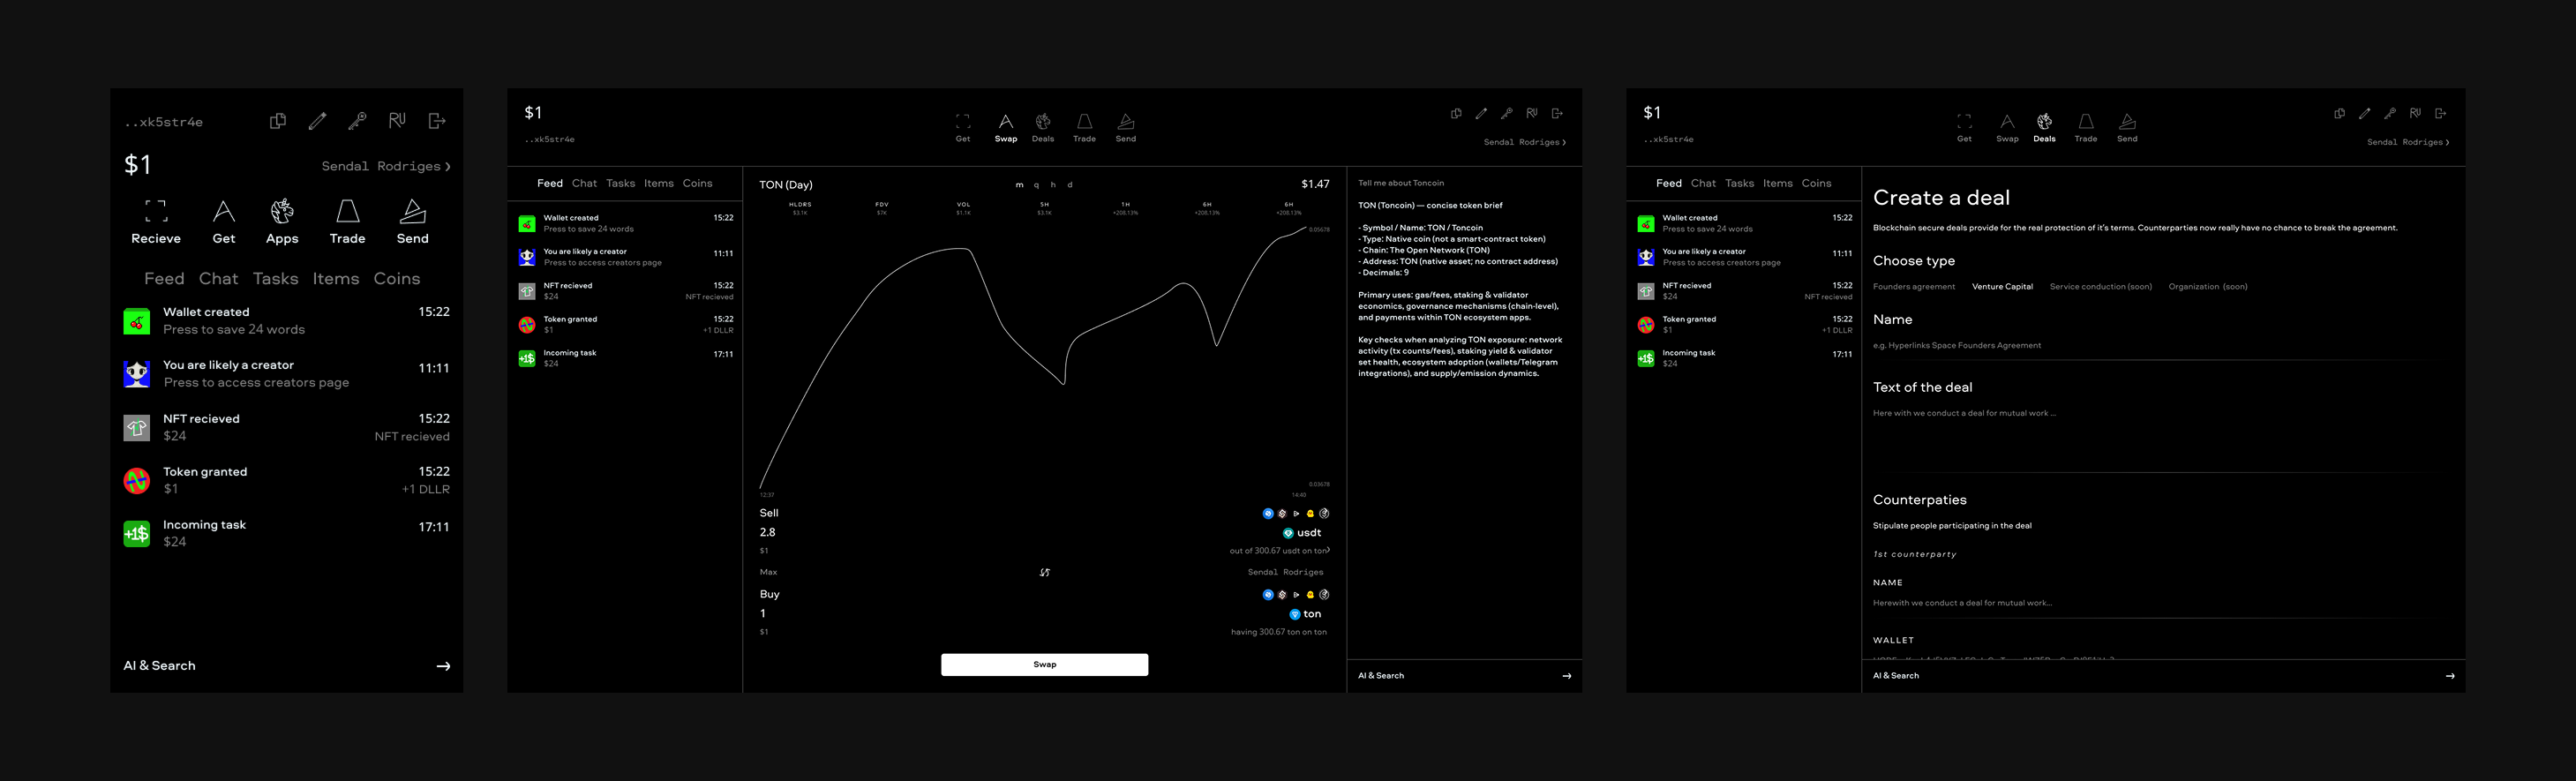
AI & Blockchain multiplatform solution for managing, investing and earning assets. Features recommendations, chats, swaps, trades, wallets and deals. AI Transmitter accesses chains' data.
https://github.com/hyperlinksspace/hyperlinksspaceprogram
ai android blockchain eth iphone mac telegram ton windows
Last synced: about 1 month ago
JSON representation
AI & Blockchain multiplatform solution for managing, investing and earning assets. Features recommendations, chats, swaps, trades, wallets and deals. AI Transmitter accesses chains' data.
- Host: GitHub
- URL: https://github.com/hyperlinksspace/hyperlinksspaceprogram
- Owner: HyperlinksSpace
- Created: 2025-11-03T18:41:30.000Z (8 months ago)
- Default Branch: main
- Last Pushed: 2026-04-15T04:40:58.000Z (2 months ago)
- Last Synced: 2026-04-15T06:03:26.876Z (2 months ago)
- Topics: ai, android, blockchain, eth, iphone, mac, telegram, ton, windows
- Language: TypeScript
- Homepage: https://landing.program.hyperlinks.space/
- Size: 15.2 MB
- Stars: 2
- Watchers: 1
- Forks: 4
- Open Issues: 10
-
Metadata Files:
- Readme: README.md
Awesome Lists containing this project
README
# Hyperlinks Space Program
**In progress, contribute!**
This program is built upon [React Native](https://reactnative.dev/) by Meta and [Expo](https://expo.dev) multiplatform technologies, Windows build and executable creation achieved with [Electron Builder](https://www.electron.build/) and [Electron Forge](https://www.electronforge.io/), working in Telegram with help of [Telegram Mini Apps React SDK](http://telegram-mini-apps.com/), [Bot API](https://core.telegram.org/bots) and [Grammy](https://grammy.dev/). AI is backed by [OpenAI API](https://openai.com/ru-RU/api/), blockchain info is processed from [Swap.Coffee API](https://docs.swap.coffee/eng/user-guides/welcome). DB for the best user's experience we host on [Neon](https://neon.tech/). Keys are managed by [Google Cloud Key Management](https://cloud.google.com/security/products/security-key-management).
Check out our [Pitch Deck](./PitchDeck/PitchDeck.md).
## Program design
Access [Figma](https://www.figma.com/design/53lDKAD6pRv3e0uef1DP18/TECHSYMBAL-Inc.?node-id=754-71&t=v3tmAlywNgXkTWMd-1) in real time for contributing. Contact [Seva](https://t.me/anriltine) in Telegram to discuss and implement.
All core materials are available publicly for currently active https://www.hyperlinks.space/ team members' instant and easy access worldwide and our project's availability for newcomers' research only.
## Structure
- [`app`](./app) - Expo/React Telegram Mini App client (web/mobile screens, navigation, UI logic).
- [`ui`](./ui) - shared UI layer (components, theme tokens, and font configuration used by the app).
- [`bot`](./bot) - TypeScript Telegram bot service and runtime entrypoints.
- [`database`](./database) - database startup/migration/service scripts.
- [`ai`](./ai) - AI assistant service logic and model integration points.
- [`api`](./api) - backend API handlers and server-side endpoints.
- [`blockchain`](./blockchain) - TON/blockchain interaction logic and related helpers.
- [`telegram`](./telegram) - Telegram-specific integration utilities and adapters.
- [`windows`](./windows) - Electron desktop shell, NSIS installer config, and auto-update flow. Troubleshooting in-app updates: [texts/windows-in-app-updater-debug.md](./texts/windows-in-app-updater-debug.md).
- [`scripts`](./scripts) - developer/ops scripts (local run, migration, release helpers).
- [`docs`](./docs) - project and operational documentation (architecture, releases, security reference, tooling).
- [`research`](./research) - exploratory notes, investigations, and proposals not yet promoted to `docs/`.
- [`backlogs`](./backlogs) - short-term planning notes and prioritized work items.
- [`assets`](./assets) - static assets used by app, installer, and branding.
- [`dist`](./dist) - generated web build output (export artifacts).
## How to fork and contribute?
1. Install GitHub CLI and authorize to GitHub from CLI for instant work
```
winget install --id GitHub.cli
gh auth login
```
2. Fork the repo, clone it and create a new branch and switch to it
```
gh repo fork https://github.com/HyperlinksSpace/HyperlinksSpaceBot.git --clone
git checkout -b new-branch-for-an-update
git switch -c new-branch-for-an-update
```
3. Make a commit (address unassigned issue or think yourself)
```
git add . # Stage changes on this branch
git commit -m "Describe your change" # Commit on this branch
```
3. After making a commit, make a pull request, gh tool will already know the upstream remote
```
gh pr create --title "My new PR" --body "It is my best PR"
```
4. For subsequent commits (sync `main`, create a fresh branch, and commit there)
```
git checkout main # Return to main
git fetch upstream # Fully sync with upstream main
git reset --hard upstream/main # Reset local main to upstream/main
git push origin main # Keep your fork main in sync too
git switch -c new-branch-for-next-update # Create and switch to a new feature branch
```
**Move in loops starting from the step 3.**
## Local deploy
`npm` package note: `.env.example` is included in the published package so you can use it as a reference for establishing your testing environment with `.env` file.
Before local deploy / cloud deploy, prepare these env-backed services:
1. **Neon PostgreSQL (`DATABASE_URL`)**
- Create an account/project at [Neon](https://neon.tech/).
- Create a database and copy the connection string.
- Put it into `.env` as `DATABASE_URL=...`.
2. **OpenAI API (`OPENAI_API_KEY`)**
- Create an account at [OpenAI Platform](https://platform.openai.com/).
- Create an API key in the API Keys page.
- Put it into `.env` as `OPENAI_API_KEY=...`.
3. **Telegram bot token (`BOT_TOKEN`)**
- In Telegram, open [@BotFather](https://t.me/BotFather), create a test bot with `/newbot`.
- Copy the bot token and put it into `.env` as `BOT_TOKEN=...`.
4. **Vercel project envs (for comfortable deploy/testing)**
- Create a [Vercel](https://vercel.com/) account and import this repository as a project.
- In Project Settings -> Environment Variables, set at least:
- `DATABASE_URL`
- `OPENAI_API_KEY`
- `BOT_TOKEN` (or `TELEGRAM_BOT_TOKEN`)
- Optional — **Google Cloud KMS** (wallet envelope API): **`GCP_SERVICE_ACCOUNT_JSON`** — see [below](#gcp_service_account_json-google-cloud-kms).
- Pull envs locally when needed with `vercel env pull .env.local`.
5. **Vercel CLI login (required for `npm run start`)**
The default dev command runs **`vercel dev`** (local API). That needs a **valid Vercel CLI session**, not only project env vars in the dashboard.
- Install the CLI if needed: `npm i -g vercel` (or use `npx vercel` as the scripts do).
- Run **`vercel login`** once and complete authentication in the browser.
- From the repo root, run **`vercel link`** if prompted so this directory is tied to your Vercel project (team/project scope).
- If you see **`The specified token is not valid`**, your stored token expired or was revoked: run **`vercel login`** again to refresh it. Do not set a broken **`VERCEL_TOKEN`** in `.env` unless it is a current deploy token from the Vercel dashboard.
### GCP_SERVICE_ACCOUNT_JSON (Google Cloud KMS)
Serverless routes under [`api/`](./api) that call **Cloud KMS** (wallet envelope KEK) read credentials from the env var **`GCP_SERVICE_ACCOUNT_JSON`**. The value must be the **full JSON object** of a Google Cloud **service account key** whose identity is allowed to use the KMS crypto key (see [`infra/gcp/kms.env.example`](./infra/gcp/kms.env.example)). The app passes this JSON in-process to the Google client — **no** key file is required on Vercel.
**How to get the JSON**
1. Open [Google Cloud Console](https://console.cloud.google.com/), select project **`hyperlinksspacebot`**.
2. Go to **IAM & Admin → Service Accounts** and open **`wallet-kms-unwrap@hyperlinksspacebot.iam.gserviceaccount.com`** (the account permitted for your key; adjust if you use a different project or SA).
3. **Keys → Add key → Create new key → JSON**. A `.json` file downloads.
**CLI alternative** (with [`gcloud`](https://cloud.google.com/sdk/gcloud) installed and authorized):
```bash
gcloud iam service-accounts keys create ./wallet-kms-unwrap-sa-key.json \
--iam-account=wallet-kms-unwrap@hyperlinksspacebot.iam.gserviceaccount.com \
--project=hyperlinksspacebot
```
**What to put in `GCP_SERVICE_ACCOUNT_JSON`**
- The **entire file contents** of that key — the single JSON object with `"type": "service_account"`, `"client_email"`, `"private_key"`, etc. Paste into Vercel as one variable (minified or multi-line per the dashboard; the value must remain valid JSON).
**Where to configure**
- **Vercel (production):** Project → **Settings → Environment Variables** → add **`GCP_SERVICE_ACCOUNT_JSON`**, assign to **Production** (and **Preview** if needed), **Redeploy** so serverless functions see the new value.
- **Local dev:** Prefer a file and `GOOGLE_APPLICATION_CREDENTIALS`, or put the same JSON string in `.env.local` — details in [`infra/gcp/backend-authentication.md`](./infra/gcp/backend-authentication.md).
The downloaded key is a **secret** (like a password): do **not** commit it to git; add `wallet-kms-unwrap-sa-key.json` to `.gitignore` if you keep a local copy.
Copy env template locally:
```bash
cp .env.example .env
```
To start the full local stack, run:
```bash
npm run start
```
This runs Expo dev server, the Telegram bot (polling mode), and local Vercel API (`vercel dev`). **Without a successful `vercel login`, the Vercel leg will exit** (e.g. invalid token). Use **`npm run start:expo`** if you only need the app and want to skip Vercel for now.
After `npm run start`, you can test the app on real phones with Expo Go:
- Install **Expo Go** from Google Play (Android) or App Store (iOS).
- Make sure your phone and development machine are on the same network.
- Open Expo Go and scan the QR code shown in the terminal/Expo UI.
- The app will launch on the device and hot-reload on code changes.
Isolated/local run options:
- Expo only (no bot, no Vercel): `npm run start:expo`
- Bot only (polling mode): `npm run bot:local`
- Vercel API only: `npm run dev:vercel`
## GitHub Actions
Current Actions workflows include:
- [`Vercel Deploy Test`](./.github/workflows/vercel-deploy-test-envs.yml) - manual web deploy to Vercel.
- [`Electron Forge EXE Release`](./.github/workflows/electron-forge-exe-release.yml) - manual Windows release pipeline.
- [`Electron EXE Release`](./.github/workflows/electron-exe-release.yml) - manual Windows release pipeline.
- [`Lint errors check`](./.github/workflows/lint-errors-check.yml) - manual lint check.
- [`EXPO Publish`](./.github/workflows/expo-publish.yml) - manual OTA publish with EAS CLI.
- [`NPM Package Release`](./.github/workflows/npm-package-release.yml) - npm/GitHub Packages release workflow.
## Deploy to Vercel
From the repository root, deploy the static web build to Vercel production:
```bash
vercel --prod
```
Deploying from repository root makes this folder the project root, so `api/bot` is deployed and no Root Directory setting is needed. The project is configured so Vercel runs `npx expo export -p web` and serves the `dist/` output. Link the project first with `vercel` if needed.
## Telegram bot
The bot is extended beyond a basic "Hello" and "Start program" responder and now supports AI streaming and threads.
**Vercel (webhook)**
- **Runtime path:** Telegram sends updates to `POST /api/bot`. This route proxies to the shared bot webhook handler in `bot/webhook`.
- **Webhook setup:** `scripts/set-webhook.ts` sets `https:///api/bot` using `VERCEL_PROJECT_PRODUCTION_URL` (preferred) or `VERCEL_URL`.
- **Required env:** set `BOT_TOKEN` (or `TELEGRAM_BOT_TOKEN`) in Vercel project envs for production deploys.
- **Deploy flow:** webhook mode is intended for Vercel deploys (CLI `vercel --prod` or the manual GitHub Action `Vercel Deploy (Test Envs)`).
**Bot works locally but not on Vercel**
1. Confirm Vercel env has `BOT_TOKEN` and redeploy.
2. Ensure the deployed URL is stable and matches the webhook target (`/api/bot`).
3. Check deploy/runtime logs for `[set-webhook]` and `[webhook]` errors.
4. Do not run local polling with the same token while validating webhook mode.
**Local (getUpdates, no webhook)**
- Only `BOT_TOKEN` is required (env or `.env`).
- Run bot only: `npm run bot:local`
- Run full local stack (Expo + bot + Vercel): `npm run start`
- Keep production and local bot tokens separate when possible to avoid webhook/polling conflicts.
## Pull requests and commits requirements
- Give pull requests and commits a proper name and description
- Dedicate each pull request to an understandable area or field, each commit to a focused logical change
- Check file changes in every commit pulled, no arbitrary files modifications should persist such as LF/CRLF line-ending conversion, broken/garbled text diffs, BOM added or removed, accidental "invisible" corruption from text filters
- Add dependecies and packages step by step for security
- An issue creation or following an existing before a pull request would be a good practice
## Expo Workflows
[EAS Workflows](https://docs.expo.dev/eas/workflows/get-started/) are here for Expo update/build/deploy flows (triggered via npm scripts from [`package.json`](./package.json)).
## Previews
Run `npm run draft` to [publish a preview update](https://docs.expo.dev/eas/workflows/examples/publish-preview-update/) of your project, which can be viewed in Expo Go or in a development build.
## Development Builds
Run `npm run development-builds` to [create a development build](https://docs.expo.dev/eas/workflows/examples/create-development-builds/). Note - you'll need to follow the [Prerequisites](https://docs.expo.dev/eas/workflows/examples/create-development-builds/#prerequisites) to ensure you have the correct emulator setup on your machine.
## Expo envs setup
**Expo app** – `npx expo start` reads env from the environment; for app-only env vars you can also put them in `.env` and use an Expo-compatible loader if you add one, or set them in the shell before running:
```bash
export BOT_TOKEN=your_token
npx expo start
```
## GitLab access
GitHub and GitLab repositories are identical. If you want to contribute through GitLab, get access from [@staindart](https://github.com/staindart).
If you can push to **both** [GitHub](https://github.com/HyperlinksSpace/HyperlinksSpaceProgram) and [GitLab](https://gitlab.com/hyperlinks.space/HyperlinksSpaceProgram) directly, we ask you to configure Git so pushes keep **both** hosts in sync: the repositories are the same; avoid updating only one side.
1. **Keep `origin` on GitHub for fetch and the first push URL.** If you cloned from GitHub, this is already true: `origin` is where `git pull` / `git fetch origin` get updates. We standardize on GitHub for **incoming** history from `origin` so your local `main` tracks `origin/main` on GitHub.
2. **Register GitLab as a second push URL on `origin`.** Git allows multiple **push** URLs per remote name, but only one **fetch** URL. Adding GitLab here means a single `git push origin ` (or the IDE **Sync** push step) sends the same commits to **both** GitHub and GitLab without a second command.
```bash
git remote set-url --add --push origin https://gitlab.com/hyperlinks.space/HyperlinksSpaceProgram.git
```
Run this once per clone; it does not change where you fetch from.
3. **Add a separate remote named `gitlab`.** Because `origin`’s fetch URL stays on GitHub, `git fetch origin` never downloads refs from GitLab. The extra remote lets you run `git fetch gitlab` when you need to compare or merge with the GitLab copy (for example if CI or another contributor updated GitLab only).
```bash
git remote add gitlab https://gitlab.com/hyperlinks.space/HyperlinksSpaceProgram.git
```
Note, that GitHub and GitLab URL's are a little different :)
If `gitlab` already exists with a wrong URL, use `git remote set-url gitlab https://gitlab.com/hyperlinks.space/HyperlinksSpaceProgram.git` instead.
4. **Verify** with `git remote -v`. You should see GitHub on fetch/push for `origin`, GitLab as the second `origin` push line, and `gitlab` for fetch/push to GitLab:
```text
gitlab https://gitlab.com/hyperlinks.space/HyperlinksSpaceProgram.git (fetch)
gitlab https://gitlab.com/hyperlinks.space/HyperlinksSpaceProgram.git (push)
origin https://github.com/HyperlinksSpace/HyperlinksSpaceProgram.git (fetch)
origin https://github.com/HyperlinksSpace/HyperlinksSpaceProgram.git (push)
origin https://gitlab.com/hyperlinks.space/HyperlinksSpaceProgram.git (push)
```
**GitLab HTTPS access:** GitLab.com does not use **fine-grained** personal access tokens for Git-over-HTTPS (`git push` / `git fetch`). Create a **legacy** personal access token under GitLab → **Edit profile** → **Access tokens** with scopes **`read_repository`** and **`write_repository`**, as described in the official guide: [Personal access tokens](https://docs.gitlab.com/ee/user/profile/personal_access_tokens.html). Use your GitLab username and the token as the password when Git prompts. GitHub authentication stays separate (for example `gh auth login` or your existing GitHub credential).
## Program Kit
To make it easier for developers to create multiplatform programs with us, we decided to launch an npm package that provides a ready starter for creating such a program basis in one command.
```bash
npx @www.hyperlinks.space/program-kit ./new-program
```
Link to the package: https://www.npmjs.com/package/@www.hyperlinks.space/program-kit
The **npm registry page** shows a separate package-oriented description: [`npmReadMe.md`](./npmReadMe.md) in the repo root. At publish time the [NPM Package Release](.github/workflows/npm-package-release.yml) workflow copies the main [`README.md`](./README.md) to `fullREADME.md`, then replaces `README.md` with the contents of `npmReadMe.md` so `npm pack` / `npm publish` ship the shorter readme as the package readme (npm always surfaces `README.md` from the tarball). Snapshot channels, tags, and local `npm pack` checks are in [`docs/npm-release.md`](./docs/npm-release.md).
## Project discussions
This repository has [GitHub Discussions](https://github.com/HyperlinksSpace/HyperlinksSpaceProgram/discussions) opened, as well you can join our [Telegram Chat](https://t.me/HyperlinksSpaceChat) and [Channel](https://t.me/HyperlinksSpace).